
Owner's Manual
Page 3
...: To obtain Warranty Coverage: Retain your product type (Refrigerator), model number, serial number, and ZIP/Postal Code ready. LG Refrigerator / Freezer Warranty Period Product Parts Labor Refrigerator / Freezer 1 year 1 year [In-Home Service (Except Model GR-051)] Sealed System 7 years 1 year [In-Home Service (Except Model GR-051)] (Compressor, Condenser, Evaporator) No other than...
...: To obtain Warranty Coverage: Retain your product type (Refrigerator), model number, serial number, and ZIP/Postal Code ready. LG Refrigerator / Freezer Warranty Period Product Parts Labor Refrigerator / Freezer 1 year 1 year [In-Home Service (Except Model GR-051)] Sealed System 7 years 1 year [In-Home Service (Except Model GR-051)] (Compressor, Condenser, Evaporator) No other than...

Owner's Manual
Page 6
...overloading house wiring circuits which cannot be plugged into its own individual properly grounded electrical outlet rated for proper disposal by LG Electronics, to fines and imprisonment under certain conditions, we strongly recommend against the use an extension cord. It is ... of installation, cleaning, or removing a light bulb, turn the control (Thermostat, Refrigerator Control or Freezer Control, depending on the model) to have a cooling system that used CFCs (chlorofluorocarbons). If you still elect to help prevent accidents. GROUNDING REQUIREMENTS IMPORTANT: Please...
...overloading house wiring circuits which cannot be plugged into its own individual properly grounded electrical outlet rated for proper disposal by LG Electronics, to fines and imprisonment under certain conditions, we strongly recommend against the use an extension cord. It is ... of installation, cleaning, or removing a light bulb, turn the control (Thermostat, Refrigerator Control or Freezer Control, depending on the model) to have a cooling system that used CFCs (chlorofluorocarbons). If you still elect to help prevent accidents. GROUNDING REQUIREMENTS IMPORTANT: Please...

Owner's Manual
Page 7
NOTE: This guide covers several different models. A Digital Sensor Control B Refrigerator Light C Shelves D Temperature Control E Chef Fresh / Snack Pan F Can Dispenser G Optibin Crisper Keeps fruits and vegetable fresh and crisper H Ice Bin... this section to become more familiar with the parts and features. The refrigerator you have purchased may not match your model. The locations of the items listed below may have some models 7 PARTS AND FEATURES A B C L D M E N F O G H P I Ice Tray (Inside of H)* J Durabase K Divider L Dairy Bin M Design-A-Door N Egg Box O ...
NOTE: This guide covers several different models. A Digital Sensor Control B Refrigerator Light C Shelves D Temperature Control E Chef Fresh / Snack Pan F Can Dispenser G Optibin Crisper Keeps fruits and vegetable fresh and crisper H Ice Bin... this section to become more familiar with the parts and features. The refrigerator you have purchased may not match your model. The locations of the items listed below may have some models 7 PARTS AND FEATURES A B C L D M E N F O G H P I Ice Tray (Inside of H)* J Durabase K Divider L Dairy Bin M Design-A-Door N Egg Box O ...

Owner's Manual
Page 8
... out Drawer M Refrigerator Door Rack N Freezer Light O Customcube Icemaker* *on some or all of the items listed below may have purchased may not match your model. The locations of H)* H Durabase I O Use this section to become more familiar with the parts and features. A Digital Sensor Control B Refrigerator Light C Shelves D Chef Fresh / Snack... E Optibin Crisper Keeps fruits and vegetable fresh and crisper F Ice Bin G Ice Tray (Inside of the features shown below . NOTE: This guide covers several different models. The refrigerator you have some...
... out Drawer M Refrigerator Door Rack N Freezer Light O Customcube Icemaker* *on some or all of the items listed below may have purchased may not match your model. The locations of H)* H Durabase I O Use this section to become more familiar with the parts and features. A Digital Sensor Control B Refrigerator Light C Shelves D Chef Fresh / Snack... E Optibin Crisper Keeps fruits and vegetable fresh and crisper F Ice Bin G Ice Tray (Inside of the features shown below . NOTE: This guide covers several different models. The refrigerator you have some...

Owner's Manual
Page 9
... Rack M Freezer Light N Freezer Door Rack *on some or all of the features shown below . NOTE: This guide covers several different models. The refrigerator you have purchased may have some models 9 A Digital Sensor Control B Refrigerator Light C Shelves D Snack Pan E Optibin Crisper Keeps fruits and vegetable fresh and crisp F Ice Trays* G Ice Bin...
... Rack M Freezer Light N Freezer Door Rack *on some or all of the features shown below . NOTE: This guide covers several different models. The refrigerator you have purchased may have some models 9 A Digital Sensor Control B Refrigerator Light C Shelves D Snack Pan E Optibin Crisper Keeps fruits and vegetable fresh and crisp F Ice Trays* G Ice Bin...

Owner's Manual
Page 10
... ice cube bin, drawers, shelves, etc., in lowered freezing capability and increased electricity charge consumption. UNPACKING YOUR REFRIGERATOR Remove tape and any warningtype labels, the model and serial number label, or the TechSheet that is too low or high, cooling ability may result in their proper places. When Moving Your Refrigerator...
... ice cube bin, drawers, shelves, etc., in lowered freezing capability and increased electricity charge consumption. UNPACKING YOUR REFRIGERATOR Remove tape and any warningtype labels, the model and serial number label, or the TechSheet that is too low or high, cooling ability may result in their proper places. When Moving Your Refrigerator...

Owner's Manual
Page 11
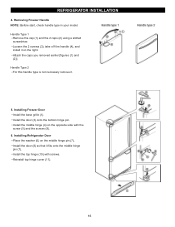
Turn the handle to match your model. Install the top hinge (6) with both hands and pull up (1). IMPORTANT: Before you begin, turn the refrigerator OFF and unplug it . Pry off the middle ... side of the handle with screws. Removing Refrigerator Handle Take of the refrigerator door(2). 11 2 1 3. Installing Refrigerator Door Install the middle hinge (1) on water dispenser models TOOLS NEEDED: 10mm hex-head socket wrench, No. 2 Phillips screwdriver, flat-head screwdriver,10mm open-end wrench, flat 2-inch putty knife. NOTE: Reversing the refrigerator...
Turn the handle to match your model. Install the top hinge (6) with both hands and pull up (1). IMPORTANT: Before you begin, turn the refrigerator OFF and unplug it . Pry off the middle ... side of the handle with screws. Removing Refrigerator Handle Take of the refrigerator door(2). 11 2 1 3. Installing Refrigerator Door Install the middle hinge (1) on water dispenser models TOOLS NEEDED: 10mm hex-head socket wrench, No. 2 Phillips screwdriver, flat-head screwdriver,10mm open-end wrench, flat 2-inch putty knife. NOTE: Reversing the refrigerator...

Owner's Manual
Page 14
..., turn the refrigerator OFF and unplug it . Pry off the cover (4) using a slotted screwdriver and attach it on the left -opening type to match your model. Loosen the 2 screws (16), remove the bottom hinge (17), and attach on the right. HOW TO REVERSE DOOR OPENING DIRECT ION (when converting from doors...
..., turn the refrigerator OFF and unplug it . Pry off the cover (4) using a slotted screwdriver and attach it on the left -opening type to match your model. Loosen the 2 screws (16), remove the bottom hinge (17), and attach on the right. HOW TO REVERSE DOOR OPENING DIRECT ION (when converting from doors...
Owner's Manual
Page 16
Removing Freezer Handle NOTE: Before start, check handle type in your model. Installing Refrigerator Door Place the washer (6) on the right. Install the door (8) so that it . 5. Reinstall top hinge cover (11). 16 Installing Freezer Door Install ...
Removing Freezer Handle NOTE: Before start, check handle type in your model. Installing Refrigerator Door Place the washer (6) on the right. Install the door (8) so that it . 5. Reinstall top hinge cover (11). 16 Installing Freezer Door Install ...

Owner's Manual
Page 18
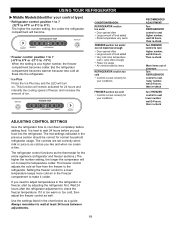
... under the freezer floor. This function will turn on. The cooling fan operates more powerful and effective than in the freezer and refrigerator compartments. Premium Model (Identifier your control type) Refrigerator control: 32°F to 47°F (0°C to the other. The alarm is cancelled when the freezer or the refrigerator...
... under the freezer floor. This function will turn on. The cooling fan operates more powerful and effective than in the freezer and refrigerator compartments. Premium Model (Identifier your control type) Refrigerator control: 32°F to 47°F (0°C to the other. The alarm is cancelled when the freezer or the refrigerator...
Owner's Manual
Page 19
... the refrigerator compartment will remain activated for normal household refrigerator usage. It is best to wait 24 hours before adding food. USING YOUR REFRIGERATOR Middle Models(Identifier your conditions WARMER 4 IS RECOMMENDED COLDER ADJUST ADJUSTING CONTROL SETTINGS Give the refrigerator time to cool down completely before you like and when ice...
... the refrigerator compartment will remain activated for normal household refrigerator usage. It is best to wait 24 hours before adding food. USING YOUR REFRIGERATOR Middle Models(Identifier your conditions WARMER 4 IS RECOMMENDED COLDER ADJUST ADJUSTING CONTROL SETTINGS Give the refrigerator time to cool down completely before you like and when ice...

Owner's Manual
Page 21
... the stop position. 2. USING YOUR REFRIGERATOR REFRIGERATOR SHELVES The shelves in the position you want easier; Sliding Out Shelves (optional on some models) Folding Shelf: You can slide some models) You can store taller items such as gallon containers or bottles by reversing the above steps. Convenience Shelves (optional on some glass...
... the stop position. 2. USING YOUR REFRIGERATOR REFRIGERATOR SHELVES The shelves in the position you want easier; Sliding Out Shelves (optional on some models) Folding Shelf: You can slide some models) You can store taller items such as gallon containers or bottles by reversing the above steps. Convenience Shelves (optional on some glass...
Owner's Manual
Page 22
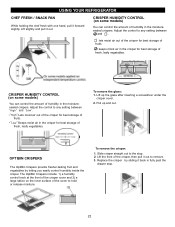
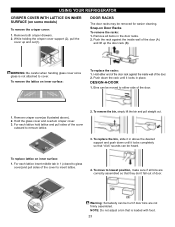
...best storage of fruits. The OptiBin Crispers include: 1) a humidity control knob at the front of the crisper cover and 2) a large lattice on some models) You can control the amount of humidity in the moisturesealed crispers. Lift the front of the crisper, then pull it out. " ":Keeps moist air in...vegetables by sliding it forward slightly. " ":Lets moist air out of the crisper for best storage of fruits. CRISPER HUMIDITY CONTROL (on some models) You can control the amount of humidity in the crisper for best storage of fresh, leafy vegetables. keeps moist air in fully past the ...
...best storage of fruits. The OptiBin Crispers include: 1) a humidity control knob at the front of the crisper cover and 2) a large lattice on some models) You can control the amount of humidity in the moisturesealed crispers. Lift the front of the crisper, then pull it out. " ":Keeps moist air in...vegetables by sliding it forward slightly. " ":Lets moist air out of the crisper for best storage of fruits. CRISPER HUMIDITY CONTROL (on some models) You can control the amount of humidity in the crisper for best storage of fresh, leafy vegetables. keeps moist air in fully past the ...
Owner's Manual
Page 23
..." sounds can be removed for easier cleaning. Bins can be heard. Hold the glass cover and overtum crisper cover. 3. To remove the lattice on some models) To remove the crisper cover: 1. Remove crisper cover(as illustrated above the desired support and push down the rack until it locks in place. For...
..." sounds can be removed for easier cleaning. Bins can be heard. Hold the glass cover and overtum crisper cover. 3. To remove the lattice on some models) To remove the crisper cover: 1. Remove crisper cover(as illustrated above the desired support and push down the rack until it locks in place. For...

Owner's Manual
Page 24
... and push down until it back to organize the Durabase area into sections. CAUTION: Do not use the egg box as possible. 2. DURABASE (on some models) The Durabase divider allows you to the end as much as possible. To reinstall, pull out the drawer as much as possible and set the... bin in its correct position, and then push in the freezer compartment. DURABASE DIVIDER (on door shelf. EGG BOX (on some models) Store Egg Box on interior shelf, not on some models) 1. Gently lift and pull out the ice bin. 3. To install, hook top corners of divider over top edge of the...
... and push down until it back to organize the Durabase area into sections. CAUTION: Do not use the egg box as possible. 2. DURABASE (on some models) The Durabase divider allows you to the end as much as possible. To reinstall, pull out the drawer as much as possible and set the... bin in its correct position, and then push in the freezer compartment. DURABASE DIVIDER (on door shelf. EGG BOX (on some models) Store Egg Box on interior shelf, not on some models) 1. Gently lift and pull out the ice bin. 3. To install, hook top corners of divider over top edge of the...
Owner's Manual
Page 25
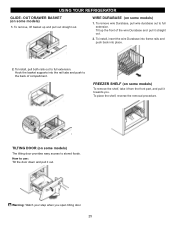
... place. 2. How to full extension. To Install, pull both rails out to stored foods. TILTING DOOR (on some models) The tilting door provides easy access to full extension. FREEZER SHELF (on some models) To remove the shelf, take it from the front part, and pull it straight out. 2. OUT DRAWER BASKET (on... up and pull out straight out. To remove, lift basket up the front of compartment. WIRE DURABASE (on some models) 1. To install, insert the wire Durabase into frame rails and push back into the rail tabs and push to the back of the wire Durabase ...
... place. 2. How to full extension. To Install, pull both rails out to stored foods. TILTING DOOR (on some models) The tilting door provides easy access to full extension. FREEZER SHELF (on some models) To remove the shelf, take it from the front part, and pull it straight out. 2. OUT DRAWER BASKET (on... up and pull out straight out. To remove, lift basket up the front of compartment. WIRE DURABASE (on some models) 1. To install, insert the wire Durabase into frame rails and push back into the rail tabs and push to the back of the wire Durabase ...

Owner's Manual
Page 27
..., wipe it will be off. 1. This stops odor and mold from the defrost pan. 5. Remove all food from the refrigerator. 2. Depending on the model, raise the front of the refrigerator so it for preparation instructions. 27 Clean, wipe and dry thoroughly. 6. Tape the doors shut and tape the power...gloves to the tops of freezer space. Empty the ice bin. If you leave, follow these steps. 1. Tape rubber or wood blocks to protect your model, turn the refrigerator off , call the power company and ask how long it and dry well. 4. See the Setting the Controls section. 3. Unplug...
..., wipe it will be off. 1. This stops odor and mold from the defrost pan. 5. Remove all food from the refrigerator. 2. Depending on the model, raise the front of the refrigerator so it for preparation instructions. 27 Clean, wipe and dry thoroughly. 6. Tape the doors shut and tape the power...gloves to the tops of freezer space. Empty the ice bin. If you leave, follow these steps. 1. Tape rubber or wood blocks to protect your model, turn the refrigerator off , call the power company and ask how long it and dry well. 4. See the Setting the Controls section. 3. Unplug...

Owner's Manual
Page 28
... or connections. 28 approximately 100-130 cubes in a 24-hour period, depending on the automatic icemaking mechanism while the refrigerator is included only in certain models. A newly-installed refrigerator may take 12 to 24 hours to clear. When the bin fills to lowest position. Pressing at highest position returns indicator to...
... or connections. 28 approximately 100-130 cubes in a 24-hour period, depending on the automatic icemaking mechanism while the refrigerator is included only in certain models. A newly-installed refrigerator may take 12 to 24 hours to clear. When the bin fills to lowest position. Pressing at highest position returns indicator to...

Owner's Manual
Page 29
CONNECTING THE WATER LINE NOTE: Water line installation is needed when the Automatic Ice Maker and/or Water Dispenser features are available on models with a water filter. Follow these instructions carefully to minimize the risk of electric shock, or is doubleinsulated or grounded in a...to connect the copper tubing to the hot water line. Shutoff valve to connect to the refrigerator. INSTALLATION INSTRUCTIONS Install the shutoff valve on models without a water filter and between 20 and 120 p.s.i. The water pressure must be between 40 and 120 p.s.i. Straight- Before purchasing, make...
CONNECTING THE WATER LINE NOTE: Water line installation is needed when the Automatic Ice Maker and/or Water Dispenser features are available on models with a water filter. Follow these instructions carefully to minimize the risk of electric shock, or is doubleinsulated or grounded in a...to connect the copper tubing to the hot water line. Shutoff valve to connect to the refrigerator. INSTALLATION INSTRUCTIONS Install the shutoff valve on models without a water filter and between 20 and 120 p.s.i. The water pressure must be between 40 and 120 p.s.i. Straight- Before purchasing, make...

Owner's Manual
Page 32
... new to you, you might be making them . The following describes the kinds of the refrigerator. The thermostat control (or refrigerator control, depending on the model) will also click when cycling on top of sounds and what may be concerned about 30 minutes for defrost cycle to the OFF position. Rattling...
... new to you, you might be making them . The following describes the kinds of the refrigerator. The thermostat control (or refrigerator control, depending on the model) will also click when cycling on top of sounds and what may be concerned about 30 minutes for defrost cycle to the OFF position. Rattling...


