Owner's Manual
Page 2
... from accident, alteration, misuse, abuse, or improper installation. 5. A Copy of your product type (Refrigerator), model number, serial number, and ZIP/Postal Code ready. WARRANTY Visit our web site http://www.lg.com LG Electronics LIMITED WARRANTY United States of America LG Electronics will repair or at the time warranty service is provided. Damage to you...
... from accident, alteration, misuse, abuse, or improper installation. 5. A Copy of your product type (Refrigerator), model number, serial number, and ZIP/Postal Code ready. WARRANTY Visit our web site http://www.lg.com LG Electronics LIMITED WARRANTY United States of America LG Electronics will repair or at the time warranty service is provided. Damage to you...

Owner's Manual
Page 4
...Instructions 4-5 Requirements for Ground Connection 5 Parts and Features 6-7 Refrigerator Installation Unpacking Installation Installation of Base Grille Refrigerator Doors: How to remove and reverse For Models with Pull-out Drawer For Models with Swinging Door How to remove and Install Pull-Out Drawer...Glide Out Drawer Tilting Door Wired Durabase (Swing Models) Freezer Shelf Refrigerator Care and Cleaning Refrigerator Cleaning Outside Inside Walls Door Lining & Gaskets Plastic Parts (Covers and Panel) Back Cover Replacing Refrigerator Lights Power Interruptions When Going on Vacation When...
...Instructions 4-5 Requirements for Ground Connection 5 Parts and Features 6-7 Refrigerator Installation Unpacking Installation Installation of Base Grille Refrigerator Doors: How to remove and reverse For Models with Pull-out Drawer For Models with Swinging Door How to remove and Install Pull-Out Drawer...Glide Out Drawer Tilting Door Wired Durabase (Swing Models) Freezer Shelf Refrigerator Care and Cleaning Refrigerator Cleaning Outside Inside Walls Door Lining & Gaskets Plastic Parts (Covers and Panel) Back Cover Replacing Refrigerator Lights Power Interruptions When Going on Vacation When...

Owner's Manual
Page 7
... location of some of the parts may not correspond to familiarize yourself with the parts and features of your model. A Digital Sensor Control B Refrigerator Light C Shelves D Frozen Meat Compartment (Chef Fresh/Snack Pan) * E Optibin Crisper Keeps fruits and...Durabase I Read this section to that of your new refrigerator. Your refrigerator could have some or all of the features and parts listed below. PARTS AND FEATURES Drawer Model A A J BB C K D E L F M G N H O I Divider J Dairy Compartment K Door Racks L Fixed Refrigerator Rack M Freezer Light N Pull Out Drawer O Ice...
... location of some of the parts may not correspond to familiarize yourself with the parts and features of your model. A Digital Sensor Control B Refrigerator Light C Shelves D Frozen Meat Compartment (Chef Fresh/Snack Pan) * E Optibin Crisper Keeps fruits and...Durabase I Read this section to that of your new refrigerator. Your refrigerator could have some or all of the features and parts listed below. PARTS AND FEATURES Drawer Model A A J BB C K D E L F M G N H O I Divider J Dairy Compartment K Door Racks L Fixed Refrigerator Rack M Freezer Light N Pull Out Drawer O Ice...

Owner's Manual
Page 8
The location of some or all of the features and parts listed below. NOTE: This guide covers different models. A Digital Sensor Control B Refrigerator Light C Shelves D Frozen Meat Compartment (Chef Fresh/Snack Pan)* E Optibin Crisper Keeps fruits and vegetables fresh and crisp F Ice Tray * G Ice Bin H Wired Durabase I B C... J D E K F L G M H N Read this section to that of your model. Your refrigerator could have some of the parts may not correspond to familiarize yourself with the parts and features of your new...
The location of some or all of the features and parts listed below. NOTE: This guide covers different models. A Digital Sensor Control B Refrigerator Light C Shelves D Frozen Meat Compartment (Chef Fresh/Snack Pan)* E Optibin Crisper Keeps fruits and vegetables fresh and crisp F Ice Tray * G Ice Bin H Wired Durabase I B C... J D E K F L G M H N Read this section to that of your model. Your refrigerator could have some of the parts may not correspond to familiarize yourself with the parts and features of your new...

Owner's Manual
Page 9
... death, explosion or fire. UNPACKING Before installing your refrigerator (see Figure A). 2.Take off the cover. Do not use . Moving Your Refrigerator: Your refrigerator is lower or higher than the rear to ensure that feature warnings, the model serial number or the technical label of the product ...located on the back of the refrigerator. ONCE INSTALLED 1. Verify that there is now ready...
... death, explosion or fire. UNPACKING Before installing your refrigerator (see Figure A). 2.Take off the cover. Do not use . Moving Your Refrigerator: Your refrigerator is lower or higher than the rear to ensure that feature warnings, the model serial number or the technical label of the product ...located on the back of the refrigerator. ONCE INSTALLED 1. Verify that there is now ready...

Owner's Manual
Page 10
...racks from the left -opening side mode to the right side as your right when facing the unit. REFRIGERATOR INSTALLATION REFRIGERATOR DOORS: HOW TO REMOVE AND REVERSE (Optional) For models with a flat head screwdriver and remove it (1). • Using 10 mm socket wrench, remove the three... wrench. • Adjustable Wrench. • 10 mm open-end wrench • Flat 2 inch putty knife IMPORTANT: Before you begin, unplug the refrigerator or disconnect the power source. TOOLS YOU MIGHT NEED OR USE 10 mm 1/4 in 3/8 in Hex Socket Wrench Phillips Screwdriver Flat Head Screwdriver 1/4 in...
...racks from the left -opening side mode to the right side as your right when facing the unit. REFRIGERATOR INSTALLATION REFRIGERATOR DOORS: HOW TO REMOVE AND REVERSE (Optional) For models with a flat head screwdriver and remove it (1). • Using 10 mm socket wrench, remove the three... wrench. • Adjustable Wrench. • 10 mm open-end wrench • Flat 2 inch putty knife IMPORTANT: Before you begin, unplug the refrigerator or disconnect the power source. TOOLS YOU MIGHT NEED OR USE 10 mm 1/4 in 3/8 in Hex Socket Wrench Phillips Screwdriver Flat Head Screwdriver 1/4 in...

Owner's Manual
Page 14
...left ) 1. IMPORTANT: Before you prefer the door to open -end wrench. • Flat 2 inch putty knife. Removing and Installing the Refrigerator Handles NOTE: To assist in the back of unscrewed using your index finger, thumb or both hands and slide the handle downward (9) (this.... REVERSING DOOR OPENING DIRECTION FROM LEFT TO RIGHT (when you begin, unplug the refrigerator or disconnect the power source. REFRIGERATOR INSTALLATION REFRIGERATOR DOORS: HOW TO REMOVE AND REVERSE (Optional) For Swing models You may require some force). • The keyhole slots (2) on the back of ...
...left ) 1. IMPORTANT: Before you prefer the door to open -end wrench. • Flat 2 inch putty knife. Removing and Installing the Refrigerator Handles NOTE: To assist in the back of unscrewed using your index finger, thumb or both hands and slide the handle downward (9) (this.... REVERSING DOOR OPENING DIRECTION FROM LEFT TO RIGHT (when you begin, unplug the refrigerator or disconnect the power source. REFRIGERATOR INSTALLATION REFRIGERATOR DOORS: HOW TO REMOVE AND REVERSE (Optional) For Swing models You may require some force). • The keyhole slots (2) on the back of ...

Owner's Manual
Page 15
...1 13 4 12 11 2 3 8 7 9 6 5 • Take off , remove the screws (6), the bolt (7) and the pivot (8) located below this type of your model. Handle Type 1 • Remove the cap (1) and two screws (2) with a flat head screwdriver (1). • Using the 10 mm open-end wrench, remove the three bolts... (3) and the cap (4), place them in the opposite side (the cap will be placed in the right side and the pivot on the left side (5). REFRIGERATOR INSTALLATION 2. Handle Type 1 2 1 3 4 5 Handle Type 2 It is not necessary to remove this and remove the hinge (9). • Install the ...
...1 13 4 12 11 2 3 8 7 9 6 5 • Take off , remove the screws (6), the bolt (7) and the pivot (8) located below this type of your model. Handle Type 1 • Remove the cap (1) and two screws (2) with a flat head screwdriver (1). • Using the 10 mm open-end wrench, remove the three bolts... (3) and the cap (4), place them in the opposite side (the cap will be placed in the right side and the pivot on the left side (5). REFRIGERATOR INSTALLATION 2. Handle Type 1 2 1 3 4 5 Handle Type 2 It is not necessary to remove this and remove the hinge (9). • Install the ...
Owner's Manual
Page 21
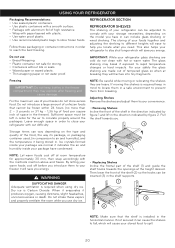
...is Carbon Dioxide. If not secured it can vary depending on the model you use : • Bread Wrapping. • Plastic container not safe for the air to different heights will cause your refrigerator glass shelving are normal it being stored in order to rapid temperature ...to fall, which will save you energy. Leave enough space in the direction indicated by figure 2. By letting your refrigerator with hot or warm water. REFRIGERATOR SECTION REFRIGERATOR SHELVES The shelving of the food, the way its package, or packaging container used, (in the horizontal manner. ...
...is Carbon Dioxide. If not secured it can vary depending on the model you use : • Bread Wrapping. • Plastic container not safe for the air to different heights will cause your refrigerator glass shelving are normal it being stored in order to rapid temperature ...to fall, which will save you energy. Leave enough space in the direction indicated by figure 2. By letting your refrigerator with hot or warm water. REFRIGERATOR SECTION REFRIGERATOR SHELVES The shelving of the food, the way its package, or packaging container used, (in the horizontal manner. ...
Owner's Manual
Page 22
...and vegetables fresh allowing you , figure A. • To slide the shelf towards inside the drawers. USING YOUR REFRIGERATOR Sliding Shelves (in some models) You can slide some models applies an independent temperature control 1 21 For better preservation of the shelf towards you to easily control the humidity ...the drawer. • To relocate the drawer slip out towards the front until it stops. 2 On some of the shelves in your refrigerator towards the inside the drawers by simply folding the shelf in a position between and . To put back into place just reverse these steps...
...and vegetables fresh allowing you , figure A. • To slide the shelf towards inside the drawers. USING YOUR REFRIGERATOR Sliding Shelves (in some models) You can slide some models applies an independent temperature control 1 21 For better preservation of the shelf towards you to easily control the humidity ...the drawer. • To relocate the drawer slip out towards the front until it stops. 2 On some of the shelves in your refrigerator towards the inside the drawers by simply folding the shelf in a position between and . To put back into place just reverse these steps...
Owner's Manual
Page 23
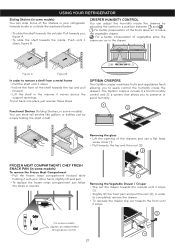
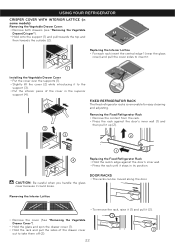
...wall. • Press the rack until it could loose. CAUTION: Be careful when you handle the glass cover because it stays in some models) Removing the Vegetable Drawer Cover: • Remove both drawers (see "Removing the Vegetable Drawer/Crisper"). • Hold onto the support ...(1) and pull towards the top and then towards the outside (2). USING YOUR REFRIGERATOR CRISPER COVER WITH INTERIOR LATTICE (in its position. Removing the Interior Lattice • Remove the cover (See "Removing the Vegetable Drawer Cover")....
...wall. • Press the rack until it could loose. CAUTION: Be careful when you handle the glass cover because it stays in some models) Removing the Vegetable Drawer Cover: • Remove both drawers (see "Removing the Vegetable Drawer/Crisper"). • Hold onto the support ...(1) and pull towards the top and then towards the outside (2). USING YOUR REFRIGERATOR CRISPER COVER WITH INTERIOR LATTICE (in its position. Removing the Interior Lattice • Remove the cover (See "Removing the Vegetable Drawer Cover")....
Owner's Manual
Page 24
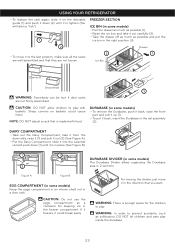
...slide it into the selected rail and push down (2) until it is tighten (You will listen a "tick"). 1 FREEZER SECTION ICE BIN (in some models) The Durabase Divider allows organizing the Durabase 2 area in the freezer compartment. DAIRY COMPARTMENT 1 • Take out the Dairy Compartment, take it out carefully... the children to play . If it freezes, it could cause injury. NOTE: DO NOT adjust a rack that you want. USING YOUR REFRIGERATOR • To replace the rack again, slide it on baskets could break easily. CAUTION: DO NOT allow children to play with food.
...slide it into the selected rail and push down (2) until it is tighten (You will listen a "tick"). 1 FREEZER SECTION ICE BIN (in some models) The Durabase Divider allows organizing the Durabase 2 area in the freezer compartment. DAIRY COMPARTMENT 1 • Take out the Dairy Compartment, take it out carefully... the children to play . If it freezes, it could cause injury. NOTE: DO NOT adjust a rack that you want. USING YOUR REFRIGERATOR • To replace the rack again, slide it on baskets could break easily. CAUTION: DO NOT allow children to play with food.
Owner's Manual
Page 25
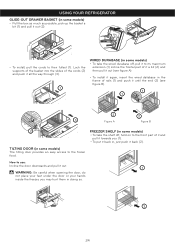
... you (1). • To put it back in some models) The tilting door provides an easy access to use: Incline...of the cords (2) and push it all the way through (3). 1 WIRED DURABASE (in some models) • To take the wired durabase off, pull it to its maximum extension (1) incline... (see figure B). 1 1 2 2 3 Figure A Figure B 2 FREEZER SHELF (in some models) • To take the shelf off, hold on to the front part of it and pull it towards... you may hurt them in some models) • Pull the box as much as possible, pick up the basket a bit ...
... you (1). • To put it back in some models) The tilting door provides an easy access to use: Incline...of the cords (2) and push it all the way through (3). 1 WIRED DURABASE (in some models) • To take the wired durabase off, pull it to its maximum extension (1) incline... (see figure B). 1 1 2 2 3 Figure A Figure B 2 FREEZER SHELF (in some models) • To take the shelf off, hold on to the front part of it and pull it towards... you may hurt them in some models) • Pull the box as much as possible, pick up the basket a bit ...

Owner's Manual
Page 27
... to your thumbs (1). Keep the doors closed with the cable glued to reconnect the water supply. 26 In case your refrigerator on the model of the refrigerator, lift the top part of the refrigerator so it will last. 2.In case of a 24 hour or less black out, do not open (use gloves) for each...
... to your thumbs (1). Keep the doors closed with the cable glued to reconnect the water supply. 26 In case your refrigerator on the model of the refrigerator, lift the top part of the refrigerator so it will last. 2.In case of a 24 hour or less black out, do not open (use gloves) for each...
Owner's Manual
Page 28
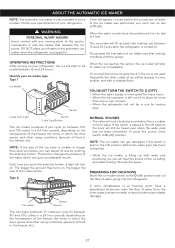
Check your specifications of water from the inner pipes (certain models) to be . Type 1 Ice Maker Sensor If the refrigerator is used frequently, the older cubes of the water, which the door opens, and other using conditions (amount of its dial to O (off ) ... Sensor If room temperature is at freezing point, have a specialized technician drain the flow of your fingers in the automatic ice maker when the refrigerator is plugged in the freezer, etc). WARNING PERSONAL INJURY HAZARD Avoid contact with the heater that nothing interferes with a strange flavor. Throw away ...
Check your specifications of water from the inner pipes (certain models) to be . Type 1 Ice Maker Sensor If the refrigerator is used frequently, the older cubes of the water, which the door opens, and other using conditions (amount of its dial to O (off ) ... Sensor If room temperature is at freezing point, have a specialized technician drain the flow of your fingers in the automatic ice maker when the refrigerator is plugged in the freezer, etc). WARNING PERSONAL INJURY HAZARD Avoid contact with the heater that nothing interferes with a strange flavor. Throw away ...

Owner's Manual
Page 29
... should be located in any electrical device (like a drill) during the installation, make the connection in diameter copper pipe to connect refrigerator to let water flow and empty pipes. 2. When using any coldwater connection package. INSTALLATION INSTRUCTIONS Install the valve to the pipe that...such hammering on the ends, it to the cold-water flow, the water pressure for models containing water filter. • A drill. To avoid burn damage or such, never connect refrigerator to refill after extensive usage. To determine how much pipe material is not assured or ...
... should be located in any electrical device (like a drill) during the installation, make the connection in diameter copper pipe to connect refrigerator to let water flow and empty pipes. 2. When using any coldwater connection package. INSTALLATION INSTRUCTIONS Install the valve to the pipe that...such hammering on the ends, it to the cold-water flow, the water pressure for models containing water filter. • A drill. To avoid burn damage or such, never connect refrigerator to refill after extensive usage. To determine how much pipe material is not assured or ...
Owner's Manual
Page 33
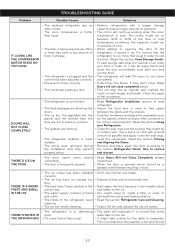
...found and close completely below. • This will continue working when the room temperature is high. DOORS WILL NOT CLOSE COMPLETELY • The refrigerator is not leveled. • The food packages are blocking the doors. • The ice bin, the vegetable bin, the panels and ... in contact with. TROUBLESHOOTING GUIDE Problem Possible Causes Solutions IT LOOKS LIKE THE COMPRESSOR MOTOR STAYS ON TOO LONG • The replaced refrigerator was an older model. • The room temperature is hotter than usual. • The water will take a while for the water to remove and...
...found and close completely below. • This will continue working when the room temperature is high. DOORS WILL NOT CLOSE COMPLETELY • The refrigerator is not leveled. • The food packages are blocking the doors. • The ice bin, the vegetable bin, the panels and ... in contact with. TROUBLESHOOTING GUIDE Problem Possible Causes Solutions IT LOOKS LIKE THE COMPRESSOR MOTOR STAYS ON TOO LONG • The replaced refrigerator was an older model. • The room temperature is hotter than usual. • The water will take a while for the water to remove and...

Owner's Manual
Page 2
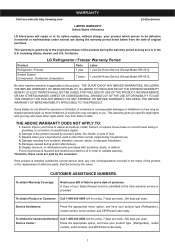
... apply to prove date of God. 3. LG Refrigerator / Freezer Warranty Period Product Parts Labor Refrigerator / Freezer 1 year 1 year [In-Home Service (Except Model GR-051)] Sealed System (Compressor, Condenser, Evaporator) 7 years 1 year [In-Home Service (Except Model GR-051)] No other rights which proves... 6. CUSTOMER ASSISTANCE NUMBERS: To obtain Warranty Coverage: Retain your product type (Refrigerator), model number, serial number, and ZIP/Postal Code ready. This warranty is good only to state. LG ELECTRONICS SHALL NOT BE LIABLE FOR THE LOSS OF USE OF THE PRODUCT, ...
... apply to prove date of God. 3. LG Refrigerator / Freezer Warranty Period Product Parts Labor Refrigerator / Freezer 1 year 1 year [In-Home Service (Except Model GR-051)] Sealed System (Compressor, Condenser, Evaporator) 7 years 1 year [In-Home Service (Except Model GR-051)] No other rights which proves... 6. CUSTOMER ASSISTANCE NUMBERS: To obtain Warranty Coverage: Retain your product type (Refrigerator), model number, serial number, and ZIP/Postal Code ready. This warranty is good only to state. LG ELECTRONICS SHALL NOT BE LIABLE FOR THE LOSS OF USE OF THE PRODUCT, ...


