
Owner's Manual
Page 6
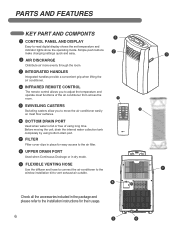
... DRAIN PORT ^ Used when Continuous Drainage or in dry mode. 9 FLEXIBLE VENTING HOSE Use the diffuser and hose to connect the air conditioner to the 7 window installation kit to vent exhaust air outside. 8 Check all the accessories included in the package and please refer to -read digital display shows the set temperature and...
... DRAIN PORT ^ Used when Continuous Drainage or in dry mode. 9 FLEXIBLE VENTING HOSE Use the diffuser and hose to connect the air conditioner to the 7 window installation kit to vent exhaust air outside. 8 Check all the accessories included in the package and please refer to -read digital display shows the set temperature and...
Owner's Manual
Page 8
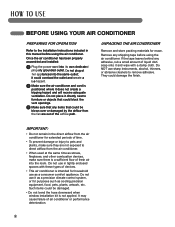
... to furniture or objects that could damage the finish. Such items could be damaged. • Do not bend the hose downward when window installation kit is intended for reuse. Remove any shipping tape before using the air conditioner. IMPORTANT: • Do not remain in the direct airflow... in tightly enclosed spaces with a damp cloth. HOW TO USE BEFORE USING YOUR AIR CONDITIONER PREPARING FOR OPERATION Refer to the Installation Instructions included in this manual before using the air conditioner. Do not plug ot her appliances into its own dedicated properly grounded ...
... to furniture or objects that could damage the finish. Such items could be damaged. • Do not bend the hose downward when window installation kit is intended for reuse. Remove any shipping tape before using the air conditioner. IMPORTANT: • Do not remain in the direct airflow... in tightly enclosed spaces with a damp cloth. HOW TO USE BEFORE USING YOUR AIR CONDITIONER PREPARING FOR OPERATION Refer to the Installation Instructions included in this manual before using the air conditioner. Do not plug ot her appliances into its own dedicated properly grounded ...
Owner's Manual
Page 13
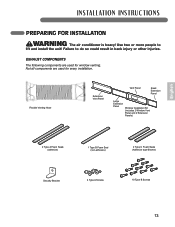
EXHAUST COMPONENTS The following components are used for every installation. Not all components are used for window venting. Failure to lift and install the unit! Flexible Venting Hose Extension Vent Panel Vent Panel Small Extension Panel Large Extension Panel Window Installation Kit (includes 2 Window Vent Panel and 2 Extension Panels) 2 Type A Foam Seals (adhesive) 1 Type B Foam Seal (non-adhesive...
EXHAUST COMPONENTS The following components are used for every installation. Not all components are used for window venting. Failure to lift and install the unit! Flexible Venting Hose Extension Vent Panel Vent Panel Small Extension Panel Large Extension Panel Window Installation Kit (includes 2 Window Vent Panel and 2 Extension Panels) 2 Type A Foam Seals (adhesive) 1 Type B Foam Seal (non-adhesive...
Owner's Manual
Page 14
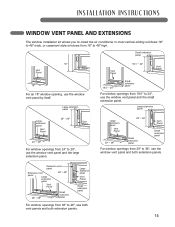
... PANEL AND EXTENSIONS The window installation kit allows you to install the air conditioner in most vertical-sliding windows 18" to 48" wide, or casement-style windows from 36″ to 48″, use both vent panels and both extension panels. Extension vent panel Extension vent panel Large ...large extension panel. Large extension panel Vent Panel 29" − 36" 29" − 36" Small extension panel Vent Panel Small extension panel For window openings from 181⁄4" to 48" high. Large extension panel Vent Panel 181⁄4" − 24" Vent Panel 181⁄4" − 24"...
... PANEL AND EXTENSIONS The window installation kit allows you to install the air conditioner in most vertical-sliding windows 18" to 48" wide, or casement-style windows from 36″ to 48″, use both vent panels and both extension panels. Extension vent panel Extension vent panel Large ...large extension panel. Large extension panel Vent Panel 29" − 36" 29" − 36" Small extension panel Vent Panel Small extension panel For window openings from 181⁄4" to 48" high. Large extension panel Vent Panel 181⁄4" − 24" Vent Panel 181⁄4" − 24"...
Owner's Manual
Page 15
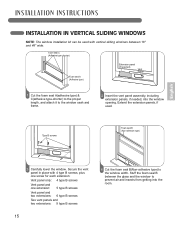
INSTALLATION INSTRUCTIONS INSTALLATION IN VERTICAL SLIDING WINDOWS NOTE: The window installation kit can be used . Type B screws Foam seal B (Non-adhesive type) English 3 Carefully lower the window. Extend the extension panels, if used with 4 type B screws, plus one screw for each extension: Vent panel only: ... type B screws 15 4 Cut the foam seal B(Non-adhesive type) to the window width. Secure the vent panel in place with vertical sliding windows between the glass and the window to the window sash and frame. 2 Insert the vent panel assembly, including extension panels, if needed...
INSTALLATION INSTRUCTIONS INSTALLATION IN VERTICAL SLIDING WINDOWS NOTE: The window installation kit can be used . Type B screws Foam seal B (Non-adhesive type) English 3 Carefully lower the window. Extend the extension panels, if used with 4 type B screws, plus one screw for each extension: Vent panel only: ... type B screws 15 4 Cut the foam seal B(Non-adhesive type) to the window width. Secure the vent panel in place with vertical sliding windows between the glass and the window to the window sash and frame. 2 Insert the vent panel assembly, including extension panels, if needed...

Owner's Manual
Page 16
Type A screws 6 Insert the oval end of the diffuser into the window installation kit until the locking tabs engage. Secure in place with a type B screw, as shown. INSTALLATION INSTRUCTIONS INSTALLATION IN VERTICAL SLIDING WINDOWS Security Bracket Type B screw 5 Install the security bracket with four Type A screws. 16
Type A screws 6 Insert the oval end of the diffuser into the window installation kit until the locking tabs engage. Secure in place with a type B screw, as shown. INSTALLATION INSTRUCTIONS INSTALLATION IN VERTICAL SLIDING WINDOWS Security Bracket Type B screw 5 Install the security bracket with four Type A screws. 16
Owner's Manual
Page 17
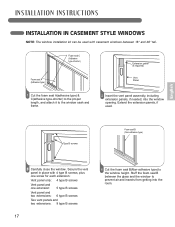
...-adhesive type) to prevent air and insects from getting into the window opening. Type B screws Foam seal B (Non-adhesive type) English 3 Carefully close the window. Stuff the foam seal B between 18″ and 48″ tall. INSTALLATION INSTRUCTIONS INSTALLATION IN CASEMENT STYLE WINDOWS NOTE: The window installation kit can be used . Extension panel (if required) Vent Panel 2 Insert...
...-adhesive type) to prevent air and insects from getting into the window opening. Type B screws Foam seal B (Non-adhesive type) English 3 Carefully close the window. Stuff the foam seal B between 18″ and 48″ tall. INSTALLATION INSTRUCTIONS INSTALLATION IN CASEMENT STYLE WINDOWS NOTE: The window installation kit can be used . Extension panel (if required) Vent Panel 2 Insert...

Owner's Manual
Page 18
Secure in place with a type B screw, as shown. INSTALLATION INSTRUCTIONS INSTALLATION IN CASEMENT STYLE WINDOWS Security bracket Type B screw Type B screw 5 Install the window security bracket with four of the diffuser into the window installation kit until the locking tabs engage. Type A screws 6 Insert the oval end of the included screws. 18
Secure in place with a type B screw, as shown. INSTALLATION INSTRUCTIONS INSTALLATION IN CASEMENT STYLE WINDOWS Security bracket Type B screw Type B screw 5 Install the window security bracket with four of the diffuser into the window installation kit until the locking tabs engage. Type A screws 6 Insert the oval end of the included screws. 18


