Owner's Manual
Page 2
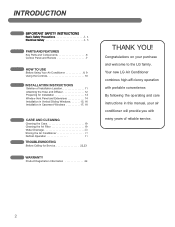
... 15, 16 Installation in this manual, your purchase and welcome to the LG family. INTRODUCTION PARTS AND FEATURES Key Parts and Components 6 Control Panel and Remote 7 HOW TO USE Before Using Your Air Conditioner 8, 9 Using the Controls 10 INSTALLATION INSTRUCTIONS Seletion of reliable service. Congratulations on your air conditioner will provide you...
... 15, 16 Installation in this manual, your purchase and welcome to the LG family. INTRODUCTION PARTS AND FEATURES Key Parts and Components 6 Control Panel and Remote 7 HOW TO USE Before Using Your Air Conditioner 8, 9 Using the Controls 10 INSTALLATION INSTRUCTIONS Seletion of reliable service. Congratulations on your air conditioner will provide you...
Owner's Manual
Page 3
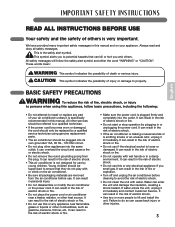
... and unplug the air conditioner before use this appliance, follow the safety alert symbol and either the word "WARNING" or "CAUTION". IMPORTANT SAFETY INSTRUCTIONS English READ ALL INSTRUCTIONS BEFORE USE Your safety and the safety of others . it is the safety alert symbol. It can result in the risk of electric shock...
... and unplug the air conditioner before use this appliance, follow the safety alert symbol and either the word "WARNING" or "CAUTION". IMPORTANT SAFETY INSTRUCTIONS English READ ALL INSTRUCTIONS BEFORE USE Your safety and the safety of others . it is the safety alert symbol. It can result in the risk of electric shock...
Owner's Manual
Page 4
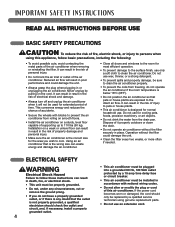
Never unplug by a qualified service technician using this appliance, follow these instructions can result in death, fire, or electrical shock. • This unit must be installed in accordance with blocks to prevent the air conditioner from...• This air conditioner is not properly grounded, a qualified electrician should only be replaced by pulling on the cord. Do not use . IMPORTANT SAFETY INSTRUCTIONS READ ALL INSTRUCTIONS BEFORE USE BASIC SAFETY PRECAUTIONS CAUTION To reduce the risk of fire, electric shock, or injury to persons when using genuine replacement parts. •...
Never unplug by a qualified service technician using this appliance, follow these instructions can result in death, fire, or electrical shock. • This unit must be installed in accordance with blocks to prevent the air conditioner from...• This air conditioner is not properly grounded, a qualified electrician should only be replaced by pulling on the cord. Do not use . IMPORTANT SAFETY INSTRUCTIONS READ ALL INSTRUCTIONS BEFORE USE BASIC SAFETY PRECAUTIONS CAUTION To reduce the risk of fire, electric shock, or injury to persons when using genuine replacement parts. •...
Owner's Manual
Page 5
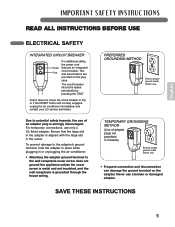
... Ensure proper ground exists before use. • Frequent connection and disconnection can damage the ground terminal on the plug case. SAVE THESE INSTRUCTIONS 5 For temporary connections, use a broken or damaged adapter. TEMPORARY GROUNDING METHOD (Use of an adapter plug is grounded through the house... adapter ground terminal to trip, or if the RESET button will not stay engaged, unplug the air conditioner immediately and contact your LG service technician. Never use only a UL-listed adapter. The circuit breaker should be tested periodically by pressing the TEST button does ...
... Ensure proper ground exists before use. • Frequent connection and disconnection can damage the ground terminal on the plug case. SAVE THESE INSTRUCTIONS 5 For temporary connections, use a broken or damaged adapter. TEMPORARY GROUNDING METHOD (Use of an adapter plug is grounded through the house... adapter ground terminal to trip, or if the RESET button will not stay engaged, unplug the air conditioner immediately and contact your LG service technician. Never use only a UL-listed adapter. The circuit breaker should be tested periodically by pressing the TEST button does ...
Owner's Manual
Page 6
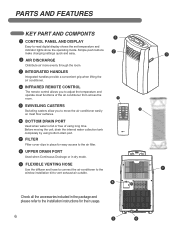
... the internal water collection tank completely by using long time. PARTS AND FEATURES KEY PART AND COMPONTS 1 1 CONTROL PANEL AND DISPLAY Easy-to the installation instructions for easy access to the air filter. 8 UPPER DRAIN PORT ^ Used when Continuous Drainage or in dry mode. 9 FLEXIBLE VENTING HOSE Use the diffuser and...
... the internal water collection tank completely by using long time. PARTS AND FEATURES KEY PART AND COMPONTS 1 1 CONTROL PANEL AND DISPLAY Easy-to the installation instructions for easy access to the air filter. 8 UPPER DRAIN PORT ^ Used when Continuous Drainage or in dry mode. 9 FLEXIBLE VENTING HOSE Use the diffuser and...
Owner's Manual
Page 7
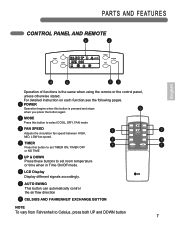
For detailed instruction on each function,see the following pages. 1 POWER Operation begins when this button to set TIMER ON, TIMER OFF or NO TIME 5 UP & DOWN Press ...
For detailed instruction on each function,see the following pages. 1 POWER Operation begins when this button to set TIMER ON, TIMER OFF or NO TIME 5 UP & DOWN Press ...
Owner's Manual
Page 8
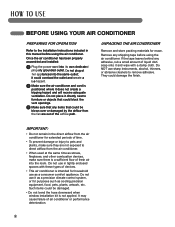
... leaves behind any shipping tape before using the air conditioner. HOW TO USE BEFORE USING YOUR AIR CONDITIONER PREPARING FOR OPERATION Refer to the Installation Instructions included in this manual before using the air conditioner. Once the air conditioner has been properly assembled and installed: 1 Plug the power cord into the...
... leaves behind any shipping tape before using the air conditioner. HOW TO USE BEFORE USING YOUR AIR CONDITIONER PREPARING FOR OPERATION Refer to the Installation Instructions included in this manual before using the air conditioner. Once the air conditioner has been properly assembled and installed: 1 Plug the power cord into the...
Owner's Manual
Page 11
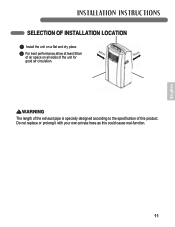
English 11 Do not replace or prolong it with your own private hose as this product. INSTALLATION INSTRUCTIONS SELECTION OF INSTALLATION LOCATION 1 Install the unit on a flat and dry place. 2 For best performance,allow at least 50cm 50cm of air space on all sides of this could cause mal-function. WARNING The length of the exhaust pipe is specially designed according to the specification of the unit for 50cm good air circulation.
English 11 Do not replace or prolong it with your own private hose as this product. INSTALLATION INSTRUCTIONS SELECTION OF INSTALLATION LOCATION 1 Install the unit on a flat and dry place. 2 For best performance,allow at least 50cm 50cm of air space on all sides of this could cause mal-function. WARNING The length of the exhaust pipe is specially designed according to the specification of the unit for 50cm good air circulation.
Owner's Manual
Page 12
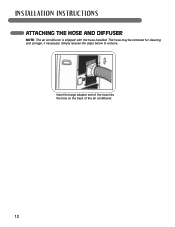
Simply reverse the steps below to remove. Insert the large adapter end of the hose into the hole on the back of the air conditioner. 12 The hose may be removed for cleaning and storage, if necessary. INSTALLATION INSTRUCTIONS ATTACHING THE HOSE AND DIFFUSER NOTE: The air conditioner is shipped with the hose installed.
Simply reverse the steps below to remove. Insert the large adapter end of the hose into the hole on the back of the air conditioner. 12 The hose may be removed for cleaning and storage, if necessary. INSTALLATION INSTRUCTIONS ATTACHING THE HOSE AND DIFFUSER NOTE: The air conditioner is shipped with the hose installed.
Owner's Manual
Page 13
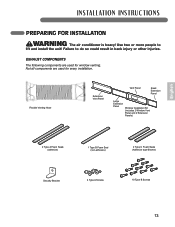
... 4 Type A Screws 10 Type B Screws 13 EXHAUST COMPONENTS The following components are used for every installation. Failure to lift and install the unit! English INSTALLATION INSTRUCTIONS PREPARING FOR INSTALLATION WARNING The air conditioner is heavy!
... 4 Type A Screws 10 Type B Screws 13 EXHAUST COMPONENTS The following components are used for every installation. Failure to lift and install the unit! English INSTALLATION INSTRUCTIONS PREPARING FOR INSTALLATION WARNING The air conditioner is heavy!
Owner's Manual
Page 14
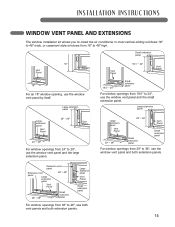
..." − 36" Small extension panel Vent Panel Small extension panel For window openings from 29" to 24", use the window vent panel by itself. INSTALLATION INSTRUCTIONS WINDOW VENT PANEL AND EXTENSIONS The window installation kit allows you to install the air conditioner in most vertical-sliding windows 18" to 48" wide...
..." − 36" Small extension panel Vent Panel Small extension panel For window openings from 29" to 24", use the window vent panel by itself. INSTALLATION INSTRUCTIONS WINDOW VENT PANEL AND EXTENSIONS The window installation kit allows you to install the air conditioner in most vertical-sliding windows 18" to 48" wide...
Owner's Manual
Page 15
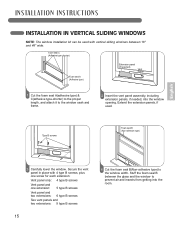
... window to prevent air and insects from getting into the window opening. Type B screws Foam seal B (Non-adhesive type) English 3 Carefully lower the window. INSTALLATION INSTRUCTIONS INSTALLATION IN VERTICAL SLIDING WINDOWS NOTE: The window installation kit can be used . Foam seal C (Adhesive type-shorter) Foam seal A (Adhesive type) Extension panel (if...
... window to prevent air and insects from getting into the window opening. Type B screws Foam seal B (Non-adhesive type) English 3 Carefully lower the window. INSTALLATION INSTRUCTIONS INSTALLATION IN VERTICAL SLIDING WINDOWS NOTE: The window installation kit can be used . Foam seal C (Adhesive type-shorter) Foam seal A (Adhesive type) Extension panel (if...

Owner's Manual
Page 16
Type A screws 6 Insert the oval end of the diffuser into the window installation kit until the locking tabs engage. Secure in place with a type B screw, as shown. INSTALLATION INSTRUCTIONS INSTALLATION IN VERTICAL SLIDING WINDOWS Security Bracket Type B screw 5 Install the security bracket with four Type A screws. 16
Type A screws 6 Insert the oval end of the diffuser into the window installation kit until the locking tabs engage. Secure in place with a type B screw, as shown. INSTALLATION INSTRUCTIONS INSTALLATION IN VERTICAL SLIDING WINDOWS Security Bracket Type B screw 5 Install the security bracket with four Type A screws. 16
Owner's Manual
Page 17
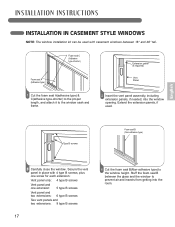
...″ and 48″ tall. Extension panel (if required) Vent Panel 2 Insert the vent panel assembly, including extension panels, if needed, into the room. INSTALLATION INSTRUCTIONS INSTALLATION IN CASEMENT STYLE WINDOWS NOTE: The window installation kit can be used . Type B screws Foam seal B (Non-adhesive type) English 3 Carefully close the window...
...″ and 48″ tall. Extension panel (if required) Vent Panel 2 Insert the vent panel assembly, including extension panels, if needed, into the room. INSTALLATION INSTRUCTIONS INSTALLATION IN CASEMENT STYLE WINDOWS NOTE: The window installation kit can be used . Type B screws Foam seal B (Non-adhesive type) English 3 Carefully close the window...

Owner's Manual
Page 18
Secure in place with a type B screw, as shown. Type A screws 6 Insert the oval end of the included screws. 18 INSTALLATION INSTRUCTIONS INSTALLATION IN CASEMENT STYLE WINDOWS Security bracket Type B screw Type B screw 5 Install the window security bracket with four of the diffuser into the window installation kit until the locking tabs engage.
Secure in place with a type B screw, as shown. Type A screws 6 Insert the oval end of the included screws. 18 INSTALLATION INSTRUCTIONS INSTALLATION IN CASEMENT STYLE WINDOWS Security bracket Type B screw Type B screw 5 Install the window security bracket with four of the diffuser into the window installation kit until the locking tabs engage.
Owner's Manual
Page 21
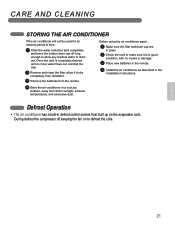
... reinstall it is completely drained and no cracks or damage. 3 Place new batteries in the remote. 4 Install the air conditioner as described in the Installation Instructions. 4 Store the air conditioner in place 2 Check the cord to make sure it . 3 Remove the batteries from direct sunlight, extreme temperatures, and excessive dust. Before...
... reinstall it is completely drained and no cracks or damage. 3 Place new batteries in the remote. 4 Install the air conditioner as described in the Installation Instructions. 4 Store the air conditioner in place 2 Check the cord to make sure it . 3 Remove the batteries from direct sunlight, extreme temperatures, and excessive dust. Before...
Owner's Manual
Page 24
... shall be defective in the United States of the product, LG Electronics will meet intended fit and function of the product that are warranted for delivery or pick-up, installation, instruction, replacement of house fuses, connection of the air conditoner. ...Compressor: 5 Years from accident, alteration, misuse, abuse, or improper installation, repair, or maintenance. TO CONTACT LG ELECTRONICS BY MAIL: LG Customer Interactive Center P. LG ELECTRONICS, INC. USA Should your home for the unexpired portion of Purchase. This limited warranty is applicable to ...
... shall be defective in the United States of the product, LG Electronics will meet intended fit and function of the product that are warranted for delivery or pick-up, installation, instruction, replacement of house fuses, connection of the air conditoner. ...Compressor: 5 Years from accident, alteration, misuse, abuse, or improper installation, repair, or maintenance. TO CONTACT LG ELECTRONICS BY MAIL: LG Customer Interactive Center P. LG ELECTRONICS, INC. USA Should your home for the unexpired portion of Purchase. This limited warranty is applicable to ...


