Owner's Manual
Page 6
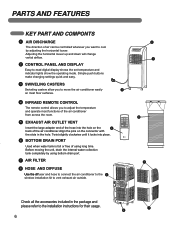
... DISCHARGE The direction of using bottom drain port. 7 AIR FILTER 8 HOSE AND DIFFUSE Use the diffuser and hose to connect the air conditioner to the 5 window installation kit to vent exhaust air outside. 2 1 8 7 Check all the accessories included in the hole. Simple push buttons make changing settings quick and easy. 3 SWIVELING CASTERS...
... DISCHARGE The direction of using bottom drain port. 7 AIR FILTER 8 HOSE AND DIFFUSE Use the diffuser and hose to connect the air conditioner to the 5 window installation kit to vent exhaust air outside. 2 1 8 7 Check all the accessories included in the hole. Simple push buttons make changing settings quick and easy. 3 SWIVELING CASTERS...
Owner's Manual
Page 8
... dedicated properly grounded outlet. Do NOT use as a consumer comfort appliance. Such items could be damaged. • Do not bend the hose downward when window installation kit is a sufficient flow of time. • To prevent damage or injury to remove adhesive. Do not place it and wipe with these types of devices...
... dedicated properly grounded outlet. Do NOT use as a consumer comfort appliance. Such items could be damaged. • Do not bend the hose downward when window installation kit is a sufficient flow of time. • To prevent damage or injury to remove adhesive. Do not place it and wipe with these types of devices...
Owner's Manual
Page 13
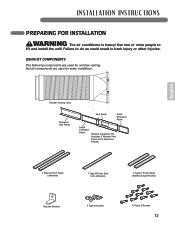
... every installation. Failure to lift and install the unit! English Flexible Venting Hose Extension Vent Panel Vent Panel Small Extension Panel Large Extension Panel Window Installation Kit (includes 2 Window Vent Panel and 2 Extension Panels) 2 Type A Foam Seals (adhesive) 1 Type B Foam Seal (non-adhesive) 2 Type C Foam Seals (Adhesive type-Shorter) Security Bracket 4 Type A Screws... could result in back injury or other injuries. INSTALLATION INSTRUCTIONS PREPARING FOR INSTALLATION WARNING The air conditioner is heavy! Not all components are used for window venting.
... every installation. Failure to lift and install the unit! English Flexible Venting Hose Extension Vent Panel Vent Panel Small Extension Panel Large Extension Panel Window Installation Kit (includes 2 Window Vent Panel and 2 Extension Panels) 2 Type A Foam Seals (adhesive) 1 Type B Foam Seal (non-adhesive) 2 Type C Foam Seals (Adhesive type-Shorter) Security Bracket 4 Type A Screws... could result in back injury or other injuries. INSTALLATION INSTRUCTIONS PREPARING FOR INSTALLATION WARNING The air conditioner is heavy! Not all components are used for window venting.
Owner's Manual
Page 14
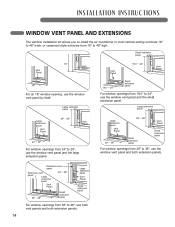
... Vent Panel Small extension panel For window openings from 18" to 48" high. INSTALLATION INSTRUCTIONS WINDOW VENT PANEL AND EXTENSIONS The window installation kit allows you to install the air conditioner in most vertical-sliding windows 18" to 48" wide, or casement-style windows from 29" to 24", use the window vent panel by itself. Small extension...
... Vent Panel Small extension panel For window openings from 18" to 48" high. INSTALLATION INSTRUCTIONS WINDOW VENT PANEL AND EXTENSIONS The window installation kit allows you to install the air conditioner in most vertical-sliding windows 18" to 48" wide, or casement-style windows from 29" to 24", use the window vent panel by itself. Small extension...
Owner's Manual
Page 15
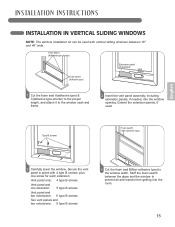
Type B screws Foam seal B (Non-adhesive type) English 3 Carefully lower the window. INSTALLATION INSTRUCTIONS INSTALLATION IN VERTICAL SLIDING WINDOWS NOTE: The window installation kit can be used . Foam seal C (Adhesive type-shorter) Foam seal A (Adhesive type) Extension panel (if required) Vent Panel 1 Cut the foam seal A(adhesive type) & C(adhesive ...
Type B screws Foam seal B (Non-adhesive type) English 3 Carefully lower the window. INSTALLATION INSTRUCTIONS INSTALLATION IN VERTICAL SLIDING WINDOWS NOTE: The window installation kit can be used . Foam seal C (Adhesive type-shorter) Foam seal A (Adhesive type) Extension panel (if required) Vent Panel 1 Cut the foam seal A(adhesive type) & C(adhesive ...
Owner's Manual
Page 16
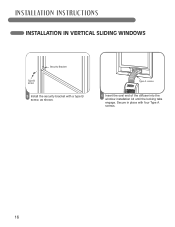
INSTALLATION INSTRUCTIONS INSTALLATION IN VERTICAL SLIDING WINDOWS Security Bracket Type B screw 5 Install the security bracket with four Type A screws. 16 Secure in place with a type B screw, as shown. 6 Insert the oval end of the diffuser into the window installation kit until the locking tabs engage.
INSTALLATION INSTRUCTIONS INSTALLATION IN VERTICAL SLIDING WINDOWS Security Bracket Type B screw 5 Install the security bracket with four Type A screws. 16 Secure in place with a type B screw, as shown. 6 Insert the oval end of the diffuser into the window installation kit until the locking tabs engage.
Owner's Manual
Page 17
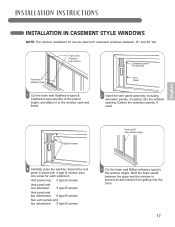
... and two extensions: 9 type B screws 4 Cut the foam seal B(Non-adhesive type) to the window sash and frame. Type B screws Foam seal B (Non-adhesive type) English 3 Carefully close the window. shorter) Foam seal A (Adhesive type) 1 Cut the foam seal A(adhesive type) & C(adhesive ...in place with casement windows between the glass and the window to prevent air and insects from getting into the window opening. Stuff the foam seal B between 18″ and 48″ tall. INSTALLATION INSTRUCTIONS INSTALLATION IN CASEMENT STYLE WINDOWS NOTE: The window installation kit can be used ...
... and two extensions: 9 type B screws 4 Cut the foam seal B(Non-adhesive type) to the window sash and frame. Type B screws Foam seal B (Non-adhesive type) English 3 Carefully close the window. shorter) Foam seal A (Adhesive type) 1 Cut the foam seal A(adhesive type) & C(adhesive ...in place with casement windows between the glass and the window to prevent air and insects from getting into the window opening. Stuff the foam seal B between 18″ and 48″ tall. INSTALLATION INSTRUCTIONS INSTALLATION IN CASEMENT STYLE WINDOWS NOTE: The window installation kit can be used ...
Owner's Manual
Page 18
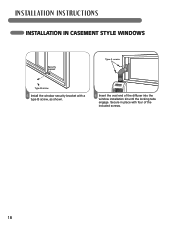
INSTALLATION INSTRUCTIONS INSTALLATION IN CASEMENT STYLE WINDOWS Security bracket Type B screw 5 Install the window security bracket with four of the diffuser into the window installation kit until the locking tabs engage. Secure in place with a type B screw, as shown. 6 Insert the oval end of the included screws. 18
INSTALLATION INSTRUCTIONS INSTALLATION IN CASEMENT STYLE WINDOWS Security bracket Type B screw 5 Install the window security bracket with four of the diffuser into the window installation kit until the locking tabs engage. Secure in place with a type B screw, as shown. 6 Insert the oval end of the included screws. 18
Specification
Page 2
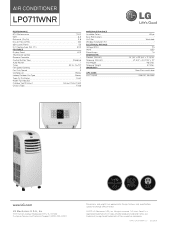
...companies. All rights reserved. Design, features and specifications subject to change without notice. © 2011 LG Electronics USA, Inc. HAAC-LP0711WNR-SS 03/28/11 FT.) FEATURES Display Panel Thermostat Control Remote Controller Control Button Type Auto Restart ...Exhaust Only (1.5M) Fixed MATERIALS/FINISHES Available Colors Easy-Roll Casters Air Filter Window Installation Kit ELECTRICAL RATINGS Voltage/50Hz Watts Rated Amps DIMENSIONS Product (WxHxD) Shipping (WxHxD) Net Weight Shipping Weight WARRANTY UPC CODE LP0711WNR White • Washable • 115 820 7.6 13 7/8" x 29 3/4" ...
...companies. All rights reserved. Design, features and specifications subject to change without notice. © 2011 LG Electronics USA, Inc. HAAC-LP0711WNR-SS 03/28/11 FT.) FEATURES Display Panel Thermostat Control Remote Controller Control Button Type Auto Restart ...Exhaust Only (1.5M) Fixed MATERIALS/FINISHES Available Colors Easy-Roll Casters Air Filter Window Installation Kit ELECTRICAL RATINGS Voltage/50Hz Watts Rated Amps DIMENSIONS Product (WxHxD) Shipping (WxHxD) Net Weight Shipping Weight WARRANTY UPC CODE LP0711WNR White • Washable • 115 820 7.6 13 7/8" x 29 3/4" ...


