
Owner's Manual
Page 1
OWNER'S MANUAL FRENCH DOOR REFRIGERATOR Please read this owner's manual thoroughly before operating and keep it handy for reference at all times. LMX28988** LMX25988** P/No.: MFL62184506 www.lg.com ENGLISH FRANÇAIS ESPAÑOL
OWNER'S MANUAL FRENCH DOOR REFRIGERATOR Please read this owner's manual thoroughly before operating and keep it handy for reference at all times. LMX28988** LMX25988** P/No.: MFL62184506 www.lg.com ENGLISH FRANÇAIS ESPAÑOL

Owner's Manual
Page 2
...Setting the Functions 26 Spaceplus Ice System 27 Automatic Icemaker 28 Storing Foods 29 Location of reliable service. Your new LG French Door Refrigerator combines advanced cooling technology with many years of Foods 30 Shelf Height Adjustment 31 Removing and Replacing Components 32 CARE ...AND CLEANING Cleaning the Refrigerator 36 General Information 36 Replacing the Water Filter 37 TROUBLESHOOTING Before Calling for Service 42 SPECIFICATIONS Key Dimensions and Specifications ...
...Setting the Functions 26 Spaceplus Ice System 27 Automatic Icemaker 28 Storing Foods 29 Location of reliable service. Your new LG French Door Refrigerator combines advanced cooling technology with many years of Foods 30 Shelf Height Adjustment 31 Removing and Replacing Components 32 CARE ...AND CLEANING Cleaning the Refrigerator 36 General Information 36 Replacing the Water Filter 37 TROUBLESHOOTING Before Calling for Service 42 SPECIFICATIONS Key Dimensions and Specifications ...
Owner's Manual
Page 3
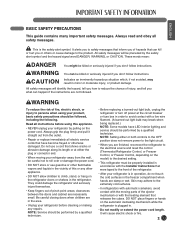
... if not avoided, may break when being replaced.) NOTE: Some models have become frayed or otherwise damaged. They could damage the refrigerator and seriously injure themselves. • Keep fingers out of injury, and tell you how to avoid contact with the Installer Instructions ... damage. Be careful closing doors when children are necessarily small. w This is plugged in the area. • Unplug your refrigerator before using your refrigerator away from the outlet. • Repair or replace immediately all safety messages. NOTE: Service should be performed by the safety ...
... if not avoided, may break when being replaced.) NOTE: Some models have become frayed or otherwise damaged. They could damage the refrigerator and seriously injure themselves. • Keep fingers out of injury, and tell you how to avoid contact with the Installer Instructions ... damage. Be careful closing doors when children are necessarily small. w This is plugged in the area. • Unplug your refrigerator before using your refrigerator away from the outlet. • Repair or replace immediately all safety messages. NOTE: Service should be performed by the safety ...

Owner's Manual
Page 4
... cream should be dangerous to eat. Even partial thawing and refreezing reduces the quality of many other foods. Before you throw away your old refrigerator or freezer: • Take off -color should not be refrozen and should be subject to fines and imprisonment under provisions of red meats.... • Small children can be knocked down. • Fingers and toes can be injured. Do not sit or climb on drawers. • Refrigerator can be supervised to ensure that of foods, particularly fruits, vegetables, and prepared foods. Use refrozen foods as soon as possible to save as much...
... cream should be dangerous to eat. Even partial thawing and refreezing reduces the quality of many other foods. Before you throw away your old refrigerator or freezer: • Take off -color should not be refrozen and should be subject to fines and imprisonment under provisions of red meats.... • Small children can be knocked down. • Fingers and toes can be injured. Do not sit or climb on drawers. • Refrigerator can be supervised to ensure that of foods, particularly fruits, vegetables, and prepared foods. Use refrozen foods as soon as possible to save as much...
Owner's Manual
Page 5
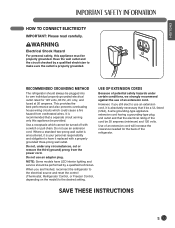
...CORDS Because of an extension cord. Do not use an extension cord, it is recommended that the electrical rating of the refrigerator. This provides the best performance and also prevents overloading house wiring circuits which cannot be performed by a qualified electrician to ...have LED interior lighting and service should always be properly grounded. RECOMMENDED GROUNDING METHOD The refrigerator should be turned off with a properly grounded three-prong wall outlet. NOTE: Some models have it be a UL-listed (USA...
...CORDS Because of an extension cord. Do not use an extension cord, it is recommended that the electrical rating of the refrigerator. This provides the best performance and also prevents overloading house wiring circuits which cannot be performed by a qualified electrician to ...have LED interior lighting and service should always be properly grounded. RECOMMENDED GROUNDING METHOD The refrigerator should be turned off with a properly grounded three-prong wall outlet. NOTE: Some models have it be a UL-listed (USA...
Owner's Manual
Page 6
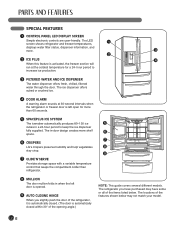
... is opened. 9 AUTO CLOSING HINGE When you have purchased may not match your model. 6 The LED screen shows refrigerator and freezer temperatures, 1 displays water filter status, dispenser information, and more shelf 6 space. 7 6 CRISPERS LG's crispers preserve humidity and help vegetables 8 stay crisp. 9 7 GLIDE'N'SERVE Provides storage space with a variable temperature control that...
... is opened. 9 AUTO CLOSING HINGE When you have purchased may not match your model. 6 The LED screen shows refrigerator and freezer temperatures, 1 displays water filter status, dispenser information, and more shelf 6 space. 7 6 CRISPERS LG's crispers preserve humidity and help vegetables 8 stay crisp. 9 7 GLIDE'N'SERVE Provides storage space with a variable temperature control that...
Owner's Manual
Page 7
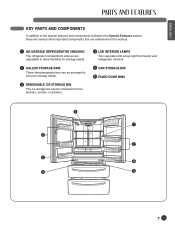
... special features and components outlined in the Special Features section, there are several other important components that are referenced in this manual. 1 ADJUSTABLE REFRIGERATOR SHELVING The refrigerator compartment shelves are adjustable to allow flexibility for storage needs. 2 GALLON STORAGE BINS Three interchangeable bins can be arranged to suit your storage needs...ice storage bin can be removed to fill ice buckets, coolers, or pitchers. 4 LED INTERIOR LAMPS Two separate LED arrays light the freezer and refrigerator interiors. 5 CAN STORAGE BIN 6 FIXED DOOR BINS 4 1 6 2 5 6 3 4 7
... special features and components outlined in the Special Features section, there are several other important components that are referenced in this manual. 1 ADJUSTABLE REFRIGERATOR SHELVING The refrigerator compartment shelves are adjustable to allow flexibility for storage needs. 2 GALLON STORAGE BINS Three interchangeable bins can be arranged to suit your storage needs...ice storage bin can be removed to fill ice buckets, coolers, or pitchers. 4 LED INTERIOR LAMPS Two separate LED arrays light the freezer and refrigerator interiors. 5 CAN STORAGE BIN 6 FIXED DOOR BINS 4 1 6 2 5 6 3 4 7
Owner's Manual
Page 8
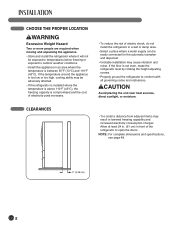
...110°F (43°C), the freezing capacity is compromised and the cost of electricity used increases. • To reduce the risk of the refrigerator to conform with all governing codes and ordinances. If the temperature around the appliance is too low or too high, cooling ability may be ...and dispenser. • Unstable installation may result in an area where the temperature is not even, make the refrigerator level by rotating the height adjusting screws. • Properly ground the refrigerator to open the doors. Allow at least 24 in. (61 cm) in front of electric shock, do not...
...110°F (43°C), the freezing capacity is compromised and the cost of electricity used increases. • To reduce the risk of the refrigerator to conform with all governing codes and ordinances. If the temperature around the appliance is too low or too high, cooling ability may be ...and dispenser. • Unstable installation may result in an area where the temperature is not even, make the refrigerator level by rotating the height adjusting screws. • Properly ground the refrigerator to open the doors. Allow at least 24 in. (61 cm) in front of electric shock, do not...

Owner's Manual
Page 9
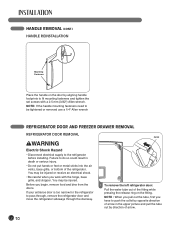
... When you assemble or disassemble a handle, you hit it . • Carpeting and soft tile surfaces are not recommended. • Never install the refrigerator on a platform or weakly supported structure. Allen Wrench Loosen the set screws with a 2.5 mm (3/32") Allen wrench and remove the handle. ENGLISH ...FLOORING • To minimize noise and vibration, the refrigerator MUST be installed on a solidly constructed floor. • To avoid vibration, the unit must push or pull with reasonable force. NOTE: If...
... When you assemble or disassemble a handle, you hit it . • Carpeting and soft tile surfaces are not recommended. • Never install the refrigerator on a platform or weakly supported structure. Allen Wrench Loosen the set screws with a 2.5 mm (3/32") Allen wrench and remove the handle. ENGLISH ...FLOORING • To minimize noise and vibration, the refrigerator MUST be installed on a solidly constructed floor. • To avoid vibration, the unit must push or pull with reasonable force. NOTE: If...
Owner's Manual
Page 10
...you work with a 2.5 mm (3/32") Allen wrench. You may be tightened or removed use a 1/4" Allen wrench REFRIGERATOR DOOR AND FREEZER DRAWER REMOVAL REFRIGERATOR DOOR REMOVAL wWARNING Electric Shock Hazard • Disconnect electrical supply to do so could result in the upper picture and pull... the tube out by aligning handle footprints to pass through, remove the refrigerator door and move the refrigerator sideways through the doorway. Failure to the refrigerator before installing. NOTE: If the handle mounting fasteners need to be injured or receive an ...
...you work with a 2.5 mm (3/32") Allen wrench. You may be tightened or removed use a 1/4" Allen wrench REFRIGERATOR DOOR AND FREEZER DRAWER REMOVAL REFRIGERATOR DOOR REMOVAL wWARNING Electric Shock Hazard • Disconnect electrical supply to do so could result in the upper picture and pull... the tube out by aligning handle footprints to pass through, remove the refrigerator door and move the refrigerator sideways through the doorway. Failure to the refrigerator before installing. NOTE: If the handle mounting fasteners need to be injured or receive an ...
Owner's Manual
Page 11
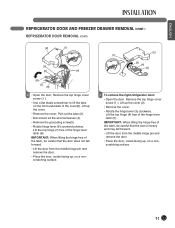
... pin and remove the door. • Place the door, inside facing up , on a nonscratching surface. (2) (1) (3) (4) (5) 3 To remove the right refrigerator door: • Open the door. ENGLISH REFRIGERATOR DOOR AND FREEZER DRAWER REMOVAL (CONT.) REFRIGERATOR DOOR REMOVAL (CONT.) (2) (1) (3) (5) (4) (6) (7) (8) 2 • Open the door. Remove the top hinge cover screw (1 ). Lift up the cover (2). • Remove...
... pin and remove the door. • Place the door, inside facing up , on a nonscratching surface. (2) (1) (3) (4) (5) 3 To remove the right refrigerator door: • Open the door. ENGLISH REFRIGERATOR DOOR AND FREEZER DRAWER REMOVAL (CONT.) REFRIGERATOR DOOR REMOVAL (CONT.) (2) (1) (3) (5) (4) (6) (7) (8) 2 • Open the door. Remove the top hinge cover screw (1 ). Lift up the cover (2). • Remove...

Owner's Manual
Page 12
... door. • Lower the door onto middle hinge pin. (2) (4) (5) (1) (3) 4 • Fit the top hinge (1) over the hinge lever latch (2) and into place. REFRIGERATOR DOOR AND FREEZER DRAWER REMOVAL (CONT.) REFRIGERATOR DOOR REINSTALLATION (4) (5) (3) (2) (1) 1 Install the right-side door first. • Lower the door onto the middle hinge pin as shown. • Make sure...
... door. • Lower the door onto middle hinge pin. (2) (4) (5) (1) (3) 4 • Fit the top hinge (1) over the hinge lever latch (2) and into place. REFRIGERATOR DOOR AND FREEZER DRAWER REMOVAL (CONT.) REFRIGERATOR DOOR REINSTALLATION (4) (5) (3) (2) (1) 1 Install the right-side door first. • Lower the door onto the middle hinge pin as shown. • Make sure...

Owner's Manual
Page 13
.... 2. Insert and tighten the cover screw. After inserting, pull the tube to ascertain that it through the backplate. Correct Incorrect 13 ENGLISH REFRIGERATOR DOOR AND FREEZER DRAWER REMOVAL (CONT.) REFRIGERATOR DOOR REINSTALLATION (CONT.) Cover Cover Screw (6) 5 • Push the water supply tube (6) into the connector. • Hook the tab on the door...
.... 2. Insert and tighten the cover screw. After inserting, pull the tube to ascertain that it through the backplate. Correct Incorrect 13 ENGLISH REFRIGERATOR DOOR AND FREEZER DRAWER REMOVAL (CONT.) REFRIGERATOR DOOR REINSTALLATION (CONT.) Cover Cover Screw (6) 5 • Push the water supply tube (6) into the connector. • Hook the tab on the door...
Owner's Manual
Page 14
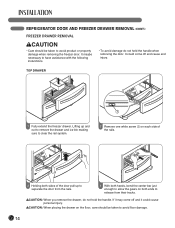
It could come off and cause and injury. wCAUTION: When you remove the drawer, do not hold the handle. REFRIGERATOR DOOR AND FREEZER DRAWER REMOVAL (CONT.) FREEZER DRAWER REMOVAL wCAUTION • Care should be taken to avoid product or property damage when removing the freezer ...
It could come off and cause and injury. wCAUTION: When you remove the drawer, do not hold the handle. REFRIGERATOR DOOR AND FREEZER DRAWER REMOVAL (CONT.) FREEZER DRAWER REMOVAL wCAUTION • Care should be taken to avoid product or property damage when removing the freezer ...
Owner's Manual
Page 15
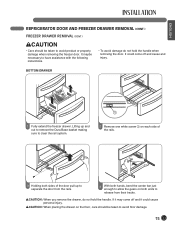
... the handle when removing the door. BOTTOM DRAWER 1 1 Fully extend the freezer drawer. wCAUTION: When you remove the drawer, do not hold the handle. ENGLISH REFRIGERATOR DOOR AND FREEZER DRAWER REMOVAL (CONT.) FREEZER DRAWER REMOVAL (CONT.) wCAUTION • Care should be taken to avoid product or property damage when removing the...
... the handle when removing the door. BOTTOM DRAWER 1 1 Fully extend the freezer drawer. wCAUTION: When you remove the drawer, do not hold the handle. ENGLISH REFRIGERATOR DOOR AND FREEZER DRAWER REMOVAL (CONT.) FREEZER DRAWER REMOVAL (CONT.) wCAUTION • Care should be taken to avoid product or property damage when removing the...

Owner's Manual
Page 16
... gears in the rail assembly. DO NOT allow them to perform the following instructions. wWARNING: DO NOT step or sit down on the freezer drawer. REFRIGERATOR DOOR AND FREEZER DRAWER REMOVAL (CONT.) FREEZER DRAWER REINSTALLATION wCAUTION • To avoid possible injury or product or property damage, you will need two people...
... gears in the rail assembly. DO NOT allow them to perform the following instructions. wWARNING: DO NOT step or sit down on the freezer drawer. REFRIGERATOR DOOR AND FREEZER DRAWER REMOVAL (CONT.) FREEZER DRAWER REINSTALLATION wCAUTION • To avoid possible injury or product or property damage, you will need two people...

Owner's Manual
Page 17
... pulled out to full extension, insert the lower basket in the rail assembly. wWARNING: DO NOT step or sit down on the freezer drawer. ENGLISH REFRIGERATOR DOOR AND FREEZER DRAWER REMOVAL (CONT.) FREEZER DRAWER REINSTALLATION (CONT.) wCAUTION • To avoid possible injury or product or property damage, you will need two...
... pulled out to full extension, insert the lower basket in the rail assembly. wWARNING: DO NOT step or sit down on the freezer drawer. ENGLISH REFRIGERATOR DOOR AND FREEZER DRAWER REMOVAL (CONT.) FREEZER DRAWER REINSTALLATION (CONT.) wCAUTION • To avoid possible injury or product or property damage, you will need two...
Owner's Manual
Page 18
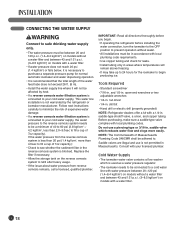
...sediment filter in the reverse osmosis system is not permitted in Massachusetts. Do not use is blocked. saddle valve which is not warranted by the refrigerator or icemaker manufacturer. Saddle valves are illegal and use a piercing-type or 3/16-in. nut driver • 1/4-in . Consult with a...your licensed plumber. saddle-type shutoff valve, a union, and copper tubing. drill bit • Hand drill or electric drill (properly grounded) NOTE: Refrigerator dealers offer a kit with a water filter. • If water pressure does not reach 20 psi (1.4 kgf/cm2) or falls below, it ...
...sediment filter in the reverse osmosis system is not permitted in Massachusetts. Do not use is blocked. saddle valve which is not warranted by the refrigerator or icemaker manufacturer. Saddle valves are illegal and use a piercing-type or 3/16-in. nut driver • 1/4-in . Consult with a...your licensed plumber. saddle-type shutoff valve, a union, and copper tubing. drill bit • Hand drill or electric drill (properly grounded) NOTE: Refrigerator dealers offer a kit with a water filter. • If water pressure does not reach 20 psi (1.4 kgf/cm2) or falls below, it ...
Owner's Manual
Page 19
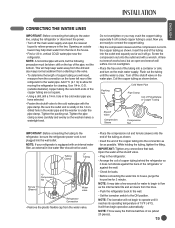
.... • Place the free end of the pipe, not the bottom. Tubing Clamp 1/4" Tubing 1/4" Compression Nut Ferrule (Sleeve) Water valve Refrigerator Connection • Remove the plastic flexible cap from collecting in the line. ENGLISH CONNECTING THE WATER LINES IMPORTANT: Before connecting the tubing to the... water line, unplug the refrigerator or disconnect the power. • Turn off the shutoff valve on the water pipe. NOTE: A horizontal pipe will not begin ...
.... • Place the free end of the pipe, not the bottom. Tubing Clamp 1/4" Tubing 1/4" Compression Nut Ferrule (Sleeve) Water valve Refrigerator Connection • Remove the plastic flexible cap from collecting in the line. ENGLISH CONNECTING THE WATER LINES IMPORTANT: Before connecting the tubing to the... water line, unplug the refrigerator or disconnect the power. • Turn off the shutoff valve on the water pipe. NOTE: A horizontal pipe will not begin ...
Owner's Manual
Page 20
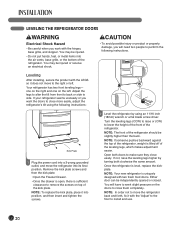
...kick plate screws and then the kick plate. • Open the Freezer Drawer. • Once the drawer is open, there is lifted off of the refrigerator should be independently opened or closed. NOTE: To replace the kick plate, place it into position, and then insert and tighten the screws. 2 Level ... following instructions. one on the right and one on the left . NOTE: The front of the leveling legs, which makes adjustment easier. LEVELING THE REFRIGERATOR DOORS wWARNING Electrical Shock Hazard • Be careful when you will have to exert slight pressure on top of the kick plate. If your...
...kick plate screws and then the kick plate. • Open the Freezer Drawer. • Once the drawer is open, there is lifted off of the refrigerator should be independently opened or closed. NOTE: To replace the kick plate, place it into position, and then insert and tighten the screws. 2 Level ... following instructions. one on the right and one on the left . NOTE: The front of the leveling legs, which makes adjustment easier. LEVELING THE REFRIGERATOR DOORS wWARNING Electrical Shock Hazard • Be careful when you will have to exert slight pressure on top of the kick plate. If your...


