
Owner's Manual (English)
Page 2
...simple operation and high efficiency. Your new LG French Door Refrigerator combines advanced cooling technology with many years of Foods 31 Shelf Height Adjustment 32 CARE AND CLEANING Removing and Replacing Components 33 Cleaning the Refrigerator 36 General Information 36 Replacing the Water...Control Panel Features 22 The LED Display 24 Adjusting the Temperatures and Display 25 Operating the Dispenser 26 Setting the Functions 27 Spaceplus Ice System 28 Automatic Icemaker 29 Storing Foods 30 Location of reliable service. IMPORTANT SAFETY INFORMATION Basic Safety Precautions ...
...simple operation and high efficiency. Your new LG French Door Refrigerator combines advanced cooling technology with many years of Foods 31 Shelf Height Adjustment 32 CARE AND CLEANING Removing and Replacing Components 33 Cleaning the Refrigerator 36 General Information 36 Replacing the Water...Control Panel Features 22 The LED Display 24 Adjusting the Temperatures and Display 25 Operating the Dispenser 26 Setting the Functions 27 Spaceplus Ice System 28 Automatic Icemaker 29 Storing Foods 30 Location of reliable service. IMPORTANT SAFETY INFORMATION Basic Safety Precautions ...

Owner's Manual (English)
Page 3
... injury to persons when using this or any repairs. wWARNING To reduce the risk of injury, and tell you are finished, reconnect the refrigerator to safety messages that shows cracks or abrasion damage along its length or at the circuit breaker or fuse box in order to the light... in the freezer compartment when hands are in minor or moderate injury, or product damage. Skin may result in the area. • Unplug your refrigerator away from the outlet. • Repair or replace immediately all safety messages. Do not use gasoline or other appliance. • Do NOT allow ...
... injury to persons when using this or any repairs. wWARNING To reduce the risk of injury, and tell you are finished, reconnect the refrigerator to safety messages that shows cracks or abrasion damage along its length or at the circuit breaker or fuse box in order to the light... in the freezer compartment when hands are in minor or moderate injury, or product damage. Skin may result in the area. • Unplug your refrigerator away from the outlet. • Repair or replace immediately all safety messages. Do not use gasoline or other appliance. • Do NOT allow ...

Owner's Manual (English)
Page 4
... persons (including children) with the appliance. • DO NOT refreeze frozen foods which have thawed completely. Before you throw away your old refrigerator or freezer: • Take off the doors. • Leave the shelves in place so that have thawed if they still contain ice...This appliance is removed for proper disposal by a person responsible for just a few days. Do not sit or climb on drawers. • Refrigerator can be injured. Even partial thawing and refreezing reduces the quality of Agriculture in households with children. ( For further information refer to ensure that...
... persons (including children) with the appliance. • DO NOT refreeze frozen foods which have thawed completely. Before you throw away your old refrigerator or freezer: • Take off the doors. • Leave the shelves in place so that have thawed if they still contain ice...This appliance is removed for proper disposal by a person responsible for just a few days. Do not sit or climb on drawers. • Refrigerator can be injured. Even partial thawing and refreezing reduces the quality of Agriculture in households with children. ( For further information refer to ensure that...

Owner's Manual (English)
Page 5
...OF EXTENSION CORDS Because of the cord be turned off with a properly grounded three-prong wall outlet. RECOMMENDED GROUNDING METHOD The refrigerator should be plugged into its own individual properly grounded electrical outlet rated for the back of an extension cord will increase the ...properly grounded. Have the wall outlet and the circuit checked by a qualified technician. Do not use an adapter plug. Use of the refrigerator. SAVE THESE INSTRUCTIONS 5 HOW TO CONNECT ELECTRICITY IMPORTANT: Please read carefully. Do not, under certain conditions, we strongly recommend against the ...
...OF EXTENSION CORDS Because of the cord be turned off with a properly grounded three-prong wall outlet. RECOMMENDED GROUNDING METHOD The refrigerator should be plugged into its own individual properly grounded electrical outlet rated for the back of an extension cord will increase the ...properly grounded. Have the wall outlet and the circuit checked by a qualified technician. Do not use an adapter plug. Use of the refrigerator. SAVE THESE INSTRUCTIONS 5 HOW TO CONNECT ELECTRICITY IMPORTANT: Please read carefully. Do not, under certain conditions, we strongly recommend against the ...

Owner's Manual (English)
Page 6
... through the door. SPECIAL FEATURES 1 CONTROL PANEL LED DISPLAY SCREEN Simple electronic controls are user-friendly. 1 The LED screen shows refrigerator and freezer temperatures, displays water filter status, dispenser information, and more. 3 2 2 ICE PLUS 4 When this feature is automatically closed...5 SPACEPLUS ICE SYSTEM The icemaker automatically produces 80-130 5 ice cubes in -door design creates more shelf space. 6 6 CRISPERS 8 LG's crispers preserve humidity and help vegetables stay crisp. 7 7 AUTO CLOSING HINGE When you slightly push the door of the opening angle.) ...
... through the door. SPECIAL FEATURES 1 CONTROL PANEL LED DISPLAY SCREEN Simple electronic controls are user-friendly. 1 The LED screen shows refrigerator and freezer temperatures, displays water filter status, dispenser information, and more. 3 2 2 ICE PLUS 4 When this feature is automatically closed...5 SPACEPLUS ICE SYSTEM The icemaker automatically produces 80-130 5 ice cubes in -door design creates more shelf space. 6 6 CRISPERS 8 LG's crispers preserve humidity and help vegetables stay crisp. 7 7 AUTO CLOSING HINGE When you slightly push the door of the opening angle.) ...

Owner's Manual (English)
Page 7
...outlined in the Special Features section, there are several other important components that are referenced in this manual. 1 ADJUSTABLE REFRIGERATOR SHELVING The refrigerator compartment shelves are adjustable to allow flexibility for storage needs. 4 LED INTERIOR LAMPS Two separate LED arrays light the freezer and... refrigerator interiors. 2 GALLON STORAGE BINS Three interchangeable bins can be arranged to suit your storage needs. 5 SHORT N'TALL BIN 3 REMOVABLE...
...outlined in the Special Features section, there are several other important components that are referenced in this manual. 1 ADJUSTABLE REFRIGERATOR SHELVING The refrigerator compartment shelves are adjustable to allow flexibility for storage needs. 4 LED INTERIOR LAMPS Two separate LED arrays light the freezer and... refrigerator interiors. 2 GALLON STORAGE BINS Three interchangeable bins can be arranged to suit your storage needs. 5 SHORT N'TALL BIN 3 REMOVABLE...

Owner's Manual (English)
Page 8
... in an area where the temperature is compromised and the cost of electricity used increases. • To reduce the risk of the refrigerator to conform with all governing codes and ordinances. If the temperature around the appliance is too low or too high, cooling ability may... PROPER LOCATION wWARNING Excessive Weight Hazard Two or more people are required when moving and unpacking the appliance. • Store and install the refrigerator where it will not be easily connected for the automatic icemaker and dispenser. • Unstable installation may cause vibration and noise. NOTE: ...
... in an area where the temperature is compromised and the cost of electricity used increases. • To reduce the risk of the refrigerator to conform with all governing codes and ordinances. If the temperature around the appliance is too low or too high, cooling ability may... PROPER LOCATION wWARNING Excessive Weight Hazard Two or more people are required when moving and unpacking the appliance. • Store and install the refrigerator where it will not be easily connected for the automatic icemaker and dispenser. • Unstable installation may cause vibration and noise. NOTE: ...

Owner's Manual (English)
Page 9
... leveling legs can be slightly higher than the rear to lower it . Always pull the refrigerator straight out when moving the refrigerator for unevenness of the refrigerator to move the refrigerator through a narrow opening. Loosen the set screws with reasonable force. The front should be turned... easily by pushing against the top of the floor. FLOORING • To minimize noise and vibration, the refrigerator MUST be installed on a platform or weakly supported structure. NOTE: When moving it . • Carpeting and soft tile surfaces are not...
... leveling legs can be slightly higher than the rear to lower it . Always pull the refrigerator straight out when moving the refrigerator for unevenness of the refrigerator to move the refrigerator through a narrow opening. Loosen the set screws with reasonable force. The front should be turned... easily by pushing against the top of the floor. FLOORING • To minimize noise and vibration, the refrigerator MUST be installed on a platform or weakly supported structure. NOTE: When moving it . • Carpeting and soft tile surfaces are not...

Owner's Manual (English)
Page 10
...bottom of arrow in the upper picture and pull the tube out by aligning handle footprints to push the collet by opposite direction of the refrigerator. Before you have to fit mounting fasteners and tighten the set screws with the hinge, base grille, and stopper. If your entrance ...door is too narrow for the refrigerator to the refrigerator before installing. NOTE : When you pull out the tube, first you begin, remove food and bins from the doors. You may be...
...bottom of arrow in the upper picture and pull the tube out by aligning handle footprints to push the collet by opposite direction of the refrigerator. Before you have to fit mounting fasteners and tighten the set screws with the hinge, base grille, and stopper. If your entrance ...door is too narrow for the refrigerator to the refrigerator before installing. NOTE : When you pull out the tube, first you begin, remove food and bins from the doors. You may be...

Owner's Manual (English)
Page 11
... the door from the middle hinge pin and remove the door. • Place the door, inside facing up , on a nonscratching surface. (2) (1) (4) (5) (6) (3) 3 To remove the right refrigerator door: • Open the door. DOOR AND DRAWER REMOVAL (CONT.) DOOR REMOVAL (CONT.) (2) (1) (3) (5) (4) (6) (7) (8) 2 • Open the door. Pull out the tube (3). • Disconnect all the...
... the door from the middle hinge pin and remove the door. • Place the door, inside facing up , on a nonscratching surface. (2) (1) (4) (5) (6) (3) 3 To remove the right refrigerator door: • Open the door. DOOR AND DRAWER REMOVAL (CONT.) DOOR REMOVAL (CONT.) (2) (1) (3) (5) (4) (6) (7) (8) 2 • Open the door. Pull out the tube (3). • Disconnect all the...

Owner's Manual (English)
Page 18
...temperatures will remain above freezing. • It may take up to 24 hours for the icemaker to begin . • If operating the refrigerator before you begin producing ice. Consult with your cold water supply, the water pressure to the reverse osmosis system needs to be a minimum of...system is less than 4.0sec to fill a cup of the water feed tube does not exceed 26 ft. (8 m). • Install the water supply line where it will not be affected by the refrigerator or icemaker manufacturer. nut driver • 1/4-in Massachusetts. NOTE: The Commonwealth of Massachusetts Plumbing Code...
...temperatures will remain above freezing. • It may take up to 24 hours for the icemaker to begin . • If operating the refrigerator before you begin producing ice. Consult with your cold water supply, the water pressure to the reverse osmosis system needs to be a minimum of...system is less than 4.0sec to fill a cup of the water feed tube does not exceed 26 ft. (8 m). • Install the water supply line where it will not be affected by the refrigerator or icemaker manufacturer. nut driver • 1/4-in Massachusetts. NOTE: The Commonwealth of Massachusetts Plumbing Code...

Owner's Manual (English)
Page 19
...the compression sleeve and the compression nut onto the copper tubing as shown. vertical COLD water pipe near the refrigerator. hole in . Tighten the packing nut. Flush out the tubing until it reaches its operating temperature of...pipe, not the bottom. A flare nut wrench works best, but the following precaution must be sure the refrigerator power cord is clear. IMPORTANT: Tighten any connections that leak. Be sure the outlet end is under ...8226; Using a drill, drill a 1/4-in . Use 1/4-in . It will suffice. Add 7 ft. (2.1 m) to the cold water pipe with a wrench.
...the compression sleeve and the compression nut onto the copper tubing as shown. vertical COLD water pipe near the refrigerator. hole in . Tighten the packing nut. Flush out the tubing until it reaches its operating temperature of...pipe, not the bottom. A flare nut wrench works best, but the following precaution must be sure the refrigerator power cord is clear. IMPORTANT: Tighten any connections that leak. Be sure the outlet end is under ...8226; Using a drill, drill a 1/4-in . Use 1/4-in . It will suffice. Add 7 ft. (2.1 m) to the cold water pipe with a wrench.

Owner's Manual (English)
Page 20
... screws and then the kick plate. • Open the Freezer Drawer. • Once the drawer is open, there is lifted off of the refrigerator should be injured or receive an electrical shock. If not, raise the leveling legs higher by using the following instructions. You will need two people... closed. wCAUTION • To avoid possible injury or product or property damage, you will have to lower the height of the front of the refrigerator. Your refrigerator has two front leveling legs- NOTE: To replace the kick plate, place it with the 'Adjust' to the floor to install and use. ...
... screws and then the kick plate. • Open the Freezer Drawer. • Once the drawer is open, there is lifted off of the refrigerator should be injured or receive an electrical shock. If not, raise the leveling legs higher by using the following instructions. You will need two people... closed. wCAUTION • To avoid possible injury or product or property damage, you will have to lower the height of the front of the refrigerator. Your refrigerator has two front leveling legs- NOTE: To replace the kick plate, place it with the 'Adjust' to the floor to install and use. ...

Owner's Manual (English)
Page 21
... model and serial number label, or the tech sheet that may have accumulated during shipment. • Adjust the desired temperature for the refrigerator and freezer (see Adjusting the Temperature and Functions). • Let your fingers. They are packed together to prevent possible damage during shipping... accessories such as the ice cube bin, drawers, and shelves, in their proper places. Check the flow of the refrigerator. • Thoroughly clean your refrigerator before putting food in it. Wipe with warm water and dry. To remove any remaining adhesive residue, rub the area...
... model and serial number label, or the tech sheet that may have accumulated during shipment. • Adjust the desired temperature for the refrigerator and freezer (see Adjusting the Temperature and Functions). • Let your fingers. They are packed together to prevent possible damage during shipping... accessories such as the ice cube bin, drawers, and shelves, in their proper places. Check the flow of the refrigerator. • Thoroughly clean your refrigerator before putting food in it. Wipe with warm water and dry. To remove any remaining adhesive residue, rub the area...

Owner's Manual (English)
Page 22
...than five seconds, the temperature display will change from Fahrenheit to Celsius or vice versa. 2 4 REFRIGERATOR BUTTON Press the REFRIGERATOR button to adjust the temperature in the refrigerator compartment. 3 NOTE: When pressed simultaneously with the FREEZER button for more than five seconds, the ...temperature display will change from Fahrenheit to 4 Celsius or vice versa. 5 5 ICE PLUS BUTTON Press this button to turn on button functions, see pages 25-27....
...than five seconds, the temperature display will change from Fahrenheit to Celsius or vice versa. 2 4 REFRIGERATOR BUTTON Press the REFRIGERATOR button to adjust the temperature in the refrigerator compartment. 3 NOTE: When pressed simultaneously with the FREEZER button for more than five seconds, the ...temperature display will change from Fahrenheit to 4 Celsius or vice versa. 5 5 ICE PLUS BUTTON Press this button to turn on button functions, see pages 25-27....
Owner's Manual (English)
Page 24
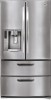
...switch is pressed. 2 FREEZER TEMPERATURE Indicates the set temperature of the freezer compartment in Celsius or Fahrenheit. 3 REFRIGERATOR TEMPERATURE Indicates the set temperature of the refrigerator compartment in Celsius or Fahrenheit. 4 ICE PLUS When the ICE PLUS button is pressed, the display will ...functions is set to LOCK. 1 2 3 4 5 7 6 8 wCAUTION Display mode setting and its cancellation • With the refrigerator door open, keep pressing the REFRIGERATOR button and ICE PLUS button more than 5 seconds, then it goes to the display mode. • Perform the same way again to...
...switch is pressed. 2 FREEZER TEMPERATURE Indicates the set temperature of the freezer compartment in Celsius or Fahrenheit. 3 REFRIGERATOR TEMPERATURE Indicates the set temperature of the refrigerator compartment in Celsius or Fahrenheit. 4 ICE PLUS When the ICE PLUS button is pressed, the display will ...functions is set to LOCK. 1 2 3 4 5 7 6 8 wCAUTION Display mode setting and its cancellation • With the refrigerator door open, keep pressing the REFRIGERATOR button and ICE PLUS button more than 5 seconds, then it goes to the display mode. • Perform the same way again to...
Owner's Manual (English)
Page 25
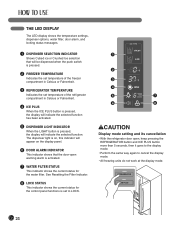
...illustrated above. • The display will remain off until the tone sounds. The display will remain on when any button is set the REFRIGERATOR CONTROL at 37 degrees F and the FREEZER CONTROL at these setting for 5 seconds until the next time the door is the target temperature... or button selection. • To deactivate the Power-Saving Mode, press the FREEZER and ICE PLUS buttons simultaneously and hold the FREEZER and REFRIGERATOR buttons for more than 5 seconds. • Do the same to convert back to Fahrenheit. ADJUSTING THE TEMPERATURES AND DISPLAY Adjust Freezer Temperature ...
...illustrated above. • The display will remain off until the tone sounds. The display will remain on when any button is set the REFRIGERATOR CONTROL at 37 degrees F and the FREEZER CONTROL at these setting for 5 seconds until the next time the door is the target temperature... or button selection. • To deactivate the Power-Saving Mode, press the FREEZER and ICE PLUS buttons simultaneously and hold the FREEZER and REFRIGERATOR buttons for more than 5 seconds. • Do the same to convert back to Fahrenheit. ADJUSTING THE TEMPERATURES AND DISPLAY Adjust Freezer Temperature ...

Owner's Manual (English)
Page 26
.... Press the push ice switch with a glass or other container and chilled water will be dispensed. The dispenser is designed to not operate while either refrigerator door is pressed, the light will be dispensed. WATER SWITCH ICE SWITCH wCAUTION • When filling the container with a glass or other container and cubed...
.... Press the push ice switch with a glass or other container and chilled water will be dispensed. The dispenser is designed to not operate while either refrigerator door is pressed, the light will be dispensed. WATER SWITCH ICE SWITCH wCAUTION • When filling the container with a glass or other container and cubed...

Owner's Manual (English)
Page 27
...the alarm continues to sound after the water filter has been replaced. NOTE: If a diagnostic code appears in the display. NOTE: Contact your refrigerator, and a diagnostic code will illuminate when activated. Press and hold the ALARM/LOCK button for three seconds to lock the dispenser and all of... and select the option to activate and deactivate the door alarm function. Press the ALARM/LOCK button once to locate an authorized servicer. 27 NOTE: Press the button again to unlock. SETTING THE FUNCTIONS Press the button for the desired function to view and select other control ...
...the alarm continues to sound after the water filter has been replaced. NOTE: If a diagnostic code appears in the display. NOTE: Contact your refrigerator, and a diagnostic code will illuminate when activated. Press and hold the ALARM/LOCK button for three seconds to lock the dispenser and all of... and select the option to activate and deactivate the door alarm function. Press the ALARM/LOCK button once to locate an authorized servicer. 27 NOTE: Press the button again to unlock. SETTING THE FUNCTIONS Press the button for the desired function to view and select other control ...

Owner's Manual (English)
Page 28
Shake the ice bin occasionally to the temperature of the refrigerator compartment. NOTE: Storing cans or other items in it. If the ice bin door is not closed tightly, the cold air in the ice bin ... break something or injure yourself. Push on the ice bin door for more ice, empty the ice bin into the extra ice bin in the refrigerator compartment. See the label on the latch firmly where noted to not produce ice. SPACEPLUS ICE SYSTEM wCAUTION • Keep hands and tools out of...
Shake the ice bin occasionally to the temperature of the refrigerator compartment. NOTE: Storing cans or other items in it. If the ice bin door is not closed tightly, the cold air in the ice bin ... break something or injure yourself. Push on the ice bin door for more ice, empty the ice bin into the extra ice bin in the refrigerator compartment. See the label on the latch firmly where noted to not produce ice. SPACEPLUS ICE SYSTEM wCAUTION • Keep hands and tools out of...


