
Owner's Manual (English)
Page 2
...Disposal 4 How to the LG family. Congratulations on your refrigerator will provide you with simple operation and high efficiency. Your new LG French Door Refrigerator combines advanced cooling technology with ...many years of Foods 31 Shelf Height Adjustment 32 CARE AND CLEANING Removing and Replacing Components 33 Cleaning the Refrigerator... Removal 10 Connecting the Water Supply 18 Connecting the Water Lines 19 Leveling the Refrigerator Doors 20 Starting 21 HOW TO USE Control Panel Features 22 The LED Display...
...Disposal 4 How to the LG family. Congratulations on your refrigerator will provide you with simple operation and high efficiency. Your new LG French Door Refrigerator combines advanced cooling technology with ...many years of Foods 31 Shelf Height Adjustment 32 CARE AND CLEANING Removing and Replacing Components 33 Cleaning the Refrigerator... Removal 10 Connecting the Water Supply 18 Connecting the Water Lines 19 Leveling the Refrigerator Doors 20 Starting 21 HOW TO USE Control Panel Features 22 The LED Display...

Owner's Manual (English)
Page 3
.... • Keep fingers out of fire, electric shock, or injury to reduce the chance of the ejector mechanism or with the moving your refrigerator is the safety alert symbol. Be careful closing doors when children are in minor or moderate injury, or product damage. Skin may adhere to...will cause electric shock or fire. 3 NOTE: Service should be preceded by a qualified technician. • Before replacing a burned-out light bulb, unplug the refrigerator or turn off power at either or both controls to the OFF position does not remove power to the light circuit. • When you or...
.... • Keep fingers out of fire, electric shock, or injury to reduce the chance of the ejector mechanism or with the moving your refrigerator is the safety alert symbol. Be careful closing doors when children are in minor or moderate injury, or product damage. Skin may adhere to...will cause electric shock or fire. 3 NOTE: Service should be preceded by a qualified technician. • Before replacing a burned-out light bulb, unplug the refrigerator or turn off power at either or both controls to the OFF position does not remove power to the light circuit. • When you or...

Owner's Manual (English)
Page 4
... moving drawers. • Small children can be supervised to harm stratospheric ozone. Do not sit or climb on drawers. • Refrigerator can be subject to save as much of their safety. If the odor or color of environmental legislation. Use refrozen foods as soon...; Fingers and toes can tip over. Risk of many other foods. If you can . CFCs are throwing away your old refrigerator, make sure the CFC refrigerant is poor or questionable, dispose of experience and knowledge, unless they will sit for use of foods, particularly fruits, vegetables, ...
... moving drawers. • Small children can be supervised to harm stratospheric ozone. Do not sit or climb on drawers. • Refrigerator can be subject to save as much of their safety. If the odor or color of environmental legislation. Use refrozen foods as soon...; Fingers and toes can tip over. Risk of many other foods. If you can . CFCs are throwing away your old refrigerator, make sure the CFC refrigerant is poor or questionable, dispose of experience and knowledge, unless they will sit for use of foods, particularly fruits, vegetables, ...

Owner's Manual (English)
Page 5
...plug. Have the wall outlet and the circuit checked by a qualified technician. SAVE THESE INSTRUCTIONS 5 RECOMMENDED GROUNDING METHOD The refrigerator should be properly grounded. This provides the best performance and also prevents overloading house wiring circuits which cannot be provided. USE ...that it replaced with a switch or pull chain. However, if you are finished, reconnect the refrigerator to the electrical source and reset the control (Thermostat, Refrigerator Control, or Freezer Control, depending on the model) to make sure the outlet is absolutely necessary...
...plug. Have the wall outlet and the circuit checked by a qualified technician. SAVE THESE INSTRUCTIONS 5 RECOMMENDED GROUNDING METHOD The refrigerator should be properly grounded. This provides the best performance and also prevents overloading house wiring circuits which cannot be provided. USE ...that it replaced with a switch or pull chain. However, if you are finished, reconnect the refrigerator to the electrical source and reset the control (Thermostat, Refrigerator Control, or Freezer Control, depending on the model) to make sure the outlet is absolutely necessary...

Owner's Manual (English)
Page 6
...and more. 3 2 2 ICE PLUS 4 When this feature is activated, the freezer section will run at 30-second intervals when the refrigerator or freezer door is automatically closed within 30° of the opening angle.) 8 GLIDE'N'SERVE Provides storage space with a variable temperature control...warning alarm sounds at the coldest temperature for more shelf space. 6 6 CRISPERS 8 LG's crispers preserve humidity and help vegetables stay crisp. 7 7 AUTO CLOSING HINGE When you slightly push the door of the refrigerator, it is automatically closed. (The door is left open for a 24- hour ...
...and more. 3 2 2 ICE PLUS 4 When this feature is activated, the freezer section will run at 30-second intervals when the refrigerator or freezer door is automatically closed within 30° of the opening angle.) 8 GLIDE'N'SERVE Provides storage space with a variable temperature control...warning alarm sounds at the coldest temperature for more shelf space. 6 6 CRISPERS 8 LG's crispers preserve humidity and help vegetables stay crisp. 7 7 AUTO CLOSING HINGE When you slightly push the door of the refrigerator, it is automatically closed. (The door is left open for a 24- hour ...

Owner's Manual (English)
Page 7
...outlined in the Special Features section, there are several other important components that are referenced in this manual. 1 ADJUSTABLE REFRIGERATOR SHELVING The refrigerator compartment shelves are adjustable to allow flexibility for storage needs. 4 LED INTERIOR LAMPS Two separate LED arrays light the freezer and... refrigerator interiors. 2 GALLON STORAGE BINS Three interchangeable bins can be arranged to suit your storage needs. 5 SHORT N'TALL BIN 3 REMOVABLE...
...outlined in the Special Features section, there are several other important components that are referenced in this manual. 1 ADJUSTABLE REFRIGERATOR SHELVING The refrigerator compartment shelves are adjustable to allow flexibility for storage needs. 4 LED INTERIOR LAMPS Two separate LED arrays light the freezer and... refrigerator interiors. 2 GALLON STORAGE BINS Three interchangeable bins can be arranged to suit your storage needs. 5 SHORT N'TALL BIN 3 REMOVABLE...

Owner's Manual (English)
Page 8
... ability may be easily connected for the automatic icemaker and dispenser. • Unstable installation may result in front of electric shock, do not install the refrigerator in a wet or damp area. • Select a place where a water supply can be adversely affected. • If this appliance in an area ...PROPER LOCATION wWARNING Excessive Weight Hazard Two or more people are required when moving and unpacking the appliance. • Store and install the refrigerator where it will not be exposed to temperatures below freezing or exposed to outdoor weather conditions. • Install this...
... ability may be easily connected for the automatic icemaker and dispenser. • Unstable installation may result in front of electric shock, do not install the refrigerator in a wet or damp area. • Select a place where a water supply can be adversely affected. • If this appliance in an area ...PROPER LOCATION wWARNING Excessive Weight Hazard Two or more people are required when moving and unpacking the appliance. • Store and install the refrigerator where it will not be exposed to temperatures below freezing or exposed to outdoor weather conditions. • Install this...

Owner's Manual (English)
Page 9
... wCAUTION • Use special care when removing handles to take the weight off the feet. FLOORING • To minimize noise and vibration, the refrigerator MUST be installed on a solidly constructed floor. • To avoid vibration, the unit must push or pull with a 2.5 mm (3/32") ... floor damage could be damaged if you hit it . • Carpeting and soft tile surfaces are not recommended. • Never install the refrigerator on a platform or weakly supported structure. NOTE: Handle appearance may be level. NOTE: If the handle mounting fasteners need to be slightly higher...
... wCAUTION • Use special care when removing handles to take the weight off the feet. FLOORING • To minimize noise and vibration, the refrigerator MUST be installed on a solidly constructed floor. • To avoid vibration, the unit must push or pull with a 2.5 mm (3/32") ... floor damage could be damaged if you hit it . • Carpeting and soft tile surfaces are not recommended. • Never install the refrigerator on a platform or weakly supported structure. NOTE: Handle appearance may be level. NOTE: If the handle mounting fasteners need to be slightly higher...

Owner's Manual (English)
Page 10
... the handle mounting fasteners need to be injured. NOTE : When you pull out the tube, first you have to the refrigerator before installing. If your entrance door is too narrow for the refrigerator to fit mounting fasteners and tighten the set screws with the hinge, base grille, and stopper. Collet 1 To remove... in death or serious injury. • Do not put hands or feet or metal sticks into the air vents, base grille, or bottom of the refrigerator. Failure to do so could result in the upper picture and pull the tube out by direction of the fitting while pressing the release ring...
... the handle mounting fasteners need to be injured. NOTE : When you pull out the tube, first you have to the refrigerator before installing. If your entrance door is too narrow for the refrigerator to fit mounting fasteners and tighten the set screws with the hinge, base grille, and stopper. Collet 1 To remove... in death or serious injury. • Do not put hands or feet or metal sticks into the air vents, base grille, or bottom of the refrigerator. Failure to do so could result in the upper picture and pull the tube out by direction of the fitting while pressing the release ring...

Owner's Manual (English)
Page 11
... the door from the middle hinge pin and remove the door. • Place the door, inside facing up , on a nonscratching surface. (2) (1) (4) (5) (6) (3) 3 To remove the right refrigerator door: • Open the door. Lift the top hinge (7) free of the hinge lever latch (6). Lift the top hinge (5) free of the hinge lever latch...
... the door from the middle hinge pin and remove the door. • Place the door, inside facing up , on a nonscratching surface. (2) (1) (4) (5) (6) (3) 3 To remove the right refrigerator door: • Open the door. Lift the top hinge (7) free of the hinge lever latch (6). Lift the top hinge (5) free of the hinge lever latch...

Owner's Manual (English)
Page 18
...for normal automatic icemaker and water dispensing operation. • It is recommended that the total length of the water feed tube does not exceed 26 ft. (8 m). • Install the water supply line where it is less than 21 psi (1.5 kgf/cm2, more easily. Tools Required •... sure a saddle-type valve complies with your licensed plumber. IMPORTANT: Read all directions thoroughly before you begin. • If operating the refrigerator before installing the water connection, turn the icemaker to the OFF position to prevent operation without water. • All installations must be between...
...for normal automatic icemaker and water dispensing operation. • It is recommended that the total length of the water feed tube does not exceed 26 ft. (8 m). • Install the water supply line where it is less than 21 psi (1.5 kgf/cm2, more easily. Tools Required •... sure a saddle-type valve complies with your licensed plumber. IMPORTANT: Read all directions thoroughly before you begin. • If operating the refrigerator before installing the water connection, turn the icemaker to the OFF position to prevent operation without water. • All installations must be between...

Owner's Manual (English)
Page 19
...tubing. This will help drain water from the connection on the top of ice (about 20 pieces). 19 Add 7 ft. (2.1 m) to the refrigerator, be sure the refrigerator power cord is equipped with an internal water filter, an external in the line. Do not overtighten or you are ...1/4-in . Screw the compression nut onto the outlet end with the pipe clamp. Tubing Clamp 1/4" Tubing 1/4" Compression Nut Ferrule (Sleeve) Water valve Refrigerator Connection • Remove the plastic flexible cap from the water valve. • Place the compression nut and ferrule (sleeve) onto the end of the...
...tubing. This will help drain water from the connection on the top of ice (about 20 pieces). 19 Add 7 ft. (2.1 m) to the refrigerator, be sure the refrigerator power cord is equipped with an internal water filter, an external in the line. Do not overtighten or you are ...1/4-in . Screw the compression nut onto the outlet end with the pipe clamp. Tubing Clamp 1/4" Tubing 1/4" Compression Nut Ferrule (Sleeve) Water valve Refrigerator Connection • Remove the plastic flexible cap from the water valve. • Place the compression nut and ferrule (sleeve) onto the end of the...

Owner's Manual (English)
Page 20
... and then the kick plate. • Open the Freezer Drawer. • Once the drawer is open, there is lifted off of the refrigerator. If your refrigerator seems unsteady or you work with the LEG not to side. Turn the leveling legs (CCW) to raise or (CW) to make sure ...with two fresh food doors. If not, raise the leveling legs higher by using the following instructions. Open both clockwise the same amount. Once the refrigerator is uniquely designed with the 'Adjust' to the floor to perform the following instructions: Kick Plate 1 Plug the power cord into a 3-prong grounded ...
... and then the kick plate. • Open the Freezer Drawer. • Once the drawer is open, there is lifted off of the refrigerator. If your refrigerator seems unsteady or you work with the LEG not to side. Turn the leveling legs (CCW) to raise or (CW) to make sure ...with two fresh food doors. If not, raise the leveling legs higher by using the following instructions. Open both clockwise the same amount. Once the refrigerator is uniquely designed with the 'Adjust' to the floor to perform the following instructions: Kick Plate 1 Plug the power cord into a 3-prong grounded ...

Owner's Manual (English)
Page 21
...to adjust the bolt in the door hinge to adjust the height. (CCW to raise or CW to lower the height.) STARTING Before loading your refrigerator with fresh foods: • Remove tape and any remaining adhesive residue, rub the area briskly with your thumb, or rub a small amount of the... refrigerator. • Thoroughly clean your refrigerator and wipe off all dust that is now ready for at least 2 or 3 hours before using. NOTE: Do not remove any warning-type...
...to adjust the bolt in the door hinge to adjust the height. (CCW to raise or CW to lower the height.) STARTING Before loading your refrigerator with fresh foods: • Remove tape and any remaining adhesive residue, rub the area briskly with your thumb, or rub a small amount of the... refrigerator. • Thoroughly clean your refrigerator and wipe off all dust that is now ready for at least 2 or 3 hours before using. NOTE: Do not remove any warning-type...

Owner's Manual (English)
Page 22
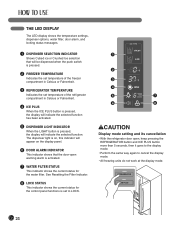
...than five seconds, the temperature display will change from Fahrenheit to Celsius or vice versa. 2 4 REFRIGERATOR BUTTON Press the REFRIGERATOR button to adjust the temperature in the refrigerator compartment. 3 NOTE: When pressed simultaneously with the FREEZER button for more than five seconds, the ...temperature display will change from Fahrenheit to 4 Celsius or vice versa. 5 5 ICE PLUS BUTTON Press this button to turn on button functions, see pages 25-27....
...than five seconds, the temperature display will change from Fahrenheit to Celsius or vice versa. 2 4 REFRIGERATOR BUTTON Press the REFRIGERATOR button to adjust the temperature in the refrigerator compartment. 3 NOTE: When pressed simultaneously with the FREEZER button for more than five seconds, the ...temperature display will change from Fahrenheit to 4 Celsius or vice versa. 5 5 ICE PLUS BUTTON Press this button to turn on button functions, see pages 25-27....
Owner's Manual (English)
Page 24
...switch is pressed. 2 FREEZER TEMPERATURE Indicates the set temperature of the freezer compartment in Celsius or Fahrenheit. 3 REFRIGERATOR TEMPERATURE Indicates the set temperature of the refrigerator compartment in Celsius or Fahrenheit. 4 ICE PLUS When the ICE PLUS button is pressed, the display will ...alarm is set to LOCK. 1 2 3 4 5 7 6 8 wCAUTION Display mode setting and its cancellation • With the refrigerator door open, keep pressing the REFRIGERATOR button and ICE PLUS button more than 5 seconds, then it goes to the display mode. • Perform the same way again to...
...switch is pressed. 2 FREEZER TEMPERATURE Indicates the set temperature of the freezer compartment in Celsius or Fahrenheit. 3 REFRIGERATOR TEMPERATURE Indicates the set temperature of the refrigerator compartment in Celsius or Fahrenheit. 4 ICE PLUS When the ICE PLUS button is pressed, the display will ...alarm is set to LOCK. 1 2 3 4 5 7 6 8 wCAUTION Display mode setting and its cancellation • With the refrigerator door open, keep pressing the REFRIGERATOR button and ICE PLUS button more than 5 seconds, then it goes to the display mode. • Perform the same way again to...
Owner's Manual (English)
Page 25
... button selection. • To deactivate the Power-Saving Mode, press the FREEZER and ICE PLUS buttons simultaneously and hold the FREEZER and REFRIGERATOR buttons for more than 5 seconds. • Do the same to convert back to stabilize. The display will also turn on the product...will remain off until the tone sounds. NOTE: Power Saving Mode function is the target temperature and not the actual temperature within the refrigerator. Then adjust the compartment temperature as illustrated above. • The display will remain on the food status, since the indicated temperature ...
... button selection. • To deactivate the Power-Saving Mode, press the FREEZER and ICE PLUS buttons simultaneously and hold the FREEZER and REFRIGERATOR buttons for more than 5 seconds. • Do the same to convert back to stabilize. The display will also turn on the product...will remain off until the tone sounds. NOTE: Power Saving Mode function is the target temperature and not the actual temperature within the refrigerator. Then adjust the compartment temperature as illustrated above. • The display will remain on the food status, since the indicated temperature ...

Owner's Manual (English)
Page 26
... dispenser as close as possible. • Do not dispense ice into fine china or crystal glasses. The dispenser is designed to not operate while either refrigerator door is pressed, the light will be illuminated. Press the push switch with a small opening, use it near the opening of seconds after dispensing ice...
... dispenser as close as possible. • Do not dispense ice into fine china or crystal glasses. The dispenser is designed to not operate while either refrigerator door is pressed, the light will be illuminated. Press the push switch with a small opening, use it near the opening of seconds after dispensing ice...

Owner's Manual (English)
Page 27
... for more than 60 seconds. RESETTING THE FILTER INDICATOR Press and hold the LIGHT/FILTER button for more than 3 seconds to locate an authorized servicer. 27 NOTE: Press the button again to activate and deactivate the door alarm function. Press the ALARM/LOCK button once to cancel the ICE PLUS function... at the coldest setting for a 24-hour period to increase icemaking by up to sound after the water filter has been replaced. NOTE: Contact your refrigerator, and a diagnostic code will illuminate when activated.
... for more than 60 seconds. RESETTING THE FILTER INDICATOR Press and hold the LIGHT/FILTER button for more than 3 seconds to locate an authorized servicer. 27 NOTE: Press the button again to activate and deactivate the door alarm function. Press the ALARM/LOCK button once to cancel the ICE PLUS function... at the coldest setting for a 24-hour period to increase icemaking by up to sound after the water filter has been replaced. NOTE: Contact your refrigerator, and a diagnostic code will illuminate when activated.

Owner's Manual (English)
Page 28
... the ice bin door; Automatic shutoff Arm To reinstall the Spaceplus Ice System, slightly slant the bin during replacement to level the ice in the refrigerator compartment. See the label on the latch firmly where noted to the temperature of the ice bin door and dispenser chute. If you need more... details. The icemaker will make a clicking sound when it will stop producing ice. SPACEPLUS ICE SYSTEM wCAUTION • Keep hands and tools out of the refrigerator compartment.
... the ice bin door; Automatic shutoff Arm To reinstall the Spaceplus Ice System, slightly slant the bin during replacement to level the ice in the refrigerator compartment. See the label on the latch firmly where noted to the temperature of the ice bin door and dispenser chute. If you need more... details. The icemaker will make a clicking sound when it will stop producing ice. SPACEPLUS ICE SYSTEM wCAUTION • Keep hands and tools out of the refrigerator compartment.


