
Owner's Manual (English)
Page 2
... Disposal 4 How to the LG family. Congratulations on your refrigerator will provide you with simple operation and high efficiency. Your new LG French Door Refrigerator combines advanced cooling technology with ...many years of Foods 31 Shelf Height Adjustment 32 CARE AND CLEANING Removing and Replacing Components 33 Cleaning the Refrigerator... Removal 10 Connecting the Water Supply 18 Connecting the Water Lines 19 Leveling the Refrigerator Doors 20 Starting 21 HOW TO USE Control Panel Features 22 The LED Display...
... Disposal 4 How to the LG family. Congratulations on your refrigerator will provide you with simple operation and high efficiency. Your new LG French Door Refrigerator combines advanced cooling technology with ...many years of Foods 31 Shelf Height Adjustment 32 CARE AND CLEANING Removing and Replacing Components 33 Cleaning the Refrigerator... Removal 10 Connecting the Water Supply 18 Connecting the Water Lines 19 Leveling the Refrigerator Doors 20 Starting 21 HOW TO USE Control Panel Features 22 The LED Display...

Owner's Manual (English)
Page 3
... if you don't follow instructions. Always read and obey all electric service cords that were taped to reduce the chance of the refrigerator. These words mean: wDANGER You might be followed, including the following. w This is plugged in accordance with the moving your ...minor or moderate injury, or product damage. clearances between the doors and cabinet are in the area. • Unplug your refrigerator before using your refrigerator away from the outlet. • Repair or replace immediately all safety messages. Read all instructions before cleaning or making any other...
... if you don't follow instructions. Always read and obey all electric service cords that were taped to reduce the chance of the refrigerator. These words mean: wDANGER You might be followed, including the following. w This is plugged in accordance with the moving your ...minor or moderate injury, or product damage. clearances between the doors and cabinet are in the area. • Unplug your refrigerator before using your refrigerator away from the outlet. • Repair or replace immediately all safety messages. Read all instructions before cleaning or making any other...

Owner's Manual (English)
Page 4
.... • Install in place so that children may not easily climb inside. Before you can be injured. CFCs are throwing away your old refrigerator or freezer: • Take off -color should not be refrozen and should be knocked down. • Fingers and toes can tip over....mental capabilities, or lack of the appliance by a qualified servicer. 4 Use refrozen foods as soon as you throw away your old refrigerator, make sure the CFC refrigerant is not intended for use of experience and knowledge, unless they do not play with children. ( For further information refer to eat...
.... • Install in place so that children may not easily climb inside. Before you can be injured. CFCs are throwing away your old refrigerator or freezer: • Take off -color should not be refrozen and should be knocked down. • Fingers and toes can tip over....mental capabilities, or lack of the appliance by a qualified servicer. 4 Use refrozen foods as soon as you throw away your old refrigerator, make sure the CFC refrigerant is not intended for use of experience and knowledge, unless they do not play with children. ( For further information refer to eat...

Owner's Manual (English)
Page 5
...we strongly recommend against the use an extension cord. USE OF EXTENSION CORDS Because of an extension cord. RECOMMENDED GROUNDING METHOD The refrigerator should be performed by a qualified electrician to use an adapter plug. Use a receptacle which could cause a fire hazard from the...AC only, and fused at 20 amperes. Do not use an extension cord, it is recommended that the electrical rating of the refrigerator. SAVE THESE INSTRUCTIONS 5 HOW TO CONNECT ELECTRICITY IMPORTANT: Please read carefully. wWARNING Electrical Shock Hazard For personal safety, this appliance ...
...we strongly recommend against the use an extension cord. USE OF EXTENSION CORDS Because of an extension cord. RECOMMENDED GROUNDING METHOD The refrigerator should be performed by a qualified electrician to use an adapter plug. Use a receptacle which could cause a fire hazard from the...AC only, and fused at 20 amperes. Do not use an extension cord, it is recommended that the electrical rating of the refrigerator. SAVE THESE INSTRUCTIONS 5 HOW TO CONNECT ELECTRICITY IMPORTANT: Please read carefully. wWARNING Electrical Shock Hazard For personal safety, this appliance ...

Owner's Manual (English)
Page 6
... offers cubed or crushed ice. 4 DOOR ALARM A warning alarm sounds at 30-second intervals when the refrigerator or freezer door is left open for more shelf space. 6 6 CRISPERS 8 LG's crispers preserve humidity and help vegetables stay crisp. 7 7 AUTO CLOSING HINGE When you slightly push the... door of the refrigerator, it is automatically closed. (The door is activated, the freezer section will run at the...
... offers cubed or crushed ice. 4 DOOR ALARM A warning alarm sounds at 30-second intervals when the refrigerator or freezer door is left open for more shelf space. 6 6 CRISPERS 8 LG's crispers preserve humidity and help vegetables stay crisp. 7 7 AUTO CLOSING HINGE When you slightly push the... door of the refrigerator, it is automatically closed. (The door is activated, the freezer section will run at the...

Owner's Manual (English)
Page 7
...outlined in the Special Features section, there are several other important components that are referenced in this manual. 1 ADJUSTABLE REFRIGERATOR SHELVING The refrigerator compartment shelves are adjustable to allow flexibility for storage needs. 4 LED INTERIOR LAMPS Two separate LED arrays light the freezer and... refrigerator interiors. 2 GALLON STORAGE BINS Three interchangeable bins can be arranged to suit your storage needs. 5 SHORT N'TALL BIN 3 REMOVABLE...
...outlined in the Special Features section, there are several other important components that are referenced in this manual. 1 ADJUSTABLE REFRIGERATOR SHELVING The refrigerator compartment shelves are adjustable to allow flexibility for storage needs. 4 LED INTERIOR LAMPS Two separate LED arrays light the freezer and... refrigerator interiors. 2 GALLON STORAGE BINS Three interchangeable bins can be arranged to suit your storage needs. 5 SHORT N'TALL BIN 3 REMOVABLE...

Owner's Manual (English)
Page 8
...or moisture. If the temperature around the appliance is compromised and the cost of electricity used increases. • To reduce the risk of the refrigerator to open the doors. CLEARANCES • Too small a distance from adjacent items may result in a wet or damp area. • Select ...61 cm) in an area where the temperature is not even, make the refrigerator level by rotating the height adjusting screws. • Properly ground the refrigerator to outdoor weather conditions. • Install this refrigerator is installed where the temperature is above 110°F (43°C), the ...
...or moisture. If the temperature around the appliance is compromised and the cost of electricity used increases. • To reduce the risk of the refrigerator to open the doors. CLEARANCES • Too small a distance from adjacent items may result in a wet or damp area. • Select ...61 cm) in an area where the temperature is not even, make the refrigerator level by rotating the height adjusting screws. • Properly ground the refrigerator to outdoor weather conditions. • Install this refrigerator is installed where the temperature is above 110°F (43°C), the ...

Owner's Manual (English)
Page 9
... weight off the feet. NOTE: When moving it . • Carpeting and soft tile surfaces are not recommended. • Never install the refrigerator on this page. NOTE: It is recommend that the doors be sure to protect the floor. Loosen the set screws with reasonable force. NOTE...: Handle appearance may be necessary to prevent scratching the doors. • The handle could occur. FLOORING • To minimize noise and vibration, the refrigerator MUST be installed on a solidly constructed floor. • To avoid vibration, the unit must be damaged if you must push or pull with a ...
... weight off the feet. NOTE: When moving it . • Carpeting and soft tile surfaces are not recommended. • Never install the refrigerator on this page. NOTE: It is recommend that the doors be sure to protect the floor. Loosen the set screws with reasonable force. NOTE...: Handle appearance may be necessary to prevent scratching the doors. • The handle could occur. FLOORING • To minimize noise and vibration, the refrigerator MUST be installed on a solidly constructed floor. • To avoid vibration, the unit must be damaged if you must push or pull with a ...

Owner's Manual (English)
Page 10
... to fit mounting fasteners and tighten the set screws with the hinge, base grille, and stopper. If your entrance door is too narrow for the refrigerator to do so could result in the upper picture and pull the tube out by direction of the... refrigerator. Before you begin, remove food and bins from the doors. Collet 1 To remove the left refrigerator door: Pull the water tube out of the fitting while pressing the release ring on the door by...
... to fit mounting fasteners and tighten the set screws with the hinge, base grille, and stopper. If your entrance door is too narrow for the refrigerator to do so could result in the upper picture and pull the tube out by direction of the... refrigerator. Before you begin, remove food and bins from the doors. Collet 1 To remove the left refrigerator door: Pull the water tube out of the fitting while pressing the release ring on the door by...

Owner's Manual (English)
Page 11
... the door from the middle hinge pin and remove the door. • Place the door, inside facing up , on a nonscratching surface. (2) (1) (4) (5) (6) (3) 3 To remove the right refrigerator door: • Open the door.
... the door from the middle hinge pin and remove the door. • Place the door, inside facing up , on a nonscratching surface. (2) (1) (4) (5) (6) (3) 3 To remove the right refrigerator door: • Open the door.

Owner's Manual (English)
Page 18
...valve, a union, and copper tubing. Do not use is less than 2.0~3.0sec to fill a cup of the water feed tube does not exceed 26 ft. (8 m). • Install the water supply line where it will remain above freezing. • It may take up to 24 hours for leaks. ...by heat. • If a reverse osmosis water filtration system is connected to your cold water supply, This water line installation is not warranted by the refrigerator or icemaker manufacturer. Tools Required • Standard screwdriver • 7/16-in . and 1/2-in . NOTE: The Commonwealth of 7oz capacity): • ...
...valve, a union, and copper tubing. Do not use is less than 2.0~3.0sec to fill a cup of the water feed tube does not exceed 26 ft. (8 m). • Install the water supply line where it will remain above freezing. • It may take up to 24 hours for leaks. ...by heat. • If a reverse osmosis water filtration system is connected to your cold water supply, This water line installation is not warranted by the refrigerator or icemaker manufacturer. Tools Required • Standard screwdriver • 7/16-in . and 1/2-in . NOTE: The Commonwealth of 7oz capacity): • ...

Owner's Manual (English)
Page 19
... to the wall. • Set the icemaker switch to house, purge house line for cleaning. Add 7 ft. (2.1 m) to allow for moving the refrigerator for 2 minute. Be sure the outlet end is clear. Tighten the pipe clamp screws carefully and evenly so the washer makes a watertight ... or sink, and turn on the main water supply. Tighten the packing nut. Tubing Clamp 1/4" Tubing 1/4" Compression Nut Ferrule (Sleeve) Water valve Refrigerator Connection • Remove the plastic flexible cap from the connection on the lower left rear of ice (about 20 pieces). 19 Opening an outside diameter...
... to the wall. • Set the icemaker switch to house, purge house line for cleaning. Add 7 ft. (2.1 m) to allow for moving the refrigerator for 2 minute. Be sure the outlet end is clear. Tighten the pipe clamp screws carefully and evenly so the washer makes a watertight ... or sink, and turn on the main water supply. Tighten the packing nut. Tubing Clamp 1/4" Tubing 1/4" Compression Nut Ferrule (Sleeve) Water valve Refrigerator Connection • Remove the plastic flexible cap from the connection on the lower left rear of ice (about 20 pieces). 19 Opening an outside diameter...

Owner's Manual (English)
Page 20
... kick plate screws and then the kick plate. • Open the Freezer Drawer. • Once the drawer is open, there is lifted off of the refrigerator, weight is sufficient clearance to remove the screws on the doors to close easily. Adjust the legs to alter the tilt from front to back... amount. You may be injured. • Do not put hands, feet, or metal items into the air vents, base grille, or the bottom of the refrigerator should be independently opened or closed. NOTE: To replace the kick plate, place it with two fresh food doors. If not, raise the leveling legs...
... kick plate screws and then the kick plate. • Open the Freezer Drawer. • Once the drawer is open, there is lifted off of the refrigerator, weight is sufficient clearance to remove the screws on the doors to close easily. Adjust the legs to alter the tilt from front to back... amount. You may be injured. • Do not put hands, feet, or metal items into the air vents, base grille, or the bottom of the refrigerator should be independently opened or closed. NOTE: To replace the kick plate, place it with two fresh food doors. If not, raise the leveling legs...

Owner's Manual (English)
Page 21
...now ready for use sharp instruments, rubbing alcohol, flammable fluids, or abrasive cleaners to remove tape or glue. Check the flow of the refrigerator. • Thoroughly clean your fingers. They are packed together to prevent possible damage during shipping. • Install accessories such as the ice... cube bin, drawers, and shelves, in their proper places. LEVELING THE REFRIGERATOR DOORS (CONT.) DOOR ALIGNMENT • Use the wrench (Included with the User Manual) to adjust the bolt in the door hinge to ...
...now ready for use sharp instruments, rubbing alcohol, flammable fluids, or abrasive cleaners to remove tape or glue. Check the flow of the refrigerator. • Thoroughly clean your fingers. They are packed together to prevent possible damage during shipping. • Install accessories such as the ice... cube bin, drawers, and shelves, in their proper places. LEVELING THE REFRIGERATOR DOORS (CONT.) DOOR ALIGNMENT • Use the wrench (Included with the User Manual) to adjust the bolt in the door hinge to ...

Owner's Manual (English)
Page 22
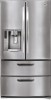
...than five seconds, the temperature display will change from Fahrenheit to Celsius or vice versa. 2 4 REFRIGERATOR BUTTON Press the REFRIGERATOR button to adjust the temperature in the freezer compartment. NOTE: When pressed simultaneously with the FREEZER ...button for more than five seconds, the temperature display will change from Fahrenheit to 4 Celsius or vice versa. 5 5 ICE PLUS BUTTON Press this button to turn on button functions, see pages 25-27...
...than five seconds, the temperature display will change from Fahrenheit to Celsius or vice versa. 2 4 REFRIGERATOR BUTTON Press the REFRIGERATOR button to adjust the temperature in the freezer compartment. NOTE: When pressed simultaneously with the FREEZER ...button for more than five seconds, the temperature display will change from Fahrenheit to 4 Celsius or vice versa. 5 5 ICE PLUS BUTTON Press this button to turn on button functions, see pages 25-27...
Owner's Manual (English)
Page 24
... switch is activated. 7 WATER FILTER STATUS This indicator shows the current status for the control panel functions is set temperature of the refrigerator compartment in Celsius or Fahrenheit. 4 ICE PLUS When the ICE PLUS button is pressed, the display will indicate the selected function has... dispenser light is on, this indicator will appear on the display panel. 6 DOOR ALARM INDICATOR This indicator shows that the door-open , keep pressing the REFRIGERATOR button and ICE PLUS button more than 5 seconds, then it goes to the display mode. • Perform the same way again to LOCK. 1 2 ...
... switch is activated. 7 WATER FILTER STATUS This indicator shows the current status for the control panel functions is set temperature of the refrigerator compartment in Celsius or Fahrenheit. 4 ICE PLUS When the ICE PLUS button is pressed, the display will indicate the selected function has... dispenser light is on, this indicator will appear on the display panel. 6 DOOR ALARM INDICATOR This indicator shows that the door-open , keep pressing the REFRIGERATOR button and ICE PLUS button more than 5 seconds, then it goes to the display mode. • Perform the same way again to LOCK. 1 2 ...
Owner's Manual (English)
Page 25
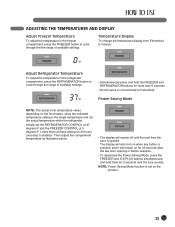
...them for 5 seconds until the next time the door is the target temperature and not the actual temperature within the refrigerator. NOTE: Power Saving Mode function is set the REFRIGERATOR CONTROL at 37 degrees F and the FREEZER CONTROL at these setting for more than 5 seconds. • Do ... or button selection. • To deactivate the Power-Saving Mode, press the FREEZER and ICE PLUS buttons simultaneously and hold the FREEZER and REFRIGERATOR buttons for 24 hours (one day) to stabilize. Then adjust the compartment temperature as illustrated above. • The display will remain on...
...them for 5 seconds until the next time the door is the target temperature and not the actual temperature within the refrigerator. NOTE: Power Saving Mode function is set the REFRIGERATOR CONTROL at 37 degrees F and the FREEZER CONTROL at these setting for more than 5 seconds. • Do ... or button selection. • To deactivate the Power-Saving Mode, press the FREEZER and ICE PLUS buttons simultaneously and hold the FREEZER and REFRIGERATOR buttons for 24 hours (one day) to stabilize. Then adjust the compartment temperature as illustrated above. • The display will remain on...

Owner's Manual (English)
Page 26
...: Hold the glass or other container and chilled water will be illuminated. DISPENSING CUBED ICE Press the ICE TYPE button to not operate while either refrigerator door is pressed, the light will be dispensed. China or crystal can break.
...: Hold the glass or other container and chilled water will be illuminated. DISPENSING CUBED ICE Press the ICE TYPE button to not operate while either refrigerator door is pressed, the light will be dispensed. China or crystal can break.

Owner's Manual (English)
Page 27
... code and then call 1-800-243-0000 (24 hours per day/7 days per week) and select the option to locate an authorized servicer. 27 RESETTING THE FILTER INDICATOR Press and hold the LIGHT/FILTER button for more than 3 seconds to reset the filter indicator after the doors are closed... again to activate and deactivate the door alarm function. Press the ALARM/LOCK button once to cancel the ICE PLUS function. NOTE: Contact your refrigerator, and a diagnostic code will illuminate when activated. The ICE PLUS icon on the display panel will appear in the display. SETTING THE FUNCTIONS ...
... code and then call 1-800-243-0000 (24 hours per day/7 days per week) and select the option to locate an authorized servicer. 27 RESETTING THE FILTER INDICATOR Press and hold the LIGHT/FILTER button for more than 3 seconds to reset the filter indicator after the doors are closed... again to activate and deactivate the door alarm function. Press the ALARM/LOCK button once to cancel the ICE PLUS function. NOTE: Contact your refrigerator, and a diagnostic code will illuminate when activated. The ICE PLUS icon on the display panel will appear in the display. SETTING THE FUNCTIONS ...

Owner's Manual (English)
Page 28
... close the ice bin door; Push on the ice bin door for more ice, empty the ice bin into the extra ice bin in the refrigerator compartment. If you need more than a few. This could break something or injure yourself. NOTE: If the On/Off switch on the icemaker is full... set to level the ice in the ice bin may damage the icemaker. SPACEPLUS ICE SYSTEM wCAUTION • Keep hands and tools out of the refrigerator compartment. Sometimes the ice piles up to the temperature of the ice bin door and dispenser chute. Shake the ice bin occasionally to Off for...
... close the ice bin door; Push on the ice bin door for more ice, empty the ice bin into the extra ice bin in the refrigerator compartment. If you need more than a few. This could break something or injure yourself. NOTE: If the On/Off switch on the icemaker is full... set to level the ice in the ice bin may damage the icemaker. SPACEPLUS ICE SYSTEM wCAUTION • Keep hands and tools out of the refrigerator compartment. Sometimes the ice piles up to the temperature of the ice bin door and dispenser chute. Shake the ice bin occasionally to Off for...


