
Owner's Manual
Page 1
OWNER'S MANUAL FRENCH DOOR REFRIGERATOR Please read this owner's manual thoroughly before operating and keep it handy for reference at all times. LMX28988** LMX25988** P/No.: MFL62184506 www.lg.com ENGLISH FRANÇAIS ESPAÑOL
OWNER'S MANUAL FRENCH DOOR REFRIGERATOR Please read this owner's manual thoroughly before operating and keep it handy for reference at all times. LMX28988** LMX25988** P/No.: MFL62184506 www.lg.com ENGLISH FRANÇAIS ESPAÑOL

Owner's Manual
Page 2
... INSTALLATION Choose the Proper Location 8 Clearances 8 Flooring 9 Handle Removal 9 Refrigerator Door and Freezer Drawer Removal ..10 Connecting the Water Supply 18 Connecting the Water Lines 19 Leveling the Refrigerator Doors 20 Starting 21 HOW TO USE Control Panel Features 22 The LED Display 23... the Functions 26 Spaceplus Ice System 27 Automatic Icemaker 28 Storing Foods 29 Location of reliable service. Your new LG French Door Refrigerator combines advanced cooling technology with many years of Foods 30 Shelf Height Adjustment 31 Removing and Replacing Components 32...
... INSTALLATION Choose the Proper Location 8 Clearances 8 Flooring 9 Handle Removal 9 Refrigerator Door and Freezer Drawer Removal ..10 Connecting the Water Supply 18 Connecting the Water Lines 19 Leveling the Refrigerator Doors 20 Starting 21 HOW TO USE Control Panel Features 22 The LED Display 23... the Functions 26 Spaceplus Ice System 27 Automatic Icemaker 28 Storing Foods 29 Location of reliable service. Your new LG French Door Refrigerator combines advanced cooling technology with many years of Foods 30 Shelf Height Adjustment 31 Removing and Replacing Components 32...

Owner's Manual
Page 3
... or fire. 3 These words mean: wDANGER You might be killed or seriously injured if you don't follow instructions. clearances between the doors and cabinet are finished, reconnect the refrigerator to the electrical source and reset the control (Thermostat Refrigerator Control, or Freezer Control, or Freezer... Control, depending on the power cord. Be careful closing doors when children are in the area. • Unplug your refrigerator is in operation, do not touch the cold surfaces in the freezer...
... or fire. 3 These words mean: wDANGER You might be killed or seriously injured if you don't follow instructions. clearances between the doors and cabinet are finished, reconnect the refrigerator to the electrical source and reset the control (Thermostat Refrigerator Control, or Freezer Control, or Freezer... Control, depending on the power cord. Be careful closing doors when children are in the area. • Unplug your refrigerator is in operation, do not touch the cold surfaces in the freezer...

Owner's Manual
Page 4
... be knocked down. • Fingers and toes can tip over. Even partial thawing and refreezing reduces the quality of any off-odor or off the doors. • Do not leave the shelves in place, as the place where flammable gas is leaked. • This appliance is affected less than that used...
... be knocked down. • Fingers and toes can tip over. Even partial thawing and refreezing reduces the quality of any off-odor or off the doors. • Do not leave the shelves in place, as the place where flammable gas is leaked. • This appliance is affected less than that used...

Owner's Manual
Page 6
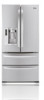
... of the opening angle.) NOTE: This guide covers several different models. The ice dispenser offers cubed or crushed ice. 4 DOOR ALARM A warning alarm sounds at the coldest temperature for more shelf 6 space. 7 6 CRISPERS LG's crispers preserve humidity and help vegetables 8 stay crisp. 9 7 GLIDE'N'SERVE Provides storage space with a variable temperature control that...
... of the opening angle.) NOTE: This guide covers several different models. The ice dispenser offers cubed or crushed ice. 4 DOOR ALARM A warning alarm sounds at the coldest temperature for more shelf 6 space. 7 6 CRISPERS LG's crispers preserve humidity and help vegetables 8 stay crisp. 9 7 GLIDE'N'SERVE Provides storage space with a variable temperature control that...

Owner's Manual
Page 7
... removed to fill ice buckets, coolers, or pitchers. 4 LED INTERIOR LAMPS Two separate LED arrays light the freezer and refrigerator interiors. 5 CAN STORAGE BIN 6 FIXED DOOR BINS 4 1 6 2 5 6 3 4 7
... removed to fill ice buckets, coolers, or pitchers. 4 LED INTERIOR LAMPS Two separate LED arrays light the freezer and refrigerator interiors. 5 CAN STORAGE BIN 6 FIXED DOOR BINS 4 1 6 2 5 6 3 4 7

Owner's Manual
Page 8
If the floor is not even, make the refrigerator level by rotating the height adjusting screws. • Properly ground the refrigerator to open the doors. CLEARANCES • Too small a distance from adjacent items may cause vibration and noise. If the temperature around the appliance is too low or too high, ...
If the floor is not even, make the refrigerator level by rotating the height adjusting screws. • Properly ground the refrigerator to open the doors. CLEARANCES • Too small a distance from adjacent items may cause vibration and noise. If the temperature around the appliance is too low or too high, ...

Owner's Manual
Page 9
... to protect the floor. floor damage could be damaged if you must be sure to lower it ; NOTE: It is necessary to prevent scratching the doors. • The handle could occur. NOTE: When moving it with a hammer while removing or attaching. • When you assemble or disassemble a ... The front should be tightened or removed, use a 1/4" Allen wrench. 9 Do not wiggle or walk the refrigerator when trying to aid in door closing. Allen Wrench Loosen the set screws with reasonable force. NOTE: If the handle mounting fasteners need to be slightly higher than the rear to...
... to protect the floor. floor damage could be damaged if you must be sure to lower it ; NOTE: It is necessary to prevent scratching the doors. • The handle could occur. NOTE: When moving it with a hammer while removing or attaching. • When you assemble or disassemble a ... The front should be tightened or removed, use a 1/4" Allen wrench. 9 Do not wiggle or walk the refrigerator when trying to aid in door closing. Allen Wrench Loosen the set screws with reasonable force. NOTE: If the handle mounting fasteners need to be slightly higher than the rear to...

Owner's Manual
Page 10
...injury. • Do not put hands or feet or metal sticks into the air vents, base grille, or bottom of the refrigerator. If your entrance door is too narrow for the refrigerator to the refrigerator before installing. NOTE : When you pull out the tube, first you begin, remove food and bins... from the doors. You may be injured or receive an electrical shock. • Be careful when you work with a 2.5 mm (3/32") Allen wrench. Collet 1 To remove the ...
...injury. • Do not put hands or feet or metal sticks into the air vents, base grille, or bottom of the refrigerator. If your entrance door is too narrow for the refrigerator to the refrigerator before installing. NOTE : When you pull out the tube, first you begin, remove food and bins... from the doors. You may be injured or receive an electrical shock. • Be careful when you work with a 2.5 mm (3/32") Allen wrench. Collet 1 To remove the ...

Owner's Manual
Page 11
... (1 ). • Use a flat blade screwdriver to lift the tabs on a nonscratching surface. (2) (1) (3) (4) (5) 3 To remove the right refrigerator door: • Open the door. Lift the top hinge (7) free of the hinge lever latch (5). Lift the top hinge (4) free of the hinge lever latch (8). IMPORTANT: When lifting the... hinge free of the latch, be careful that the door does not fall forward. • Lift the door from the middle hinge pin and remove the door. • Place the door, inside facing up , on the front underside of the latch, be careful that...
... (1 ). • Use a flat blade screwdriver to lift the tabs on a nonscratching surface. (2) (1) (3) (4) (5) 3 To remove the right refrigerator door: • Open the door. Lift the top hinge (7) free of the hinge lever latch (5). Lift the top hinge (4) free of the hinge lever latch (8). IMPORTANT: When lifting the... hinge free of the latch, be careful that the door does not fall forward. • Lift the door from the middle hinge pin and remove the door. • Place the door, inside facing up , on the front underside of the latch, be careful that...

Owner's Manual
Page 12
... the hinge. • Install the grounding screw (4) and connect all the wire harnesses (5). 12 Insert and tighten the cover screw (5). 3 Install the left-side door. • Lower the door onto middle hinge pin. (2) (4) (5) (1) (3) 4 • Fit the top hinge (1) over the hinge lever latch (2) and into place. Position the cover into place. Rotate...
... the hinge. • Install the grounding screw (4) and connect all the wire harnesses (5). 12 Insert and tighten the cover screw (5). 3 Install the left-side door. • Lower the door onto middle hinge pin. (2) (4) (5) (1) (3) 4 • Fit the top hinge (1) over the hinge lever latch (2) and into place. Position the cover into place. Rotate...

Owner's Manual
Page 13
... until you can see only one of the wire opening in . (15 mm) into the connector. • Hook the tab on the door-switch side of the cover under the edge of the lines printed on the top case and pull it is secure. 3. Correct Incorrect 13 Assemble... the clip. Insert and tighten the cover screw. Insert Line Clip 1. ENGLISH REFRIGERATOR DOOR AND FREEZER DRAWER REMOVAL (CONT.) REFRIGERATOR DOOR REINSTALLATION (CONT.) Cover Cover Screw (6) 5 • Push the water supply tube (6) into place. wCAUTION Collet Tube 6 Insert the...
... until you can see only one of the wire opening in . (15 mm) into the connector. • Hook the tab on the door-switch side of the cover under the edge of the lines printed on the top case and pull it is secure. 3. Correct Incorrect 13 Assemble... the clip. Insert and tighten the cover screw. Insert Line Clip 1. ENGLISH REFRIGERATOR DOOR AND FREEZER DRAWER REMOVAL (CONT.) REFRIGERATOR DOOR REINSTALLATION (CONT.) Cover Cover Screw (6) 5 • Push the water supply tube (6) into place. wCAUTION Collet Tube 6 Insert the...

Owner's Manual
Page 14
It could cause personal injury. wCAUTION: When placing the drawer on both ends to release from the rails. 54 With both sides of the door pull up and out to remove the drawer and ice bin making sure to clear the rail system. 2 Remove one white screw ቢ...1 1 Fully extend the freezer drawer. wCAUTION: When you remove the drawer, do not hold the handle. Lifting up to separate the door from their tracks. REFRIGERATOR DOOR AND FREEZER DRAWER REMOVAL (CONT.) FREEZER DRAWER REMOVAL wCAUTION • Care should be taken to avoid product or property damage when removing the...
It could cause personal injury. wCAUTION: When placing the drawer on both ends to release from the rails. 54 With both sides of the door pull up and out to remove the drawer and ice bin making sure to clear the rail system. 2 Remove one white screw ቢ...1 1 Fully extend the freezer drawer. wCAUTION: When you remove the drawer, do not hold the handle. Lifting up to separate the door from their tracks. REFRIGERATOR DOOR AND FREEZER DRAWER REMOVAL (CONT.) FREEZER DRAWER REMOVAL wCAUTION • Care should be taken to avoid product or property damage when removing the...

Owner's Manual
Page 15
... release from their tracks. If it could cause personal injury. wCAUTION: When you remove the drawer, do not hold the handle. ENGLISH REFRIGERATOR DOOR AND FREEZER DRAWER REMOVAL (CONT.) FREEZER DRAWER REMOVAL (CONT.) wCAUTION • Care should be taken to have assistance with the following insturctions.... • To avoid damage do not hold the handle when removing the door. wCAUTION: When placing the drawer on both hands, bend the center bar just enough to allow the gears on the floor, care ...
... release from their tracks. If it could cause personal injury. wCAUTION: When you remove the drawer, do not hold the handle. ENGLISH REFRIGERATOR DOOR AND FREEZER DRAWER REMOVAL (CONT.) FREEZER DRAWER REMOVAL (CONT.) wCAUTION • Care should be taken to have assistance with the following insturctions.... • To avoid damage do not hold the handle when removing the door. wCAUTION: When placing the drawer on both hands, bend the center bar just enough to allow the gears on the floor, care ...

Owner's Manual
Page 16
... gears in the secure holes on the opposite rails and pull out until the drawer rails are fully extended. 2 Hook door supports ቢ into rail tabs ባ. 3 Lower door into final position and tighten the screws. 4 With the drawer pulled out to full extension, insert the drawer and ice... bin in the rail assembly. wWARNING: DO NOT step or sit down on the freezer drawer. REFRIGERATOR DOOR AND FREEZER DRAWER REMOVAL (CONT.) FREEZER DRAWER REINSTALLATION wCAUTION • To avoid possible injury or product or property damage, you will need two ...
... gears in the secure holes on the opposite rails and pull out until the drawer rails are fully extended. 2 Hook door supports ቢ into rail tabs ባ. 3 Lower door into final position and tighten the screws. 4 With the drawer pulled out to full extension, insert the drawer and ice... bin in the rail assembly. wWARNING: DO NOT step or sit down on the freezer drawer. REFRIGERATOR DOOR AND FREEZER DRAWER REMOVAL (CONT.) FREEZER DRAWER REINSTALLATION wCAUTION • To avoid possible injury or product or property damage, you will need two ...

Owner's Manual
Page 17
ENGLISH REFRIGERATOR DOOR AND FREEZER DRAWER REMOVAL (CONT.) FREEZER DRAWER REINSTALLATION (CONT.) wCAUTION • To avoid possible injury or product or property damage, you will need two people .... wWARNING: DO NOT step or sit down on the opposite rails and pull out until the drawer rails are fully extended. 2 Hook door supports ቢ into rail tabs ባ. 3 Lower door into final position and tighten the screws. 4 With the drawer pulled out to play inside of drawer. BOTTOM DRAWER 1 2 1 To reinstall...
ENGLISH REFRIGERATOR DOOR AND FREEZER DRAWER REMOVAL (CONT.) FREEZER DRAWER REINSTALLATION (CONT.) wCAUTION • To avoid possible injury or product or property damage, you will need two people .... wWARNING: DO NOT step or sit down on the opposite rails and pull out until the drawer rails are fully extended. 2 Hook door supports ቢ into rail tabs ባ. 3 Lower door into final position and tighten the screws. 4 With the drawer pulled out to play inside of drawer. BOTTOM DRAWER 1 2 1 To reinstall...

Owner's Manual
Page 20
...to alter the tilt from front to back or side to close them completely. If your refrigerator seems unsteady or you want the doors to close easily. Open both clockwise the same amount. NOTE: Your new refrigerator is sufficient clearance to perform the following instructions: Kick... Plate 1 Plug the power cord into its final position. LEVELING THE REFRIGERATOR DOORS wWARNING Electrical Shock Hazard • Be careful when you work with the 'Adjust' to the floor to install and use. 20 If ...
...to alter the tilt from front to back or side to close them completely. If your refrigerator seems unsteady or you want the doors to close easily. Open both clockwise the same amount. NOTE: Your new refrigerator is sufficient clearance to perform the following instructions: Kick... Plate 1 Plug the power cord into its final position. LEVELING THE REFRIGERATOR DOORS wWARNING Electrical Shock Hazard • Be careful when you work with the 'Adjust' to the floor to install and use. 20 If ...

Owner's Manual
Page 21
... refrigerator is taped to the back of cold air in their proper places. ENGLISH LEVELING THE REFRIGERATOR DOORS (CONT.) DOOR ALIGNMENT • Use the wrench (Included with the User Manual) to adjust the bolt in the door hinge to adjust the height. (counter clockwise to raise or clockwise to lower) STARTING Before loading...
... refrigerator is taped to the back of cold air in their proper places. ENGLISH LEVELING THE REFRIGERATOR DOORS (CONT.) DOOR ALIGNMENT • Use the wrench (Included with the User Manual) to adjust the bolt in the door hinge to adjust the height. (counter clockwise to raise or clockwise to lower) STARTING Before loading...

Owner's Manual
Page 22
...than 3 seconds to reset the filter indicator after the water filter has been replaced. 6 7 ALARM/LOCK BUTTON Press this button to control the door-open alarm. 7 Press and hold this button for more than five seconds, the temperature display will change from Fahrenheit to Celsius or vice versa...including operation of the buttons may not match your model. 1 LED DISPLAY The LED display shows the temperature settings, dispenser options, water filter, door alarm, and locking status messages. 2 ICE TYPE BUTTON The ICE TYPE button is used to select Cubed Ice or Crushed Ice. 3 FREEZER ...
...than 3 seconds to reset the filter indicator after the water filter has been replaced. 6 7 ALARM/LOCK BUTTON Press this button to control the door-open alarm. 7 Press and hold this button for more than five seconds, the temperature display will change from Fahrenheit to Celsius or vice versa...including operation of the buttons may not match your model. 1 LED DISPLAY The LED display shows the temperature settings, dispenser options, water filter, door alarm, and locking status messages. 2 ICE TYPE BUTTON The ICE TYPE button is used to select Cubed Ice or Crushed Ice. 3 FREEZER ...

Owner's Manual
Page 23
...for the control panel functions is set to LOCK. 1 2 3 4 7 5 8 6 9 wCAUTION Display mode setting and its cancellation • With the refrigerator door open warning alarm is activated. 7 ENERGY SAVING This indicater shows that Energy Saving mode is on, this indicator will appear on the display panel.... 6 DOOR ALARM INDICATOR This indicator shows that will be dispensed when the push switch is pressed. 2 FREEZER TEMPERATURE Indicates the set temperature of ...
...for the control panel functions is set to LOCK. 1 2 3 4 7 5 8 6 9 wCAUTION Display mode setting and its cancellation • With the refrigerator door open warning alarm is activated. 7 ENERGY SAVING This indicater shows that Energy Saving mode is on, this indicator will appear on the display panel.... 6 DOOR ALARM INDICATOR This indicator shows that will be dispensed when the push switch is pressed. 2 FREEZER TEMPERATURE Indicates the set temperature of ...


