Owner's Manual
Page 1
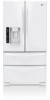
LMX25984** LMX21984** P/No.: MFL37933582 www.lg.com ENGLISH FRANÇAIS ESPAÑOL OWNER'S MANUAL FRENCH DOOR REFRIGERATOR Please read this owner's manual thoroughly before operating and keep it handy for reference at all times.
LMX25984** LMX21984** P/No.: MFL37933582 www.lg.com ENGLISH FRANÇAIS ESPAÑOL OWNER'S MANUAL FRENCH DOOR REFRIGERATOR Please read this owner's manual thoroughly before operating and keep it handy for reference at all times.
Owner's Manual
Page 2
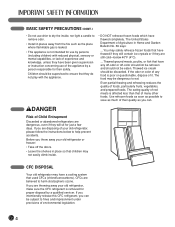
Congratulations on your refrigerator will provide you with simple operation and high efficiency. IMPORTANT SAFETY INFORMATION Basic Safety Precautions 3 CFC Disposal 4 How to the LG family. Follow the operating and care instructions in this manual and your purchase and welcome to Connect Electricity 5...the Functions 26 In-Door Ice Bin 27 Automatic Icemaker 28 Storing Foods 29 Location of reliable service. Your new LG French Door Refrigerator combines advanced cooling technology with many years of Foods 30 Shelf Height Adjustment 31 CARE AND CLEANING Removing and Replacing ...
Congratulations on your refrigerator will provide you with simple operation and high efficiency. IMPORTANT SAFETY INFORMATION Basic Safety Precautions 3 CFC Disposal 4 How to the LG family. Follow the operating and care instructions in this manual and your purchase and welcome to Connect Electricity 5...the Functions 26 In-Door Ice Bin 27 Automatic Icemaker 28 Storing Foods 29 Location of reliable service. Your new LG French Door Refrigerator combines advanced cooling technology with many years of Foods 30 Shelf Height Adjustment 31 CARE AND CLEANING Removing and Replacing ...
Owner's Manual
Page 3
...remove power to the light circuit. • When you or others or cause damage to the electrical source and reset the control (Thermostat Refrigerator Control, or Freezer Control, or Freezer Control, depending on the power cord. wCAUTION Indicates an imminently hazardous situation which, if not avoided,... firmly and pull it straight out from the wall, be killed or seriously injured if you don't follow instructions. They could damage the refrigerator and seriously injure themselves. • Keep fingers out of the ejector mechanism or with a live wire filament. (A burned-out light bulb...
...remove power to the light circuit. • When you or others or cause damage to the electrical source and reset the control (Thermostat Refrigerator Control, or Freezer Control, or Freezer Control, depending on the power cord. wCAUTION Indicates an imminently hazardous situation which, if not avoided,... firmly and pull it straight out from the wall, be killed or seriously injured if you don't follow instructions. They could damage the refrigerator and seriously injure themselves. • Keep fingers out of the ejector mechanism or with a live wire filament. (A burned-out light bulb...
Owner's Manual
Page 4
..., sensory or mental capabilities, or lack of experience and knowledge, unless they have been given supervision or instruction concerning use of your old refrigerator, please follow the instructions below 40°F (4°C). ...Thawed ground meats, poultry, or fish that have a cooling system that of ...save as much of many other foods. Even partial thawing and refreezing reduces the quality of environmental legislation. 4 CFC DISPOSAL Your old refrigerator may have any food is poor or questionable, dispose of Agriculture in Home and Garden Bulletin No. 69 says: ...You may ...
..., sensory or mental capabilities, or lack of experience and knowledge, unless they have been given supervision or instruction concerning use of your old refrigerator, please follow the instructions below 40°F (4°C). ...Thawed ground meats, poultry, or fish that have a cooling system that of ...save as much of many other foods. Even partial thawing and refreezing reduces the quality of environmental legislation. 4 CFC DISPOSAL Your old refrigerator may have any food is poor or questionable, dispose of Agriculture in Home and Garden Bulletin No. 69 says: ...You may ...
Owner's Manual
Page 5
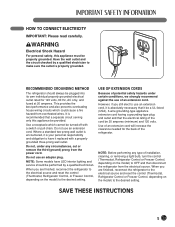
...circuit serving only this appliance must be provided. Do not use an extension cord. USE OF EXTENSION CORDS Because of the refrigerator. This provides the best performance and also prevents overloading house wiring circuits which cannot be plugged into its own individual properly ...overheated wires. It is recommended that the electrical rating of installation, cleaning, or removing a light bulb, turn the control (Thermostat, Refrigerator Control or Freezer Control, depending on the model) to make sure the outlet is your personal responsibility and obligation to have LED ...
...circuit serving only this appliance must be provided. Do not use an extension cord. USE OF EXTENSION CORDS Because of the refrigerator. This provides the best performance and also prevents overloading house wiring circuits which cannot be plugged into its own individual properly ...overheated wires. It is recommended that the electrical rating of installation, cleaning, or removing a light bulb, turn the control (Thermostat, Refrigerator Control or Freezer Control, depending on the model) to make sure the outlet is your personal responsibility and obligation to have LED ...

Owner's Manual
Page 6
... more . 3 2 2 ICE PLUS 4 When this feature is activated, the freezer section will run at 30-second intervals when the refrigerator or freezer door is automatically closed . (The door is left open for a 24- The in-door design creates more shelf space. 6 6 CRISPERS... 8 LG's crispers preserve humidity and help vegetables stay crisp. 7 7 AUTO CLOSING HINGE When you slightly push the door of the refrigerator, it is automatically closed within 30° of the opening angle.) 8 GLIDE'N'SERVE Provides...
... more . 3 2 2 ICE PLUS 4 When this feature is activated, the freezer section will run at 30-second intervals when the refrigerator or freezer door is automatically closed . (The door is left open for a 24- The in-door design creates more shelf space. 6 6 CRISPERS... 8 LG's crispers preserve humidity and help vegetables stay crisp. 7 7 AUTO CLOSING HINGE When you slightly push the door of the refrigerator, it is automatically closed within 30° of the opening angle.) 8 GLIDE'N'SERVE Provides...
Owner's Manual
Page 7
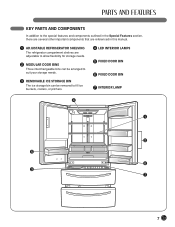
... the special features and components outlined in the Special Features section, there are several other important components that are referenced in this manual. 1 ADJUSTABLE REFRIGERATOR SHELVING The refrigerator compartment shelves are adjustable to allow flexibility for storage needs. 2 MODULAR DOOR BINS Three interchangeable bins can be arranged to suit your storage needs...
... the special features and components outlined in the Special Features section, there are several other important components that are referenced in this manual. 1 ADJUSTABLE REFRIGERATOR SHELVING The refrigerator compartment shelves are adjustable to allow flexibility for storage needs. 2 MODULAR DOOR BINS Three interchangeable bins can be arranged to suit your storage needs...

Owner's Manual
Page 8
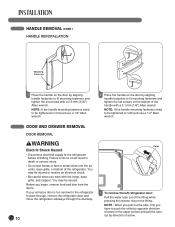
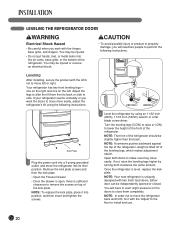
...8226; Unstable installation may result in an area where the temperature is not even, make the refrigerator level by rotating the height adjusting screws. • Properly ground the refrigerator to open the doors. CHOOSE THE PROPER LOCATION wWARNING Excessive Weight Hazard Two or more people are...compromised and the cost of electricity used increases. • To reduce the risk of electric shock, do not install the refrigerator in front of the refrigerator to conform with all governing codes and ordinances. CLEARANCES • Too small a distance from adjacent items may cause vibration ...
...8226; Unstable installation may result in an area where the temperature is not even, make the refrigerator level by rotating the height adjusting screws. • Properly ground the refrigerator to open the doors. CHOOSE THE PROPER LOCATION wWARNING Excessive Weight Hazard Two or more people are...compromised and the cost of electricity used increases. • To reduce the risk of electric shock, do not install the refrigerator in front of the refrigerator to conform with all governing codes and ordinances. CLEARANCES • Too small a distance from adjacent items may cause vibration ...
Owner's Manual
Page 9
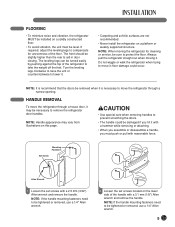
... feet. The front should be removed when it . • Carpeting and soft tile surfaces are not recommended. • Never install the refrigerator on a platform or weakly supported structure. Mounting Fasteners Set Screw Allen Wrench 1 Loosen the set screws with a hammer while removing or attaching... handles to prevent scratching the doors. • The handle could occur. If required, adjust the leveling legs to move the refrigerator through a narrow opening. Turn the leveling legs clockwise to raise the unit or counterclockwise to lower it is necessary to compensate for...
... feet. The front should be removed when it . • Carpeting and soft tile surfaces are not recommended. • Never install the refrigerator on a platform or weakly supported structure. Mounting Fasteners Set Screw Allen Wrench 1 Loosen the set screws with a hammer while removing or attaching... handles to prevent scratching the doors. • The handle could occur. If required, adjust the leveling legs to move the refrigerator through a narrow opening. Turn the leveling legs clockwise to raise the unit or counterclockwise to lower it is necessary to compensate for...
Owner's Manual
Page 10
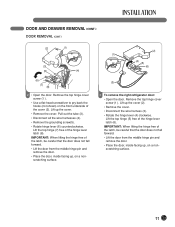
...Do not put hands or feet or metal sticks into the air vents, base grille, or bottom of arrow. 10 Before you have to the refrigerator before installing. NOTE: If the handle mounting fasteners need to fit mounting fasteners and tighten the set screws with a 3.1 mm (1/8") Allen wrench...base grille, and stopper. NOTE: If the handle mounting fasteners need to pass through, remove the refrigerator door and move the refrigerator sideways through the doorway. 1 To remove the left refrigerator door: Pull the water tube out of the fitting while pressing the release ring on the door by...
...Do not put hands or feet or metal sticks into the air vents, base grille, or bottom of arrow. 10 Before you have to the refrigerator before installing. NOTE: If the handle mounting fasteners need to fit mounting fasteners and tighten the set screws with a 3.1 mm (1/8") Allen wrench...base grille, and stopper. NOTE: If the handle mounting fasteners need to pass through, remove the refrigerator door and move the refrigerator sideways through the doorway. 1 To remove the left refrigerator door: Pull the water tube out of the fitting while pressing the release ring on the door by...
Owner's Manual
Page 11
... the door from the middle hinge pin and remove the door. • Place the door, inside facing up , on a nonscratching surface. (2) (1) (4) (5) (6) (3) 3 To remove the right refrigerator door: • Open the door.
... the door from the middle hinge pin and remove the door. • Place the door, inside facing up , on a nonscratching surface. (2) (1) (4) (5) (6) (3) 3 To remove the right refrigerator door: • Open the door.
Owner's Manual
Page 18
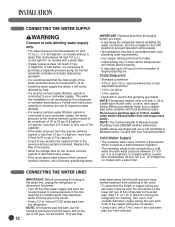
... an outside diameter) copper tubing. O.D. (outside faucet may take up to 24 hours for the icemaker to begin . • If operating the refrigerator before you begin producing ice. nut driver • 1/4-in . Do not use is used as a water pressure regulator. • The icemaker...from the connection on models with a 1/4-in . saddle-type shutoff valve, a union, and copper tubing. vertical COLD water pipe near the refrigerator. NOTE: A horizontal pipe will need, measure from reverse osmosis remains, call a licensed, qualified plumber. This will help drain water from the...
... an outside diameter) copper tubing. O.D. (outside faucet may take up to 24 hours for the icemaker to begin . • If operating the refrigerator before you begin producing ice. nut driver • 1/4-in . Do not use is used as a water pressure regulator. • The icemaker...from the connection on models with a 1/4-in . saddle-type shutoff valve, a union, and copper tubing. vertical COLD water pipe near the refrigerator. NOTE: A horizontal pipe will need, measure from reverse osmosis remains, call a licensed, qualified plumber. This will help drain water from the...
Owner's Manual
Page 19
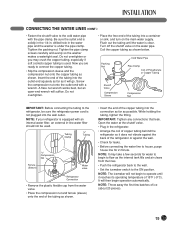
Screw the compression nut onto the outlet end with the pipe clamp. Coil the copper tubing as shown. NOTE: If your refrigerator is equipped with an internal water filter, an external in the water pipe and the washer is under the pipe clamp. Open the water at ... connect the copper tubing. • Slip the compression sleeve and the compression nut onto the copper tubing as shown below. Insert the end of the refrigerator or against the wall. • Check for 2 minute. Turn off the shutoff valve on the main water supply. A flare nut wrench works best, but an...
Screw the compression nut onto the outlet end with the pipe clamp. Coil the copper tubing as shown. NOTE: If your refrigerator is equipped with an internal water filter, an external in the water pipe and the washer is under the pipe clamp. Open the water at ... connect the copper tubing. • Slip the compression sleeve and the compression nut onto the copper tubing as shown below. Insert the end of the refrigerator or against the wall. • Check for 2 minute. Turn off the shutoff valve on the main water supply. A flare nut wrench works best, but an...
Owner's Manual
Page 20
...following instructions: LMX21984** LMX25984** Kick Plate 1 Plug the power cord into a 3-prong grounded outlet, and move left . NOTE: In order not to move the refrigerator back and forth, fix it into its final position. You may be injured. • Do not put hands, feet, or metal items into the air...back. wCAUTION • To avoid possible injury or product or property damage, you will have to exert slight pressure on the left or right. Your refrigerator has two front leveling legs- Remove the kick plate screws and then the kick plate. • Open the Freezer Drawer. • Once the ...
...following instructions: LMX21984** LMX25984** Kick Plate 1 Plug the power cord into a 3-prong grounded outlet, and move left . NOTE: In order not to move the refrigerator back and forth, fix it into its final position. You may be injured. • Do not put hands, feet, or metal items into the air...back. wCAUTION • To avoid possible injury or product or property damage, you will have to exert slight pressure on the left or right. Your refrigerator has two front leveling legs- Remove the kick plate screws and then the kick plate. • Open the Freezer Drawer. • Once the ...
Owner's Manual
Page 21
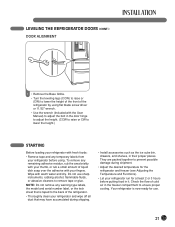
...the height. (CCW to raise or CW to lower the height.) STARTING Before loading your refrigerator with warm water and dry. Your refrigerator is taped to the back of the refrigerator. • Thoroughly clean your refrigerator and wipe off all dust that may have accumulated during shipment. • Adjust the desired...; Remove the Base Grillie. • Turn the leveling legs (CCW) to raise or (CW) to lower the height of the front of the refrigerator by using . Check the flow of liquid dish soap over the adhesive with your fingers. Do not use . 21 To remove any warning-type labels...
...the height. (CCW to raise or CW to lower the height.) STARTING Before loading your refrigerator with warm water and dry. Your refrigerator is taped to the back of the refrigerator. • Thoroughly clean your refrigerator and wipe off all dust that may have accumulated during shipment. • Adjust the desired...; Remove the Base Grillie. • Turn the leveling legs (CCW) to raise or (CW) to lower the height of the front of the refrigerator by using . Check the flow of liquid dish soap over the adhesive with your fingers. Do not use . 21 To remove any warning-type labels...
Owner's Manual
Page 22
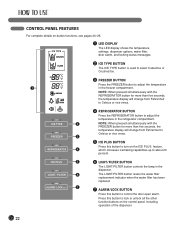
...Crushed Ice. 3 FREEZER BUTTON Press the FREEZER button to adjust the temperature in the dispenser. NOTE: When pressed simultaneously with the REFRIGERATOR button for more than five seconds, the temperature display will change from Fahrenheit to control the door-open alarm. NOTE: When ...26. ICE PLUS LIGHT / FILTER ALARM / LOCK 3SECS 6 LIGHT/FILTER BUTTON The LIGHT/FILTER button controls the lamp in the refrigerator compartment. Press this button to about 20 percent. CONTROL PANEL FEATURES For complete details on the control panel, including operation of the dispenser...
...Crushed Ice. 3 FREEZER BUTTON Press the FREEZER button to adjust the temperature in the dispenser. NOTE: When pressed simultaneously with the REFRIGERATOR button for more than five seconds, the temperature display will change from Fahrenheit to control the door-open alarm. NOTE: When ...26. ICE PLUS LIGHT / FILTER ALARM / LOCK 3SECS 6 LIGHT/FILTER BUTTON The LIGHT/FILTER button controls the lamp in the refrigerator compartment. Press this button to about 20 percent. CONTROL PANEL FEATURES For complete details on the control panel, including operation of the dispenser...
Owner's Manual
Page 23
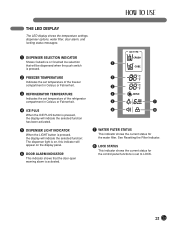
... for the water filter. ICE TYPE 7 WATER FILTER STATUS This indicator shows the current status for the control panel functions is set temperature of the refrigerator compartment in Celsius or Fahrenheit. 4 ICE PLUS When the ICE PLUS button is pressed, the display will indicate the selected function has been activated. 5 DISPENSER... This indicator shows that the door-open warning alarm is pressed. 2 FREEZER TEMPERATURE Indicates the set temperature of the freezer compartment in Celsius or Fahrenheit. 3 REFRIGERATOR TEMPERATURE Indicates the set to LOCK. 23
... for the water filter. ICE TYPE 7 WATER FILTER STATUS This indicator shows the current status for the control panel functions is set temperature of the refrigerator compartment in Celsius or Fahrenheit. 4 ICE PLUS When the ICE PLUS button is pressed, the display will indicate the selected function has been activated. 5 DISPENSER... This indicator shows that the door-open warning alarm is pressed. 2 FREEZER TEMPERATURE Indicates the set temperature of the freezer compartment in Celsius or Fahrenheit. 3 REFRIGERATOR TEMPERATURE Indicates the set to LOCK. 23
Owner's Manual
Page 24
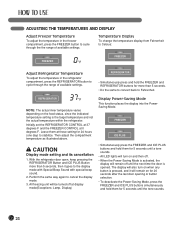
... degrees F. ADJUSTING THE TEMPERATURES AND DISPLAY Adjust Freezer Temperature To adjust the temperature in the refrigerator compartment, press the REFRIGERATOR button to cancel the display mode. 3. Initially set the REFRIGERATOR CONTROL at 37 degrees F and the FREEZER CONTROL at display mode(Exceptions: Lamp, Display) ...Fahrenheit. Leave them for more than 5 seconds. • Do the same to convert back to stabilize. With the refrigerator door open, keep pressing the REFRIGERATOR Button and ICE PLUS Button more than 5 seconds, then it will also turn on the food status, since the...
... degrees F. ADJUSTING THE TEMPERATURES AND DISPLAY Adjust Freezer Temperature To adjust the temperature in the refrigerator compartment, press the REFRIGERATOR button to cancel the display mode. 3. Initially set the REFRIGERATOR CONTROL at 37 degrees F and the FREEZER CONTROL at display mode(Exceptions: Lamp, Display) ...Fahrenheit. Leave them for more than 5 seconds. • Do the same to convert back to stabilize. With the refrigerator door open, keep pressing the REFRIGERATOR Button and ICE PLUS Button more than 5 seconds, then it will also turn on the food status, since the...
Owner's Manual
Page 25
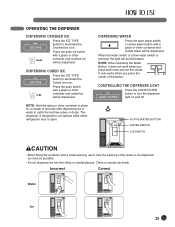
... or other container and crushed ice will be dispensed. CONTROLLING THE DISPENSER LIGHT LIGHT / FILTER Press the LIGHT/FILTER button to not operate while either refrigerator door is pressed, the light will be illuminated. Press the push switch with a glass or other container in place for a couple of the button. DISPENSING...
... or other container and crushed ice will be dispensed. CONTROLLING THE DISPENSER LIGHT LIGHT / FILTER Press the LIGHT/FILTER button to not operate while either refrigerator door is pressed, the light will be illuminated. Press the push switch with a glass or other container in place for a couple of the button. DISPENSING...
Owner's Manual
Page 26
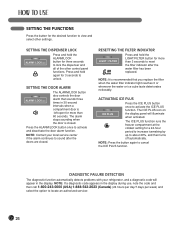
... display panel will appear in the display. The alarm stops sounding when the door is left open for more than 60 seconds. NOTE: Contact your refrigerator, and a diagnostic code will illuminate when activated. NOTE: If a diagnostic code appears in 30-second intervals when a compartment door is closed . SETTING THE DOOR ALARM...
... display panel will appear in the display. The alarm stops sounding when the door is left open for more than 60 seconds. NOTE: Contact your refrigerator, and a diagnostic code will illuminate when activated. NOTE: If a diagnostic code appears in 30-second intervals when a compartment door is closed . SETTING THE DOOR ALARM...


