Specification (English)
Page 1
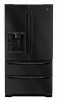
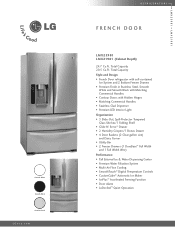
Smooth White Smooth Black Stainless Steel LGusa.com R E F R I G E R ATO R S FRENCH DOOR L M X 259 81 L M X 219 81 (Cabinet Depth) 24.7 Cu.Ft. Total Capacity Style and Design • French Door refrigerator with self-contained Ice System and 2 Bottom Freezer Drawers • Premium Finish in Stainless Steel, Smooth White and Smooth Black with Matching Commercial Handles • ...™ Automatic Ice Maker • IcePlus™ Accelerated Freezing Function • Door Alarm • LoDecibel™ Quiet Operation L M X 259 81 L M X 219 81 Total Capacity 20.5 Cu.Ft.
Smooth White Smooth Black Stainless Steel LGusa.com R E F R I G E R ATO R S FRENCH DOOR L M X 259 81 L M X 219 81 (Cabinet Depth) 24.7 Cu.Ft. Total Capacity Style and Design • French Door refrigerator with self-contained Ice System and 2 Bottom Freezer Drawers • Premium Finish in Stainless Steel, Smooth White and Smooth Black with Matching Commercial Handles • ...™ Automatic Ice Maker • IcePlus™ Accelerated Freezing Function • Door Alarm • LoDecibel™ Quiet Operation L M X 259 81 L M X 219 81 Total Capacity 20.5 Cu.Ft.
Specification (English)
Page 2
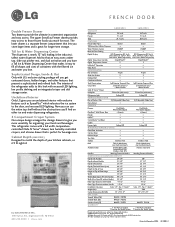
...176; without Handle) 39 1/4" 39 1/4" Door Edge Clearance with recessed LED lighting, low profile shelving and an integrated crisper and deli storage center. LG ELECTRONICS INC. 1000 Sylvan Ave., Englewood Cliffs, NJ 07632 800.243.0000 LGusa.com FRENCH DOOR L M X 259 81 L M X 219... SmoothTouch™ Digital Temperature Sensors 5 5 LoDecibel™ Operation Door Alarm R E F R I T Y Refrigerator 17.6 cu.ft. 14.7 cu.ft. Total 24.7 cu.ft. 20.5 cu.ft. Printed in convenient organization and easy access. Cabinet Depth (LMX21981) Designed to those frozen foods you love. of...
...176; without Handle) 39 1/4" 39 1/4" Door Edge Clearance with recessed LED lighting, low profile shelving and an integrated crisper and deli storage center. LG ELECTRONICS INC. 1000 Sylvan Ave., Englewood Cliffs, NJ 07632 800.243.0000 LGusa.com FRENCH DOOR L M X 259 81 L M X 219... SmoothTouch™ Digital Temperature Sensors 5 5 LoDecibel™ Operation Door Alarm R E F R I T Y Refrigerator 17.6 cu.ft. 14.7 cu.ft. Total 24.7 cu.ft. 20.5 cu.ft. Printed in convenient organization and easy access. Cabinet Depth (LMX21981) Designed to those frozen foods you love. of...
Owner's Manual (English)
Page 2
... CFC Disposal 4 How to the LG family. Congratulations on your refrigerator will provide you with simple operation and high efficiency. Your new LG French Door Refrigerator combines advanced cooling technology with many... years of Foods 30 Shelf Height Adjustment 31 CARE AND CLEANING Removing and Replacing Components 32 Cleaning the Refrigerator ... Supply 18 Connecting the Water Lines 18 Leveling the Refrigerator Doors 20 Starting 21 HOW TO USE Control Panel Features 22 The LED Display 23 Adjusting...
... CFC Disposal 4 How to the LG family. Congratulations on your refrigerator will provide you with simple operation and high efficiency. Your new LG French Door Refrigerator combines advanced cooling technology with many... years of Foods 30 Shelf Height Adjustment 31 CARE AND CLEANING Removing and Replacing Components 32 Cleaning the Refrigerator ... Supply 18 Connecting the Water Lines 18 Leveling the Refrigerator Doors 20 Starting 21 HOW TO USE Control Panel Features 22 The LED Display 23 Adjusting...
Owner's Manual (English)
Page 3
... the following. Do not use gasoline or other flammable vapors and liquids in the vicinity of this appliance. • NEVER unplug your refrigerator away from the outlet. • Repair or replace immediately all safety messages. clearances between the doors and cabinet are in order to ...or otherwise damaged. wWARNING To reduce the risk of fire, electric shock, or injury to the extremely cold surfaces. • In refrigerators with automatic icemakers, avoid contact with the Installer Instructions that were taped to reduce the chance of the ejector mechanism or with a live...
... the following. Do not use gasoline or other flammable vapors and liquids in the vicinity of this appliance. • NEVER unplug your refrigerator away from the outlet. • Repair or replace immediately all safety messages. clearances between the doors and cabinet are in order to ...or otherwise damaged. wWARNING To reduce the risk of fire, electric shock, or injury to the extremely cold surfaces. • In refrigerators with automatic icemakers, avoid contact with the Installer Instructions that were taped to reduce the chance of the ejector mechanism or with a live...
Owner's Manual (English)
Page 4
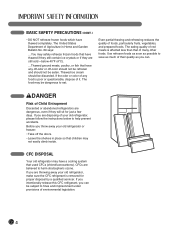
...so that children may have thawed completely. wDANGER Risk of foods, particularly fruits, vegetables, and prepared foods. CFC DISPOSAL Your old refrigerator may not easily climb inside. If you are believed to save as much of it. Thawed ice cream should not be subject to... which have a cooling system that used CFCs (chlorofluorocarbons). Even partial thawing and refreezing reduces the quality of Child Entrapment Discarded or abandoned refrigerators are dangerous, even if they are disposing of red meats is removed for just a few days. The food may safely refreeze frozen...
...so that children may have thawed completely. wDANGER Risk of foods, particularly fruits, vegetables, and prepared foods. CFC DISPOSAL Your old refrigerator may not easily climb inside. If you are believed to save as much of it. Thawed ice cream should not be subject to... which have a cooling system that used CFCs (chlorofluorocarbons). Even partial thawing and refreezing reduces the quality of Child Entrapment Discarded or abandoned refrigerators are dangerous, even if they are disposing of red meats is removed for just a few days. The food may safely refreeze frozen...
Owner's Manual (English)
Page 5
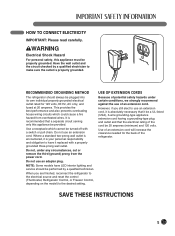
...certain conditions, we strongly recommend against the use an extension cord, it is your personal responsibility and obligation to use of the refrigerator. Have the wall outlet and the circuit checked by a qualified technician. Use a receptacle which could cause a fire hazard from ... Electrical Shock Hazard For personal safety, this appliance be performed by a qualified electrician to the desired setting. RECOMMENDED GROUNDING METHOD The refrigerator should be provided. NOTE: Some models have it be a UL-listed (USA), 3-wire grounding-type appliance extension cord having a...
...certain conditions, we strongly recommend against the use an extension cord, it is your personal responsibility and obligation to use of the refrigerator. Have the wall outlet and the circuit checked by a qualified technician. Use a receptacle which could cause a fire hazard from ... Electrical Shock Hazard For personal safety, this appliance be performed by a qualified electrician to the desired setting. RECOMMENDED GROUNDING METHOD The refrigerator should be provided. NOTE: Some models have it be a UL-listed (USA), 3-wire grounding-type appliance extension cord having a...
Owner's Manual (English)
Page 6
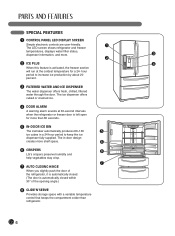
...in-door design creates more shelf space. 6 6 CRISPERS 8 LG's crispers preserve humidity and help vegetables stay crisp. 7 7... SPECIAL FEATURES 1 CONTROL PANEL LED DISPLAY SCREEN Simple electronic controls are user-friendly. 1 The LED screen shows refrigerator and freezer temperatures, displays water filter status, dispenser information, and more. 3 2 2 ICE PLUS 4 When ... 30-second intervals when the refrigerator or freezer door is automatically closed within 30° of the refrigerator, it is automatically closed. (The door is left open for a 24- hour period to keep the...
...in-door design creates more shelf space. 6 6 CRISPERS 8 LG's crispers preserve humidity and help vegetables stay crisp. 7 7... SPECIAL FEATURES 1 CONTROL PANEL LED DISPLAY SCREEN Simple electronic controls are user-friendly. 1 The LED screen shows refrigerator and freezer temperatures, displays water filter status, dispenser information, and more. 3 2 2 ICE PLUS 4 When ... 30-second intervals when the refrigerator or freezer door is automatically closed within 30° of the refrigerator, it is automatically closed. (The door is left open for a 24- hour period to keep the...

Owner's Manual (English)
Page 7
... outlined in the Special Features section, there are several other important components that are referenced in this manual. 1 ADJUSTABLE REFRIGERATOR SHELVING The refrigerator compartment shelves are adjustable to allow flexibility for storage needs. 4 LED INTERIOR LAMPS Two separate LED arrays light the freezer and... refrigerator interiors. 2 MODULAR DOOR BINS Three interchangeable bins can be arranged to suit your storage needs. 5 FIXED DOOR BIN 3 REMOVABLE ...
... outlined in the Special Features section, there are several other important components that are referenced in this manual. 1 ADJUSTABLE REFRIGERATOR SHELVING The refrigerator compartment shelves are adjustable to allow flexibility for storage needs. 4 LED INTERIOR LAMPS Two separate LED arrays light the freezer and... refrigerator interiors. 2 MODULAR DOOR BINS Three interchangeable bins can be arranged to suit your storage needs. 5 FIXED DOOR BIN 3 REMOVABLE ...
Owner's Manual (English)
Page 8
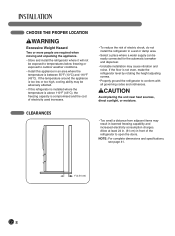
... adjacent items may result in front of electric shock, do not install the refrigerator in an area where the temperature is between 55°F (13°C) and 110°F (43°C). Allow at least 24 in. (61 cm) in lowered freezing capability and increased electricity consumption charges.... LOCATION wWARNING Excessive Weight Hazard Two or more people are required when moving and unpacking the appliance. • Store and install the refrigerator where it will not be exposed to temperatures below freezing or exposed to outdoor weather conditions. • Install this appliance in a wet...
... adjacent items may result in front of electric shock, do not install the refrigerator in an area where the temperature is between 55°F (13°C) and 110°F (43°C). Allow at least 24 in. (61 cm) in lowered freezing capability and increased electricity consumption charges.... LOCATION wWARNING Excessive Weight Hazard Two or more people are required when moving and unpacking the appliance. • Store and install the refrigerator where it will not be exposed to temperatures below freezing or exposed to outdoor weather conditions. • Install this appliance in a wet...
Owner's Manual (English)
Page 9
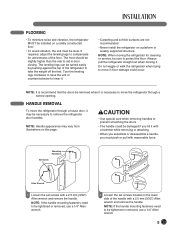
...or attaching. • When you assemble or disassemble a handle, you hit it . NOTE: If the handle mounting fasteners need to remove the refrigerator door handles. floor damage could be damaged if you must be level. NOTE: Handle appearance may be necessary to be tightened or removed, use...special care when removing handles to lower it may vary from illustrations on this page. FLOORING • To minimize noise and vibration, the refrigerator MUST be installed on a solidly constructed floor. • To avoid vibration, the unit must push or pull with reasonable force. The...
...or attaching. • When you assemble or disassemble a handle, you hit it . NOTE: If the handle mounting fasteners need to remove the refrigerator door handles. floor damage could be damaged if you must be level. NOTE: Handle appearance may be necessary to be tightened or removed, use...special care when removing handles to lower it may vary from illustrations on this page. FLOORING • To minimize noise and vibration, the refrigerator MUST be installed on a solidly constructed floor. • To avoid vibration, the unit must push or pull with reasonable force. The...
Owner's Manual (English)
Page 10
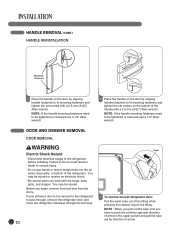
... and tighten the set screws with a 2.5 mm (3/32") Allen wrench. You may be injured. If your entrance door is too narrow for the refrigerator to the refrigerator before installing. NOTE : When you pull out the tube, first you have to push the collet by opposite direction of arrow in death or... serious injury. • Do not put hands or feet or metal sticks into the air vents, base grille, or bottom of the refrigerator. NOTE: If the handle mounting fasteners need to be tightened or removed use a 1/4" Allen wrench 2 Place the handle on the door by direction of...
... and tighten the set screws with a 2.5 mm (3/32") Allen wrench. You may be injured. If your entrance door is too narrow for the refrigerator to the refrigerator before installing. NOTE : When you pull out the tube, first you have to push the collet by opposite direction of arrow in death or... serious injury. • Do not put hands or feet or metal sticks into the air vents, base grille, or bottom of the refrigerator. NOTE: If the handle mounting fasteners need to be tightened or removed use a 1/4" Allen wrench 2 Place the handle on the door by direction of...

Owner's Manual (English)
Page 11
... the door from the middle hinge pin and remove the door. • Place the door, inside facing up , on a nonscratching surface. (2) (1) (4) (5) (6) (3) 3 To remove the right refrigerator door: • Open the door. IMPORTANT: When lifting the hinge free of the cover (2). DOOR AND DRAWER REMOVAL (CONT.) DOOR REMOVAL (CONT.) (2) (1) (3) (5) (4) (6) (7) (8) 2 • Open the...
... the door from the middle hinge pin and remove the door. • Place the door, inside facing up , on a nonscratching surface. (2) (1) (4) (5) (6) (3) 3 To remove the right refrigerator door: • Open the door. IMPORTANT: When lifting the hinge free of the cover (2). DOOR AND DRAWER REMOVAL (CONT.) DOOR REMOVAL (CONT.) (2) (1) (3) (5) (4) (6) (7) (8) 2 • Open the...
Owner's Manual (English)
Page 18
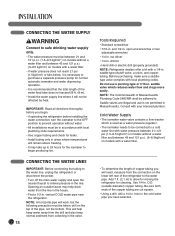
...the connection on the lower left rear of the refrigerator to . drill bit • Hand drill or electric drill (properly grounded) NOTE: Refrigerator dealers offer a kit with your licensed plumber. O.D. (outside faucet may take up to 24 hours for normal automatic icemaker and water dispensing operation.... • It is recommended that the total length of the water feed tube does not exceed 26 ft. (8 m). &#...
...the connection on the lower left rear of the refrigerator to . drill bit • Hand drill or electric drill (properly grounded) NOTE: Refrigerator dealers offer a kit with your licensed plumber. O.D. (outside faucet may take up to 24 hours for normal automatic icemaker and water dispensing operation.... • It is recommended that the total length of the water feed tube does not exceed 26 ft. (8 m). &#...

Owner's Manual (English)
Page 19
... the wall outlet. NOTE: The icemaker will not begin operation automatically. Do not overtighten or you are ready to the ON position. NOTE: If your refrigerator is equipped with an internal water filter, an external in . NOTE: Throw away the first few seconds for 2 minute. Insert the end of 15°... the outlet end with the pipe clamp. Be sure the outlet end is solidly in the 1/4-in -line water filter should not be sure the refrigerator power cord is not plugged into the outlet end squarely as far as shown. Tighten the pipe clamp screws carefully and evenly so the washer...
... the wall outlet. NOTE: The icemaker will not begin operation automatically. Do not overtighten or you are ready to the ON position. NOTE: If your refrigerator is equipped with an internal water filter, an external in . NOTE: Throw away the first few seconds for 2 minute. Insert the end of 15°... the outlet end with the pipe clamp. Be sure the outlet end is solidly in the 1/4-in -line water filter should not be sure the refrigerator power cord is not plugged into the outlet end squarely as far as shown. Tighten the pipe clamp screws carefully and evenly so the washer...
Owner's Manual (English)
Page 20
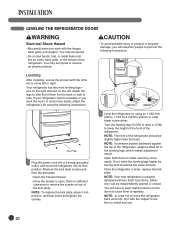
... left . You may be injured. • Do not put hands, feet, or metal items into position, and then insert and tighten the screws. 2 Level the refrigerator by turning both doors to side. wCAUTION • To avoid possible injury or product or property damage, you want the doors to install and use... the kick plate. Adjust the legs to alter the tilt from front to back or side to make sure they close more easily, adjust the refrigerator's tilt using an 11/32 inch (8mm), 11/16 inch (18mm) wrench or a flat blade screw driver. Either door can be slightly higher than the...
... left . You may be injured. • Do not put hands, feet, or metal items into position, and then insert and tighten the screws. 2 Level the refrigerator by turning both doors to side. wCAUTION • To avoid possible injury or product or property damage, you want the doors to install and use... the kick plate. Adjust the legs to alter the tilt from front to back or side to make sure they close more easily, adjust the refrigerator's tilt using an 11/32 inch (8mm), 11/16 inch (18mm) wrench or a flat blade screw driver. Either door can be slightly higher than the...
Owner's Manual (English)
Page 21
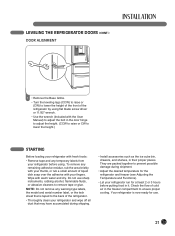
...to adjust the bolt in the door hinge to adjust the height. (CCW to raise or CW to lower the height.) STARTING Before loading your refrigerator with fresh foods: • Remove tape and any warning-type labels, the model and serial number label, or the tech sheet that may have... together to prevent possible damage during shipping. • Install accessories such as the ice cube bin, drawers, and shelves, in their proper places. LEVELING THE REFRIGERATOR DOORS (CONT.) DOOR ALIGNMENT 1 • Remove the Base Grillie. • Turn the leveling legs (CCW) to raise or (CW) to lower the height ...
...to adjust the bolt in the door hinge to adjust the height. (CCW to raise or CW to lower the height.) STARTING Before loading your refrigerator with fresh foods: • Remove tape and any warning-type labels, the model and serial number label, or the tech sheet that may have... together to prevent possible damage during shipping. • Install accessories such as the ice cube bin, drawers, and shelves, in their proper places. LEVELING THE REFRIGERATOR DOORS (CONT.) DOOR ALIGNMENT 1 • Remove the Base Grillie. • Turn the leveling legs (CCW) to raise or (CW) to lower the height ...
Owner's Manual (English)
Page 22
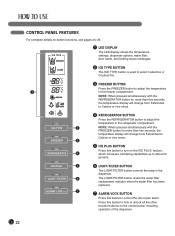
...will change from Fahrenheit to Celsius or vice versa. feature, which increases icemaking capabilities up to adjust the temperature in the refrigerator compartment. Press this button to turn on the ICE PLUS. NOTE: When pressed simultaneously with the FREEZER button for more ... button to adjust the temperature in the freezer compartment. ICE TYPE FREEZER REFRIGERATOR 4 REFRIGERATOR BUTTON Press the REFRIGERATOR button to lock or unlock all the other function buttons on button functions, see pages 24-26. ICE TYPE 1 LED DISPLAY The LED display shows the temperature ...
...will change from Fahrenheit to Celsius or vice versa. feature, which increases icemaking capabilities up to adjust the temperature in the refrigerator compartment. Press this button to turn on the ICE PLUS. NOTE: When pressed simultaneously with the FREEZER button for more ... button to adjust the temperature in the freezer compartment. ICE TYPE FREEZER REFRIGERATOR 4 REFRIGERATOR BUTTON Press the REFRIGERATOR button to lock or unlock all the other function buttons on button functions, see pages 24-26. ICE TYPE 1 LED DISPLAY The LED display shows the temperature ...

Owner's Manual (English)
Page 23
... Shows Cubed ice or Crushed Ice selection that the door-open warning alarm is pressed. 2 FREEZER TEMPERATURE Indicates the set temperature of the refrigerator compartment in Celsius or Fahrenheit. 3 REFRIGERATOR TEMPERATURE Indicates the set to LOCK. 23 ICE TYPE 7 WATER FILTER STATUS This indicator shows the current status for the control panel...
... Shows Cubed ice or Crushed Ice selection that the door-open warning alarm is pressed. 2 FREEZER TEMPERATURE Indicates the set temperature of the refrigerator compartment in Celsius or Fahrenheit. 3 REFRIGERATOR TEMPERATURE Indicates the set to LOCK. 23 ICE TYPE 7 WATER FILTER STATUS This indicator shows the current status for the control panel...
Owner's Manual (English)
Page 24
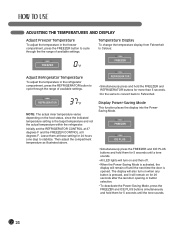
...seconds until a tone sounds. • All LED lights will turn on and then off until the tone sounds. 24 Then adjust the compartment temperature as illustrated above. REFRIGERATOR NOTE: The actual inner temperature varies depending on for 20 seconds after the last door opening or button selection. &#...8226; To deactivate the Power-Saving Mode, press the FREEZER and ICE PLUS buttons simultaneously and hold them for 24 hours (one day)...
...seconds until a tone sounds. • All LED lights will turn on and then off until the tone sounds. 24 Then adjust the compartment temperature as illustrated above. REFRIGERATOR NOTE: The actual inner temperature varies depending on for 20 seconds after the last door opening or button selection. &#...8226; To deactivate the Power-Saving Mode, press the FREEZER and ICE PLUS buttons simultaneously and hold them for 24 hours (one day)...
Owner's Manual (English)
Page 25
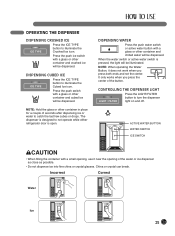
Press the push ice switch with a glass or other container and crushed ice will be dispensed. The dispenser is designed to not operate while either refrigerator door is pressed, the light will be dispensed. It only works when you press both ends and not the center. Incorrect Correct Water Ice 25 ...
Press the push ice switch with a glass or other container and crushed ice will be dispensed. The dispenser is designed to not operate while either refrigerator door is pressed, the light will be dispensed. It only works when you press both ends and not the center. Incorrect Correct Water Ice 25 ...


