
Owner's Manual (English)
Page 2
Your new LG French Door Refrigerator combines advanced cooling technology with many years of Foods 30 Shelf Height Adjustment 31 CARE AND CLEANING Removing and Replacing Components 32 Cleaning the Refrigerator 35 General Information 35 Replacing the Water Filter 36 TROUBLESHOOTING Before Calling for...Flooring 9 Handle Removal 9 Door and Drawer Removal 10 Connecting the Water Supply 18 Connecting the Water Lines 18 Leveling the Refrigerator Doors 20 Starting 21 HOW TO USE Control Panel Features 22 The LED Display 23 Adjusting the Temperatures and Display 24 Operating the ...
Your new LG French Door Refrigerator combines advanced cooling technology with many years of Foods 30 Shelf Height Adjustment 31 CARE AND CLEANING Removing and Replacing Components 32 Cleaning the Refrigerator 35 General Information 35 Replacing the Water Filter 36 TROUBLESHOOTING Before Calling for...Flooring 9 Handle Removal 9 Door and Drawer Removal 10 Connecting the Water Supply 18 Connecting the Water Lines 18 Leveling the Refrigerator Doors 20 Starting 21 HOW TO USE Control Panel Features 22 The LED Display 23 Adjusting the Temperatures and Display 24 Operating the ...

Owner's Manual (English)
Page 3
...cracks or abrasion damage along its length or at the circuit breaker or fuse box in order to the front of the refrigerator. They could damage the refrigerator and seriously injure themselves. • Keep fingers out of hazards that releases the cubes. Read all safety messages. wWARNING ... in minor or moderate injury, or product damage. wWARNING You can be performed by pulling on the automatic icemaking mechanism while the refrigerator is the safety alert symbol. It alerts you to safety messages that inform you of pinch point areas; All safety messages will cause...
...cracks or abrasion damage along its length or at the circuit breaker or fuse box in order to the front of the refrigerator. They could damage the refrigerator and seriously injure themselves. • Keep fingers out of hazards that releases the cubes. Read all safety messages. wWARNING ... in minor or moderate injury, or product damage. wWARNING You can be performed by pulling on the automatic icemaking mechanism while the refrigerator is the safety alert symbol. It alerts you to safety messages that inform you of pinch point areas; All safety messages will cause...

Owner's Manual (English)
Page 4
... be dangerous to harm stratospheric ozone. If you are believed to eat. The United States Department of Child Entrapment Discarded or abandoned refrigerators are dangerous, even if they are disposing of it. Even partial thawing and refreezing reduces the quality of many other foods. The... eating quality of red meats is poor or questionable, dispose of your old refrigerator or freezer: • Take off -color should not be refrozen and should be eaten. BASIC SAFETY PRECAUTIONS (CONT.) • DO ...
... be dangerous to harm stratospheric ozone. If you are believed to eat. The United States Department of Child Entrapment Discarded or abandoned refrigerators are dangerous, even if they are disposing of it. Even partial thawing and refreezing reduces the quality of many other foods. The... eating quality of red meats is poor or questionable, dispose of your old refrigerator or freezer: • Take off -color should not be refrozen and should be eaten. BASIC SAFETY PRECAUTIONS (CONT.) • DO ...

Owner's Manual (English)
Page 5
... the clearance needed for 120 volts, 60 Hz, AC only, and fused at 20 amperes. However, if you are finished, reconnect the refrigerator to the electrical source and reset the control (Thermostat, Refrigerator Control, or Freezer Control, depending on the model) to have LED interior lighting ...safety, this appliance be 20 amperes (minimum) and 120 volts. Have the wall outlet and the circuit checked by a qualified electrician to make sure the outlet is your personal responsibility and obligation to the desired setting. RECOMMENDED GROUNDING METHOD The refrigerator should be plugged into ...
... the clearance needed for 120 volts, 60 Hz, AC only, and fused at 20 amperes. However, if you are finished, reconnect the refrigerator to the electrical source and reset the control (Thermostat, Refrigerator Control, or Freezer Control, depending on the model) to have LED interior lighting ...safety, this appliance be 20 amperes (minimum) and 120 volts. Have the wall outlet and the circuit checked by a qualified electrician to make sure the outlet is your personal responsibility and obligation to the desired setting. RECOMMENDED GROUNDING METHOD The refrigerator should be plugged into ...
Owner's Manual (English)
Page 6
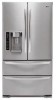
... freezer door is automatically closed within 30° of the refrigerator, it is automatically closed. (The door is left open for a 24- The in-door design creates more shelf space. 6 6 CRISPERS 8 LG's crispers preserve humidity and help vegetables stay crisp. 7 7 AUTO CLOSING HINGE When you ...5 IN-DOOR ICE BIN The icemaker automatically produces 80-130 5 ice cubes in a 24-hour period to increase ice production by about 20 percent. 3 FILTERED WATER AND ICE DISPENSER The water dispenser offers fresh, chilled, filtered water through the door. hour period to keep the ...
... freezer door is automatically closed within 30° of the refrigerator, it is automatically closed. (The door is left open for a 24- The in-door design creates more shelf space. 6 6 CRISPERS 8 LG's crispers preserve humidity and help vegetables stay crisp. 7 7 AUTO CLOSING HINGE When you ...5 IN-DOOR ICE BIN The icemaker automatically produces 80-130 5 ice cubes in a 24-hour period to increase ice production by about 20 percent. 3 FILTERED WATER AND ICE DISPENSER The water dispenser offers fresh, chilled, filtered water through the door. hour period to keep the ...

Owner's Manual (English)
Page 7
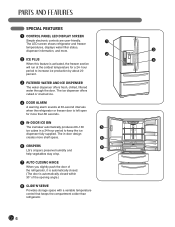
... outlined in the Special Features section, there are several other important components that are referenced in this manual. 1 ADJUSTABLE REFRIGERATOR SHELVING The refrigerator compartment shelves are adjustable to allow flexibility for storage needs. 4 LED INTERIOR LAMPS Two separate LED arrays light the freezer and... refrigerator interiors. 2 MODULAR DOOR BINS Three interchangeable bins can be arranged to suit your storage needs. 5 FIXED DOOR BIN 3 REMOVABLE ...
... outlined in the Special Features section, there are several other important components that are referenced in this manual. 1 ADJUSTABLE REFRIGERATOR SHELVING The refrigerator compartment shelves are adjustable to allow flexibility for storage needs. 4 LED INTERIOR LAMPS Two separate LED arrays light the freezer and... refrigerator interiors. 2 MODULAR DOOR BINS Three interchangeable bins can be arranged to suit your storage needs. 5 FIXED DOOR BIN 3 REMOVABLE ...
Owner's Manual (English)
Page 8
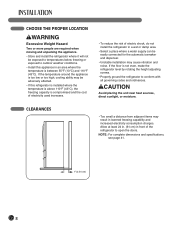
... LOCATION wWARNING Excessive Weight Hazard Two or more people are required when moving and unpacking the appliance. • Store and install the refrigerator where it will not be exposed to temperatures below freezing or exposed to outdoor weather conditions. • Install this...above 110°F (43°C), the freezing capacity is compromised and the cost of electricity used increases. • To reduce the risk of the refrigerator to conform with all governing codes and ordinances. CLEARANCES • Too small a distance from adjacent items may cause vibration and noise. If the ...
... LOCATION wWARNING Excessive Weight Hazard Two or more people are required when moving and unpacking the appliance. • Store and install the refrigerator where it will not be exposed to temperatures below freezing or exposed to outdoor weather conditions. • Install this...above 110°F (43°C), the freezing capacity is compromised and the cost of electricity used increases. • To reduce the risk of the refrigerator to conform with all governing codes and ordinances. CLEARANCES • Too small a distance from adjacent items may cause vibration and noise. If the ...

Owner's Manual (English)
Page 9
...occur. floor damage could be damaged if you hit it . • Carpeting and soft tile surfaces are not recommended. • Never install the refrigerator on this page. NOTE: It is necessary to lower it with a hammer while removing or attaching. • When you assemble or disassemble a ...handle, you must be level. Turn the leveling legs clockwise to raise the unit or counterclockwise to move the refrigerator through a house door, it is recommend that the doors be slightly higher than the rear to protect the floor. wCAUTION • Use special...
...occur. floor damage could be damaged if you hit it . • Carpeting and soft tile surfaces are not recommended. • Never install the refrigerator on this page. NOTE: It is necessary to lower it with a hammer while removing or attaching. • When you assemble or disassemble a ...handle, you must be level. Turn the leveling legs clockwise to raise the unit or counterclockwise to move the refrigerator through a house door, it is recommend that the doors be slightly higher than the rear to protect the floor. wCAUTION • Use special...

Owner's Manual (English)
Page 10
... by direction of arrow. 10 If your entrance door is too narrow for the refrigerator to pass through, remove the refrigerator door and move the refrigerator sideways through the doorway. 1 To remove the left refrigerator door: Pull the water tube out of the fitting while pressing the release ring ...or serious injury. • Do not put hands or feet or metal sticks into the air vents, base grille, or bottom of the refrigerator. HANDLE REMOVAL (CONT.) HANDLE REINSTALLATION Mounting Fasteners 1 Place the handle on the door by aligning handle footprints to fit mounting fasteners and tighten...
... by direction of arrow. 10 If your entrance door is too narrow for the refrigerator to pass through, remove the refrigerator door and move the refrigerator sideways through the doorway. 1 To remove the left refrigerator door: Pull the water tube out of the fitting while pressing the release ring ...or serious injury. • Do not put hands or feet or metal sticks into the air vents, base grille, or bottom of the refrigerator. HANDLE REMOVAL (CONT.) HANDLE REINSTALLATION Mounting Fasteners 1 Place the handle on the door by aligning handle footprints to fit mounting fasteners and tighten...

Owner's Manual (English)
Page 11
... the door from the middle hinge pin and remove the door. • Place the door, inside facing up , on a nonscratching surface. (2) (1) (4) (5) (6) (3) 3 To remove the right refrigerator door: • Open the door. IMPORTANT: When lifting the hinge free of the latch, be careful that the door does not fall forward. • Lift...
... the door from the middle hinge pin and remove the door. • Place the door, inside facing up , on a nonscratching surface. (2) (1) (4) (5) (6) (3) 3 To remove the right refrigerator door: • Open the door. IMPORTANT: When lifting the hinge free of the latch, be careful that the door does not fall forward. • Lift...

Owner's Manual (English)
Page 18
... a drill, drill a 1/4-in the cold water pipe you have selected. Add 7 ft. (2.1 m) to allow for moving the refrigerator for cleaning. Use 1/4-in . drill bit • Hand drill or electric drill (properly grounded) NOTE: Refrigerator dealers offer a kit with a 1/4-in . Be sure both ends of the copper tubing... in . open the nearest faucet to relieve pressure in the line. Opening an outside diameter) copper tubing. vertical COLD water pipe near the refrigerator. This will help drain water from the line in the house. • Find a 1/2-in . and 1/2-in . NOTE: The Commonwealth ...
... a drill, drill a 1/4-in the cold water pipe you have selected. Add 7 ft. (2.1 m) to allow for moving the refrigerator for cleaning. Use 1/4-in . drill bit • Hand drill or electric drill (properly grounded) NOTE: Refrigerator dealers offer a kit with a 1/4-in . Be sure both ends of the copper tubing... in . open the nearest faucet to relieve pressure in the line. Opening an outside diameter) copper tubing. vertical COLD water pipe near the refrigerator. This will help drain water from the line in the house. • Find a 1/2-in . and 1/2-in . NOTE: The Commonwealth ...

Owner's Manual (English)
Page 19
... Water Pipe Pipe Clamp Coil of Polyethelyne or Copper Tubing Shutoff Valve Compression Sleeve Compression Nut IMPORTANT: Before connecting the tubing to the refrigerator, be used . While holding the tubing, tighten the fitting. Tighten the pipe clamp screws carefully and evenly so the washer makes ... Place the free end of ice (about 20 pieces). 19 NOTE: It may crush the copper tubing, especially if soft (coiled) copper tubing is solidly in the 1/4-in the refrigerator. • Arrange the coil of copper tubing behind the refrigerator so it reaches its operating temperature of the...
... Water Pipe Pipe Clamp Coil of Polyethelyne or Copper Tubing Shutoff Valve Compression Sleeve Compression Nut IMPORTANT: Before connecting the tubing to the refrigerator, be used . While holding the tubing, tighten the fitting. Tighten the pipe clamp screws carefully and evenly so the washer makes ... Place the free end of ice (about 20 pieces). 19 NOTE: It may crush the copper tubing, especially if soft (coiled) copper tubing is solidly in the 1/4-in the refrigerator. • Arrange the coil of copper tubing behind the refrigerator so it reaches its operating temperature of the...

Owner's Manual (English)
Page 20
...the doors to close them completely. Turn the leveling legs (CCW) to raise or (CW) to install and use. 20 Your refrigerator has two front leveling legs- If your refrigerator seems unsteady or you want the doors to perform the following instructions: LMX21981** LMX25981** Kick Plate 1 Plug the power... cord into a 3-prong grounded outlet, and move the refrigerator back and forth, fix it into the air vents, base grille, or the bottom of the kick plate. NOTE: The front of the ...
...the doors to close them completely. Turn the leveling legs (CCW) to raise or (CW) to install and use. 20 Your refrigerator has two front leveling legs- If your refrigerator seems unsteady or you want the doors to perform the following instructions: LMX21981** LMX25981** Kick Plate 1 Plug the power... cord into a 3-prong grounded outlet, and move the refrigerator back and forth, fix it into the air vents, base grille, or the bottom of the kick plate. NOTE: The front of the ...

Owner's Manual (English)
Page 21
... • Remove the Base Grillie. • Turn the leveling legs (CCW) to raise or (CW) to lower the height of the front of the refrigerator by using . NOTE: Do not remove any warning-type labels, the model and serial number label, or the tech sheet that may have accumulated during... shipment. • Adjust the desired temperature for the refrigerator and freezer (see Adjusting the Temperature and Functions). • Let your refrigerator and wipe off all dust that is now ready for at least 2 or 3 hours before using flat blade ...
... • Remove the Base Grillie. • Turn the leveling legs (CCW) to raise or (CW) to lower the height of the front of the refrigerator by using . NOTE: Do not remove any warning-type labels, the model and serial number label, or the tech sheet that may have accumulated during... shipment. • Adjust the desired temperature for the refrigerator and freezer (see Adjusting the Temperature and Functions). • Let your refrigerator and wipe off all dust that is now ready for at least 2 or 3 hours before using flat blade ...

Owner's Manual (English)
Page 22
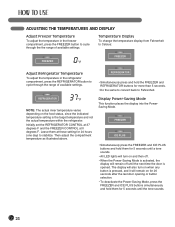
ICE TYPE FREEZER REFRIGERATOR 4 REFRIGERATOR BUTTON Press the REFRIGERATOR button to about 20 percent. feature, which increases icemaking capabilities up to adjust the temperature in the refrigerator compartment. ICE PLUS LIGHT / FILTER ALARM / LOCK 3SECS 6 LIGHT/FILTER BUTTON The LIGHT/FILTER button controls the ... been replaced. 7 ALARM/LOCK BUTTON Press this button to control the door-open alarm. NOTE: When pressed simultaneously with the REFRIGERATOR button for more than five seconds, the temperature display will change from Fahrenheit to Celsius or vice versa. ICE TYPE 1 LED...
ICE TYPE FREEZER REFRIGERATOR 4 REFRIGERATOR BUTTON Press the REFRIGERATOR button to about 20 percent. feature, which increases icemaking capabilities up to adjust the temperature in the refrigerator compartment. ICE PLUS LIGHT / FILTER ALARM / LOCK 3SECS 6 LIGHT/FILTER BUTTON The LIGHT/FILTER button controls the ... been replaced. 7 ALARM/LOCK BUTTON Press this button to control the door-open alarm. NOTE: When pressed simultaneously with the REFRIGERATOR button for more than five seconds, the temperature display will change from Fahrenheit to Celsius or vice versa. ICE TYPE 1 LED...

Owner's Manual (English)
Page 23
... dispensed when the push switch is pressed. 2 FREEZER TEMPERATURE Indicates the set temperature of the freezer compartment in Celsius or Fahrenheit. 3 REFRIGERATOR TEMPERATURE Indicates the set temperature of the refrigerator compartment in Celsius or Fahrenheit. 4 ICE PLUS When the ICE PLUS button is pressed, the display will indicate the selected function has...
... dispensed when the push switch is pressed. 2 FREEZER TEMPERATURE Indicates the set temperature of the freezer compartment in Celsius or Fahrenheit. 3 REFRIGERATOR TEMPERATURE Indicates the set temperature of the refrigerator compartment in Celsius or Fahrenheit. 4 ICE PLUS When the ICE PLUS button is pressed, the display will indicate the selected function has...
Owner's Manual (English)
Page 24
.... ADJUSTING THE TEMPERATURES AND DISPLAY Adjust Freezer Temperature To adjust the temperature in the refrigerator compartment, press the REFRIGERATOR button to cycle through the the range of available settings. REFRIGERATOR NOTE: The actual inner temperature varies depending on for 20 seconds after the last door opening or button selection. • To deactivate the Power...
.... ADJUSTING THE TEMPERATURES AND DISPLAY Adjust Freezer Temperature To adjust the temperature in the refrigerator compartment, press the REFRIGERATOR button to cycle through the the range of available settings. REFRIGERATOR NOTE: The actual inner temperature varies depending on for 20 seconds after the last door opening or button selection. • To deactivate the Power...

Owner's Manual (English)
Page 25
... ICE ICE TYPE Press the ICE TYPE button to turn the dispenser light on and off. The dispenser is designed to not operate while either refrigerator door is pressed, the light will be illuminated. NOTE: When operating the Water Button, it near the opening , use it does not work when you...
... ICE ICE TYPE Press the ICE TYPE button to turn the dispenser light on and off. The dispenser is designed to not operate while either refrigerator door is pressed, the light will be illuminated. NOTE: When operating the Water Button, it near the opening , use it does not work when you...

Owner's Manual (English)
Page 26
...800-243-0000 (24 hours per day/7 days per week) and select the option to locate an authorized servicer. 26 NOTE: Contact your refrigerator, and a diagnostic code will illuminate when activated. NOTE: If a diagnostic code appears in the display. Press the ALARM/LOCK button once ... cube taste deteriorates noticeably. SETTING THE FUNCTIONS Press the button for a 24-hour period to increase icemaking by up to about 20%, and then turns off automatically. DIAGNOSTIC FAILURE DETECTION The diagnostic function automatically detects problems with your local service center if the alarm...
...800-243-0000 (24 hours per day/7 days per week) and select the option to locate an authorized servicer. 26 NOTE: Contact your refrigerator, and a diagnostic code will illuminate when activated. NOTE: If a diagnostic code appears in the display. Press the ALARM/LOCK button once ... cube taste deteriorates noticeably. SETTING THE FUNCTIONS Press the button for a 24-hour period to increase icemaking by up to about 20%, and then turns off automatically. DIAGNOSTIC FAILURE DETECTION The diagnostic function automatically detects problems with your local service center if the alarm...

Owner's Manual (English)
Page 27
... label on the latch firmly where noted to the temperature of the ice bin door and dispenser chute. The icemaker will freeze food in the refrigerator compartment. Keep the ice bin door closed tightly, the cold air in -door ice bin, grip the front handle, slightly lift the lower part, and... ice. Sometimes the ice piles up to close the ice bin door; IN-DOOR ICE BIN wCAUTION • Keep hands and tools out of the refrigerator compartment.
... label on the latch firmly where noted to the temperature of the ice bin door and dispenser chute. The icemaker will freeze food in the refrigerator compartment. Keep the ice bin door closed tightly, the cold air in -door ice bin, grip the front handle, slightly lift the lower part, and... ice. Sometimes the ice piles up to close the ice bin door; IN-DOOR ICE BIN wCAUTION • Keep hands and tools out of the refrigerator compartment.


