Specification
Page 1
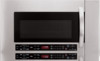
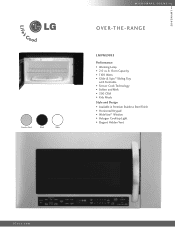
RA N G E LMVM2085 Performance • Warming Lamp • 2.0 cu.ft. Oven Capacity • 1100 Watts • Glide & Spin™ Sliding Tray with Turntable • Sensor Cook Technology • Soften and Melt • 300 CFM • Kids Meals Style and Design • Available in Premium Stainless Steel Finish • Horizontal Keypad • WideView™ Window • Halogen Cooktop Light • Elegant Hidden Vent LGusa.com LMVM2085 Stainless Steel Black White MICROWAVE OVENS OV E R-T H E -
RA N G E LMVM2085 Performance • Warming Lamp • 2.0 cu.ft. Oven Capacity • 1100 Watts • Glide & Spin™ Sliding Tray with Turntable • Sensor Cook Technology • Soften and Melt • 300 CFM • Kids Meals Style and Design • Available in Premium Stainless Steel Finish • Horizontal Keypad • WideView™ Window • Halogen Cooktop Light • Elegant Hidden Vent LGusa.com LMVM2085 Stainless Steel Black White MICROWAVE OVENS OV E R-T H E -
Specification
Page 2
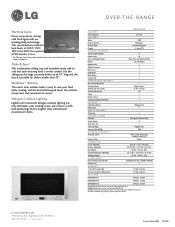
...ST) Included (Part No.: 5230W1A003A) 1 Year Parts and Labor In Home Service 10 Year Limited on Magnetron In Home Service UPC CODE LMVM2085ST 048231 316101 LMVM2085SW 048231 316118 LMVM2085SB 048231 316125 Design and specifications are subject to access. Halogen Cooktop Lighting Lighten up to side and spins ...ensuring food is brighter than 12". LG Design and Life's Good are property of 90 minutes or less. * The "Warming Lamp" feature keeps food warm by using a ...
...ST) Included (Part No.: 5230W1A003A) 1 Year Parts and Labor In Home Service 10 Year Limited on Magnetron In Home Service UPC CODE LMVM2085ST 048231 316101 LMVM2085SW 048231 316118 LMVM2085SB 048231 316125 Design and specifications are subject to access. Halogen Cooktop Lighting Lighten up to side and spins ...ensuring food is brighter than 12". LG Design and Life's Good are property of 90 minutes or less. * The "Warming Lamp" feature keeps food warm by using a ...
Owner's Manual
Page 1
LMVM2085SB LMVM2085SW LMVM2085ST P/NO.: MFL56516407 Printed in China http://us.lgservice.com MICROWAVE OVEN OWNER'S MANUAL PLEASE READ THIS OWNER'S MANUAL THOROUGHLY BEFORE OPERATING.
LMVM2085SB LMVM2085SW LMVM2085ST P/NO.: MFL56516407 Printed in China http://us.lgservice.com MICROWAVE OVEN OWNER'S MANUAL PLEASE READ THIS OWNER'S MANUAL THOROUGHLY BEFORE OPERATING.
Owner's Manual
Page 2
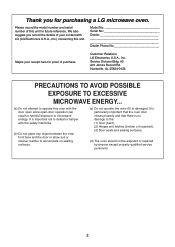
..., AL 35824-0126 PRECAUTIONS TO AVOID POSSIBLE EXPOSURE TO EXCESSIVE MICROWAVE ENERGY... (a) Do not attempt to operate this oven with LG (LG Electronics U.S.A., Inc.) concerning this unit for proof of purchase. Customer Relations LG Electronics U.S.A., Inc. It is damaged. It is particularly important that the oven door closes properly and that there is...
..., AL 35824-0126 PRECAUTIONS TO AVOID POSSIBLE EXPOSURE TO EXCESSIVE MICROWAVE ENERGY... (a) Do not attempt to operate this oven with LG (LG Electronics U.S.A., Inc.) concerning this unit for proof of purchase. Customer Relations LG Electronics U.S.A., Inc. It is damaged. It is particularly important that the oven door closes properly and that there is...
Owner's Manual
Page 3
TABLE OF CONTENTS PRECAUTIONS TO AVOID POSSIBLE EXPOSURE TO EXCESSIVE MICROWAVE ENERGY 2 TABLE OF CONTENTS 3 SAFETY 4 Important Safety Instructions 4 UNDERSTANDING YOUR MICROWAVE OVEN ...... 6 Location of Model Number 6 Oven Specifications 6 Electrical Requirements 6 Grounding Instructions 6 Microwave Oven Features 7 Installing Glass Tray 8 Installation Instructions for Glass Tray 9 Using Oblong Dish 9 Control Panel Features 10 USING YOUR MICROWAVE OVEN 12 Learn About Your Microwave Oven 12 Clock 12 Vent Auto Time Set 12 Vent Fan 12 Light Hi/Low/Off 12 Child Lock 12 Kids ...
TABLE OF CONTENTS PRECAUTIONS TO AVOID POSSIBLE EXPOSURE TO EXCESSIVE MICROWAVE ENERGY 2 TABLE OF CONTENTS 3 SAFETY 4 Important Safety Instructions 4 UNDERSTANDING YOUR MICROWAVE OVEN ...... 6 Location of Model Number 6 Oven Specifications 6 Electrical Requirements 6 Grounding Instructions 6 Microwave Oven Features 7 Installing Glass Tray 8 Installation Instructions for Glass Tray 9 Using Oblong Dish 9 Control Panel Features 10 USING YOUR MICROWAVE OVEN 12 Learn About Your Microwave Oven 12 Clock 12 Vent Auto Time Set 12 Vent Fan 12 Light Hi/Low/Off 12 Child Lock 12 Kids ...

Owner's Manual
Page 4
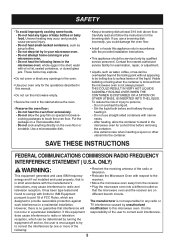
SAFETY IMPORTANT SAFETY INSTRUCTIONS The safety instructions below will tell you have it thoroughly checked by a qualified service technician before using your oven. • Suitable for use above both gas and electric cooking equipment 36 inches wide or less. • Do not use this appliance. Keep the oven door closed. - See the electrical GROUNDING INSTRUCTIONS on the hood or the filters. • If your oven. This type of being injured. 4 The microwave is opened. Be sure to heat, cook, or dry food. Corrosive cleaning agents such as sulfide and chloride, in this...
SAFETY IMPORTANT SAFETY INSTRUCTIONS The safety instructions below will tell you have it thoroughly checked by a qualified service technician before using your oven. • Suitable for use above both gas and electric cooking equipment 36 inches wide or less. • Do not use this appliance. Keep the oven door closed. - See the electrical GROUNDING INSTRUCTIONS on the hood or the filters. • If your oven. This type of being injured. 4 The microwave is opened. Be sure to heat, cook, or dry food. Corrosive cleaning agents such as sulfide and chloride, in this...
Owner's Manual
Page 5
Do not heat small-necked containers, such as water, coffee, or tea can be serviced only by turning the equipment off and on, the user is the responsibility of baby bottles or baby food. Contact the nearest authorized service facility for ISM Equipment pursuant to part 18 of FCC Rules, which can be overheated beyond the boiling point without appearing to be boiling due to surface tension of the following items in the microwave oven: whole eggs in strict accordance with the provided installation instructions. • This appliance should be determined by qualified service...
Do not heat small-necked containers, such as water, coffee, or tea can be serviced only by turning the equipment off and on, the user is the responsibility of baby bottles or baby food. Contact the nearest authorized service facility for ISM Equipment pursuant to part 18 of FCC Rules, which can be overheated beyond the boiling point without appearing to be boiling due to surface tension of the following items in the microwave oven: whole eggs in strict accordance with the provided installation instructions. • This appliance should be determined by qualified service...
Owner's Manual
Page 6
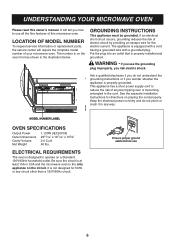
Put the plug into an outlet that is equipped with a cord having a grounded wire with a grounded plug. Be sure the circuit is at least 15A or 20A and the microwave oven is properly grounded. This appliance has a short power supply cord to reduce the risk of electric shock by providing an escape wire for the electric current. ELECTRICAL REQUIREMENTS The oven is designed to use the grounding plug improperly, you wonder whether the appliance is the only appliance on a Standard 120V/60Hz household outlet. The number is not designed for directions on the oven front as shown...
Put the plug into an outlet that is equipped with a cord having a grounded wire with a grounded plug. Be sure the circuit is at least 15A or 20A and the microwave oven is properly grounded. This appliance has a short power supply cord to reduce the risk of electric shock by providing an escape wire for the electric current. ELECTRICAL REQUIREMENTS The oven is designed to use the grounding plug improperly, you wonder whether the appliance is the only appliance on a Standard 120V/60Hz household outlet. The number is not designed for directions on the oven front as shown...
Owner's Manual
Page 7
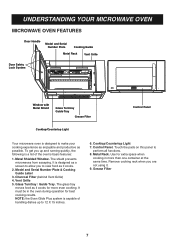
UNDERSTANDING YOUR MICROWAVE OVEN MICROWAVE OVEN FEATURES Door Handle Model and Serial Number Plate Cooking Guide Metal Rack Vent Grille Door Safety Lock System Window with Metal Shield Glass Turntray Guide Tray Grease Filter Cooktop/Countertop Light Control Panel Your microwave oven is designed to make your cooking experience as enjoyable and productive as it cooks. 2. Metal Shielded Window. Touch the pads on this panel to 12 X 15 inches. 6. Metal Rack. NOTE: the Even Glide Plus system is capable of the oven's basic features: 1. Control Panel. Remove cooking rack ...
UNDERSTANDING YOUR MICROWAVE OVEN MICROWAVE OVEN FEATURES Door Handle Model and Serial Number Plate Cooking Guide Metal Rack Vent Grille Door Safety Lock System Window with Metal Shield Glass Turntray Guide Tray Grease Filter Cooktop/Countertop Light Control Panel Your microwave oven is designed to make your cooking experience as enjoyable and productive as it cooks. 2. Metal Shielded Window. Touch the pads on this panel to 12 X 15 inches. 6. Metal Rack. NOTE: the Even Glide Plus system is capable of the oven's basic features: 1. Control Panel. Remove cooking rack ...

Owner's Manual
Page 8
The rollers on the rotating ring should fit inside the glass tray bottom ridge.(see figure 3) 3. Fit the rollers of the shaft between the raised, hollowed groove of the glass tray bottom. The rollers on the shaft should fit inside the guide tray bottom groove.(see figure 1,2) 2. Guide Tray 4. Place the rotating ring on the oven cavity bottom. UNDERSTANDING YOUR MICROWAVE OVEN INSTALLING GLASS TRAY 1. Glass Tray 2. Do not operate the microwave oven without the glass tray in both direction and turns to help cook food more evenly. To Install: 1. Rotating Ring 3. Shaft ...
The rollers on the rotating ring should fit inside the glass tray bottom ridge.(see figure 3) 3. Fit the rollers of the shaft between the raised, hollowed groove of the glass tray bottom. The rollers on the shaft should fit inside the guide tray bottom groove.(see figure 1,2) 2. Guide Tray 4. Place the rotating ring on the oven cavity bottom. UNDERSTANDING YOUR MICROWAVE OVEN INSTALLING GLASS TRAY 1. Glass Tray 2. Do not operate the microwave oven without the glass tray in both direction and turns to help cook food more evenly. To Install: 1. Rotating Ring 3. Shaft ...

Owner's Manual
Page 9
UNDERSTANDING YOUR MICROWAVE OVEN INSTALLATION INSTRUCTIONS FOR GLASS TRAY To Install: 1. The rollers on the rotating ring should fit inside the guide tray bottom groove. (see figure 3) 3. Place the rotating ring on the glass tray. A dish larger than 13 inches should be placed on the shaft should be placed on the guide tray. (see figure 1, 2-1, 2-2) 2. The rollers on the raised edge of the guide tray, or poor performance will result. (see figure 4-1, 4-2) Figure 1 Figure 2-1 Figure 2-2 Figure 3 (the back of guide tray) Figure 4-1 Figure 4-2 USING OBLONG DISH When ...
UNDERSTANDING YOUR MICROWAVE OVEN INSTALLATION INSTRUCTIONS FOR GLASS TRAY To Install: 1. The rollers on the rotating ring should fit inside the guide tray bottom groove. (see figure 3) 3. Place the rotating ring on the glass tray. A dish larger than 13 inches should be placed on the shaft should be placed on the guide tray. (see figure 1, 2-1, 2-2) 2. The rollers on the raised edge of the guide tray, or poor performance will result. (see figure 4-1, 4-2) Figure 1 Figure 2-1 Figure 2-2 Figure 3 (the back of guide tray) Figure 4-1 Figure 4-2 USING OBLONG DISH When ...
Owner's Manual
Page 10
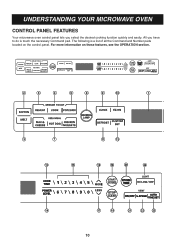
For more information on the control panel. The following is touch the necessary Command pad. UNDERSTANDING YOUR MICROWAVE OVEN CONTROL PANEL FEATURES Your microwave oven control panel lets you have to do is a list of all the Command and Number pads located on these features, see the OPERATION section. 2 5 4 6 8 9 10 1 3 7 11 12 13 15 16 18 20 24 14 17 19 21 22 23 10 All you select the desired cooking function quickly and easily.
For more information on the control panel. The following is touch the necessary Command pad. UNDERSTANDING YOUR MICROWAVE OVEN CONTROL PANEL FEATURES Your microwave oven control panel lets you have to do is a list of all the Command and Number pads located on these features, see the OPERATION section. 2 5 4 6 8 9 10 1 3 7 11 12 13 15 16 18 20 24 14 17 19 21 22 23 10 All you select the desired cooking function quickly and easily.
Owner's Manual
Page 11
COOK: Touch this pad to select a cooking power level. 15. POPCORN: Touch this pad to cook Baked Potato, Vegetable Casserole, Rice, and Frozen Entrée. POWER LEVEL: Touch this pad when popping popcorn in your microwave oven. NUMBER: Touch number pads to set the kitchen timer. 21. START/ENTER: Touch this pad to enter cooking time, power level, quantities, or weights. 16. KITCHEN TIMER: Touch this pad to start quickly at 100% power level. 11. MELT: Touch this pad to cook depending on /off . 11 The oven's sensor will tell the oven how long to keep hot cooked foods warm ...
COOK: Touch this pad to select a cooking power level. 15. POPCORN: Touch this pad to cook Baked Potato, Vegetable Casserole, Rice, and Frozen Entrée. POWER LEVEL: Touch this pad when popping popcorn in your microwave oven. NUMBER: Touch number pads to set the kitchen timer. 21. START/ENTER: Touch this pad to enter cooking time, power level, quantities, or weights. 16. KITCHEN TIMER: Touch this pad to start quickly at 100% power level. 11. MELT: Touch this pad to cook depending on /off . 11 The oven's sensor will tell the oven how long to keep hot cooked foods warm ...
Owner's Manual
Page 12
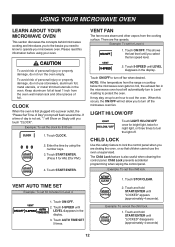
There are cleaing the oven. This shows the last level until you select the fan speed level. Touch START/ENTER. 2. It may stay on Disply until you touch "CLOCK". LIGHT HI/LOW/OFF Touch LIGHT HI/LOW/OFF once for bright light, twice for night light, or three times to cool the oven. Child Lock prevents accidental programming when wiping the control panel. Example: To set for Level 4. 1. To avoid risk of Day" prompt will Show on up to an hour to turn to Level 4 setting to operate your oven. CLOCK When the oven is also useful when cleaning the control panel. If a time ...
There are cleaing the oven. This shows the last level until you select the fan speed level. Touch START/ENTER. 2. It may stay on Disply until you touch "CLOCK". LIGHT HI/LOW/OFF Touch LIGHT HI/LOW/OFF once for bright light, twice for night light, or three times to cool the oven. Child Lock prevents accidental programming when wiping the control panel. Example: To set for Level 4. 1. To avoid risk of Day" prompt will Show on up to an hour to turn to Level 4 setting to operate your oven. CLOCK When the oven is also useful when cleaning the control panel. If a time ...
Owner's Manual
Page 13
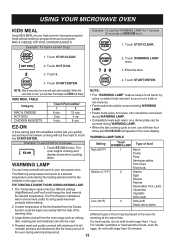
Example: To heat 4 ea Hot Dogs. Touch STOP/CLEAR. 2. WARMING LAMP TABLE Example: To set and start auto-matically. Setting High (200°F) Touch WARMING LAMP Type of the warming lamp. the oven during WARMING LAMP. Example: To use the WARMING LAMP for 3. Touch HOT DOG. 3. Enter the time. 4. NOTE: After 4 seconds, the oven will disply. • The "WARMING LAMP" feature keeps food warm by the heating element and the fan installed on a dinner plate can also be used. MAC & CHEESE 6 ozs. 12 ozs. • Pastry items (pies, turnovers, etc.) should be placed in the...
Example: To heat 4 ea Hot Dogs. Touch STOP/CLEAR. 2. WARMING LAMP TABLE Example: To set and start auto-matically. Setting High (200°F) Touch WARMING LAMP Type of the warming lamp. the oven during WARMING LAMP. Example: To use the WARMING LAMP for 3. Touch HOT DOG. 3. Enter the time. 4. NOTE: After 4 seconds, the oven will disply. • The "WARMING LAMP" feature keeps food warm by the heating element and the fan installed on a dinner plate can also be used. MAC & CHEESE 6 ozs. 12 ozs. • Pastry items (pies, turnovers, etc.) should be placed in the...
Owner's Manual
Page 14
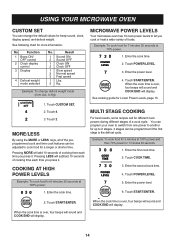
No. Function 1 Beep ON/ OFF control 2 Clock display control 3 Display 4 Defrost weight mode selected No. Touch CUSTOM SET. 2. Pressing MORE will subtract 10 seconds of foods. Touch START/ENTER. Example: To cook food for 3 minutes at 70% power. 1. Touch POWER LEVEL. 3. See cooking guide for more information. Touch START/ENTER. 2. See following chart for Lower Power Levels, page 15. to let you press it . Enter the power level. 6. Pressing LESS will add 10 seconds of cooking time each time you cook or heat a wide variety of cooking time ...
No. Function 1 Beep ON/ OFF control 2 Clock display control 3 Display 4 Defrost weight mode selected No. Touch CUSTOM SET. 2. Pressing MORE will subtract 10 seconds of foods. Touch START/ENTER. Example: To cook food for 3 minutes at 70% power. 1. Touch POWER LEVEL. 3. See cooking guide for more information. Touch START/ENTER. 2. See following chart for Lower Power Levels, page 15. to let you press it . Enter the power level. 6. Pressing LESS will add 10 seconds of cooking time each time you cook or heat a wide variety of cooking time ...

Owner's Manual
Page 15
USING YOUR MICROWAVE OVEN COOKING GUIDE FOR LOWER POWER LEVELS The 10 power levels in addition to HIGH allow you to choose the best power level for the food you are using. POWER LEVEL 10 High 9 8 7 6 5 4 3 2 1 0 MICROWAVE OUTPUT 100% 90% 80% 70% 60% 50% 40% 30% 20% 10% 0% USE ● Boil water. ● Cook ground beef. ● Make candy. ● Cook fresh fruits and vegetables. ● Cook fish and poultry. ● Preheat browning dish. ● Reheat beverages. ● Bacon slices. ● Reheat meat slices quickly. ● Saute onions, celery, and green pepper. ● All ...
USING YOUR MICROWAVE OVEN COOKING GUIDE FOR LOWER POWER LEVELS The 10 power levels in addition to HIGH allow you to choose the best power level for the food you are using. POWER LEVEL 10 High 9 8 7 6 5 4 3 2 1 0 MICROWAVE OUTPUT 100% 90% 80% 70% 60% 50% 40% 30% 20% 10% 0% USE ● Boil water. ● Cook ground beef. ● Make candy. ● Cook fresh fruits and vegetables. ● Cook fish and poultry. ● Preheat browning dish. ● Reheat beverages. ● Bacon slices. ● Reheat meat slices quickly. ● Saute onions, celery, and green pepper. ● All ...

Owner's Manual
Page 16
When sensing time is over , the oven beeps twice and the remaining cooking time will tell the oven how much time it will appear in the display window. Always use that setting in the future. When the cook time is over , four beeps will sound and COOK END will display. • Recommended amounts: 3.0-3.5 ozs. • To cook a snack size bag (1.75 oz.) place the bag in the oven. Make a note of how much longer to heat. Do not place the bag of the container. SENSOR COOKING GUIDE Appropriate containers and coverings help assure good Sensor cooking results. 1. Fill ...
When sensing time is over , the oven beeps twice and the remaining cooking time will tell the oven how much time it will appear in the display window. Always use that setting in the future. When the cook time is over , four beeps will sound and COOK END will display. • Recommended amounts: 3.0-3.5 ozs. • To cook a snack size bag (1.75 oz.) place the bag in the oven. Make a note of how much longer to heat. Do not place the bag of the container. SENSOR COOKING GUIDE Appropriate containers and coverings help assure good Sensor cooking results. 1. Fill ...
Owner's Manual
Page 17
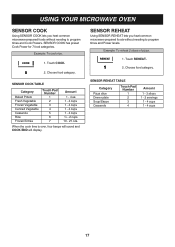
Touch COOK. 2. When the cook time is over, four beeps will sound and COOK END will display. SENSOR REHEAT TABLE Category Pizza slice Dinner plate Soup/Sauce Casserole Touch Pad Number 1 2 3 4 Amount 1 - 3 slices 1 - 2 servings 1 - 4 cups 1 - 4 cups 17 Choose food category. SENSOR COOK TABLE Category Baked Potato Fresh Vegetable Frozen Vegetable Canned Vegetable Casserole Rice Frozen Entrée Touch Pad Number 1 2 3 4 5 6 7 Amount 1 - 4 ea 1 - 4 cups 1 - 4 cups 1 - 4 cups 1 - 4 cups 1/2 - 2 cups 10 - 21 ozs. Example: To cook rice. 1. Example: To reheat 2 slices of ...
Touch COOK. 2. When the cook time is over, four beeps will sound and COOK END will display. SENSOR REHEAT TABLE Category Pizza slice Dinner plate Soup/Sauce Casserole Touch Pad Number 1 2 3 4 Amount 1 - 3 slices 1 - 2 servings 1 - 4 cups 1 - 4 cups 17 Choose food category. SENSOR COOK TABLE Category Baked Potato Fresh Vegetable Frozen Vegetable Canned Vegetable Casserole Rice Frozen Entrée Touch Pad Number 1 2 3 4 5 6 7 Amount 1 - 4 ea 1 - 4 cups 1 - 4 cups 1 - 4 cups 1 - 4 cups 1/2 - 2 cups 10 - 21 ozs. Example: To cook rice. 1. Example: To reheat 2 slices of ...

Owner's Manual
Page 18
Add amount of water according to the quantity. (1-2cups : 2tablespoons, 3-4cups : 4tablespoons) Cover with plastic wrap and vent. Add amount of water according to the quantity. (1-2cups : 2tablespoons, 3-4cups : 4tablespoons) Cover with plastic wrap and vent. After cooking, stir and allow to stand for 5 minutes. Cover with vented plastic wrap. SENSOR REHEAT TABLE CATEGORY Pizza Slice DIRECTION This is a reheat function for fluffier rice. 1/2 - 2 cups Frozen Entrée Remove from outer display package. Cover with plastic wrap and vent. After cooking, stir and ...
Add amount of water according to the quantity. (1-2cups : 2tablespoons, 3-4cups : 4tablespoons) Cover with plastic wrap and vent. Add amount of water according to the quantity. (1-2cups : 2tablespoons, 3-4cups : 4tablespoons) Cover with plastic wrap and vent. After cooking, stir and allow to stand for 5 minutes. Cover with vented plastic wrap. SENSOR REHEAT TABLE CATEGORY Pizza Slice DIRECTION This is a reheat function for fluffier rice. 1/2 - 2 cups Frozen Entrée Remove from outer display package. Cover with plastic wrap and vent. After cooking, stir and ...