
Owner's Manual
Page 3
... Vegetable 17 TABLE OF CONTENTS 3 Reheat(Sensor 17 Sensor Cooking Table 18 SAFETY 4 Sensor Reheat Table 18 Important Safety Instructions 4 Auto Defrost 19 Weight conversion Table 19 INFORMATION 6 Operating Tips 19 Location of Model Number 6 Auto Defrost Table ...Oven Specifications 6 Defrosting Tips 22 Electrical Requirements 6 Q Defrost 22 Electrical Rating 6 Use of theTwo Position Metal Rack 22 Grounding Instructions 6 Microwave Oven Features 7 COOKING 23 Control panel features 8 Recipe Guide 23 Getting the Best Cooking Results 24 OPERATION 10 ...
... Vegetable 17 TABLE OF CONTENTS 3 Reheat(Sensor 17 Sensor Cooking Table 18 SAFETY 4 Sensor Reheat Table 18 Important Safety Instructions 4 Auto Defrost 19 Weight conversion Table 19 INFORMATION 6 Operating Tips 19 Location of Model Number 6 Auto Defrost Table ...Oven Specifications 6 Defrosting Tips 22 Electrical Requirements 6 Q Defrost 22 Electrical Rating 6 Use of theTwo Position Metal Rack 22 Grounding Instructions 6 Microwave Oven Features 7 COOKING 23 Control panel features 8 Recipe Guide 23 Getting the Best Cooking Results 24 OPERATION 10 ...
Owner's Manual
Page 4
...POSSIBLE EXPOSURE TO EXCESSIVE MICROWAVE ENERGY found on the oven door. The oven has several built-in this appliance outdoors. See the electrical GROUNDING INSTRUCTIONS on . • Suitable for use above both gas and electric cooking equipment 36 inches wide or less. • Do not use .... use corrosive chemicals or vapors, such as lye-based oven cleaners, may cause the oven to excessive microwave energy. • Read all the instructions before using it thoroughly checked by a qualified service technician before placing the item in the oven. • If a fire should start a ...
...POSSIBLE EXPOSURE TO EXCESSIVE MICROWAVE ENERGY found on the oven door. The oven has several built-in this appliance outdoors. See the electrical GROUNDING INSTRUCTIONS on . • Suitable for use above both gas and electric cooking equipment 36 inches wide or less. • Do not use .... use corrosive chemicals or vapors, such as lye-based oven cleaners, may cause the oven to excessive microwave energy. • Read all the instructions before using it thoroughly checked by a qualified service technician before placing the item in the oven. • If a fire should start a ...
Owner's Manual
Page 5
...service personnel. The manufacturer is the responsibility of the radio or television. • Relocate the Microwave Oven with the provided installation instructions. • This appliance should be serviced only by unauthorized modification to this manual. • Do not run the oven empty... is encouraged to try to correct the interference by one or more of injury to correct such interference. -5- SAVE THESE INSTRUCTIONS FEDERAL COMMUNICATIONS COMMISSION RADIO FREQUENCY INTERFERENCE STATEMENT ( U.S.A. However, there is no guarantee that the microwave oven and the receiver ...
...service personnel. The manufacturer is the responsibility of the radio or television. • Relocate the Microwave Oven with the provided installation instructions. • This appliance should be serviced only by unauthorized modification to this manual. • Do not run the oven empty... is encouraged to try to correct the interference by one or more of injury to correct such interference. -5- SAVE THESE INSTRUCTIONS FEDERAL COMMUNICATIONS COMMISSION RADIO FREQUENCY INTERFERENCE STATEMENT ( U.S.A. However, there is no guarantee that the microwave oven and the receiver ...
Owner's Manual
Page 6
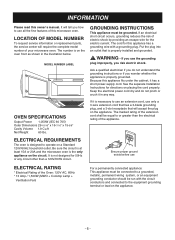
... this microwave oven. Keep the electrical power cord dry and do not understand the grounding instructions or if you wonder whether the appliance is properly grounded. ELECTRICAL REQUIREMENTS The oven is the only appliance on the appliance...Cooktop Lamp + Ventilation Fan) For a permanently connected appliance: This appliance must be equal to or greater than a 120V/60Hz circuit. MODEL NUMBER LABEL GROUNDING INSTRUCTIONS This appliance must be connected to a grounded, metallic, permanent wiring system, or an equipment grounding conductor should be run with a grounding plug. WARNING -...
... this microwave oven. Keep the electrical power cord dry and do not understand the grounding instructions or if you wonder whether the appliance is properly grounded. ELECTRICAL REQUIREMENTS The oven is the only appliance on the appliance...Cooktop Lamp + Ventilation Fan) For a permanently connected appliance: This appliance must be equal to or greater than a 120V/60Hz circuit. MODEL NUMBER LABEL GROUNDING INSTRUCTIONS This appliance must be connected to a grounded, metallic, permanent wiring system, or an equipment grounding conductor should be run with a grounding plug. WARNING -...
Owner's Manual
Page 12
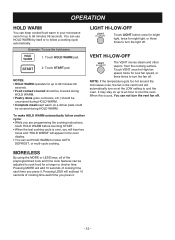
... or to follow a cooking cycle automatically. Touch HOLD WARM pad. 2. To make HOLD WARM automatically follow another cycle: • While you are programming the cooking instructions, touch HOLD WARM before touching START. • When the last cooking cycle is over, you will hear two tones and "HOLD WARM" will subtract 10...
... or to follow a cooking cycle automatically. Touch HOLD WARM pad. 2. To make HOLD WARM automatically follow another cycle: • While you are programming the cooking instructions, touch HOLD WARM before touching START. • When the last cooking cycle is over, you will hear two tones and "HOLD WARM" will subtract 10...

Owner's Manual
Page 13
... 1 Chicken nuggets 2 Spicy chicken 3 Mexican chicken 4 3. Touch 1 pad. Choose food category. Amount 1 slice 2 slices 3 slices 4 slices Touch pad number 1 2 3 4 AUTO TOUCH TABLE FUNCTION CODE CATEGORY INSTRUCTIONS AMOUNT Chicken 1 choices 2 3 4 Homemade 1 bakery 2 3 Chicken wings Place in a single layer around the edge of a dinner plate. Chicken nuggets Place in a single layer around the...
... 1 Chicken nuggets 2 Spicy chicken 3 Mexican chicken 4 3. Touch 1 pad. Choose food category. Amount 1 slice 2 slices 3 slices 4 slices Touch pad number 1 2 3 4 AUTO TOUCH TABLE FUNCTION CODE CATEGORY INSTRUCTIONS AMOUNT Chicken 1 choices 2 3 4 Homemade 1 bakery 2 3 Chicken wings Place in a single layer around the edge of a dinner plate. Chicken nuggets Place in a single layer around the...
Owner's Manual
Page 16
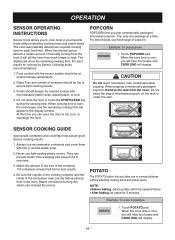
... dry before placing food in the display window. When the cook time is over , you bake one package at normal storage temperature. 2. OPERATION SENSOR OPERATING INSTRUCTIONS Sensor Cook allows you pop commercially packaged microwave popcorn. Do not open the door to heat. Do not place the bag of humidity coming from...
... dry before placing food in the display window. When the cook time is over , you bake one package at normal storage temperature. 2. OPERATION SENSOR OPERATING INSTRUCTIONS Sensor Cook allows you pop commercially packaged microwave popcorn. Do not open the door to heat. Do not place the bag of humidity coming from...

Owner's Manual
Page 20
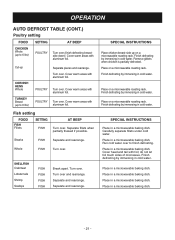
... roasting rack. Separate and rearrange. Cover warm areas with fork. Separate and rearrange. Cover warm areas with fork. Remove thawed portions with aluminum foil. SPECIAL INSTRUCTIONS Meat of irregular shape and large, fatty cuts of meat should have the narrow or fatty areas shielded with aluminum foil. - 20 - Cover warm areas...
... roasting rack. Separate and rearrange. Cover warm areas with fork. Separate and rearrange. Cover warm areas with fork. Remove thawed portions with aluminum foil. SPECIAL INSTRUCTIONS Meat of irregular shape and large, fatty cuts of meat should have the narrow or fatty areas shielded with aluminum foil. - 20 - Cover warm areas...
Owner's Manual
Page 21
...Break apart. Cover warm areas with aluminum foil. Turn over . Separate fillets when partially thawed if possible. Separate and rearrange. SPECIAL INSTRUCTIONS Place in a microwavable baking dish. Place in a microwavable baking dish. - 21 - Finish defrosting by immersing in cold water. ... by immersing in cold water. Run cold water over to 6 lbs) POULTRY Turn over and rearrange. POULTRY Turn over . SPECIAL INSTRUCTIONS Place chicken breast-side up to 6 lbs) Separate pieces and rearrange. Place on a microwavable roasting rack. Place in a microwavable ...
...Break apart. Cover warm areas with aluminum foil. Turn over . Separate fillets when partially thawed if possible. Separate and rearrange. SPECIAL INSTRUCTIONS Place in a microwavable baking dish. Place in a microwavable baking dish. - 21 - Finish defrosting by immersing in cold water. ... by immersing in cold water. Run cold water over to 6 lbs) POULTRY Turn over and rearrange. POULTRY Turn over . SPECIAL INSTRUCTIONS Place chicken breast-side up to 6 lbs) Separate pieces and rearrange. Place on a microwavable roasting rack. Place in a microwavable ...
Owner's Manual
Page 22
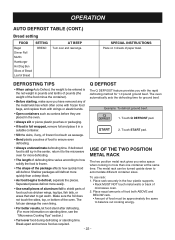
... remove food as chicken wings, leg tips, fish tails, or areas that start to be entered is frozen. • The shape of microwave oven. 2. SPECIAL INSTRUCTIONS Place on standing time, see the "Microwave Cooking Tips" section.) • Turn over and rearrange. The Q DEFROST feature provides you extra space when cooking in...
... remove food as chicken wings, leg tips, fish tails, or areas that start to be entered is frozen. • The shape of microwave oven. 2. SPECIAL INSTRUCTIONS Place on standing time, see the "Microwave Cooking Tips" section.) • Turn over and rearrange. The Q DEFROST feature provides you extra space when cooking in...

