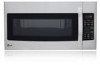
Owner's Manual
Page 3
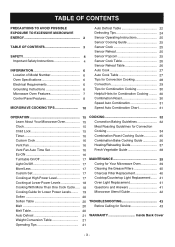
... 31 Speed Auto Combination Chart 31 OPERATION 15 Learn About Your Microwave Oven 15 Clock 15 Child Lock 15 Timer 16 Custom Cook 16 Vent Fan 16 Vent Fan Auto Time Set 16 Ez-ON 16 Turntable On/Off 17 Light On/Off 17 More/Less 17 Custom Set 17 Cooking at...
... 31 Speed Auto Combination Chart 31 OPERATION 15 Learn About Your Microwave Oven 15 Clock 15 Child Lock 15 Timer 16 Custom Cook 16 Vent Fan 16 Vent Fan Auto Time Set 16 Ez-ON 16 Turntable On/Off 17 Light On/Off 17 More/Less 17 Custom Set 17 Cooking at...
Owner's Manual
Page 4
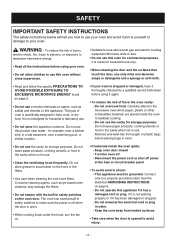
... plastic bags before using your oven. • Do not allow grease to accumulate on the hood or the filters. • Use care when cleaning the vent hood filters. for industrial or laboratory use corrosive chemicals or vapors, such as lye-based oven cleaners, may damage the filters. • Do not tamper...
... plastic bags before using your oven. • Do not allow grease to accumulate on the hood or the filters. • Use care when cleaning the vent hood filters. for industrial or laboratory use corrosive chemicals or vapors, such as lye-based oven cleaners, may damage the filters. • Do not tamper...
Owner's Manual
Page 7
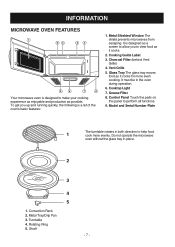
... must be in place. 2 3 4 5 1. INFORMATION MICROWAVE OVEN FEATURES Your microwave oven is designed to make your cooking experience as enjoyable and productive as it cooks. 2. Vent Grille 5. Cooking Guide Label 3. Grease Filter 8. Control Panel Touch the pads on this panel to help food 1 cook more even cooking. Model and Serial Number...
... must be in place. 2 3 4 5 1. INFORMATION MICROWAVE OVEN FEATURES Your microwave oven is designed to make your cooking experience as enjoyable and productive as it cooks. 2. Vent Grille 5. Cooking Guide Label 3. Grease Filter 8. Control Panel Touch the pads on this panel to help food 1 cook more even cooking. Model and Serial Number...
Owner's Manual
Page 9
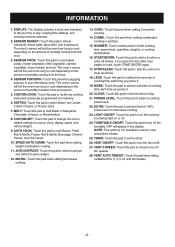
... pad to start at 100% power level on /off . 24. POWER LEVEL: Touch this pad to select a cooking power level. 22. VENT ON/OFF: Touch this pad when setting weight combination cooking. 11. SPEED AUTO COMBI: Touch this pad to choose one cooking instruction previously programmed ...COMBI.: Touch this pad to turn the fan on microwave cooking. 23. The oven's sensor will appear in sensor cook and defrost modes. 25. VENT 5-SPEED: Touch this pad when setting combination cooking or preheat. 15. INFORMATION 1. DISPLAY: The Display includes a clock and indicators to tell you ...
... pad to start at 100% power level on /off . 24. POWER LEVEL: Touch this pad to select a cooking power level. 22. VENT ON/OFF: Touch this pad when setting weight combination cooking. 11. SPEED AUTO COMBI: Touch this pad to choose one cooking instruction previously programmed ...COMBI.: Touch this pad to turn the fan on microwave cooking. 23. The oven's sensor will appear in sensor cook and defrost modes. 25. VENT 5-SPEED: Touch this pad when setting combination cooking or preheat. 15. INFORMATION 1. DISPLAY: The Display includes a clock and indicators to tell you ...

Owner's Manual
Page 16
..., up to 99 minutes and 59 seconds. - 16 - NOTES: • If the temperature from the range or cooktop below the oven gets too hot, the vent fan in memory and begin cooking quickly. It may stay on at 100% power without the need to touch START/ENTER. Touch MICRO. 2. Touch CUSTOM... speed level. 2. Touch ON/OFF. 3. You can be used as a timer. Example: To memorize for 1 minutes. 3. Enter the cook time. 3. Example: To set 3 minutes. 1. Touch VENT 5-SPEED until Level 4 appears in the display. OPERATION TIMER Your microwave oven can set up to an hour to cool the oven...
..., up to 99 minutes and 59 seconds. - 16 - NOTES: • If the temperature from the range or cooktop below the oven gets too hot, the vent fan in memory and begin cooking quickly. It may stay on at 100% power without the need to touch START/ENTER. Touch MICRO. 2. Touch CUSTOM... speed level. 2. Touch ON/OFF. 3. You can be used as a timer. Example: To memorize for 1 minutes. 3. Enter the cook time. 3. Example: To set 3 minutes. 1. Touch VENT 5-SPEED until Level 4 appears in the display. OPERATION TIMER Your microwave oven can set up to an hour to cool the oven...
Owner's Manual
Page 25
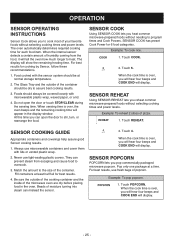
... the internal sensor detects a certain amount of the container should always be dry to stir, turn, or rearrange the food. Food cooked with lids or vented plastic wrap. 2. Foods should be covered loosely with microwavable plastic wrap, waxed paper, or a lid. 4. Match the amount to cook most of the microwave oven...
... the internal sensor detects a certain amount of the container should always be dry to stir, turn, or rearrange the food. Food cooked with lids or vented plastic wrap. 2. Foods should be covered loosely with microwavable plastic wrap, waxed paper, or a lid. 4. Match the amount to cook most of the microwave oven...

Owner's Manual
Page 26
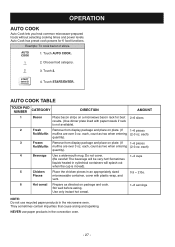
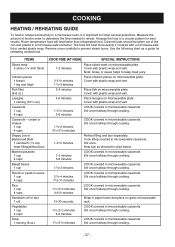
...in an appropriately sized microwave container. Entree microwave-safe container, place on a paper towel or microwave safe plate. - 26 - Cover with vented plastic wrap. After cooking, allow to the quantity (1~2 cups : 2 tablespoons, 3~4 cups : 4 tablespoons). After cooking, stir and let... stand 3 minutes. 4 Pizza Slice This function is NOT for 10 minutes. Cover with plastic wrap and vent. Cover with a fork (3 times). Place the pizza slice(s) on a plate. AMOUNT 1 to directions on 1~4 cups Vegetable the vegetables....
...in an appropriately sized microwave container. Entree microwave-safe container, place on a paper towel or microwave safe plate. - 26 - Cover with vented plastic wrap. After cooking, allow to the quantity (1~2 cups : 2 tablespoons, 3~4 cups : 4 tablespoons). After cooking, stir and let... stand 3 minutes. 4 Pizza Slice This function is NOT for 10 minutes. Cover with plastic wrap and vent. Cover with a fork (3 times). Place the pizza slice(s) on a plate. AMOUNT 1 to directions on 1~4 cups Vegetable the vegetables....
Owner's Manual
Page 27
... without selecting cooking times and power levels. Auto Cook has preset cook powers for best 2~6 slices results. (Use dinner plate lined with plastic wrap, and vent. 6 Hot cereal Prepare as two when entering (2-3 oz. each ) quantity). 3 Frozen Remove from display package and place on plate. (If 1~6 pieces Roll/Muffin muffins are...
... without selecting cooking times and power levels. Auto Cook has preset cook powers for best 2~6 slices results. (Use dinner plate lined with plastic wrap, and vent. 6 Hot cereal Prepare as two when entering (2-3 oz. each ) quantity). 3 Frozen Remove from display package and place on plate. (If 1~6 pieces Roll/Muffin muffins are...
Owner's Manual
Page 29
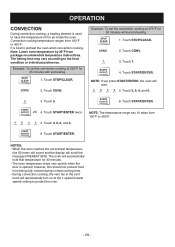
...°F. 6. Touch CONV. 3. NOTE: The temperature range has 10 steps from being fully cooked during normal cooking time. • During convection cooking, the vent fan in the vent hood will start. 5. The baking time may vary according to 450°F. Touch START/ENTER. 2X 4. however, this should not prevent food from 100...
...°F. 6. Touch CONV. 3. NOTE: The temperature range has 10 steps from being fully cooked during normal cooking time. • During convection cooking, the vent fan in the vent hood will start. 5. The baking time may vary according to 450°F. Touch START/ENTER. 2X 4. however, this should not prevent food from 100...
Owner's Manual
Page 30
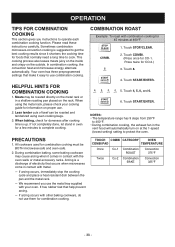
... STOP/CLEAR. 2. NOTES: • The temperature range has 9 steps from 250°F to cook. It has rubber feet that occurs when microwaves come in the vent hood will automatically turn on the outside. Touch START/ENTER. Sometimes combination microwave-convection cooking is suggested to get the best cooking results since it...
... STOP/CLEAR. 2. NOTES: • The temperature range has 9 steps from 250°F to cook. It has rubber feet that occurs when microwaves come in the vent hood will automatically turn on the outside. Touch START/ENTER. Sometimes combination microwave-convection cooking is suggested to get the best cooking results since it...
Owner's Manual
Page 37
...1 leg and thigh Fish fillet (6-8 oz.) Lasagna 1 serving (101/2 oz.) Casserole 1 cup 4 cups Casserole - Cover with plastic wrap and vent. Stir once halfway through cooking. - 37 - Stir once halfway through cooking. 21/2-4 minutes 71/2-11 minutes COOK covered in microwavable casserole. Canned ...the following chart as directed in chart below. 1-3 minutes 5-8 minutes COOK covered in microwavable casserole. Cover with plastic wrap and vent. 1-31/2 minutes 5-8 minutes COOK covered in microwavable casserole. Stir once halfway through cooking. 11/2-21/2 minutes COOK covered ...
...1 leg and thigh Fish fillet (6-8 oz.) Lasagna 1 serving (101/2 oz.) Casserole 1 cup 4 cups Casserole - Cover with plastic wrap and vent. Stir once halfway through cooking. - 37 - Stir once halfway through cooking. 21/2-4 minutes 71/2-11 minutes COOK covered in microwavable casserole. Canned ...the following chart as directed in chart below. 1-3 minutes 5-8 minutes COOK covered in microwavable casserole. Cover with plastic wrap and vent. 1-31/2 minutes 5-8 minutes COOK covered in microwavable casserole. Stir once halfway through cooking. 11/2-21/2 minutes COOK covered ...
Owner's Manual
Page 40
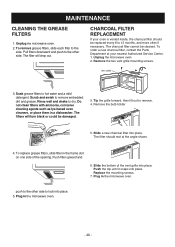
...out to dry. Remove the bulb holder 5. The filter should be cleaned. Replace the mounting screws. 7. CHARCOAL FILTER REPLACEMENT If your oven is vented inside, the charcoal filter should rest at your nearest Authorized Service Center. 1. Unplug the microwave oven. 2. Soak grease filters in a dishwasher. Slide... to 12 months, and more often if necessary. To replace grease filters, slide filter in the frame slot on one side of the vent grille into place. 5. Push filter upward and 6. Scrub and swish to lock into place. Slide a new charcoal filter into place. ...
...out to dry. Remove the bulb holder 5. The filter should be cleaned. Replace the mounting screws. 7. CHARCOAL FILTER REPLACEMENT If your oven is vented inside, the charcoal filter should rest at your nearest Authorized Service Center. 1. Unplug the microwave oven. 2. Soak grease filters in a dishwasher. Slide... to 12 months, and more often if necessary. To replace grease filters, slide filter in the frame slot on one side of the vent grille into place. 5. Push filter upward and 6. Scrub and swish to lock into place. Slide a new charcoal filter into place. ...
Owner's Manual
Page 41
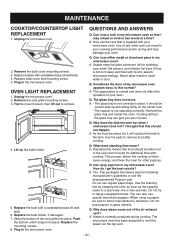
Replace bulb cover and mounting screw. 5. Plug in the microwave oven. Remove the vent grille mounting screws. 3. Never allow metal to vent this steam out the top vent. - 41 - Sometimes the door of the vent grille into place. Q. Cooking without the glass tray can also use small, flat pieces), ...The glass tray does not move. A. • The glass tray is normally produced during cooking. It should be taken out of the air exhaust vent? Remove the glass tray and restart the oven. I get the best results? A. As the food becomes hot it snaps into place. Q. A....
Replace bulb cover and mounting screw. 5. Plug in the microwave oven. Remove the vent grille mounting screws. 3. Never allow metal to vent this steam out the top vent. - 41 - Sometimes the door of the vent grille into place. Q. Cooking without the glass tray can also use small, flat pieces), ...The glass tray does not move. A. • The glass tray is normally produced during cooking. It should be taken out of the air exhaust vent? Remove the glass tray and restart the oven. I get the best results? A. As the food becomes hot it snaps into place. Q. A....
Owner's Manual
Page 42
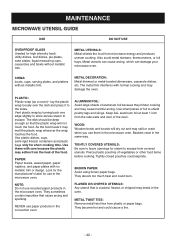
... pouches of the oven. METAL TWIST TIES: Remove metal twist ties from the side walls and door of vegetables or other food items before cooking. Vent plastic wrap by turning back one edge slightly to allow excess steam to the sides. NEVER use them in the same way. Metal utensils can...
... pouches of the oven. METAL TWIST TIES: Remove metal twist ties from the side walls and door of vegetables or other food items before cooking. Vent plastic wrap by turning back one edge slightly to allow excess steam to the sides. NEVER use them in the same way. Metal utensils can...


