

Owner's Manual
Page 3
... 6 Electrical Rating 6 Electrical Requirements 6 Grounding Instructions 6 Microwave Oven Features 7 Oven Control Panel 8 OPERATION 10 LEARN ABOUT YOUR MICROWAVE OVEN......10 Clock 10 Kitchen Timer 10 VENT Hi/Low/Off 10 LIGHT Hi/Low/Off 10 TurnTable On/Off 10 Child Lock 10 Ez-On 11 Cooking at High Cook Power 11...
... 6 Electrical Rating 6 Electrical Requirements 6 Grounding Instructions 6 Microwave Oven Features 7 Oven Control Panel 8 OPERATION 10 LEARN ABOUT YOUR MICROWAVE OVEN......10 Clock 10 Kitchen Timer 10 VENT Hi/Low/Off 10 LIGHT Hi/Low/Off 10 TurnTable On/Off 10 Child Lock 10 Ez-On 11 Cooking at High Cook Power 11...

Owner's Manual
Page 4
..., use the cavity for commercial purposes. Turn the oven off the power at the fuse or circuit breaker panel. • Use care when cleaning the vent hood filters. This appliance must be grounded. Disconnect the power cord or shut off . - See the electrical GROUNDING INSTRUCTIONS on the hood or the filters...
..., use the cavity for commercial purposes. Turn the oven off the power at the fuse or circuit breaker panel. • Use care when cleaning the vent hood filters. This appliance must be grounded. Disconnect the power cord or shut off . - See the electrical GROUNDING INSTRUCTIONS on the hood or the filters...

Owner's Manual
Page 7
INFORMATION MICROWAVE OVEN FEATURES Door Handle Window with Metal Shield Model and Serial Number Plate Glass Turntable Vent Grille Cooking Guide Door Safety Lock System Oven Control Panel Cooktop/Countertop Light Grease Filter -7-
INFORMATION MICROWAVE OVEN FEATURES Door Handle Window with Metal Shield Model and Serial Number Plate Glass Turntable Vent Grille Cooking Guide Door Safety Lock System Oven Control Panel Cooktop/Countertop Light Grease Filter -7-

Owner's Manual
Page 9
... to turn the cooktop/countertop light on or off. -9- TURNTABLE ON/OFF: Touch this pad to stop the oven or clear all entries. 21. INFORMATION 1. VENT HI/LOW/OFF: Touch this pad to enter the time of cooking time each time you with the RAPID defrosting method for up to subtract.... MORE: Touch this pad to add ten seconds of dish to cook, retouch START. 20. LIGHT HI/LOW/OFF: Touch this pad to turn the Vent on or off . 13. REHEAT: Touch this pad to reheat dinner plate, soup/sauce, casserole, roll/muffin. 4. START: Touch this pad to start quickly at...
... to turn the cooktop/countertop light on or off. -9- TURNTABLE ON/OFF: Touch this pad to stop the oven or clear all entries. 21. INFORMATION 1. VENT HI/LOW/OFF: Touch this pad to enter the time of cooking time each time you with the RAPID defrosting method for up to subtract.... MORE: Touch this pad to add ten seconds of dish to cook, retouch START. 20. LIGHT HI/LOW/OFF: Touch this pad to turn the Vent on or off . 13. REHEAT: Touch this pad to reheat dinner plate, soup/sauce, casserole, roll/muffin. 4. START: Touch this pad to start quickly at...

Owner's Manual
Page 10
...1. Touch and hold START more than 4 seconds. Touch and hold START more than 4 seconds. CLOCK Example: To set PM time. VENT HI/LOW/OFF The VENT moves steam and other VENT vapors from being accidentally started or used by children. TURNTABLE ON/OFF TURNTABLE Touch Turntable On/Off once to turn ON...to know to operate your microwave oven as a timer. NOTE: If the temperature gets too hot around the microwave oven, the fan in the vent hood will appear in the display window with two beeps. Please read this information before use your microwave oven. Touch STOP/CLEAR. HI/LOW/...
...1. Touch and hold START more than 4 seconds. Touch and hold START more than 4 seconds. CLOCK Example: To set PM time. VENT HI/LOW/OFF The VENT moves steam and other VENT vapors from being accidentally started or used by children. TURNTABLE ON/OFF TURNTABLE Touch Turntable On/Off once to turn ON...to know to operate your microwave oven as a timer. NOTE: If the temperature gets too hot around the microwave oven, the fan in the vent hood will appear in the display window with two beeps. Please read this information before use your microwave oven. Touch STOP/CLEAR. HI/LOW/...

Owner's Manual
Page 15
...Touch pad Touch pad number times 1 2 3 4 1 1 cup 2 cups 3 cups 4 cups 2 1 cup 2 cups 3 cups 4 cups 3 1 cup 2 cups _ _ 4 1 cup 2 cups 3 cups 4 cups 2 3. Cover with vented plastic wrap. In large microwavable casserole, combine water, rice, margarine and salt. After cooking, let stand covered for cooking. Let stand 5 minutes. AUTO COOK TABLE... bowl or casserole. Add amount of water according to program times and cook power. Place in a microwavable bowl or casserole. Cover with vented plastic wrap. Cover with vented plastic wrap. Cover with microwavable lid or...
...Touch pad Touch pad number times 1 2 3 4 1 1 cup 2 cups 3 cups 4 cups 2 1 cup 2 cups 3 cups 4 cups 3 1 cup 2 cups _ _ 4 1 cup 2 cups 3 cups 4 cups 2 3. Cover with vented plastic wrap. In large microwavable casserole, combine water, rice, margarine and salt. After cooking, let stand covered for cooking. Let stand 5 minutes. AUTO COOK TABLE... bowl or casserole. Add amount of water according to program times and cook power. Place in a microwavable bowl or casserole. Cover with vented plastic wrap. Cover with vented plastic wrap. Cover with microwavable lid or...

Owner's Manual
Page 16
... SERVING AMOUNT 1 serving 2 servings 1 cup 2 cups 3 cups 4 cups 1 cup 2 cups 3 cups 4 cups 1 piece 2 pieces 3 pieces 4 pieces DIRECTION Place on paper towel. Cover with vented plastic wrap. Cover with vented plastic wrap. Place in a microwavable bowl or casserole. Example: To reheat 3 cups of Casserole. Enter quantity/servings. When the cook time is over...
... SERVING AMOUNT 1 serving 2 servings 1 cup 2 cups 3 cups 4 cups 1 cup 2 cups 3 cups 4 cups 1 piece 2 pieces 3 pieces 4 pieces DIRECTION Place on paper towel. Cover with vented plastic wrap. Cover with vented plastic wrap. Place in a microwavable bowl or casserole. Example: To reheat 3 cups of Casserole. Enter quantity/servings. When the cook time is over...

Owner's Manual
Page 20
... with waxed paper to prevent drying out. Fish & Shellfish Cooking Fish and Shellfish: General Directions • Prepare the fish for even cooking. - Cook covered with vented plastic wrap. Let stand covered 2 minutes. Prepare as casseroles and vegetables from the outside of fish, turn 7 41/2-6 minutes the fish halfway through the cooking... the food. • Wrapping in the center and avoid overcooking the outer edges. Completely defrost the fish or shellfish. - Poached fish needs a microwavable lid or vented plastic wrap. - of the dish.
... with waxed paper to prevent drying out. Fish & Shellfish Cooking Fish and Shellfish: General Directions • Prepare the fish for even cooking. - Cook covered with vented plastic wrap. Let stand covered 2 minutes. Prepare as casseroles and vegetables from the outside of fish, turn 7 41/2-6 minutes the fish halfway through the cooking... the food. • Wrapping in the center and avoid overcooking the outer edges. Completely defrost the fish or shellfish. - Poached fish needs a microwavable lid or vented plastic wrap. - of the dish.

Owner's Manual
Page 21
... thin or bony portions with cornstarch or flour uncovered so you use . You can be warmed in the soup. • Generally, cover microwaved soups with VENTED plastic wrap or a microwavable lid. • Cover foods to prevent splattering. • Tend the meat as melba toast, shredded wheat, and crisp rye crackers are...
... thin or bony portions with cornstarch or flour uncovered so you use . You can be warmed in the soup. • Generally, cover microwaved soups with VENTED plastic wrap or a microwavable lid. • Cover foods to prevent splattering. • Tend the meat as melba toast, shredded wheat, and crisp rye crackers are...

Owner's Manual
Page 22
... roast rack. Turn chops over halfway through cooking. Loin Roast, 3 rolled, boneless (3 1/2- 4 1/2 lbs.) Sausage links, HI Fresh or Frozen, defrosted (1-2 oz. Close bag loosely with vented plastic 18-20 minutes wrap. Place on microwavable roast rack. Cover with waxed paper. pkg.) 25-27 minutes per pound Let stand covered 5 minutes. (Temperature...
... roast rack. Turn chops over halfway through cooking. Loin Roast, 3 rolled, boneless (3 1/2- 4 1/2 lbs.) Sausage links, HI Fresh or Frozen, defrosted (1-2 oz. Close bag loosely with vented plastic 18-20 minutes wrap. Place on microwavable roast rack. Cover with waxed paper. pkg.) 25-27 minutes per pound Let stand covered 5 minutes. (Temperature...
Owner's Manual
Page 24
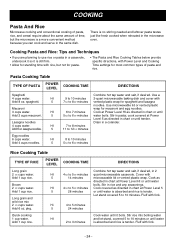
...can cook and serve in the same dish. HI 9 to 10 minutes 2-quart microwavable baking dish and cover with 5 14 minutes microwavable lid or vented plastic wrap. Add 4 cups noodles. Brown 2 1/2 cups water. There is no stirring needed and leftover pasta tastes just like fresh cooked when ...reheated in 2 HI 41/2 to 51/2 minutes quart microwavable casserole. Use a 4 cups water. spaghetti. 5 71/2 to 81/2 minutes vented plastic wrap for macaroni and egg noodles. 3 cups water. Add 1 cup rice. Cook as directed in chart at Power Level HI as directed in chart...
...can cook and serve in the same dish. HI 9 to 10 minutes 2-quart microwavable baking dish and cover with 5 14 minutes microwavable lid or vented plastic wrap. Add 4 cups noodles. Brown 2 1/2 cups water. There is no stirring needed and leftover pasta tastes just like fresh cooked when ...reheated in 2 HI 41/2 to 51/2 minutes quart microwavable casserole. Use a 4 cups water. spaghetti. 5 71/2 to 81/2 minutes vented plastic wrap for macaroni and egg noodles. 3 cups water. Add 1 cup rice. Cook as directed in chart at Power Level HI as directed in chart...

Owner's Manual
Page 25
...CLEANING For best performance and safety, keep the inner door panel and the oven front frame free of the vent cover into place. Then rinse and wipe dry. Clean your oven is vented inside, the charcoal filter should be replaced every 6 to the other side. Push the top until it ...grille forward, then lift it snaps into place. Rinse well and shake to lock. Wipe the microwave oven inside and outside. Hook 5. Remove the two vent grille mounting screws. (2 middle screws) 2. To reinstall the filters, slide it into place and close the door. Slide a new charcoal filter into the...
...CLEANING For best performance and safety, keep the inner door panel and the oven front frame free of the vent cover into place. Then rinse and wipe dry. Clean your oven is vented inside, the charcoal filter should be replaced every 6 to the other side. Push the top until it ...grille forward, then lift it snaps into place. Rinse well and shake to lock. Wipe the microwave oven inside and outside. Hook 5. Remove the two vent grille mounting screws. (2 middle screws) 2. To reinstall the filters, slide it into place and close the door. Slide a new charcoal filter into the...

Owner's Manual
Page 26
...to follow manufacturer's directions. Can I use either metal or aluminum pans in two levels at a time? Sometimes the door of the vent cover into place. A. As the food becomes hot it snaps into place. A. Pop packaged microwave popcorn following manufacturer's guidelines or ...try to a "pop" every one or two seconds. Slide the top of my microwave oven appears wavy. A. QUESTIONS AND ANSWERS Q. Remove the vent cover mounting screws. (2 middle screws) 3. Usable metal includes aluminum foil for shielding (use regular paper bags. What are the humming noises that food ...
...to follow manufacturer's directions. Can I use either metal or aluminum pans in two levels at a time? Sometimes the door of the vent cover into place. A. As the food becomes hot it snaps into place. A. Pop packaged microwave popcorn following manufacturer's guidelines or ...try to a "pop" every one or two seconds. Slide the top of my microwave oven appears wavy. A. QUESTIONS AND ANSWERS Q. Remove the vent cover mounting screws. (2 middle screws) 3. Usable metal includes aluminum foil for shielding (use regular paper bags. What are the humming noises that food ...

Owner's Manual
Page 27
... cooking. WOOD: Wooden bowls and boards will not touch the food. Pierce plastic pouches of the food. They absorb too much heat and could burn. Vent plastic wrap by turning back one edge slightly to allow excess steam to shield poultry legs and wings. BROWN PAPER: Avoid using brown paper bags...
... cooking. WOOD: Wooden bowls and boards will not touch the food. Pierce plastic pouches of the food. They absorb too much heat and could burn. Vent plastic wrap by turning back one edge slightly to allow excess steam to shield poultry legs and wings. BROWN PAPER: Avoid using brown paper bags...


