Installation Instructions
Page 2
... 24 ESP Function 25 Ceiling dimension and hanging bolt location 26 Wiring Connection 27 Conduit connection 27 Installation of Wired Remote Controller(Optional)...........28 Installation of Decorative Panel 30 Drain Piping 32 Flaring Work and Connection of Piping 35 Flaring work 35 Connection of water ❏ Screw driver ❏ Hexagonal wrench(4mm) ❏ Refrigerant Gas Leak Detector ❏ Vacuum pump ❏ Gauge manifold ❏ Owner's manual ❏ Thermometer ❏ Remote Control Holder 2 Multi Air Conditioner
... 24 ESP Function 25 Ceiling dimension and hanging bolt location 26 Wiring Connection 27 Conduit connection 27 Installation of Wired Remote Controller(Optional)...........28 Installation of Decorative Panel 30 Drain Piping 32 Flaring Work and Connection of Piping 35 Flaring work 35 Connection of water ❏ Screw driver ❏ Hexagonal wrench(4mm) ❏ Refrigerant Gas Leak Detector ❏ Vacuum pump ❏ Gauge manifold ❏ Owner's manual ❏ Thermometer ❏ Remote Control Holder 2 Multi Air Conditioner
Installation Instructions
Page 3
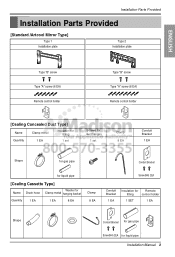
... Quantity 1 EA 1 set Screws for duct flanges 1 set Clamp 8 EA Conduit Bracket 1 EA Shape for gas pipe Conduit Bracket for liquid pipe [Cealing Cassette Type] Washer for Name Drain hose Clamp metal hanging backet Quantity 1 EA 1 EA 8 EA Clamp 8 EA Screw(M4) 2EA Conduit Bracket 1 EA Insulation for Remote fitting control holder 1 SET 1 EA Shape Conduit Bracket for gas pipe Screw(M4) 2EA for liquid pipe Installation Manual 3
... Quantity 1 EA 1 set Screws for duct flanges 1 set Clamp 8 EA Conduit Bracket 1 EA Shape for gas pipe Conduit Bracket for liquid pipe [Cealing Cassette Type] Washer for Name Drain hose Clamp metal hanging backet Quantity 1 EA 1 EA 8 EA Clamp 8 EA Screw(M4) 2EA Conduit Bracket 1 EA Insulation for Remote fitting control holder 1 SET 1 EA Shape Conduit Bracket for gas pipe Screw(M4) 2EA for liquid pipe Installation Manual 3
Installation Instructions
Page 4
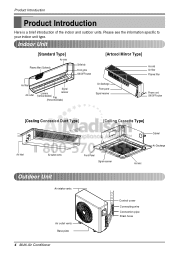
...) Grille tab Front grille ON/OFF button [Artcool Mirror Type] Air inlet Air filter Plasma filter Air filter Air outlet Signal Louvers receiver (Vertical blades) Flap (Horizontal blade) Air discharge Front panel Signal receiver Power cord ON/OFF button [Cealing Concealed Duct Type] [Ceiling Cassette Type] Cabinet Air Inlet more than 30 cm (11.8 inch) Air Intake (side, rear) Air outlet venmtsore than 30 cm (11.8 inch) Outdoor Unit Front Panel Signal receiver Control cover Connecting wire Connection pipe Drain hose...
...) Grille tab Front grille ON/OFF button [Artcool Mirror Type] Air inlet Air filter Plasma filter Air filter Air outlet Signal Louvers receiver (Vertical blades) Flap (Horizontal blade) Air discharge Front panel Signal receiver Power cord ON/OFF button [Cealing Concealed Duct Type] [Ceiling Cassette Type] Cabinet Air Inlet more than 30 cm (11.8 inch) Air Intake (side, rear) Air outlet venmtsore than 30 cm (11.8 inch) Outdoor Unit Front Panel Signal receiver Control cover Connecting wire Connection pipe Drain hose...
Installation Instructions
Page 5
... sure to properties only. Always install an air leakage breaker and a dedicated switching board. The seriousness is damaged. Be sure not to follow the instruction. Do not keep or use flammable gases or combustibles near the air conditioner. • If the electrical part cover of product. I Installation Always perform grounding. Securely attach the electrical part cover to the indoor unit and the service panel to dust, water, etc. • Otherwise, it may...
... sure to properties only. Always install an air leakage breaker and a dedicated switching board. The seriousness is damaged. Be sure not to follow the instruction. Do not keep or use flammable gases or combustibles near the air conditioner. • If the electrical part cover of product. I Installation Always perform grounding. Securely attach the electrical part cover to the indoor unit and the service panel to dust, water, etc. • Otherwise, it may...
Installation Instructions
Page 6
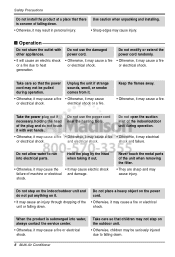
... down . 6 Multi Air Conditioner Take the power plug out if necessary, holding the head of the unit when removing the filter. • They are sharp and may cause injury. Never touch the metal parts of the plug and do not put anything on the power cord. • Otherwise, it may cause a fire or electrical shock. power cord. Take care so that the power cord may not...
... down . 6 Multi Air Conditioner Take the power plug out if necessary, holding the head of the unit when removing the filter. • They are sharp and may cause injury. Never touch the metal parts of the plug and do not put anything on the power cord. • Otherwise, it may cause a fire or electrical shock. power cord. Take care so that the power cord may not...
Installation Instructions
Page 12
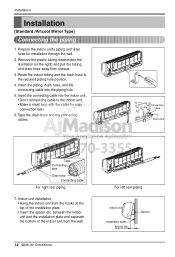
... required piping hole position. 4. Indoor unit installation • Hang the indoor unit from the wall. 12 Multi Air Conditioner For left rear piping Indoor unit Installation plate 80(33/16) Spacer Tape the drain hose and the connecting cables. Insert the connecting cable into the piping hole. 5. Remove the plastic tubing retainer(see the illustration on the right) and pull the tubing and drain hose away from chassis. 3. Installation Installation [Standard /Artcool Mirror Type...
... required piping hole position. 4. Indoor unit installation • Hang the indoor unit from the wall. 12 Multi Air Conditioner For left rear piping Indoor unit Installation plate 80(33/16) Spacer Tape the drain hose and the connecting cables. Insert the connecting cable into the piping hole. 5. Remove the plastic tubing retainer(see the illustration on the right) and pull the tubing and drain hose away from chassis. 3. Installation Installation [Standard /Artcool Mirror Type...
Installation Instructions
Page 16
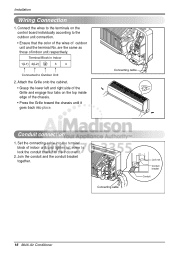
... Indoor 1(L1) 2(L2) 3 4 Connected to the outdoor unit connection. • Ensure that the color of the wires of the Grille and engage four tabs on the control board individually according to Outdoor Unit 2. Attach the Grille onto the cabinet. • Grasp the lower left and right side of outdoor unit and the terminal No. Connecting cable Lock nut Conduit bracket Conduit 16 Multi Air Conditioner Set...
... Indoor 1(L1) 2(L2) 3 4 Connected to the outdoor unit connection. • Ensure that the color of the wires of the Grille and engage four tabs on the control board individually according to Outdoor Unit 2. Attach the Grille onto the cabinet. • Grasp the lower left and right side of outdoor unit and the terminal No. Connecting cable Lock nut Conduit bracket Conduit 16 Multi Air Conditioner Set...
Installation Instructions
Page 18
... the wires of outdoor unit and the terminal No. Remove the busing rubber product attached on the control board individually according to the terminals on the indoor unit. 2. Set the connecting cable into the terminal block of indoor unit, and tighten set screw to lock the conduit bracket to prevent unit falling. Lock nut Conduit Conduit mounting plate 18 Multi Air Conditioner are the same as those of indoor unit...
... the wires of outdoor unit and the terminal No. Remove the busing rubber product attached on the control board individually according to the terminals on the indoor unit. 2. Set the connecting cable into the terminal block of indoor unit, and tighten set screw to lock the conduit bracket to prevent unit falling. Lock nut Conduit Conduit mounting plate 18 Multi Air Conditioner are the same as those of indoor unit...
Installation Instructions
Page 19
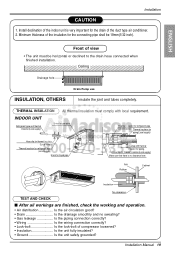
... the duct type air conditioner. 2. Install declination of view • The unit must comply with thermal insulator for thermal insulator(Local supply) Make sure that there is very important for the connecting pipe shall be horizontal or declined to the drain hose connected when finished installation. Felt Rubber Cabinet Insulation No clearance TEST AND CHECK I After all workings are finished...
... the duct type air conditioner. 2. Install declination of view • The unit must comply with thermal insulator for thermal insulator(Local supply) Make sure that there is very important for the connecting pipe shall be horizontal or declined to the drain hose connected when finished installation. Felt Rubber Cabinet Insulation No clearance TEST AND CHECK I After all workings are finished...
Installation Instructions
Page 20
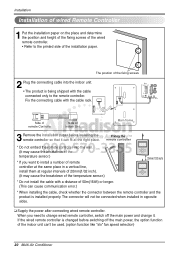
... used. (option function like "slo" fan speed selection) 20 Multi Air Conditioner The position of 50m(164ft) or longer. (This can cause communication error.) * When installing the cable, check whether the connector between the remote controller and the product is changed before installing the Fixing the remote controller so that it . Fix the connecting cable with the cable connected only to install a number of the temperature sensor...
... used. (option function like "slo" fan speed selection) 20 Multi Air Conditioner The position of 50m(164ft) or longer. (This can cause communication error.) * When installing the cable, check whether the connector between the remote controller and the product is changed before installing the Fixing the remote controller so that it . Fix the connecting cable with the cable connected only to install a number of the temperature sensor...
Installation Instructions
Page 21
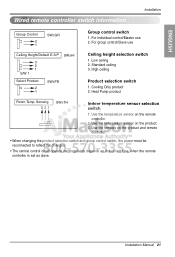
... control could operate inappropriately depends on the remote controller. 2. Low ceiling 2. Heat Pump product Room Temp. Use the temperature sensor on the product. 3. For individual control/Master use Ceiling Height/Default E.S.P 3 2 1 S/W 1 SW±HI Select Product 2 1 SW±PD Ceiling height selection switch 1. ENGLISH Wired remote controller switch information Installation Group Control 2 1 SW±GR Group control switch 1. Standard ceiling 3. Sensing 321 SW±TH Indoor temperature sensor selection switch 1. Installation Manual 21 Cooling Only...
... control could operate inappropriately depends on the remote controller. 2. Low ceiling 2. Heat Pump product Room Temp. Use the temperature sensor on the product. 3. For individual control/Master use Ceiling Height/Default E.S.P 3 2 1 S/W 1 SW±HI Select Product 2 1 SW±PD Ceiling height selection switch 1. ENGLISH Wired remote controller switch information Installation Group Control 2 1 SW±GR Group control switch 1. Standard ceiling 3. Sensing 321 SW±TH Indoor temperature sensor selection switch 1. Installation Manual 21 Cooling Only...
Installation Instructions
Page 24
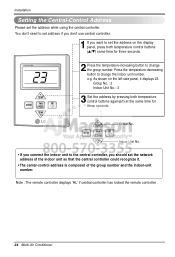
... the remote controller . 24 Multi Air Conditioner MODE TEMP FAN SPEED TEMP Group No. PQRCUCS0C Defrost Preheat Out door Room Temp Total on the display panel, press both temperature control buttons again(s/t) at the same time for three seconds. e.g. Group No. : 2 Indoor Unit No. : 3 3 Set the address by pressing both temperature control buttons (L/M) same time for three seconds. Installation Setting the Central-Control Address Please set the network address of the group number and the indoor-unit number. Indoor Unit No...
... the remote controller . 24 Multi Air Conditioner MODE TEMP FAN SPEED TEMP Group No. PQRCUCS0C Defrost Preheat Out door Room Temp Total on the display panel, press both temperature control buttons again(s/t) at the same time for three seconds. e.g. Group No. : 2 Indoor Unit No. : 3 3 Set the address by pressing both temperature control buttons (L/M) same time for three seconds. Installation Setting the Central-Control Address Please set the network address of the group number and the indoor-unit number. Indoor Unit No...

Installation Instructions
Page 26
...(22 15/32) Unit Size • Select and mark the position for fixing bolts and piping hole. • Decide the position for fixing bolts slightly tilted to the drain direction after considering the direction of drain hose. • Drill the hole for anchor bolt on the wall. 461(18 5/32) Unit: mm(inch) CAUTION : • This air-conditioner uses a drain pump. • Install the unit horizontally using a level gauge. •...
...(22 15/32) Unit Size • Select and mark the position for fixing bolts and piping hole. • Decide the position for fixing bolts slightly tilted to the drain direction after considering the direction of drain hose. • Drill the hole for anchor bolt on the wall. 461(18 5/32) Unit: mm(inch) CAUTION : • This air-conditioner uses a drain pump. • Install the unit horizontally using a level gauge. •...
Installation Instructions
Page 27
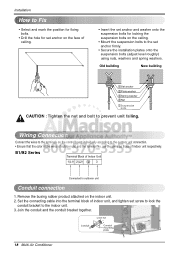
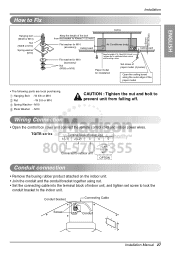
... air conditioner bottom surface and the ceiling surface Paper model for installation Set screw of paper model (4 pieces) Open the ceiling board along the outer edge of the bolt from falling off. Wiring Connection • Open the control box cover and connect the remote control cord and indoor power wires. M10 CAUTION : Tighten the nut and bolt to the indoor unit. W 3/8 or M10 Spring Washer - Conduit bracket Connecting Cable Screw Conduit Installation Manual...
... air conditioner bottom surface and the ceiling surface Paper model for installation Set screw of paper model (4 pieces) Open the ceiling board along the outer edge of the bolt from falling off. Wiring Connection • Open the control box cover and connect the remote control cord and indoor power wires. M10 CAUTION : Tighten the nut and bolt to the indoor unit. W 3/8 or M10 Spring Washer - Conduit bracket Connecting Cable Screw Conduit Installation Manual...
Installation Instructions
Page 33
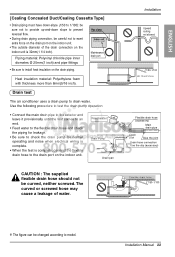
... noise when electrical wiring is complete. • When the test is 32mm(1 1/4 inch). The curved or screwed hose may cause a leakage of the drain connection on the indoor unit is complete, connect the flexible drain hose to the drain port on the drain piping. Feed water Drain Pump Drain pan CAUTION : The supplied flexible drain hose should not be changed according to model. ENGLISH [Cealing Concealed Duct/Cealing Cassette Type] • Drain piping...
... noise when electrical wiring is complete. • When the test is 32mm(1 1/4 inch). The curved or screwed hose may cause a leakage of the drain connection on the indoor unit is complete, connect the flexible drain hose to the drain port on the drain piping. Feed water Drain Pump Drain pan CAUTION : The supplied flexible drain hose should not be changed according to model. ENGLISH [Cealing Concealed Duct/Cealing Cassette Type] • Drain piping...
Installation Instructions
Page 37
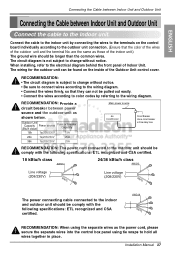
... the indoor and outdoor unit should be found on the control board individually according to the wiring diagram. Connect the cable to the indoor unit by referring to the outdoor unit connection. (Ensure that the color of the wires of Indoor Unit. Outdoor Unit Capacity Power source (Btu/h class) Fuse or breaker Capacity 18k 1ø,208/230V 15A 24k 1ø,208/230V 25A 36k 1ø,208/230V 25A Main power source Air Conditioner Circuit Breaker Use a circuit breaker...
... the indoor and outdoor unit should be found on the control board individually according to the wiring diagram. Connect the cable to the indoor unit by referring to the outdoor unit connection. (Ensure that the color of the wires of Indoor Unit. Outdoor Unit Capacity Power source (Btu/h class) Fuse or breaker Capacity 18k 1ø,208/230V 15A 24k 1ø,208/230V 25A 36k 1ø,208/230V 25A Main power source Air Conditioner Circuit Breaker Use a circuit breaker...
Installation Instructions
Page 40
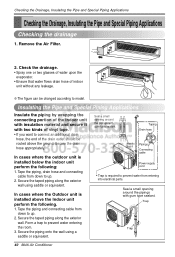
... be changed according to model. Tape the piping, drain hose and connecting cable from down to up . 2. In cases where the Outdoor unit is required to prevent water from down to up . 2. Secure the piping onto the wall using saddle or equivalent. Seal a small opening around the pipings with gum type sealant. Tape the piping and connecting cable from entering into electrical parts. Trap Trap 40 Multi Air Conditioner...
... be changed according to model. Tape the piping, drain hose and connecting cable from down to up . 2. In cases where the Outdoor unit is required to prevent water from down to up . 2. Secure the piping onto the wall using saddle or equivalent. Seal a small opening around the pipings with gum type sealant. Tape the piping and connecting cable from entering into electrical parts. Trap Trap 40 Multi Air Conditioner...

Installation Instructions
Page 42
... gas side service valves on the outdoor unit. Check that each indoor unit connection set, separately. ❈ The figure can be changed according to be free of the cylinder must always be kept closed at the nitrogen cylinder. Usually, the cylinder is found to model. 42 Multi Air Conditioner After the system is used in the refrigeration system. Next, test for leak testing. Water may...
... gas side service valves on the outdoor unit. Check that each indoor unit connection set, separately. ❈ The figure can be changed according to be free of the cylinder must always be kept closed at the nitrogen cylinder. Usually, the cylinder is found to model. 42 Multi Air Conditioner After the system is used in the refrigeration system. Next, test for leak testing. Water may...

Service Manual
Page 2
... x 1 43 x 1 9.5/ 8/ 7 13/ 12/ 11 335/282/247 459/424/388 - - - - Specification Indoor unit type Ceilling Cassette - 4way Model Decoration Panel Name AMNW12GTRA0[LMCN125HV] AMNW18GTQA0[LMCN185HV] PT-UQC PT-UQC Power Supply Capacity(*) Current Fan Running Current Motor Type Fan Type Ø / V / Hz Btu/h class A 1/ 208~230/ 60 12,000 0.25 BLDC Turbo Fan 1/ 208~230/ 60 18,000 0.25 BLDC Turbo Fan Coil Dimensions (W x H x D) Motor Output(W) x No. of Zero 2.
... x 1 43 x 1 9.5/ 8/ 7 13/ 12/ 11 335/282/247 459/424/388 - - - - Specification Indoor unit type Ceilling Cassette - 4way Model Decoration Panel Name AMNW12GTRA0[LMCN125HV] AMNW18GTQA0[LMCN185HV] PT-UQC PT-UQC Power Supply Capacity(*) Current Fan Running Current Motor Type Fan Type Ø / V / Hz Btu/h class A 1/ 208~230/ 60 12,000 0.25 BLDC Turbo Fan 1/ 208~230/ 60 18,000 0.25 BLDC Turbo Fan Coil Dimensions (W x H x D) Motor Output(W) x No. of Zero 2.

Service Manual
Page 3
...) Jet cool(Power wind) Swirl wind Deodorizing filter Plasma air purifier Prefilter(washable / anti-fungus) Drain pump E.S.P. LGE Internal Use Only 2. Copyright ©2008 LG Electronics. Inc. control Electric heater(operation) High ceiling operation Hot start Self diagnosis Soft dry operation Auto changeover Auto cleaning Auto operation(artificial intelligence) Auto restart operation Child lock Energy-Saving Cooling Mode Forced operation Group control Sleep mode Timer(on/off) Timer(weekly) Two thermistor control Wide wired remote controller Deluxe wired remote controller Simple wired...
...) Jet cool(Power wind) Swirl wind Deodorizing filter Plasma air purifier Prefilter(washable / anti-fungus) Drain pump E.S.P. LGE Internal Use Only 2. Copyright ©2008 LG Electronics. Inc. control Electric heater(operation) High ceiling operation Hot start Self diagnosis Soft dry operation Auto changeover Auto cleaning Auto operation(artificial intelligence) Auto restart operation Child lock Energy-Saving Cooling Mode Forced operation Group control Sleep mode Timer(on/off) Timer(weekly) Two thermistor control Wide wired remote controller Deluxe wired remote controller Simple wired...


