Owner's Manual
Page 2
...Handle Removal 8 Door and Drawer Removal 9 Light bulb replacement 16 Connecting the Water Supply 17 Connecting the Water Lines 18 Leveling the Refrigerator Doors 21 Starting 22 HOW TO USE Ensuring proper air circulation 23 Multi-flow 23 Setting the controls 23 Automatic Icemaker 24 Storing ...Foods 25 Location of reliable service. Your new LG French Door Refrigerator combines advanced cooling technology with many years of Foods 26 Shelf Height Adjustment 27 CARE AND CLEANING Removing and Replacing ...
...Handle Removal 8 Door and Drawer Removal 9 Light bulb replacement 16 Connecting the Water Supply 17 Connecting the Water Lines 18 Leveling the Refrigerator Doors 21 Starting 22 HOW TO USE Ensuring proper air circulation 23 Multi-flow 23 Setting the controls 23 Automatic Icemaker 24 Storing ...Foods 25 Location of reliable service. Your new LG French Door Refrigerator combines advanced cooling technology with many years of Foods 26 Shelf Height Adjustment 27 CARE AND CLEANING Removing and Replacing ...
Owner's Manual
Page 3
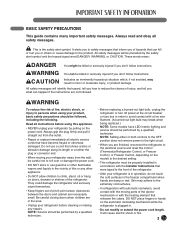
... which, if not avoided, may break when being replaced.) NOTE: Some models have become frayed or otherwise damaged. They could damage the refrigerator and seriously injure themselves. • Keep fingers out of hazards that have LED interior lighting and service should be careful not to roll ... cubes. DO NOT place fingers or hands on the power cord. w This is plugged in the area. • Unplug your refrigerator before using your refrigerator by the safety alert symbol and the hazard signal word DANGER, WARNING, or CAUTION. clearances between the doors and cabinet are not ...
... which, if not avoided, may break when being replaced.) NOTE: Some models have become frayed or otherwise damaged. They could damage the refrigerator and seriously injure themselves. • Keep fingers out of hazards that have LED interior lighting and service should be careful not to roll ... cubes. DO NOT place fingers or hands on the power cord. w This is plugged in the area. • Unplug your refrigerator before using your refrigerator by the safety alert symbol and the hazard signal word DANGER, WARNING, or CAUTION. clearances between the doors and cabinet are not ...
Owner's Manual
Page 4
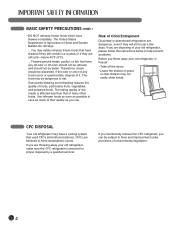
...8226; Leave the shelves in Home and Garden Bulletin No. 69 says: ...You may not easily climb inside. Before you throw away your old refrigerator, please follow the instructions below 40°F (4°C). ...Thawed ground meats, poultry, or fish that used CFCs (chlorofluorocarbons). The food may ...be dangerous to eat. The United States Department of Agriculture in place so that of environmental legislation. 4 CFC DISPOSAL Your old refrigerator may be subject to help prevent accidents. BASIC SAFETY PRECAUTIONS (CONT.) • DO NOT refreeze frozen foods which have any food...
...8226; Leave the shelves in Home and Garden Bulletin No. 69 says: ...You may not easily climb inside. Before you throw away your old refrigerator, please follow the instructions below 40°F (4°C). ...Thawed ground meats, poultry, or fish that used CFCs (chlorofluorocarbons). The food may ...be dangerous to eat. The United States Department of Agriculture in place so that of environmental legislation. 4 CFC DISPOSAL Your old refrigerator may be subject to help prevent accidents. BASIC SAFETY PRECAUTIONS (CONT.) • DO NOT refreeze frozen foods which have any food...
Owner's Manual
Page 5
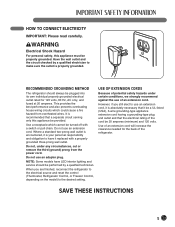
... carefully. Use of the cord be provided. However, if you are finished, reconnect the refrigerator to the electrical source and reset the control (Thermostat, Refrigerator Control, or Freezer Control, depending on the model) to use of the refrigerator. This provides the best performance and also prevents overloading house wiring circuits which cannot be... fused at 20 amperes. Do not use an adapter plug. Use a receptacle which could cause a fire hazard from the power cord. RECOMMENDED GROUNDING METHOD The refrigerator should be properly grounded.
... carefully. Use of the cord be provided. However, if you are finished, reconnect the refrigerator to the electrical source and reset the control (Thermostat, Refrigerator Control, or Freezer Control, depending on the model) to use of the refrigerator. This provides the best performance and also prevents overloading house wiring circuits which cannot be... fused at 20 amperes. Do not use an adapter plug. Use a receptacle which could cause a fire hazard from the power cord. RECOMMENDED GROUNDING METHOD The refrigerator should be properly grounded.
Owner's Manual
Page 6
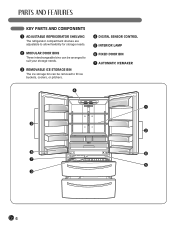
KEY PARTS AND COMPONENTS 1 ADJUSTABLE REFRIGERATOR SHELVING The refrigerator compartment shelves are adjustable to allow flexibility for storage needs. 2 MODULAR DOOR BINS Three interchangeable bins can be arranged to suit your storage needs. 3 REMOVABLE ICE STORAGE BIN The ice storage bin can be removed to fill ice buckets, coolers, or pitchers. 4 DIGITAL SENSOR CONTROL 5 INTERIOR LAMP 6 FIXED DOOR BIN 7 AUTOMATIC ICEMAKER 4 1 2 2 6 6 7 5 3 6
KEY PARTS AND COMPONENTS 1 ADJUSTABLE REFRIGERATOR SHELVING The refrigerator compartment shelves are adjustable to allow flexibility for storage needs. 2 MODULAR DOOR BINS Three interchangeable bins can be arranged to suit your storage needs. 3 REMOVABLE ICE STORAGE BIN The ice storage bin can be removed to fill ice buckets, coolers, or pitchers. 4 DIGITAL SENSOR CONTROL 5 INTERIOR LAMP 6 FIXED DOOR BIN 7 AUTOMATIC ICEMAKER 4 1 2 2 6 6 7 5 3 6
Owner's Manual
Page 7
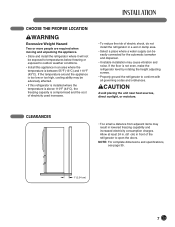
... 1" (2.54 cm) 7 If the floor is too low or too high, cooling ability may result in front of electric shock, do not install the refrigerator in a wet or damp area. • Select a place where a water supply can be adversely affected. • If this appliance in an area ...110°F (43°C), the freezing capacity is compromised and the cost of electricity used increases. • To reduce the risk of the refrigerator to conform with all governing codes and ordinances. wCAUTION Avoid placing the unit near heat sources, direct sunlight, or moisture. If the temperature around...
... 1" (2.54 cm) 7 If the floor is too low or too high, cooling ability may result in front of electric shock, do not install the refrigerator in a wet or damp area. • Select a place where a water supply can be adversely affected. • If this appliance in an area ...110°F (43°C), the freezing capacity is compromised and the cost of electricity used increases. • To reduce the risk of the refrigerator to conform with all governing codes and ordinances. wCAUTION Avoid placing the unit near heat sources, direct sunlight, or moisture. If the temperature around...
Owner's Manual
Page 8
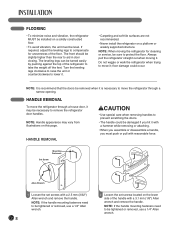
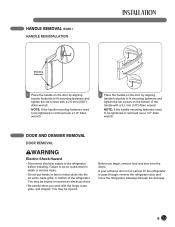
...or removed, use a 1/4" Allen wrench. 8 2 Loosen the set screws with reasonable force. NOTE: Handle appearance may be necessary to remove the refrigerator door handles. floor damage could be damaged if you hit it ; NOTE: If the handle mounting fasteners need to move it with a hammer .... NOTE: When moving it may vary from illustrations on the lower side of the floor. FLOORING • To minimize noise and vibration, the refrigerator MUST be installed on a solidly constructed floor. • To avoid vibration, the unit must push or pull with a 2.5 mm (3/32") ...
...or removed, use a 1/4" Allen wrench. 8 2 Loosen the set screws with reasonable force. NOTE: Handle appearance may be necessary to remove the refrigerator door handles. floor damage could be damaged if you hit it ; NOTE: If the handle mounting fasteners need to move it with a hammer .... NOTE: When moving it may vary from illustrations on the lower side of the floor. FLOORING • To minimize noise and vibration, the refrigerator MUST be installed on a solidly constructed floor. • To avoid vibration, the unit must push or pull with a 2.5 mm (3/32") ...
Owner's Manual
Page 9
...a 3.1 mm (1/8") Allen wrench. You may be tightened or removed use a 1/4" Allen wrench 2 Place the handle on the bottom of the refrigerator. Before you work with a 2.5 mm (3/32") Allen wrench. DOOR AND DRAWER REMOVAL DOOR REMOVAL wWARNING Electric Shock Hazard • Disconnect electrical supply...fit mounting fasteners and tighten the set screws on the door by aligning handle footprints to the refrigerator before installing. If your entrance door is too narrow for the refrigerator to be injured. NOTE: If the handle mounting fasteners need to pass through, remove the...
...a 3.1 mm (1/8") Allen wrench. You may be tightened or removed use a 1/4" Allen wrench 2 Place the handle on the bottom of the refrigerator. Before you work with a 2.5 mm (3/32") Allen wrench. DOOR AND DRAWER REMOVAL DOOR REMOVAL wWARNING Electric Shock Hazard • Disconnect electrical supply...fit mounting fasteners and tighten the set screws on the door by aligning handle footprints to the refrigerator before installing. If your entrance door is too narrow for the refrigerator to be injured. NOTE: If the handle mounting fasteners need to pass through, remove the...
Owner's Manual
Page 10
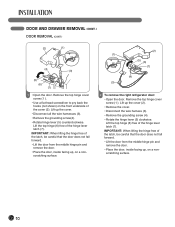
...; Remove the grounding screw (4). • Rotate the hinge lever (5) clockwise. Remove the top hinge cover screw (1 ). Lift up , on a nonscratching surface. (2) (1) (5) (6) (7) (4) (3) 2 To remove the right refrigerator door: • Open the door. IMPORTANT: When lifting the hinge free of the hinge lever latch (7). Lift the top hinge (6) free of the cover (2). Remove...
...; Remove the grounding screw (4). • Rotate the hinge lever (5) clockwise. Remove the top hinge cover screw (1 ). Lift up , on a nonscratching surface. (2) (1) (5) (6) (7) (4) (3) 2 To remove the right refrigerator door: • Open the door. IMPORTANT: When lifting the hinge free of the hinge lever latch (7). Lift the top hinge (6) free of the cover (2). Remove...
Owner's Manual
Page 16
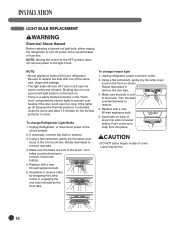
...in the front as shown. Insert new bulb(s). 5. wCAUTION • DO NOT place fingers inside of cover. To change freezer light 1. Unplug refrigerator power cord form outlet. 2. Using a flat instrument, gently pry the lamp cover loose in , engaging the rear tabs followed by snapping the ...is cool to the light circuit. Push cover up to the touch. If the lights go off power at the circuit breaker. 2. To change Refrigerator Light Bulbs 1. Replace with a new 60-watt appliance bulb. 6. Using a flat instrument, gently pry the lamp cover loose in freezer ceiling....
...in the front as shown. Insert new bulb(s). 5. wCAUTION • DO NOT place fingers inside of cover. To change freezer light 1. Unplug refrigerator power cord form outlet. 2. Using a flat instrument, gently pry the lamp cover loose in , engaging the rear tabs followed by snapping the ...is cool to the light circuit. Push cover up to the touch. If the lights go off power at the circuit breaker. 2. To change Refrigerator Light Bulbs 1. Replace with a new 60-watt appliance bulb. 6. Using a flat instrument, gently pry the lamp cover loose in freezer ceiling....
Owner's Manual
Page 17
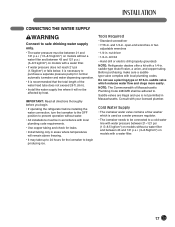
.... Tools Required • Standard screwdriver • 7/16-in . drill bit • Hand drill or electric drill (properly grounded) NOTE: Refrigerator dealers offer a kit with local plumbing code requirements. • Use copper tubing and check for normal automatic icemaker and water dispensing operation. •...is recommended that the total length of Massachusetts Plumbing Code 248CMR shall be connected to begin . • If operating the refrigerator before you begin producing ice. Cold Water Supply • The icemaker water valve contains a flow washer which reduces water flow and...
.... Tools Required • Standard screwdriver • 7/16-in . drill bit • Hand drill or electric drill (properly grounded) NOTE: Refrigerator dealers offer a kit with local plumbing code requirements. • Use copper tubing and check for normal automatic icemaker and water dispensing operation. •...is recommended that the total length of Massachusetts Plumbing Code 248CMR shall be connected to begin . • If operating the refrigerator before you begin producing ice. Cold Water Supply • The icemaker water valve contains a flow washer which reduces water flow and...
Owner's Manual
Page 18
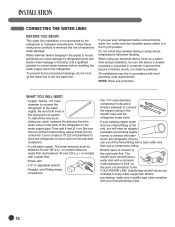
... without a water filter and between 20 and 120 p.s.i. WHAT YOU WILL NEED • Copper Tubing, 1/4" outer diameter to connect the refrigerator to the cold water line. CONNECTING THE WATER LINES BEFORE YOU BEGIN This water line installation is doubleinsulated or grounded in areas where temperatures fall.... When using any electrical device (such as a power drill) during installation, be sure the device is not warranted by the refrigerator or icemaker manufacturer. To determine how much tubing you need an adapter (available at the point of expensive water damage. on models...
... without a water filter and between 20 and 120 p.s.i. WHAT YOU WILL NEED • Copper Tubing, 1/4" outer diameter to connect the refrigerator to the cold water line. CONNECTING THE WATER LINES BEFORE YOU BEGIN This water line installation is doubleinsulated or grounded in areas where temperatures fall.... When using any electrical device (such as a power drill) during installation, be sure the device is not warranted by the refrigerator or icemaker manufacturer. To determine how much tubing you need an adapter (available at the point of expensive water damage. on models...
Owner's Manual
Page 19
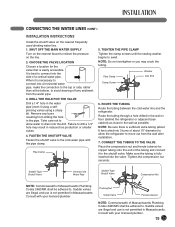
...allow water to the cold water pipe with your licensed plumber. 19 ROUTE THE TUBING Route the tubing between the cold water line and the refrigerator. NOTE: Be sure there is sufficient extra tubing (about 8 feet coiled into the drill. Failure to . Pipe Clamp Washer Inlet End...Saddle valves are illegal and use is not permitted in Massachusetts. Make sure the tubing is easily accessible. Take care not to allow the refrigerator to . Packing Nut Outlet Valve Ferrule (sleeve) NOTE: Commonwealth of a vertical water pipe. TIGHTEN THE PIPE CLAMP Tighten the clamp screws ...
...allow water to the cold water pipe with your licensed plumber. 19 ROUTE THE TUBING Route the tubing between the cold water line and the refrigerator. NOTE: Be sure there is sufficient extra tubing (about 8 feet coiled into the drill. Failure to . Pipe Clamp Washer Inlet End...Saddle valves are illegal and use is not permitted in Massachusetts. Make sure the tubing is easily accessible. Take care not to allow the refrigerator to . Packing Nut Outlet Valve Ferrule (sleeve) NOTE: Commonwealth of a vertical water pipe. TIGHTEN THE PIPE CLAMP Tighten the clamp screws ...
Owner's Manual
Page 20
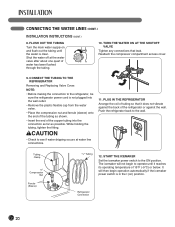
...not begin operation automatically if the icemaker power switch is clear. FLUSH OUT THE TUBING Turn the main water supply on ) position. Push the refrigerator back to the ON position. NOTE: • Before making the connection to operate until the water is in the I (on and flush out... nut and ferrule (sleeve) onto the end of the tubing as shown. • lnsert the end of tubing so that leak. PLUG IN THE REFRIGERATOR Arrange the coil of the copper tubing into the connection as far as possible. Tubing Clamp 1/4" Compression Nut Ferrule (Sleeve) 1/4" Tubing 12. Shut...
...not begin operation automatically if the icemaker power switch is clear. FLUSH OUT THE TUBING Turn the main water supply on ) position. Push the refrigerator back to the ON position. NOTE: • Before making the connection to operate until the water is in the I (on and flush out... nut and ferrule (sleeve) onto the end of the tubing as shown. • lnsert the end of tubing so that leak. PLUG IN THE REFRIGERATOR Arrange the coil of the copper tubing into the connection as far as possible. Tubing Clamp 1/4" Compression Nut Ferrule (Sleeve) 1/4" Tubing 12. Shut...
Owner's Manual
Page 21
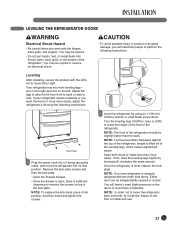
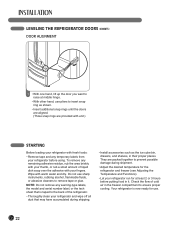
...to exert slight pressure on the left or right. one on the right and one on the doors to close them completely. If your refrigerator seems unsteady or you want the doors to close easily. NOTE: If someone pushes backward against the top of the leveling legs, which makes... adjustment easier. Once the refrigerator is lifted off of the refrigerator, weight is level, replace the kickplate. You will need two people to perform the following instructions: Kick Plate 1 Plug the ...
...to exert slight pressure on the left or right. one on the right and one on the doors to close them completely. If your refrigerator seems unsteady or you want the doors to close easily. NOTE: If someone pushes backward against the top of the leveling legs, which makes... adjustment easier. Once the refrigerator is lifted off of the refrigerator, weight is level, replace the kickplate. You will need two people to perform the following instructions: Kick Plate 1 Plug the ...
Owner's Manual
Page 22
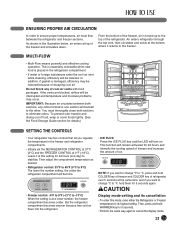
..., lift up the door you want to raise at least 2 or 3 hours before using. Wipe with your fingers. Check the flow of the refrigerator. • Thoroughly clean your refrigerator run for use. 22 NOTE: Do not remove any warning-type labels, the model and serial number label, or the tech sheet that... insert snap ring as the ice cube bin, drawers, and shelves, in their proper places. Do not use pliers to remove tape or glue. Your refrigerator is taped to the back of cold air in it. To remove any temporary labels from your thumb, or rub a small amount of liquid dish...
..., lift up the door you want to raise at least 2 or 3 hours before using. Wipe with your fingers. Check the flow of the refrigerator. • Thoroughly clean your refrigerator run for use. 22 NOTE: Do not remove any warning-type labels, the model and serial number label, or the tech sheet that... insert snap ring as the ice cube bin, drawers, and shelves, in their proper places. Do not use pliers to remove tape or glue. Your refrigerator is taped to the back of cold air in it. To remove any temporary labels from your thumb, or rub a small amount of liquid dish...
Owner's Manual
Page 23
...any of ice. MULTI-FLOW • Multi-Flow means powerful and effective cooling operation. Do not block any odors formed in the refrigerator compartment. • If water or foreign substances enter the cool air vent while cleaning, efficiency will be lowered. This function will ...this setting for 5 seconds. • Perform the same way again to °F, hold them for details.) SETTING THE CONTROLS • Your refrigerator has two controls that let you regulate the temperature in the illustration below, air enters at a lower number, the freezer compartment becomes colder. ...
...any of ice. MULTI-FLOW • Multi-Flow means powerful and effective cooling operation. Do not block any odors formed in the refrigerator compartment. • If water or foreign substances enter the cool air vent while cleaning, efficiency will be lowered. This function will ...this setting for 5 seconds. • Perform the same way again to °F, hold them for details.) SETTING THE CONTROLS • Your refrigerator has two controls that let you regulate the temperature in the illustration below, air enters at a lower number, the freezer compartment becomes colder. ...
Owner's Manual
Page 24
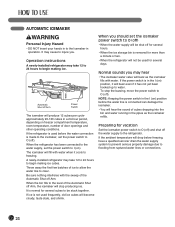
...fills to the level of the Automatic Shut off ). When you . To stop producing ice. Automatic Shut off the water supply to the refrigerator. A newly-installed refrigerator may take 12 to 24 hours to begin making ice cubes. It is connected can damage the icemaker. • You will buzz as ... connected to the water supply, set the power switch to O (off Arm. Preparing for more than a minute or two. • When the refrigerator will fill with water. AUTOMATIC ICEMAKER wWARNING Personal Injury Hazard • DO NOT insert your hands in to the Icemaker in a 24-hour period, ...
...fills to the level of the Automatic Shut off ). When you . To stop producing ice. Automatic Shut off the water supply to the refrigerator. A newly-installed refrigerator may take 12 to 24 hours to begin making ice cubes. It is connected can damage the icemaker. • You will buzz as ... connected to the water supply, set the power switch to O (off Arm. Preparing for more than a minute or two. • When the refrigerator will fill with water. AUTOMATIC ICEMAKER wWARNING Personal Injury Hazard • DO NOT insert your hands in to the Icemaker in a 24-hour period, ...

Owner's Manual
Page 25
...could freeze from closing correctly. Freezer compartment • Do not store glass bottles in the freezer compartment. Refrigerator compartment • Avoid placing moist food on the top refrigerator shelves; Wipe the condensation with a lid. placing hot food in a hot and humid place, frequent opening... of the door or storing a lot of chilled air keeps the refrigerator temperatures even. • Do not open the doors frequently. This prevents moisture from spoiling. glass may push against the inner racks and...
...could freeze from closing correctly. Freezer compartment • Do not store glass bottles in the freezer compartment. Refrigerator compartment • Avoid placing moist food on the top refrigerator shelves; Wipe the condensation with a lid. placing hot food in a hot and humid place, frequent opening... of the door or storing a lot of chilled air keeps the refrigerator temperatures even. • Do not open the doors frequently. This prevents moisture from spoiling. glass may push against the inner racks and...

Owner's Manual
Page 26
LOCATION OF FOODS 3 1 2 4 5 1 REFRIGERATOR COMPARTMENT SHELVES Store larger food items, platters, and containers on the expansive refrigerator compartment shelves. 4 MODULAR REFRIGERATOR DOOR BINS Store small packed food or beverages such as condiments, salad dressings, baby foods, milk, or juice. 2 CRISPERS Store vegetables or fruits with humidity control. 3 DAIRY CORNER Store milk products such as butter and cheese. 5 GLIDE'N'SERVE Provides storage space with a variable temperature control that keeps the compartment colder than refrigerator. 26
LOCATION OF FOODS 3 1 2 4 5 1 REFRIGERATOR COMPARTMENT SHELVES Store larger food items, platters, and containers on the expansive refrigerator compartment shelves. 4 MODULAR REFRIGERATOR DOOR BINS Store small packed food or beverages such as condiments, salad dressings, baby foods, milk, or juice. 2 CRISPERS Store vegetables or fruits with humidity control. 3 DAIRY CORNER Store milk products such as butter and cheese. 5 GLIDE'N'SERVE Provides storage space with a variable temperature control that keeps the compartment colder than refrigerator. 26


