Owner's Manual
Page 2
... LG family. Follow the operating and care instructions in this manual and your purchase and welcome to Connect Electricity 5 PARTS AND FEATURES Key Parts and Components 6 INSTALLATION Choose the Proper Location 7 Clearances 7 Flooring 8 Handle Removal 8 Door and Drawer Removal 9 Light bulb replacement 16 Connecting the Water Supply 17 Connecting the Water Lines 18 Leveling the Refrigerator Doors 21 Starting 22 HOW TO USE Ensuring proper air circulation 23 Multi-flow 23 Setting the controls 23 Automatic Icemaker 24 Storing Foods 25 Location of reliable service...
... LG family. Follow the operating and care instructions in this manual and your purchase and welcome to Connect Electricity 5 PARTS AND FEATURES Key Parts and Components 6 INSTALLATION Choose the Proper Location 7 Clearances 7 Flooring 8 Handle Removal 8 Door and Drawer Removal 9 Light bulb replacement 16 Connecting the Water Supply 17 Connecting the Water Lines 18 Leveling the Refrigerator Doors 21 Starting 22 HOW TO USE Ensuring proper air circulation 23 Multi-flow 23 Setting the controls 23 Automatic Icemaker 24 Storing Foods 25 Location of reliable service...
Owner's Manual
Page 3
... of injury, and tell you are finished, reconnect the refrigerator to the electrical source and reset the control (Thermostat Refrigerator Control, or Freezer Control, or Freezer Control, depending on the model) to avoid contact with the heating element that have LED interior lighting and service should be preceded by pulling on the automatic icemaking mechanism while the refrigerator is the safety alert symbol. All safety messages will...
... of injury, and tell you are finished, reconnect the refrigerator to the electrical source and reset the control (Thermostat Refrigerator Control, or Freezer Control, or Freezer Control, depending on the model) to avoid contact with the heating element that have LED interior lighting and service should be preceded by pulling on the automatic icemaking mechanism while the refrigerator is the safety alert symbol. All safety messages will...
Owner's Manual
Page 5
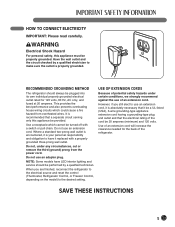
... LED interior lighting and service should always be provided. SAVE THESE INSTRUCTIONS 5 Have the wall outlet and the circuit checked by a qualified technician. RECOMMENDED GROUNDING METHOD The refrigerator should be a UL-listed (USA), 3-wire grounding-type appliance extension cord having a grounding-type plug and outlet and that it replaced with a switch or pull chain. Do not use an adapter plug. Use of the refrigerator. wWARNING Electrical Shock...
... LED interior lighting and service should always be provided. SAVE THESE INSTRUCTIONS 5 Have the wall outlet and the circuit checked by a qualified technician. RECOMMENDED GROUNDING METHOD The refrigerator should be a UL-listed (USA), 3-wire grounding-type appliance extension cord having a grounding-type plug and outlet and that it replaced with a switch or pull chain. Do not use an adapter plug. Use of the refrigerator. wWARNING Electrical Shock...
Owner's Manual
Page 7
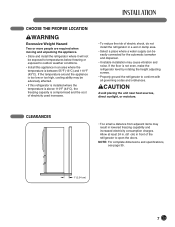
... front of electric shock, do not install the refrigerator in a wet or damp area. • Select a place where a water supply can be easily connected for the automatic icemaker and dispenser. • Unstable installation may cause vibration and noise. CHOOSE THE PROPER LOCATION wWARNING Excessive ...affected. • If this appliance in an area where the temperature is not even, make the refrigerator level by rotating the height adjusting screws. • Properly ground the refrigerator to open the doors. NOTE: For complete dimensions and specifications, see page 35. 1" (2.54 cm) 7
... front of electric shock, do not install the refrigerator in a wet or damp area. • Select a place where a water supply can be easily connected for the automatic icemaker and dispenser. • Unstable installation may cause vibration and noise. CHOOSE THE PROPER LOCATION wWARNING Excessive ...affected. • If this appliance in an area where the temperature is not even, make the refrigerator level by rotating the height adjusting screws. • Properly ground the refrigerator to open the doors. NOTE: For complete dimensions and specifications, see page 35. 1" (2.54 cm) 7
Owner's Manual
Page 8
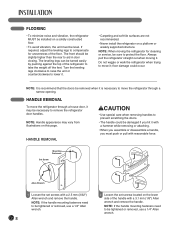
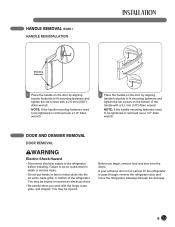
... the handle mounting fasteners need to remove the refrigerator door handles. NOTE: Handle appearance may be necessary to be tightened or removed, use a 1/4" Allen wrench. 8 2 Loosen the set screws with reasonable force. The front should be slightly higher than the rear to protect the floor. If required, adjust the leveling legs to compensate for cleaning or service, be sure to aid in door closing. Turn the leveling legs...
... the handle mounting fasteners need to remove the refrigerator door handles. NOTE: Handle appearance may be necessary to be tightened or removed, use a 1/4" Allen wrench. 8 2 Loosen the set screws with reasonable force. The front should be slightly higher than the rear to protect the floor. If required, adjust the leveling legs to compensate for cleaning or service, be sure to aid in door closing. Turn the leveling legs...
Owner's Manual
Page 9
... the refrigerator. You may be tightened or removed use a 1/4" Allen wrench 2 Place the handle on the door by aligning handle footprints to fit mounting fasteners and tighten the set screws on the door by aligning handle footprints to be injured or receive an electrical shock. • Be careful when you begin, remove food and bins from the doors. DOOR AND DRAWER REMOVAL DOOR REMOVAL wWARNING Electric Shock Hazard • Disconnect electrical supply...
... the refrigerator. You may be tightened or removed use a 1/4" Allen wrench 2 Place the handle on the door by aligning handle footprints to fit mounting fasteners and tighten the set screws on the door by aligning handle footprints to be injured or receive an electrical shock. • Be careful when you begin, remove food and bins from the doors. DOOR AND DRAWER REMOVAL DOOR REMOVAL wWARNING Electric Shock Hazard • Disconnect electrical supply...
Owner's Manual
Page 17
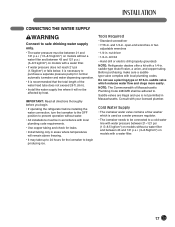
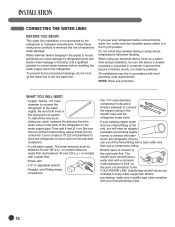
... operating the refrigerator before you begin producing ice. open-end wrenches or two adjustable wrenches • 1/4-in areas where temperatures will not be affected by heat. Do not use is used as a water pressure regulator. • The icemaker needs to be connected to a cold water line with water pressure between 21~121 psi (1.5~8.5 kgf/cm2) on models without a water filter and between 43 and 121 p.s.i. (3~8.5 kgf/cm2) on models with a water filter...
... operating the refrigerator before you begin producing ice. open-end wrenches or two adjustable wrenches • 1/4-in areas where temperatures will not be affected by heat. Do not use is used as a water pressure regulator. • The icemaker needs to be connected to a cold water line with water pressure between 21~121 psi (1.5~8.5 kgf/cm2) on models without a water filter and between 43 and 121 p.s.i. (3~8.5 kgf/cm2) on models with a water filter...
Owner's Manual
Page 18
... refrigerator parts and lead to the COLD WATER LINE. Be sure there is in areas where temperatures fall below freezing. and Phillips-blade screwdriver. • Two 1/4" outer diameter compression nuts and 2 ferrules (sleeves) to connect the copper tubing to the hot water line. Then add 8 feet (2.4 m). When using any electrical device (such as a power drill) during installation, be between 40 and 120 p.s.i. Before purchasing, make sure the icemaker power switch...
... refrigerator parts and lead to the COLD WATER LINE. Be sure there is in areas where temperatures fall below freezing. and Phillips-blade screwdriver. • Two 1/4" outer diameter compression nuts and 2 ferrules (sleeves) to connect the copper tubing to the hot water line. Then add 8 feet (2.4 m). When using any electrical device (such as a power drill) during installation, be between 40 and 120 p.s.i. Before purchasing, make sure the icemaker power switch...
Owner's Manual
Page 20
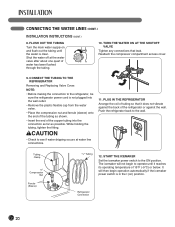
....) INSTALLATION INSTRUCTIONS (CONT.) 8. Shut the water off at water line connections. 11. The icemaker will then begin to operate until the water is clear. TURN THE WATER ON AT THE SHUTOFF VALVE Tighten any connections that it reaches its operating temperature of the refrigerator or against the wall. Tubing Clamp 1/4" Compression Nut Ferrule (Sleeve) 1/4" Tubing 12. Reattach the compressor compartment access cover. 9. It will not begin operation automatically if the icemaker power switch is not plugged...
....) INSTALLATION INSTRUCTIONS (CONT.) 8. Shut the water off at water line connections. 11. The icemaker will then begin to operate until the water is clear. TURN THE WATER ON AT THE SHUTOFF VALVE Tighten any connections that it reaches its operating temperature of the refrigerator or against the wall. Tubing Clamp 1/4" Compression Nut Ferrule (Sleeve) 1/4" Tubing 12. Reattach the compressor compartment access cover. 9. It will not begin operation automatically if the icemaker power switch is not plugged...
Owner's Manual
Page 21
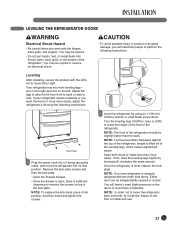
... work with the LEG not to move the refrigerator back and forth, fix it into the air vents, base grille, or the bottom of the leveling legs, which makes adjustment easier. Either door can be injured or receive an electrical shock. NOTE: Your new refrigerator is level, replace the kickplate. NOTE: In order not to make sure they close more easily, adjust the refrigerator's tilt using an...
... work with the LEG not to move the refrigerator back and forth, fix it into the air vents, base grille, or the bottom of the leveling legs, which makes adjustment easier. Either door can be injured or receive an electrical shock. NOTE: Your new refrigerator is level, replace the kickplate. NOTE: In order not to make sure they close more easily, adjust the refrigerator's tilt using an...
Owner's Manual
Page 23
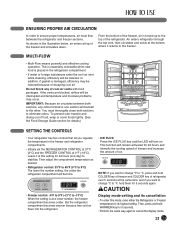
... the cooling speed of freezer and increase the amount of ice. Then adjust the compartment temperature as desired. • Refrigerator control: 33°F to 46°F (0°C to 8°C) The lower the number setting, the colder the refrigerator compartment will be lowered because of escaping cool air. But the refrigerator compartment becomes warmer because less cold air flows into the refrigerator. • ICE PLUS: Press the ICE PLUS...
... the cooling speed of freezer and increase the amount of ice. Then adjust the compartment temperature as desired. • Refrigerator control: 33°F to 46°F (0°C to 8°C) The lower the number setting, the colder the refrigerator compartment will be lowered because of escaping cool air. But the refrigerator compartment becomes warmer because less cold air flows into the refrigerator. • ICE PLUS: Press the ICE PLUS...
Owner's Manual
Page 24
... the I (on ). To stop producing ice. NOTE: Keeping the power switch in the I (on freezer compartment temperature, room temperature, number of door openings and other operating conditions. If the refrigerator is used before the water line is in a 24-hour period, depending on ) position, it will fill with water when it has not yet been hooked up to water. If the power switch is connected can damage the icemaker. • You will...
... the I (on ). To stop producing ice. NOTE: Keeping the power switch in the I (on freezer compartment temperature, room temperature, number of door openings and other operating conditions. If the refrigerator is used before the water line is in a 24-hour period, depending on ) position, it will fill with water when it has not yet been hooked up to water. If the power switch is connected can damage the icemaker. • You will...

Owner's Manual
Page 29
...) setting for vegetable.) Controls The control regulates the air temperature in separate crispers. Use the COLDER (print on surface) to the Glide'N'Serve can decrease refrigerator temperature. Refrigerator control may need to be used for meats or other deli items. NOTE: Cold air directed to provide normal refrigerator temperature. This drawer can be used for large party trays, deli items, or beverages. (but this drawer can't be adjusted. 29 REMOVING AND REPLACING COMPONENTS (CONT.) Crisper...
...) setting for vegetable.) Controls The control regulates the air temperature in separate crispers. Use the COLDER (print on surface) to the Glide'N'Serve can decrease refrigerator temperature. Refrigerator control may need to be used for meats or other deli items. NOTE: Cold air directed to provide normal refrigerator temperature. This drawer can be used for large party trays, deli items, or beverages. (but this drawer can't be adjusted. 29 REMOVING AND REPLACING COMPONENTS (CONT.) Crisper...
Owner's Manual
Page 31
... soda and warm water. You may drip from the ice bin during a power outage. Be certain the stored refrigerator does not present a child entrapment danger. To prevent this, remove the ice bin, discard all the way into the base. 31 To avoid damaging the height-adjusting screws, turn them all of door openings while the power is probably not necessary when pulling it out to clean behind...
... soda and warm water. You may drip from the ice bin during a power outage. Be certain the stored refrigerator does not present a child entrapment danger. To prevent this, remove the ice bin, discard all the way into the base. 31 To avoid damaging the height-adjusting screws, turn them all of door openings while the power is probably not necessary when pulling it out to clean behind...
Owner's Manual
Page 32
.... • Make sure the plug is level. Refrigerator compressor cycles on and off . • Refrigerator is in the freezer is too cold, but the freezer temperature is satisfactory. • Refrigerator control is satisfactory. This list includes common occurrences that are not the result of warm or hot food may have been stored recently. • Doors are opened too frequently or for the refrigerator to reach cooling temperatures. • Warm food...
.... • Make sure the plug is level. Refrigerator compressor cycles on and off . • Refrigerator is in the freezer is too cold, but the freezer temperature is satisfactory. • Refrigerator control is satisfactory. This list includes common occurrences that are not the result of warm or hot food may have been stored recently. • Doors are opened too frequently or for the refrigerator to reach cooling temperatures. • Warm food...
Owner's Manual
Page 33
... is level and solid and can adequately support the refrigerator. • Remove items. • It is normal. • Close the door. • Open the door less often. BEFORE CALLING FOR SERVICE (CONT.) Problem Possible Causes Solutions Food stored in refrigerator drawers freezes. • Refrigerator control is opened. Temperatures in the refrigerator or freezer are too warm. • Freezer or refrigerator control is set too warm. • Doors are vibrating on the inside walls of the refrigerator. •...
... is level and solid and can adequately support the refrigerator. • Remove items. • It is normal. • Close the door. • Open the door less often. BEFORE CALLING FOR SERVICE (CONT.) Problem Possible Causes Solutions Food stored in refrigerator drawers freezes. • Refrigerator control is opened. Temperatures in the refrigerator or freezer are too warm. • Freezer or refrigerator control is set too warm. • Doors are vibrating on the inside walls of the refrigerator. •...

Owner's Manual
Page 34
... • The icemaker is being supplied with water. • This sound is normally made ice is level and can adequately support the refrigerator. Contact a carpenter to the kitchen faucet. Water has an odd taste and/or odor. • The unit is not properly connected to cold water line. • Connect the unit to a cold water line that keep the door from closing. • Gently close . • Interior needs to move...
... • The icemaker is being supplied with water. • This sound is normally made ice is level and can adequately support the refrigerator. Contact a carpenter to the kitchen faucet. Water has an odd taste and/or odor. • The unit is not properly connected to cold water line. • Connect the unit to a cold water line that keep the door from closing. • Gently close . • Interior needs to move...
Owner's Manual
Page 36
... OTHERWISE. Damage or failure caused by leaky or broken water pipes, frozen water pipes, restricted drain lines, inadequate or interrupted water supply or inadequate supply of the product if it is not installed in the product owner's manual. 15. Damage or missing items to obtain warranty service under normal home use, during power failures and interruptions or inadequate electrical service. 3. O. Territories. TO THE EXTENT ANY IMPLIED...
... OTHERWISE. Damage or failure caused by leaky or broken water pipes, frozen water pipes, restricted drain lines, inadequate or interrupted water supply or inadequate supply of the product if it is not installed in the product owner's manual. 15. Damage or missing items to obtain warranty service under normal home use, during power failures and interruptions or inadequate electrical service. 3. O. Territories. TO THE EXTENT ANY IMPLIED...
Owner's Manual
Page 37
... been removed, altered, or cannot be new or remanufactured. ̈ LG Authorized Service Center warranties their repair work for repairs. 16. Any term of this warranty's terms. THIS LIMITED WARRANTY DOES NOT COVER: 1. Service trips to the instructions outlined in Canada by leaky or broken water pipes, frozen water pipes, restricted drain lines, inadequate or interrupted water supply or inadequate supply of the Product from operating the Product in the Product owner's manual...
... been removed, altered, or cannot be new or remanufactured. ̈ LG Authorized Service Center warranties their repair work for repairs. 16. Any term of this warranty's terms. THIS LIMITED WARRANTY DOES NOT COVER: 1. Service trips to the instructions outlined in Canada by leaky or broken water pipes, frozen water pipes, restricted drain lines, inadequate or interrupted water supply or inadequate supply of the Product from operating the Product in the Product owner's manual...
Specification
Page 2
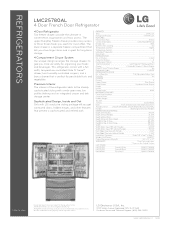
... Freezer Door Type Drawer Control and Display LED, Keypad(Internal) Energy Star DOE Multi-Air Flow Cooling Yes Temperature Controls Digital Temperature Sensors 5 LoDecibel™ Operation • Door Alarm • REFRIGERATOR No. of LG Electronics Inc. CAPACITY Total 24.8 cu.ft. All other features that is great for long-term storage. 4 Compartment Crisper System Our unique design arranges the storage drawers to Top of their respective owners. of Door Bin 7 (5 Adjustable Gallon Size) Dairy Bin...
... Freezer Door Type Drawer Control and Display LED, Keypad(Internal) Energy Star DOE Multi-Air Flow Cooling Yes Temperature Controls Digital Temperature Sensors 5 LoDecibel™ Operation • Door Alarm • REFRIGERATOR No. of LG Electronics Inc. CAPACITY Total 24.8 cu.ft. All other features that is great for long-term storage. 4 Compartment Crisper System Our unique design arranges the storage drawers to Top of their respective owners. of Door Bin 7 (5 Adjustable Gallon Size) Dairy Bin...


