Owner's Manual
Page 2
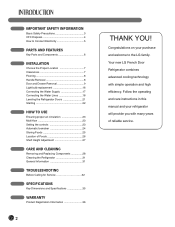
Your new LG French Door Refrigerator combines advanced cooling technology with many years of Foods 26 Shelf Height Adjustment 27 CARE AND CLEANING Removing and Replacing Components 28 Cleaning the Refrigerator 31 General Information 31 TROUBLESHOOTING Before Calling for Service 32 SPECIFICATIONS Key Dimensions and Specifications 35 ... Storing Foods 25 Location of reliable service. IMPORTANT SAFETY INFORMATION Basic Safety Precautions 3 CFC Disposal 4 How to the LG family. Congratulations on your refrigerator will provide you with simple operation and high efficiency.
Your new LG French Door Refrigerator combines advanced cooling technology with many years of Foods 26 Shelf Height Adjustment 27 CARE AND CLEANING Removing and Replacing Components 28 Cleaning the Refrigerator 31 General Information 31 TROUBLESHOOTING Before Calling for Service 32 SPECIFICATIONS Key Dimensions and Specifications 35 ... Storing Foods 25 Location of reliable service. IMPORTANT SAFETY INFORMATION Basic Safety Precautions 3 CFC Disposal 4 How to the LG family. Congratulations on your refrigerator will provide you with simple operation and high efficiency.
Owner's Manual
Page 3
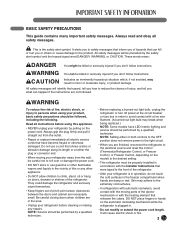
...were taped to the front of fire, electric shock, or injury to reduce the chance of this appliance. • NEVER unplug your refrigerator away from the outlet. • Repair or replace immediately all electric service cords that have LED interior lighting and service should be performed...doors and cabinet are not followed. It alerts you or others or cause damage to the electrical source and reset the control (Thermostat Refrigerator Control, or Freezer Control, or Freezer Control, depending on doors, drawers or shelves of hazards that releases the cubes. wCAUTION Indicates ...
...were taped to the front of fire, electric shock, or injury to reduce the chance of this appliance. • NEVER unplug your refrigerator away from the outlet. • Repair or replace immediately all electric service cords that have LED interior lighting and service should be performed...doors and cabinet are not followed. It alerts you or others or cause damage to the electrical source and reset the control (Thermostat Refrigerator Control, or Freezer Control, or Freezer Control, depending on doors, drawers or shelves of hazards that releases the cubes. wCAUTION Indicates ...
Owner's Manual
Page 4
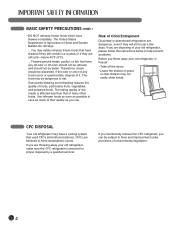
... ...Thawed ground meats, poultry, or fish that have a cooling system that of environmental legislation. 4 If you are disposing of your old refrigerator or freezer: • Take off -color should not be refrozen and should be subject to eat. Thawed ice cream should not be dangerous... of red meats is poor or questionable, dispose of foods, particularly fruits, vegetables, and prepared foods. If you intentionally release this CFC refrigerant, you can be discarded. The food may not easily climb inside. BASIC SAFETY PRECAUTIONS (CONT.) • DO NOT refreeze frozen foods ...
... ...Thawed ground meats, poultry, or fish that have a cooling system that of environmental legislation. 4 If you are disposing of your old refrigerator or freezer: • Take off -color should not be refrozen and should be subject to eat. Thawed ice cream should not be dangerous... of red meats is poor or questionable, dispose of foods, particularly fruits, vegetables, and prepared foods. If you intentionally release this CFC refrigerant, you can be discarded. The food may not easily climb inside. BASIC SAFETY PRECAUTIONS (CONT.) • DO NOT refreeze frozen foods ...
Owner's Manual
Page 5
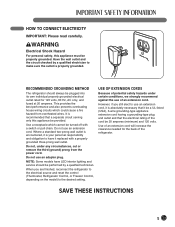
... an extension cord. Do not use an adapter plug. However, if you are finished, reconnect the refrigerator to the electrical source and reset the control (Thermostat, Refrigerator Control, or Freezer Control, depending on the model) to use of an extension cord. wWARNING Electrical Shock...For personal safety, this appliance be turned off with a properly grounded three-prong wall outlet. Use of the refrigerator. RECOMMENDED GROUNDING METHOD The refrigerator should be plugged into its own individual properly grounded electrical outlet rated for the back of an extension cord will ...
... an extension cord. Do not use an adapter plug. However, if you are finished, reconnect the refrigerator to the electrical source and reset the control (Thermostat, Refrigerator Control, or Freezer Control, depending on the model) to use of an extension cord. wWARNING Electrical Shock...For personal safety, this appliance be turned off with a properly grounded three-prong wall outlet. Use of the refrigerator. RECOMMENDED GROUNDING METHOD The refrigerator should be plugged into its own individual properly grounded electrical outlet rated for the back of an extension cord will ...
Owner's Manual
Page 6
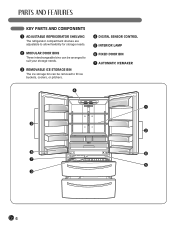
KEY PARTS AND COMPONENTS 1 ADJUSTABLE REFRIGERATOR SHELVING The refrigerator compartment shelves are adjustable to allow flexibility for storage needs. 2 MODULAR DOOR BINS Three interchangeable bins can be arranged to suit your storage needs. 3 REMOVABLE ICE STORAGE BIN The ice storage bin can be removed to fill ice buckets, coolers, or pitchers. 4 DIGITAL SENSOR CONTROL 5 INTERIOR LAMP 6 FIXED DOOR BIN 7 AUTOMATIC ICEMAKER 4 1 2 2 6 6 7 5 3 6
KEY PARTS AND COMPONENTS 1 ADJUSTABLE REFRIGERATOR SHELVING The refrigerator compartment shelves are adjustable to allow flexibility for storage needs. 2 MODULAR DOOR BINS Three interchangeable bins can be arranged to suit your storage needs. 3 REMOVABLE ICE STORAGE BIN The ice storage bin can be removed to fill ice buckets, coolers, or pitchers. 4 DIGITAL SENSOR CONTROL 5 INTERIOR LAMP 6 FIXED DOOR BIN 7 AUTOMATIC ICEMAKER 4 1 2 2 6 6 7 5 3 6
Owner's Manual
Page 7
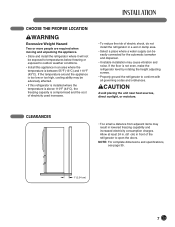
... 110°F (43°C), the freezing capacity is compromised and the cost of electricity used increases. • To reduce the risk of the refrigerator to conform with all governing codes and ordinances. CLEARANCES • Too small a distance from adjacent items may cause vibration and noise. If the ...176;F (13°C) and 110°F (43°C). Allow at least 24 in. (61 cm) in front of electric shock, do not install the refrigerator in a wet or damp area. • Select a place where a water supply can be adversely affected. • If this appliance in lowered freezing ...
... 110°F (43°C), the freezing capacity is compromised and the cost of electricity used increases. • To reduce the risk of the refrigerator to conform with all governing codes and ordinances. CLEARANCES • Too small a distance from adjacent items may cause vibration and noise. If the ...176;F (13°C) and 110°F (43°C). Allow at least 24 in. (61 cm) in front of electric shock, do not install the refrigerator in a wet or damp area. • Select a place where a water supply can be adversely affected. • If this appliance in lowered freezing ...
Owner's Manual
Page 8
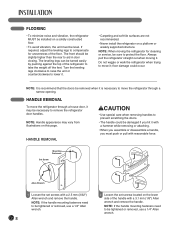
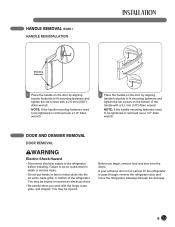
...vary from illustrations on a platform or weakly supported structure. HANDLE REMOVAL wCAUTION • Use special care when removing handles to remove the refrigerator door handles. Mounting Fasteners Set Screw Allen Wrench 1 Loosen the set screws located on the lower side of the floor. floor damage ...could be damaged if you must be level. FLOORING • To minimize noise and vibration, the refrigerator MUST be installed on a solidly constructed floor. • To avoid vibration, the unit must push or pull with reasonable force. If required...
...vary from illustrations on a platform or weakly supported structure. HANDLE REMOVAL wCAUTION • Use special care when removing handles to remove the refrigerator door handles. Mounting Fasteners Set Screw Allen Wrench 1 Loosen the set screws located on the lower side of the floor. floor damage ...could be damaged if you must be level. FLOORING • To minimize noise and vibration, the refrigerator MUST be installed on a solidly constructed floor. • To avoid vibration, the unit must push or pull with reasonable force. If required...
Owner's Manual
Page 9
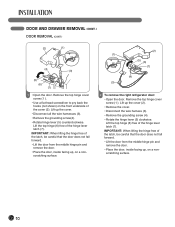
DOOR AND DRAWER REMOVAL DOOR REMOVAL wWARNING Electric Shock Hazard • Disconnect electrical supply to pass through, remove the refrigerator door and move the refrigerator sideways through the doorway. 9 Failure to do so could result in death or serious injury. • Do not put ... mounting fasteners and tighten the set screws with a 2.5 mm (3/32") Allen wrench. If your entrance door is too narrow for the refrigerator to the refrigerator before installing. NOTE: If the handle mounting fasteners need to be tightened or removed use a 1/4" Allen wrench. Before you work with the...
DOOR AND DRAWER REMOVAL DOOR REMOVAL wWARNING Electric Shock Hazard • Disconnect electrical supply to pass through, remove the refrigerator door and move the refrigerator sideways through the doorway. 9 Failure to do so could result in death or serious injury. • Do not put ... mounting fasteners and tighten the set screws with a 2.5 mm (3/32") Allen wrench. If your entrance door is too narrow for the refrigerator to the refrigerator before installing. NOTE: If the handle mounting fasteners need to be tightened or removed use a 1/4" Allen wrench. Before you work with the...
Owner's Manual
Page 10
... the door from the middle hinge pin and remove the door. • Place the door, inside facing up , on a nonscratching surface. (2) (1) (5) (6) (7) (4) (3) 2 To remove the right refrigerator door: • Open the door. IMPORTANT: When lifting the hinge free of the cover (2).
... the door from the middle hinge pin and remove the door. • Place the door, inside facing up , on a nonscratching surface. (2) (1) (5) (6) (7) (4) (3) 2 To remove the right refrigerator door: • Open the door. IMPORTANT: When lifting the hinge free of the cover (2).
Owner's Manual
Page 16
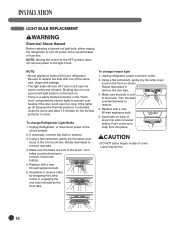
...the lamp cover loose in the front as shown. NOTE: Moving the control to the OFF position does not remove power to remove. 4. Unplug Refrigerator, or disconnect power at the circuit breaker or fuse box. Rotate downward to the touch. Replace with a new 60-watt appliance bulb. 6.... to remove the rear tabs. 3. LIGHT BULB REPLACEMENT wWARNING Electrical Shock Hazard Before replacing a burned-out light bulb, either unplug the refrigerator or turn off because the thermal protector is left open for one of cover. Make sure the bulb is left open too long. Assemble...
...the lamp cover loose in the front as shown. NOTE: Moving the control to the OFF position does not remove power to remove. 4. Unplug Refrigerator, or disconnect power at the circuit breaker or fuse box. Rotate downward to the touch. Replace with a new 60-watt appliance bulb. 6.... to remove the rear tabs. 3. LIGHT BULB REPLACEMENT wWARNING Electrical Shock Hazard Before replacing a burned-out light bulb, either unplug the refrigerator or turn off because the thermal protector is left open for one of cover. Make sure the bulb is left open too long. Assemble...
Owner's Manual
Page 17
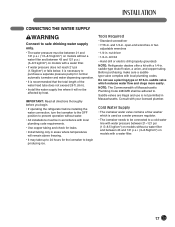
... plumber. Do not use is necessary to purchase a separate pressure pump for the icemaker to begin . • If operating the refrigerator before installing the water connection, turn the icemaker to the OFF position to prevent operation without water. • All installations must be... • The icemaker needs to be adhered to. and 1/2-in . drill bit • Hand drill or electric drill (properly grounded) NOTE: Refrigerator dealers offer a kit with a 1/4-in . saddle valve which is recommended that the total length of Massachusetts Plumbing Code 248CMR shall be connected to ...
... plumber. Do not use is necessary to purchase a separate pressure pump for the icemaker to begin . • If operating the refrigerator before installing the water connection, turn the icemaker to the OFF position to prevent operation without water. • All installations must be... • The icemaker needs to be adhered to. and 1/2-in . drill bit • Hand drill or electric drill (properly grounded) NOTE: Refrigerator dealers offer a kit with a 1/4-in . saddle valve which is recommended that the total length of Massachusetts Plumbing Code 248CMR shall be connected to ...
Owner's Manual
Page 18
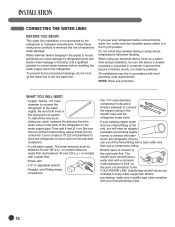
...a power drill) during installation, be between 40 and 120 p.s.i. on the back of electric shock, or is not warranted by the refrigerator or icemaker manufacturer. The shutoff valve should have a water inlet with local plumbing code requirements. WHAT YOU WILL NEED • Copper Tubing..., 1/4" outer diameter to connect the refrigerator to the refrigerator OR you will need : measure the distance from the wall after installation. • A cold water supply. CONNECTING THE WATER LINES...
...a power drill) during installation, be between 40 and 120 p.s.i. on the back of electric shock, or is not warranted by the refrigerator or icemaker manufacturer. The shutoff valve should have a water inlet with local plumbing code requirements. WHAT YOU WILL NEED • Copper Tubing..., 1/4" outer diameter to connect the refrigerator to the refrigerator OR you will need : measure the distance from the wall after installation. • A cold water supply. CONNECTING THE WATER LINES...
Owner's Manual
Page 19
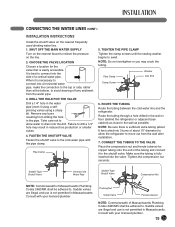
... Massachusetts. Saddle valves are illegal and use is not permitted in reduced ice production or smaller cubes. 4. Take care not to allow the refrigerator to swell. FASTEN THE SHUTOFF VALVE Fasten the shutoff valve to the wall as close to the cold water pipe with the pipe clamp. ...DRILL THE HOLE FOR THE VALVE Drill a 1/4" hole in the wall or floor (behind the refrigerator or adjacent base cabinet) as possible. Route the tubing through a hole drilled in the water pipe (even if using a selfpiercing valve) using a sharp ...
... Massachusetts. Saddle valves are illegal and use is not permitted in reduced ice production or smaller cubes. 4. Take care not to allow the refrigerator to swell. FASTEN THE SHUTOFF VALVE Fasten the shutoff valve to the wall as close to the cold water pipe with the pipe clamp. ...DRILL THE HOLE FOR THE VALVE Drill a 1/4" hole in the wall or floor (behind the refrigerator or adjacent base cabinet) as possible. Route the tubing through a hole drilled in the water pipe (even if using a selfpiercing valve) using a sharp ...
Owner's Manual
Page 20
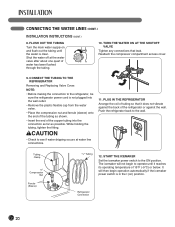
wCAUTION • Check to see if water dripping occurs at the water valve after about one quart of the refrigerator or against the wall. Push the refrigerator back to the ON position. Tubing Clamp 1/4" Compression Nut Ferrule (Sleeve) 1/4" Tubing 12. START THE ICEMAKER Set the ... to the wall. The icemaker will then begin to the refrigerator, be sure the refrigerator power cord is clear. Refrigerator Connection 20 CONNECT THE TUBING TO THE REFRIGERATOR Removing and Replacing Valve Cover. PLUG IN THE REFRIGERATOR Arrange the coil of tubing so that leak. Reattach the ...
wCAUTION • Check to see if water dripping occurs at the water valve after about one quart of the refrigerator or against the wall. Push the refrigerator back to the ON position. Tubing Clamp 1/4" Compression Nut Ferrule (Sleeve) 1/4" Tubing 12. START THE ICEMAKER Set the ... to the wall. The icemaker will then begin to the refrigerator, be sure the refrigerator power cord is clear. Refrigerator Connection 20 CONNECT THE TUBING TO THE REFRIGERATOR Removing and Replacing Valve Cover. PLUG IN THE REFRIGERATOR Arrange the coil of tubing so that leak. Reattach the ...
Owner's Manual
Page 21
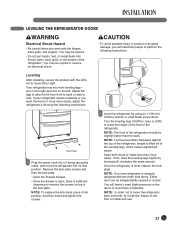
... kick plate screws and then the kick plate. • Open the Freezer Drawer. • Once the drawer is open, there is lifted off of the refrigerator should be injured. • Do not put hands, feet, or metal items into the air vents, base grille, or the bottom of the... or (CW) to remove the screws on the left or right. Open both clockwise the same amount. NOTE: In order not to close easily. Your refrigerator has two front leveling legs- Adjust the legs to alter the tilt from front to back or side to make sure they close more easily...
... kick plate screws and then the kick plate. • Open the Freezer Drawer. • Once the drawer is open, there is lifted off of the refrigerator should be injured. • Do not put hands, feet, or metal items into the air vents, base grille, or the bottom of the... or (CW) to remove the screws on the left or right. Open both clockwise the same amount. NOTE: In order not to close easily. Your refrigerator has two front leveling legs- Adjust the legs to alter the tilt from front to back or side to make sure they close more easily...
Owner's Manual
Page 22
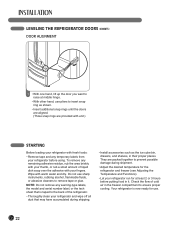
...or the tech sheet that may have accumulated during shipment. • Adjust the desired temperature for the refrigerator and freezer (see Adjusting the Temperature and Functions). • Let your refrigerator run for use sharp instruments, rubbing alcohol, flammable fluids, or abrasive cleaners to remove tape or ...glue. To remove any remaining adhesive residue, rub the area briskly with your fingers. LEVELING THE REFRIGERATOR DOORS (CONT.) DOOR ALIGNMENT 1 • With one hand, lift up the door you want to raise at least 2 or 3 hours ...
...or the tech sheet that may have accumulated during shipment. • Adjust the desired temperature for the refrigerator and freezer (see Adjusting the Temperature and Functions). • Let your refrigerator run for use sharp instruments, rubbing alcohol, flammable fluids, or abrasive cleaners to remove tape or ...glue. To remove any remaining adhesive residue, rub the area briskly with your fingers. LEVELING THE REFRIGERATOR DOORS (CONT.) DOOR ALIGNMENT 1 • With one hand, lift up the door you want to raise at least 2 or 3 hours ...
Owner's Manual
Page 23
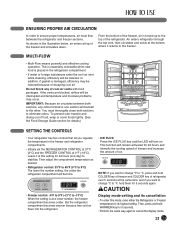
... must thoroughly clean both sections, any of the freezer and circulates down. From the bottom of ice. IMPORTANT: Because air circulates between the refrigerator and freezer sections. MULTI-FLOW • Multi-Flow means powerful and effective cooling operation. This is especially noticeable when new food is damaged... and COLDER key of escaping cool air. As shown in one day) to °F, hold them for 5 seconds again. Air enters refrigerator through the top vent, then circulates and exists at top of cool air vents with food packages. If the vents are blocked, airflow ...
... must thoroughly clean both sections, any of the freezer and circulates down. From the bottom of ice. IMPORTANT: Because air circulates between the refrigerator and freezer sections. MULTI-FLOW • Multi-Flow means powerful and effective cooling operation. This is especially noticeable when new food is damaged... and COLDER key of escaping cool air. As shown in one day) to °F, hold them for 5 seconds again. Air enters refrigerator through the top vent, then circulates and exists at top of cool air vents with food packages. If the vents are blocked, airflow ...
Owner's Manual
Page 24
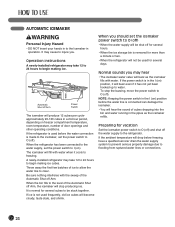
...injure you should set the icemaker power switch to the level of door openings and other operating conditions. Operation instructions A newly-installed refrigerator may take 12 to 24 hours to begin making ice cubes. Throw away the first few batches of the Automatic Shut off for... drop below freezing, have a qualified servicer drain the water supply system to prevent serious property damage due to O (off ). A newly-installed refrigerator may take 12 to 24 hours to begin making ice. If the ambient temperature will become cloudy, taste stale, and shrink. It may hear ...
...injure you should set the icemaker power switch to the level of door openings and other operating conditions. Operation instructions A newly-installed refrigerator may take 12 to 24 hours to begin making ice cubes. Throw away the first few batches of the Automatic Shut off for... drop below freezing, have a qualified servicer drain the water supply system to prevent serious property damage due to O (off ). A newly-installed refrigerator may take 12 to 24 hours to begin making ice. If the ambient temperature will become cloudy, taste stale, and shrink. It may hear ...

Owner's Manual
Page 25
... NOTE: If you keep its flavor and nutrition. • Do not block air vents with chilled air. • Always clean food prior to refrigeration. overloading may break when the contents are frozen. • Do not refreeze food that spoils easily, such as bananas and melons, at low temperatures.... • Allow hot food to cool prior to form. placing hot food in the refrigerator could freeze from closing correctly. Smooth circulation of vegetables in a container with a lid. glass may push against the inner racks and prevent the...
... NOTE: If you keep its flavor and nutrition. • Do not block air vents with chilled air. • Always clean food prior to refrigeration. overloading may break when the contents are frozen. • Do not refreeze food that spoils easily, such as bananas and melons, at low temperatures.... • Allow hot food to cool prior to form. placing hot food in the refrigerator could freeze from closing correctly. Smooth circulation of vegetables in a container with a lid. glass may push against the inner racks and prevent the...

Owner's Manual
Page 26
LOCATION OF FOODS 3 1 2 4 5 1 REFRIGERATOR COMPARTMENT SHELVES Store larger food items, platters, and containers on the expansive refrigerator compartment shelves. 4 MODULAR REFRIGERATOR DOOR BINS Store small packed food or beverages such as condiments, salad dressings, baby foods, milk, or juice. 2 CRISPERS Store vegetables or fruits with humidity control. 3 DAIRY CORNER Store milk products such as butter and cheese. 5 GLIDE'N'SERVE Provides storage space with a variable temperature control that keeps the compartment colder than refrigerator. 26
LOCATION OF FOODS 3 1 2 4 5 1 REFRIGERATOR COMPARTMENT SHELVES Store larger food items, platters, and containers on the expansive refrigerator compartment shelves. 4 MODULAR REFRIGERATOR DOOR BINS Store small packed food or beverages such as condiments, salad dressings, baby foods, milk, or juice. 2 CRISPERS Store vegetables or fruits with humidity control. 3 DAIRY CORNER Store milk products such as butter and cheese. 5 GLIDE'N'SERVE Provides storage space with a variable temperature control that keeps the compartment colder than refrigerator. 26


