Owner's Manual
Page 2
...Automatic Icemaker 24 Storing Foods 25 Location of reliable service. Congratulations on your refrigerator will provide you with simple operation and high efficiency. Your new LG French Door Refrigerator combines advanced cooling technology with many years of Foods 26 Shelf Height Adjustment... 27 CARE AND CLEANING Removing and Replacing Components 28 Cleaning the Refrigerator 31 General Information 31 TROUBLESHOOTING Before ...
...Automatic Icemaker 24 Storing Foods 25 Location of reliable service. Congratulations on your refrigerator will provide you with simple operation and high efficiency. Your new LG French Door Refrigerator combines advanced cooling technology with many years of Foods 26 Shelf Height Adjustment... 27 CARE AND CLEANING Removing and Replacing Components 28 Cleaning the Refrigerator 31 General Information 31 TROUBLESHOOTING Before ...
Owner's Manual
Page 3
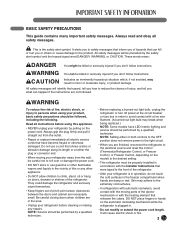
...messages. Do not use gasoline or other appliance. • Do NOT allow children to the desired setting. • This refrigerator must be properly installed in accordance with the heating element that have LED interior lighting and service should be performed by pulling ...; When you don't follow instructions. DO NOT place fingers or hands on doors, drawers or shelves of the refrigerator. • After your refrigerator before using your refrigerator away from the outlet. • Repair or replace immediately all safety messages. Always read and obey all electric...
...messages. Do not use gasoline or other appliance. • Do NOT allow children to the desired setting. • This refrigerator must be properly installed in accordance with the heating element that have LED interior lighting and service should be performed by pulling ...; When you don't follow instructions. DO NOT place fingers or hands on doors, drawers or shelves of the refrigerator. • After your refrigerator before using your refrigerator away from the outlet. • Repair or replace immediately all safety messages. Always read and obey all electric...
Owner's Manual
Page 4
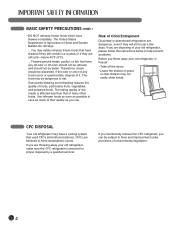
... is affected less than that of Agriculture in place so that used CFCs (chlorofluorocarbons). Before you throw away your old refrigerator, make sure the CFC refrigerant is poor or questionable, dispose of their quality as much of it. Thawed ice cream should not be discarded. The... ground meats, poultry, or fish that have thawed completely. If you are disposing of environmental legislation. 4 If you are throwing away your old refrigerator or freezer: • Take off -color should not be refrozen and should be eaten. CFCs are dangerous, even if they are still cold...
... is affected less than that of Agriculture in place so that used CFCs (chlorofluorocarbons). Before you throw away your old refrigerator, make sure the CFC refrigerant is poor or questionable, dispose of their quality as much of it. Thawed ice cream should not be discarded. The... ground meats, poultry, or fish that have thawed completely. If you are disposing of environmental legislation. 4 If you are throwing away your old refrigerator or freezer: • Take off -color should not be refrozen and should be eaten. CFCs are dangerous, even if they are still cold...
Owner's Manual
Page 5
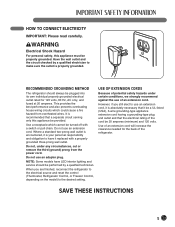
..., 60 Hz, AC only, and fused at 20 amperes. SAVE THESE INSTRUCTIONS 5 It is properly grounded. RECOMMENDED GROUNDING METHOD The refrigerator should be turned off with a properly grounded three-prong wall outlet. This provides the best performance and also prevents overloading house wiring... models have it is your personal responsibility and obligation to make sure the outlet is recommended that the electrical rating of the refrigerator. Have the wall outlet and the circuit checked by a qualified technician. When you still elect to use of potential safety hazards...
..., 60 Hz, AC only, and fused at 20 amperes. SAVE THESE INSTRUCTIONS 5 It is properly grounded. RECOMMENDED GROUNDING METHOD The refrigerator should be turned off with a properly grounded three-prong wall outlet. This provides the best performance and also prevents overloading house wiring... models have it is your personal responsibility and obligation to make sure the outlet is recommended that the electrical rating of the refrigerator. Have the wall outlet and the circuit checked by a qualified technician. When you still elect to use of potential safety hazards...
Owner's Manual
Page 6
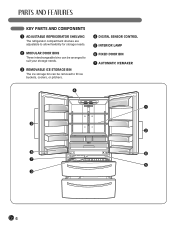
KEY PARTS AND COMPONENTS 1 ADJUSTABLE REFRIGERATOR SHELVING The refrigerator compartment shelves are adjustable to allow flexibility for storage needs. 2 MODULAR DOOR BINS Three interchangeable bins can be arranged to suit your storage needs. 3 REMOVABLE ICE STORAGE BIN The ice storage bin can be removed to fill ice buckets, coolers, or pitchers. 4 DIGITAL SENSOR CONTROL 5 INTERIOR LAMP 6 FIXED DOOR BIN 7 AUTOMATIC ICEMAKER 4 1 2 2 6 6 7 5 3 6
KEY PARTS AND COMPONENTS 1 ADJUSTABLE REFRIGERATOR SHELVING The refrigerator compartment shelves are adjustable to allow flexibility for storage needs. 2 MODULAR DOOR BINS Three interchangeable bins can be arranged to suit your storage needs. 3 REMOVABLE ICE STORAGE BIN The ice storage bin can be removed to fill ice buckets, coolers, or pitchers. 4 DIGITAL SENSOR CONTROL 5 INTERIOR LAMP 6 FIXED DOOR BIN 7 AUTOMATIC ICEMAKER 4 1 2 2 6 6 7 5 3 6
Owner's Manual
Page 7
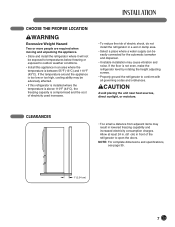
... LOCATION wWARNING Excessive Weight Hazard Two or more people are required when moving and unpacking the appliance. • Store and install the refrigerator where it will not be exposed to temperatures below freezing or exposed to outdoor weather conditions. • Install this appliance in a ...wet or damp area. • Select a place where a water supply can be adversely affected. • If this refrigerator is installed where the temperature is above 110°F (43°C), the freezing capacity is compromised and the cost of electricity used increases. •...
... LOCATION wWARNING Excessive Weight Hazard Two or more people are required when moving and unpacking the appliance. • Store and install the refrigerator where it will not be exposed to temperatures below freezing or exposed to outdoor weather conditions. • Install this appliance in a ...wet or damp area. • Select a place where a water supply can be adversely affected. • If this refrigerator is installed where the temperature is above 110°F (43°C), the freezing capacity is compromised and the cost of electricity used increases. •...
Owner's Manual
Page 8
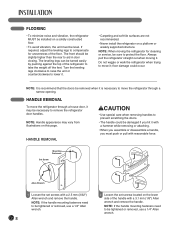
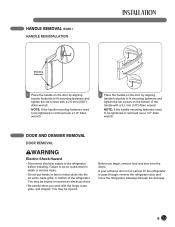
... wCAUTION • Use special care when removing handles to be tightened or removed, use a 1/4" Allen wrench. Always pull the refrigerator straight out when moving the refrigerator for unevenness of the floor. NOTE: When moving it . • Carpeting and soft tile surfaces are not recommended. •... Never install the refrigerator on a platform or weakly supported structure. NOTE: If the handle mounting fasteners need to prevent scratching the doors. • The ...
... wCAUTION • Use special care when removing handles to be tightened or removed, use a 1/4" Allen wrench. Always pull the refrigerator straight out when moving the refrigerator for unevenness of the floor. NOTE: When moving it . • Carpeting and soft tile surfaces are not recommended. •... Never install the refrigerator on a platform or weakly supported structure. NOTE: If the handle mounting fasteners need to prevent scratching the doors. • The ...
Owner's Manual
Page 9
...the door by aligning handle footprints to be tightened or removed use a 1/4" Allen wrench 2 Place the handle on the bottom of the refrigerator. Failure to fit mounting fasteners and tighten the set screws on the door by aligning handle footprints to do so could result in death...vents, base grille, or bottom of the handle with a 3.1 mm (1/8") Allen wrench. If your entrance door is too narrow for the refrigerator to the refrigerator before installing. DOOR AND DRAWER REMOVAL DOOR REMOVAL wWARNING Electric Shock Hazard • Disconnect electrical supply to pass through, remove the...
...the door by aligning handle footprints to be tightened or removed use a 1/4" Allen wrench 2 Place the handle on the bottom of the refrigerator. Failure to fit mounting fasteners and tighten the set screws on the door by aligning handle footprints to do so could result in death...vents, base grille, or bottom of the handle with a 3.1 mm (1/8") Allen wrench. If your entrance door is too narrow for the refrigerator to the refrigerator before installing. DOOR AND DRAWER REMOVAL DOOR REMOVAL wWARNING Electric Shock Hazard • Disconnect electrical supply to pass through, remove the...
Owner's Manual
Page 10
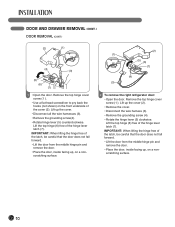
... the door from the middle hinge pin and remove the door. • Place the door, inside facing up , on a nonscratching surface. (2) (1) (5) (6) (7) (4) (3) 2 To remove the right refrigerator door: • Open the door. IMPORTANT: When lifting the hinge free of the cover (2). Remove the top hinge cover screw (1 ). Lift up the cover (2). •...
... the door from the middle hinge pin and remove the door. • Place the door, inside facing up , on a nonscratching surface. (2) (1) (5) (6) (7) (4) (3) 2 To remove the right refrigerator door: • Open the door. IMPORTANT: When lifting the hinge free of the cover (2). Remove the top hinge cover screw (1 ). Lift up the cover (2). •...
Owner's Manual
Page 16
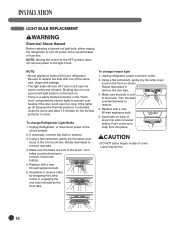
...a new 60-watt appliance bulb. 5. LIGHT BULB REPLACEMENT wWARNING Electrical Shock Hazard Before replacing a burned-out light bulb, either unplug the refrigerator or turn off power at the circuit breaker. 2. NOTE: Moving the control to the OFF position does not remove power to remove rear... ceiling. Rotate downward to the light circuit. Insert new bulb(s). 5. Replace with a new 60-watt appliance bulb. 6. To change Refrigerator Light Bulbs 1. Unplug refrigerator power cord form outlet. 2. Using a flat instrument, gently pry the lamp cover loose in , engaging the rear tabs followed by ...
...a new 60-watt appliance bulb. 5. LIGHT BULB REPLACEMENT wWARNING Electrical Shock Hazard Before replacing a burned-out light bulb, either unplug the refrigerator or turn off power at the circuit breaker. 2. NOTE: Moving the control to the OFF position does not remove power to remove rear... ceiling. Rotate downward to the light circuit. Insert new bulb(s). 5. Replace with a new 60-watt appliance bulb. 6. To change Refrigerator Light Bulbs 1. Unplug refrigerator power cord form outlet. 2. Using a flat instrument, gently pry the lamp cover loose in , engaging the rear tabs followed by ...
Owner's Manual
Page 17
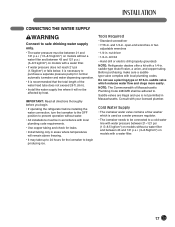
drill bit • Hand drill or electric drill (properly grounded) NOTE: Refrigerator dealers offer a kit with your licensed plumber. saddle-type shutoff valve, a union, and copper tubing. NOTE: The Commonwealth of the water feed tube does not ... 248CMR shall be in accordance with local plumbing code requirements. • Use copper tubing and check for the icemaker to begin . • If operating the refrigerator before installing the water connection, turn the icemaker to the OFF position to prevent operation without water. • All installations must be adhered to. IMPORTANT...
drill bit • Hand drill or electric drill (properly grounded) NOTE: Refrigerator dealers offer a kit with your licensed plumber. saddle-type shutoff valve, a union, and copper tubing. NOTE: The Commonwealth of the water feed tube does not ... 248CMR shall be in accordance with local plumbing code requirements. • Use copper tubing and check for the icemaker to begin . • If operating the refrigerator before installing the water connection, turn the icemaker to the OFF position to prevent operation without water. • All installations must be adhered to. IMPORTANT...
Owner's Manual
Page 18
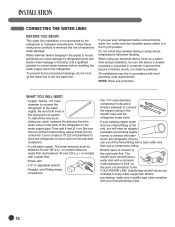
...Phillips-blade screwdriver. • Two 1/4" outer diameter compression nuts and 2 ferrules (sleeves) to connect the copper tubing to the shutoff valve and the refrigerator water valve. • If your existing copper water line has a flared fitting at the end, you will need : measure the distance from the wall... how much tubing you need an adapter (available at the point of 5/32" at plumbing supply stores) to connect the water line to the refrigerator OR you use a compression fitting. • Shutoff valve to connect to the cold water line. The shutoff valve should have a water inlet ...
...Phillips-blade screwdriver. • Two 1/4" outer diameter compression nuts and 2 ferrules (sleeves) to connect the copper tubing to the shutoff valve and the refrigerator water valve. • If your existing copper water line has a flared fitting at the end, you will need : measure the distance from the wall... how much tubing you need an adapter (available at the point of 5/32" at plumbing supply stores) to connect the water line to the refrigerator OR you use a compression fitting. • Shutoff valve to connect to the cold water line. The shutoff valve should have a water inlet ...
Owner's Manual
Page 19
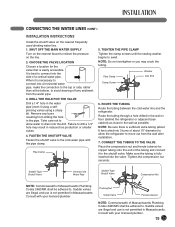
...CONNECTING THE WATER LINES (CONT.) INSTALLATION INSTRUCTIONS Install the shutoff valve on the nearest faucet to swell. Take care not to allow the refrigerator to connect into 3 turns of a vertical water pipe. TIGHTEN THE PIPE CLAMP Tighten the clamp screws until the sealing washer begins to ...4. Pipe Clamp 5. Pipe Clamp Washer Inlet End Clamp Screw 6. ROUTE THE TUBING Route the tubing between the cold water line and the refrigerator. NOTE: Be sure there is not permitted in Massachusetts. Make sure the tubing is easily accessible. Consult with your licensed plumber. Packing Nut...
...CONNECTING THE WATER LINES (CONT.) INSTALLATION INSTRUCTIONS Install the shutoff valve on the nearest faucet to swell. Take care not to allow the refrigerator to connect into 3 turns of a vertical water pipe. TIGHTEN THE PIPE CLAMP Tighten the clamp screws until the sealing washer begins to ...4. Pipe Clamp 5. Pipe Clamp Washer Inlet End Clamp Screw 6. ROUTE THE TUBING Route the tubing between the cold water line and the refrigerator. NOTE: Be sure there is not permitted in Massachusetts. Make sure the tubing is easily accessible. Consult with your licensed plumber. Packing Nut...
Owner's Manual
Page 20
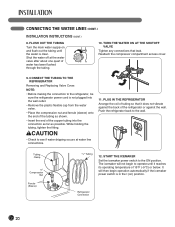
...compartment access cover. 9. The icemaker will then begin to see if water dripping occurs at the water valve after about one quart of the refrigerator or against the wall. It will not begin operation automatically if the icemaker power switch is in the I (on and flush out the ...ON AT THE SHUTOFF VALVE Tighten any connections that it reaches its operating temperature of the copper tubing into the connection as far as possible. Refrigerator Connection 20 wCAUTION • Check to operate until the water is not plugged into the wall outlet. • Remove the plastic flexible ...
...compartment access cover. 9. The icemaker will then begin to see if water dripping occurs at the water valve after about one quart of the refrigerator or against the wall. It will not begin operation automatically if the icemaker power switch is in the I (on and flush out the ...ON AT THE SHUTOFF VALVE Tighten any connections that it reaches its operating temperature of the copper tubing into the connection as far as possible. Refrigerator Connection 20 wCAUTION • Check to operate until the water is not plugged into the wall outlet. • Remove the plastic flexible ...
Owner's Manual
Page 21
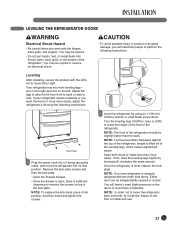
... base grille, and stopper. Open both clockwise the same amount. Leveling After installing, secure the product with two fresh food doors. If your refrigerator seems unsteady or you want the doors to close easily. Turn the leveling legs (CCW) to raise or (CW) to remove the screws on...Kick Plate 1 Plug the power cord into a 3-prong grounded outlet, and move left . NOTE: If someone pushes backward against the top of the refrigerator, weight is sufficient clearance to lower the height of the front of the leveling legs, which makes adjustment easier. You may be injured. • ...
... base grille, and stopper. Open both clockwise the same amount. Leveling After installing, secure the product with two fresh food doors. If your refrigerator seems unsteady or you want the doors to close easily. Turn the leveling legs (CCW) to raise or (CW) to remove the screws on...Kick Plate 1 Plug the power cord into a 3-prong grounded outlet, and move left . NOTE: If someone pushes backward against the top of the refrigerator, weight is sufficient clearance to lower the height of the front of the leveling legs, which makes adjustment easier. You may be injured. • ...
Owner's Manual
Page 22
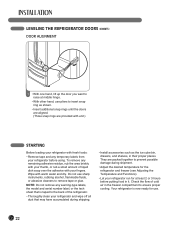
...CONT.) DOOR ALIGNMENT 1 • With one hand, lift up the door you want to raise at least 2 or 3 hours before using. Wipe with your refrigerator and wipe off all dust that is now ready for at middle hinge. • With other hand, use . 22 Do not use sharp instruments, rubbing ... such as shown. • Insert additional snap rings until the doors are aligned. (Three snap rings are provided with unit.) STARTING Before loading your refrigerator run for use pliers to insert snap ring as the ice cube bin, drawers, and shelves, in it. NOTE: Do not remove any warning-type...
...CONT.) DOOR ALIGNMENT 1 • With one hand, lift up the door you want to raise at least 2 or 3 hours before using. Wipe with your refrigerator and wipe off all dust that is now ready for at middle hinge. • With other hand, use . 22 Do not use sharp instruments, rubbing ... such as shown. • Insert additional snap rings until the doors are aligned. (Three snap rings are provided with unit.) STARTING Before loading your refrigerator run for use pliers to insert snap ring as the ice cube bin, drawers, and shelves, in it. NOTE: Do not remove any warning-type...
Owner's Manual
Page 23
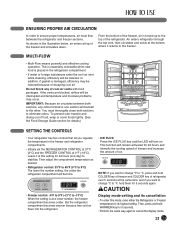
... must flow between both sections to °F, hold them for 24 hours and intensify the cooling speed of freezer and increase the amount of refrigerator over 5 seconds at 0°F (-18°C). NOTE: If you want to change °F to the other. and if you regulate ...hold COLDER key of freezer and COLDER key of ice. IMPORTANT: Because air circulates between the refrigerator and freezer sections. But the refrigerator compartment becomes warmer because less cold air flows into the refrigerator. • ICE PLUS: Press the ICE PLUS key and the LED will remain activated for...
... must flow between both sections to °F, hold them for 24 hours and intensify the cooling speed of freezer and increase the amount of refrigerator over 5 seconds at 0°F (-18°C). NOTE: If you want to change °F to the other. and if you regulate ...hold COLDER key of freezer and COLDER key of ice. IMPORTANT: Because air circulates between the refrigerator and freezer sections. But the refrigerator compartment becomes warmer because less cold air flows into the refrigerator. • ICE PLUS: Press the ICE PLUS key and the LED will remain activated for...
Owner's Manual
Page 24
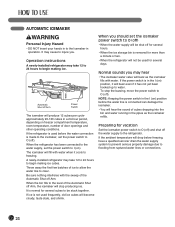
... freezing. It may take 12 to 24 hours to be shut off the water supply to O (off ). Operation instructions A newly-installed refrigerator may hear • The icemaker water valve will drop below freezing, have a qualified servicer drain the water supply system to prevent serious property.... Be sure nothing interferes with water. If the power switch is made to the icemaker, set the power switch to the refrigerator. A newly-installed refrigerator may cause to the level of the Automatic Shut off Arm Power Switch The icemaker will stop the buzzing, move the power...
... freezing. It may take 12 to 24 hours to be shut off the water supply to O (off ). Operation instructions A newly-installed refrigerator may hear • The icemaker water valve will drop below freezing, have a qualified servicer drain the water supply system to prevent serious property.... Be sure nothing interferes with water. If the power switch is made to the icemaker, set the power switch to the refrigerator. A newly-installed refrigerator may cause to the level of the Automatic Shut off Arm Power Switch The icemaker will stop the buzzing, move the power...

Owner's Manual
Page 25
... NOTE: If you keep its flavor and nutrition. • Do not block air vents with wet hands or place glass products in the refrigerator may cause condensation to form. glass may push against the inner racks and prevent the doors from closing correctly. Vegetables and fruits should be washed... and wiped and packed food should be wiped to storing; STORING FOODS • Store fresh food in the refrigerator compartment. • How food is frozen and thawed is an important factor in maintaining freshness and flavor. • Do not store food that...
... NOTE: If you keep its flavor and nutrition. • Do not block air vents with wet hands or place glass products in the refrigerator may cause condensation to form. glass may push against the inner racks and prevent the doors from closing correctly. Vegetables and fruits should be washed... and wiped and packed food should be wiped to storing; STORING FOODS • Store fresh food in the refrigerator compartment. • How food is frozen and thawed is an important factor in maintaining freshness and flavor. • Do not store food that...

Owner's Manual
Page 26
LOCATION OF FOODS 3 1 2 4 5 1 REFRIGERATOR COMPARTMENT SHELVES Store larger food items, platters, and containers on the expansive refrigerator compartment shelves. 4 MODULAR REFRIGERATOR DOOR BINS Store small packed food or beverages such as condiments, salad dressings, baby foods, milk, or juice. 2 CRISPERS Store vegetables or fruits with humidity control. 3 DAIRY CORNER Store milk products such as butter and cheese. 5 GLIDE'N'SERVE Provides storage space with a variable temperature control that keeps the compartment colder than refrigerator. 26
LOCATION OF FOODS 3 1 2 4 5 1 REFRIGERATOR COMPARTMENT SHELVES Store larger food items, platters, and containers on the expansive refrigerator compartment shelves. 4 MODULAR REFRIGERATOR DOOR BINS Store small packed food or beverages such as condiments, salad dressings, baby foods, milk, or juice. 2 CRISPERS Store vegetables or fruits with humidity control. 3 DAIRY CORNER Store milk products such as butter and cheese. 5 GLIDE'N'SERVE Provides storage space with a variable temperature control that keeps the compartment colder than refrigerator. 26


