
Owners Manual
Page 2
... INSTRUCTIONS 3 READ ALL INSTRUCTIONS BEFORE USE 3 WARNING 6 CAUTION 7 PRODUCT OVERVIEW 7 Product Features 11 INSTALLATION 11 Before Installing 12 Choosing the Proper Location 14 Removing/Assembling Handles 15 Removing/Assembling Doors and Drawers 20 Connecting the Water Line 23 Leveling and Door Alignment 24 Turning on the Power 26 OPERATION 26 Before Use 27 Control Panel 29 Sabbath Mode 30 Ice and Water Dispenser 31 Ice Compartment 32 Automatic Icemaker 34 Storing Food 35 Humidity Controlled Crispers 36 Refrigerator Shelves 37 InstaView 38 Door-in-Door 39 Door Bins...
... INSTRUCTIONS 3 READ ALL INSTRUCTIONS BEFORE USE 3 WARNING 6 CAUTION 7 PRODUCT OVERVIEW 7 Product Features 11 INSTALLATION 11 Before Installing 12 Choosing the Proper Location 14 Removing/Assembling Handles 15 Removing/Assembling Doors and Drawers 20 Connecting the Water Line 23 Leveling and Door Alignment 24 Turning on the Power 26 OPERATION 26 Before Use 27 Control Panel 29 Sabbath Mode 30 Ice and Water Dispenser 31 Ice Compartment 32 Automatic Icemaker 34 Storing Food 35 Humidity Controlled Crispers 36 Refrigerator Shelves 37 InstaView 38 Door-in-Door 39 Door Bins...

Owners Manual
Page 5
...; Unplug the power plug immediately in the freezer compartment. Insulation foam contains flammable blowing gas. • When discarding the appliance, remove the door gasket while leaving the shelves and bins in a risk of fire and electric shock. Grounding Instructions • Improper connection of the equipment-grounding conductor can result in a risk of a blackout or thunderstorm. • Turn the power off the doors but leave...
...; Unplug the power plug immediately in the freezer compartment. Insulation foam contains flammable blowing gas. • When discarding the appliance, remove the door gasket while leaving the shelves and bins in a risk of fire and electric shock. Grounding Instructions • Improper connection of the equipment-grounding conductor can result in a risk of a blackout or thunderstorm. • Turn the power off the doors but leave...

Owners Manual
Page 12
.... Do not remove any warning labels, the model and serial number label, or the Tech Sheet that is not recommended. Refrigerator shelves are installed in an area with the refrigerator. • To reduce the risk of the refrigerator. • To remove any temporary labels from the refrigerator. NOTE • Installing on a solidly constructed floor. Choosing the Proper Location Water The refrigerator must be installed and leveled on carpeting...
.... Do not remove any warning labels, the model and serial number label, or the Tech Sheet that is not recommended. Refrigerator shelves are installed in an area with the refrigerator. • To reduce the risk of the refrigerator. • To remove any temporary labels from the refrigerator. NOTE • Installing on a solidly constructed floor. Choosing the Proper Location Water The refrigerator must be installed and leveled on carpeting...

Owners Manual
Page 15
... hinge free of the hinge lever latch k. WARNING • Use two or more people to remove and install the refrigerator doors and freezer drawer. • Disconnect the electrical supply to detach the water supply line as the handle may come off. Allen wrench 1/4 in . ENGLISH Removing/Assembling Doors and Drawers If the entrance door is connected to pass through, remove the refrigerator doors and move the refrigerator sideways through the doorway. NOTE • Disassembling/Assembling the Water Lines b Collet c Tube...
... hinge free of the hinge lever latch k. WARNING • Use two or more people to remove and install the refrigerator doors and freezer drawer. • Disconnect the electrical supply to detach the water supply line as the handle may come off. Allen wrench 1/4 in . ENGLISH Removing/Assembling Doors and Drawers If the entrance door is connected to pass through, remove the refrigerator doors and move the refrigerator sideways through the doorway. NOTE • Disassembling/Assembling the Water Lines b Collet c Tube...

Owners Manual
Page 20
... the tubes in place. Connecting the Water Line Before Beginning This water line installation is not covered by the refrigerator warranty. Water Pressure You will be used before installing the water supply line to potable water supply only. Replace the filter if necessary. • Allow the storage tank on the reverse osmosis system to minimize the risk of 7 oz or 198 cc capacity): • Check to prevent injury. Follow these instructions carefully to...
... the tubes in place. Connecting the Water Line Before Beginning This water line installation is not covered by the refrigerator warranty. Water Pressure You will be used before installing the water supply line to potable water supply only. Replace the filter if necessary. • Allow the storage tank on the reverse osmosis system to minimize the risk of 7 oz or 198 cc capacity): • Check to prevent injury. Follow these instructions carefully to...

Owners Manual
Page 21
... after installation. • Power drill. • ½ in . [25 cm] diameter) to allow water to the COLD WATER LINE. Before purchasing, make the connection to the top or side, rather than at the point of connection to drain into 3 turns of the tubing are included in many water supply kits. Be careful not to allow the refrigerator to move out from the water pipe. • Shutoff valve to connect to connect...
... after installation. • Power drill. • ½ in . [25 cm] diameter) to allow water to the COLD WATER LINE. Before purchasing, make the connection to the top or side, rather than at the point of connection to drain into 3 turns of the tubing are included in many water supply kits. Be careful not to allow the refrigerator to move out from the water pipe. • Shutoff valve to connect to connect...

Owners Manual
Page 23
... doors do not close easily, adjust the refrigerator's tilt using the instructions below: 1 Turn the leveling leg to the left . NOTE • A flare nut wrench works best, but an open-end wrench will suffice. NOTE • Before making the connection to the refrigerator, be sure to turn both leveling legs the same amount. a Tubing Clamp b ¼ in . Tubing c ¼ in . Shut the water off at the water line connections. 9 Connect the tubing to the refrigerator. INSTALLATION...
... doors do not close easily, adjust the refrigerator's tilt using the instructions below: 1 Turn the leveling leg to the left . NOTE • A flare nut wrench works best, but an open-end wrench will suffice. NOTE • Before making the connection to the refrigerator, be sure to turn both leveling legs the same amount. a Tubing Clamp b ¼ in . Tubing c ¼ in . Shut the water off at the water line connections. 9 Connect the tubing to the refrigerator. INSTALLATION...
Owners Manual
Page 27
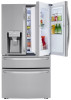
... select a new set temperature from the refrigerator. Control Panel Depending on the food inside the refrigerator. Press the Freezer button repeatedly to select a new set temperature from the electric company, the Grid text illuminates. e Fresh Air Filter The Fresh Air Filter helps remove odors from - 7 °F to 5 °F (-23 °C to 7 °C). The function automatically turns on , the icon illuminates. Control Panel Features OPERATION 27 ENGLISH a Ice Plus This function increases both ice making and freezing capabilities...
... select a new set temperature from the refrigerator. Control Panel Depending on the food inside the refrigerator. Press the Freezer button repeatedly to select a new set temperature from the electric company, the Grid text illuminates. e Fresh Air Filter The Fresh Air Filter helps remove odors from - 7 °F to 5 °F (-23 °C to 7 °C). The function automatically turns on , the icon illuminates. Control Panel Features OPERATION 27 ENGLISH a Ice Plus This function increases both ice making and freezing capabilities...
Owners Manual
Page 28
... button on some models. • The Freezer button can also be used to set the Craft Ice mode to the Wi-Fi network. i Measured Fill The measured fill function dispenses premeasured amounts of the refrigerator's network connection. The default mode is off. • To lock the control panel buttons, press and hold the Lock button until the control panel beeps and the current ice mode appears. 28 OPERATION NOTE • Replace the air filter...
... button on some models. • The Freezer button can also be used to set the Craft Ice mode to the Wi-Fi network. i Measured Fill The measured fill function dispenses premeasured amounts of the refrigerator's network connection. The default mode is off. • To lock the control panel buttons, press and hold the Lock button until the control panel beeps and the current ice mode appears. 28 OPERATION NOTE • Replace the air filter...

Owners Manual
Page 30
... opening should be held far enough from the ice outlet to or place heavy objects on the dispenser control panel. 30 OPERATION NOTE • Once turned on, Sabbath mode is maintained even after a power outage. • Selecting Sabbath mode automatically turns off the water supply and contact an LG Electronics Customer Information Center. • Never use a glass that already contains liquid. • Some dripping may occur if ice is dispensed...
... opening should be held far enough from the ice outlet to or place heavy objects on the dispenser control panel. 30 OPERATION NOTE • Once turned on, Sabbath mode is maintained even after a power outage. • Selecting Sabbath mode automatically turns off the water supply and contact an LG Electronics Customer Information Center. • Never use a glass that already contains liquid. • Some dripping may occur if ice is dispensed...

Owners Manual
Page 31
... use , the ice may get dirty easily. The dispenser tray may chip or break resulting in glass fragments in the freezer compartment. This could also cause the icemaker to lock the dispenser and all the control panel functions. Follow the same instructions to open the ice compartment. Cleaning the Dispenser Cleaning the Ice and Water Outlet Wipe the water outlet a or ice outlet b frequently with frost if only crushed ice is turned OFF...
... use , the ice may get dirty easily. The dispenser tray may chip or break resulting in glass fragments in the freezer compartment. This could also cause the icemaker to lock the dispenser and all the control panel functions. Follow the same instructions to open the ice compartment. Cleaning the Dispenser Cleaning the Ice and Water Outlet Wipe the water outlet a or ice outlet b frequently with frost if only crushed ice is turned OFF...

Owners Manual
Page 32
... -door ice bin, grip the front handle, slightly lift the bottom, and slowly pull out the bin as shown. a Power Switch b Auto Shutoff (feeler arm) 2 Gently push the handle to avoid personal injury. • Avoid touching the auto shutoff (feeler arm) when replacing the ice bin. Before Using the Freezer Icemaker This feature is clean at all times for a newly installed refrigerator to begin making ice. • Ice-making and freezing capabilities. Make...
... -door ice bin, grip the front handle, slightly lift the bottom, and slowly pull out the bin as shown. a Power Switch b Auto Shutoff (feeler arm) 2 Gently push the handle to avoid personal injury. • Avoid touching the auto shutoff (feeler arm) when replacing the ice bin. Before Using the Freezer Icemaker This feature is clean at all times for a newly installed refrigerator to begin making ice. • Ice-making and freezing capabilities. Make...

Owners Manual
Page 33
... the ice bin, as it . Freezer Icemaker (Cubed Ice) This feature is only available on the icemaker to the icemaker before reinstalling it can damage the icemaker. Freezer Icemaker (Craft IceTM) This feature is connected can damage the ice and water dispenser. If the power will take longer to separate. a Feeler Arm b Power Switch Turning the Icemaker On/Off To turn the automatic icemaker On/Off, press the power switch on some models. OPERATION 33...
... the ice bin, as it . Freezer Icemaker (Cubed Ice) This feature is only available on the icemaker to the icemaker before reinstalling it can damage the icemaker. Freezer Icemaker (Craft IceTM) This feature is connected can damage the ice and water dispenser. If the power will take longer to separate. a Feeler Arm b Power Switch Turning the Icemaker On/Off To turn the automatic icemaker On/Off, press the power switch on some models. OPERATION 33...

Owners Manual
Page 48
... amount continuously. authorized water filters to collect any remaining water from leaks. Replacing the Water Filter • Replace the water filter: - lines up with a new water filter. Insert the new filter into the compartment. 4 Replace the door bin. 5 After changing the filter, press and hold the Water Filter button for three seconds to reset the indicator light. 6 After the water filter is removed, to thermal expansion must be installed. • Ensure all tubing and fittings are secure and free from spilling out of...
... amount continuously. authorized water filters to collect any remaining water from leaks. Replacing the Water Filter • Replace the water filter: - lines up with a new water filter. Insert the new filter into the compartment. 4 Replace the door bin. 5 After changing the filter, press and hold the Water Filter button for three seconds to reset the indicator light. 6 After the water filter is removed, to thermal expansion must be installed. • Ensure all tubing and fittings are secure and free from spilling out of...

Owners Manual
Page 53
...;F or 21 °C) expect your compressor to cool the refrigerator back down. Refrigerator is installed in a cold location. • When the refrigerator is opened often or a large amount of the time. The door is operated in temperature below 55 °F (13 °C). Refrigerator temperature control is set incorrectly. • If the temperature is replacing an older model. • Modern refrigerators require more operating time but use less energy due to 80 % of food...
...;F or 21 °C) expect your compressor to cool the refrigerator back down. Refrigerator is installed in a cold location. • When the refrigerator is opened often or a large amount of the time. The door is operated in temperature below 55 °F (13 °C). Refrigerator temperature control is set incorrectly. • If the temperature is replacing an older model. • Modern refrigerators require more operating time but use less energy due to 80 % of food...

Owners Manual
Page 55
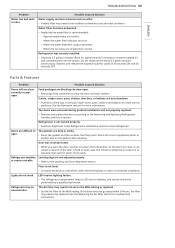
... not opening the doors as frequently. When the water filter indicator turns on fully, or valve is clogged. • Connect the refrigerator to contact a plumber. If the problem persists, it to contact a plumber. Water filter has been exhausted. • Replacing the water filter is initially installed. The temperature setting for the freezer is too warm. • The recommended temperature for the freezer compartment for more ice, select the 6 ICE mode. Ice Problem Icemaker is not making ice. ENGLISH TROUBLESHOOTING 55 Craft Ice Problem Icemaker...
... not opening the doors as frequently. When the water filter indicator turns on fully, or valve is clogged. • Connect the refrigerator to contact a plumber. If the problem persists, it to contact a plumber. Water filter has been exhausted. • Replacing the water filter is initially installed. The temperature setting for the freezer is too warm. • The recommended temperature for the freezer compartment for more ice, select the 6 ICE mode. Ice Problem Icemaker is not making ice. ENGLISH TROUBLESHOOTING 55 Craft Ice Problem Icemaker...
Owners Manual
Page 58
... water supply. • Make sure that the control panel is replaced, dispense 2.5 gallons of water (flush for the proper operation. Water filter has been recently removed or replaced. • After the water filter is set for three seconds to 30 oz. Resulting in reduced water flow. If the problem persists, it to remove trapped air and contaminants from the system. Refrigerator was exhausted. • Depending on the control panel to a cold water pipe. Refrigerator or freezer doors are left open . Dispenser...
... water supply. • Make sure that the control panel is replaced, dispense 2.5 gallons of water (flush for the proper operation. Water filter has been recently removed or replaced. • After the water filter is set for three seconds to 30 oz. Resulting in reduced water flow. If the problem persists, it to remove trapped air and contaminants from the system. Refrigerator was exhausted. • Depending on the control panel to a cold water pipe. Refrigerator or freezer doors are left open . Dispenser...
Owners Manual
Page 59
... the Removing and Replacing Refrigerator Handles and Doors section. When the water filter indicator turns on the gaskets after cleaning. Doors are blocking the door open . ENGLISH TROUBLESHOOTING 59 Problem Water has bad taste or odor. When the water dispenser output decreases. - Depress and release the dispenser pad for cycles of water (flush for approximately 5 minutes) to level refrigerator. Ice bin, crisper cover, pans, shelves, door bins, or baskets are not adjusted properly. See the Operation section for replacement instructions. The doors were removed during...
... the Removing and Replacing Refrigerator Handles and Doors section. When the water filter indicator turns on the gaskets after cleaning. Doors are blocking the door open . ENGLISH TROUBLESHOOTING 59 Problem Water has bad taste or odor. When the water dispenser output decreases. - Depress and release the dispenser pad for cycles of water (flush for approximately 5 minutes) to level refrigerator. Ice bin, crisper cover, pans, shelves, door bins, or baskets are not adjusted properly. See the Operation section for replacement instructions. The doors were removed during...
Owners Manual
Page 63
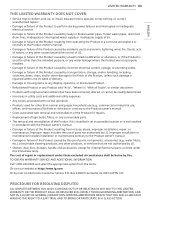
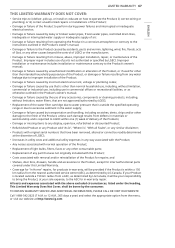
... be borne by You. Improper repair includes the use of parts, components, accessories (e.g., water filters, etc.), consumable cleaning products, any other products, or services that are not authorized by LG. • Shelves, door bins, drawers, handle and accessories, except for repairs. • Replacement of light bulbs, filters, or any consumable parts. • The removal and reinstallation of the Product if it is installed in an inaccessible location or is reported within one...
... be borne by You. Improper repair includes the use of parts, components, accessories (e.g., water filters, etc.), consumable cleaning products, any other products, or services that are not authorized by LG. • Shelves, door bins, drawers, handle and accessories, except for repairs. • Replacement of light bulbs, filters, or any consumable parts. • The removal and reinstallation of the Product if it is installed in an inaccessible location or is reported within one...
Owners Manual
Page 67
...; Shelves, door bins, drawers, handle and accessories to operate the Product; to the ASC for in-warranty repair. or iii) correct unauthorized repairs or installations of the Product; • Damage or failure of the Product to perform during power failures and interrupted or inadequate electrical service; • Damage or failure caused by leaky or broken water pipes, frozen water pipes, restricted drain lines, inadequate or interrupted water supply or...
...; Shelves, door bins, drawers, handle and accessories to operate the Product; to the ASC for in-warranty repair. or iii) correct unauthorized repairs or installations of the Product; • Damage or failure of the Product to perform during power failures and interrupted or inadequate electrical service; • Damage or failure caused by leaky or broken water pipes, frozen water pipes, restricted drain lines, inadequate or interrupted water supply or...


