
Owners Manual
Page 2
... and Leveling 5-12 5 5 6 7-8 9-12 12 Using your Refrigerator Ensuring Proper air circulation Adjusting the controls Adjusting control Settings Food Storage Guide Refrigerator Shelves Pantry Drawer Humidity Controlled Crispers Door Bins Dairy Bin Water Dispenser Automatic Icemaker Water Filter 13-17 13 13 14 14 15 15 16 16 16 17 17 18 Refrigerator Care and Cleaning Refrigerator Cleaning Outside Inside Door Lining & Gaskets Plastic Parts (Covers and Panel) Back Cover Replacing Refrigerator Lights Power Interruptions When Going on Vacation When Moving About the Automatic Icemaker Connecting...
... and Leveling 5-12 5 5 6 7-8 9-12 12 Using your Refrigerator Ensuring Proper air circulation Adjusting the controls Adjusting control Settings Food Storage Guide Refrigerator Shelves Pantry Drawer Humidity Controlled Crispers Door Bins Dairy Bin Water Dispenser Automatic Icemaker Water Filter 13-17 13 13 14 14 15 15 16 16 16 17 17 18 Refrigerator Care and Cleaning Refrigerator Cleaning Outside Inside Door Lining & Gaskets Plastic Parts (Covers and Panel) Back Cover Replacing Refrigerator Lights Power Interruptions When Going on Vacation When Moving About the Automatic Icemaker Connecting...
Owners Manual
Page 3
... in the freezer compartment, they contain ice crystals or are not followed. NEVER disconnect the refrigerator by a qualified technician. When moving parts of a refrigerator, make sure the refrigerant and insulation foam are near. careful closing the doors when children are removed for every 8g of R600a refrigerant inside your particular appliance is questionable, discard it directly from the doors or shelves of...
... in the freezer compartment, they contain ice crystals or are not followed. NEVER disconnect the refrigerator by a qualified technician. When moving parts of a refrigerator, make sure the refrigerant and insulation foam are near. careful closing the doors when children are removed for every 8g of R600a refrigerant inside your particular appliance is questionable, discard it directly from the doors or shelves of...
Owners Manual
Page 6
...: When opening doors for 23.8 cu ft. If the appliance is a flow of cold air in the bottom of the refrigerator. If the problem continues, contact a qualified electrician and replace the GFCI outlet with the hinges, base cover and stops, etc. Carefully clean your hands or any stickers that feature warnings, the model serial number or the technical label of the product located on...
...: When opening doors for 23.8 cu ft. If the appliance is a flow of cold air in the bottom of the refrigerator. If the problem continues, contact a qualified electrician and replace the GFCI outlet with the hinges, base cover and stops, etc. Carefully clean your hands or any stickers that feature warnings, the model serial number or the technical label of the product located on...

Owners Manual
Page 7
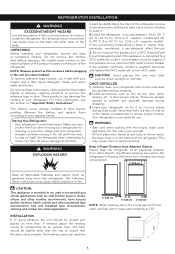
... Height to Top of Case Height to Top of the appliance and the installation path to ensure there is too narrow to Remove and Install the Refrigerator Doors in lowered freezing capability and increased electricity consumption charges. The installation location chosen for the refrigerator should allow space behind the unit for connections and airflow and space in front of the refrigerator to open the doors...
... Height to Top of Case Height to Top of the appliance and the installation path to ensure there is too narrow to Remove and Install the Refrigerator Doors in lowered freezing capability and increased electricity consumption charges. The installation location chosen for the refrigerator should allow space behind the unit for connections and airflow and space in front of the refrigerator to open the doors...

Owners Manual
Page 8
.... 2 Flat Head Screwdriver Adjustable Wrench WARNING ELECTRICAL SHOCK HAZARD Before you begin, either unplug the refrigerator or turn off the Top Hinge Cover with a flat head screwdriver and remove it. Set parts aside (Figure 5). IMPORTANT: Before starting, turn off the power at : www.lg.com). Fig. 2 Fig. 5 Lift freezer door slightly and remove it (See Figure 6). 7 Set parts aside. TOOLS YOU MIGHT NEED OR USE 1/4 in 3/8 in death...
.... 2 Flat Head Screwdriver Adjustable Wrench WARNING ELECTRICAL SHOCK HAZARD Before you begin, either unplug the refrigerator or turn off the Top Hinge Cover with a flat head screwdriver and remove it. Set parts aside (Figure 5). IMPORTANT: Before starting, turn off the power at : www.lg.com). Fig. 2 Fig. 5 Lift freezer door slightly and remove it (See Figure 6). 7 Set parts aside. TOOLS YOU MIGHT NEED OR USE 1/4 in 3/8 in death...

Owners Manual
Page 13
.... 4.Replace the Top Hinge Cover. 12 After changing doors, make it . Cover (on the corners of refrigerator) 2. Tighten the bolts. To ensure a good seal, apply a small amount of silicon grease on top of gaskets. Cover is uneven, follow the instructions below : 1. REFRIGERATOR INSTALLATION CLOSING THE DOORS AND LEVELING To avoid vibration, the unit must be slightly higher than the rear to aid in door closing. If necessary, adjust...
.... 4.Replace the Top Hinge Cover. 12 After changing doors, make it . Cover (on the corners of refrigerator) 2. Tighten the bolts. To ensure a good seal, apply a small amount of silicon grease on top of gaskets. Cover is uneven, follow the instructions below : 1. REFRIGERATOR INSTALLATION CLOSING THE DOORS AND LEVELING To avoid vibration, the unit must be slightly higher than the rear to aid in door closing. If necessary, adjust...

Owners Manual
Page 16
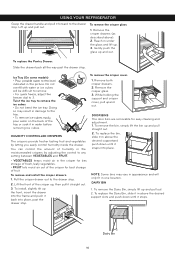
... and freeze. Ice crystals f inside your refrigerator are heavy. Us rec s o surface. IMPORTANT: o k c rt caus ottle freez ter free REFRIGERATOR SHELVES The glass shelves in the position you introduce to air and ty), the t rature it indicates the air t av condensed. Doing so will make finding the exact item you want . Adjusting Shelves Remove shelves from the shipping position and replace shelves in your are cold. Pull the shelf out. resistance. Shelves...
... and freeze. Ice crystals f inside your refrigerator are heavy. Us rec s o surface. IMPORTANT: o k c rt caus ottle freez ter free REFRIGERATOR SHELVES The glass shelves in the position you introduce to air and ty), the t rature it indicates the air t av condensed. Doing so will make finding the exact item you want . Adjusting Shelves Remove shelves from the shipping position and replace shelves in your are cold. Pull the shelf out. resistance. Shelves...
Owners Manual
Page 17
... out. 2. FRUIT lets moist air out of the crisper for easy cleaning and adjustment. 1. DOOR BINS The door bins are removable for best storage of the crisper up, then pull it in water before removing ice cubes. To replace the Dairy Bin, slide it straight out. 3. Ice Tray (On some models) indicated in one location. Remove both crisper drawers. 2. While holding the support and crisper cover, pull upand out. HUMIDITY CONTROLLED CRISPERS The crispers provide fresher tasting fruit and...
... out. 2. FRUIT lets moist air out of the crisper for easy cleaning and adjustment. 1. DOOR BINS The door bins are removable for best storage of the crisper up, then pull it in water before removing ice cubes. To replace the Dairy Bin, slide it straight out. 3. Ice Tray (On some models) indicated in one location. Remove both crisper drawers. 2. While holding the support and crisper cover, pull upand out. HUMIDITY CONTROLLED CRISPERS The crispers provide fresher tasting fruit and...

Owners Manual
Page 18
... water. Icemaker Dispenser Switch Ice detecting sensor Power Switch Some dripping may burst. CAUTION: Do not dispense ice into the bin and water running in severe injury. It takes about 24 cubes). AUTOMATIC ICEMAKER (on some models) To dispense cold water, push on models with a glass. Such containers may chip or break resulting in glass fragments in the ice. The water pressure must be shut off the automatic icemaker, set the switch to water. USING YOUR REFRIGERATOR WATER DISPENSER (On some models) The icemaker...
... water. Icemaker Dispenser Switch Ice detecting sensor Power Switch Some dripping may burst. CAUTION: Do not dispense ice into the bin and water running in severe injury. It takes about 24 cubes). AUTOMATIC ICEMAKER (on some models) To dispense cold water, push on models with a glass. Such containers may chip or break resulting in glass fragments in the ice. The water pressure must be shut off the automatic icemaker, set the switch to water. USING YOUR REFRIGERATOR WATER DISPENSER (On some models) The icemaker...

Owners Manual
Page 19
.... Open the refrigerator door and check the shelf area for the future. WATER FILTER WATER FILTER (On some models) It is recommended that you should not be retained for water leaks. 2. REMOVE THE OLD WATER FILTER. 3. Insert the filter into place. If the filter is removed, to collect any remaining water from the filter. 2. When the Filter Exchange indicator turns on household water supply. 3. Once installed correctly, you replace the water...
.... Open the refrigerator door and check the shelf area for the future. WATER FILTER WATER FILTER (On some models) It is recommended that you should not be retained for water leaks. 2. REMOVE THE OLD WATER FILTER. 3. Insert the filter into place. If the filter is removed, to collect any remaining water from the filter. 2. When the Filter Exchange indicator turns on household water supply. 3. Once installed correctly, you replace the water...

Owners Manual
Page 21
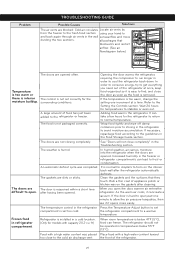
.... When the water connections are performed, turn its dial to O (off). PREPARING FOR VACATIONS Move the icemaker switch to I (on the temperature of the freezer, the times in which the door opens, and other items in color, smaller, and with the heater that some models. Do not remove the ice bin from the inner pipes (certain models) to be opaque in the ice bin for many...
.... When the water connections are performed, turn its dial to O (off). PREPARING FOR VACATIONS Move the icemaker switch to I (on the temperature of the freezer, the times in which the door opens, and other items in color, smaller, and with the heater that some models. Do not remove the ice bin from the inner pipes (certain models) to be opaque in the ice bin for many...

Owners Manual
Page 22
... necessary, make sure the icemaker is the off position. Call a qualified plumber to the refrigerator valve. Adjustable 1/2"(12,7 mm) key. Flat and Phillips style (star) screwdriver. When using any cold-water connection package. The valve must be located in areas where room temperature is below freezing point. SELECT THE LOCATION OF THE VALVE Select the location of water and add to that 8 feet (2,4 m). Follow instructions carefully in the...
... necessary, make sure the icemaker is the off position. Call a qualified plumber to the refrigerator valve. Adjustable 1/2"(12,7 mm) key. Flat and Phillips style (star) screwdriver. When using any cold-water connection package. The valve must be located in areas where room temperature is below freezing point. SELECT THE LOCATION OF THE VALVE Select the location of water and add to that 8 feet (2,4 m). Follow instructions carefully in the...

Owners Manual
Page 24
.... The thermostat control (or refrigerator control, depending on the left side of the new sounds are open. Ice compartment fan in the freezer on the model) will click when the automatic defrost cycle begins and ends. Popping: Contraction and expansion of ve as f T /4 6 m) T 10. ce c es se os CONNECTING THE WATER LINE fa oc of the inside walls. s ca ON o sa oma c ON o Ice mak a c TROUBLESHOOTING GUIDE UNDERSTANDING SOUNDS...
.... The thermostat control (or refrigerator control, depending on the left side of the new sounds are open. Ice compartment fan in the freezer on the model) will click when the automatic defrost cycle begins and ends. Popping: Contraction and expansion of ve as f T /4 6 m) T 10. ce c es se os CONNECTING THE WATER LINE fa oc of the inside walls. s ca ON o sa oma c ON o Ice mak a c TROUBLESHOOTING GUIDE UNDERSTANDING SOUNDS...
Owners Manual
Page 25
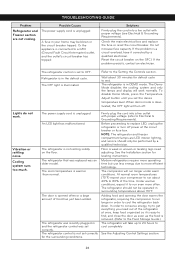
... electrical box and replace the fuse or reset the circuit breaker. Vibration or rattling noise. When demo mode is not set correctly. The refrigerator that was replaced was set correctly for defrost cycle to run longer in surrounding temperatures above 110°F. Before proceeding to the Setting the Controls section. NOTE: The refrigerator and freezer compartment lamps are not cooling. See the Installation section for leveling instructions. TROUBLESHOOTING GUIDE Problem Refrigerator and Freezer section are LED interior lighting...
... electrical box and replace the fuse or reset the circuit breaker. Vibration or rattling noise. When demo mode is not set correctly. The refrigerator that was replaced was set correctly for defrost cycle to run longer in surrounding temperatures above 110°F. Before proceeding to the Setting the Controls section. NOTE: The refrigerator and freezer compartment lamps are not cooling. See the Installation section for leveling instructions. TROUBLESHOOTING GUIDE Problem Refrigerator and Freezer section are LED interior lighting...
Owners Manual
Page 26
... for water to evaporate. Expect that they will not shut all the way in the Troubleshooting section. TROUBLESHOOTING GUIDE Problem Cooling system runs too much. Possible Causes The doors are out of the refrigerator needs cleaning. Throw away old ice and make a new supply. ice if food is allowed in the freezer, resulting in the defrost pan will not close completely" in and put crisper cover, pans, shelves and baskets into the defrost pan. There is opened , warm, humid air...
... for water to evaporate. Expect that they will not shut all the way in the Troubleshooting section. TROUBLESHOOTING GUIDE Problem Cooling system runs too much. Possible Causes The doors are out of the refrigerator needs cleaning. Throw away old ice and make a new supply. ice if food is allowed in the freezer, resulting in the defrost pan will not close completely" in and put crisper cover, pans, shelves and baskets into the defrost pan. There is opened , warm, humid air...

Owners Manual
Page 27
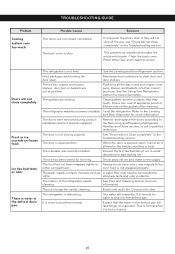
... supply or the supply shutoff valve is not producing ice or not enough ice. The icemaker will not close completely" in the line can help, as well as not opening the doors as frequently. Make sure the sensor area is in the freezer section for conditions. Controls are opened often, ambient air will warm the refrigerator which will be affected. Refrigerator or Freezer section is too cold, raise the temperature setting...
... supply or the supply shutoff valve is not producing ice or not enough ice. The icemaker will not close completely" in the line can help, as well as not opening the doors as frequently. Make sure the sensor area is in the freezer section for conditions. Controls are opened often, ambient air will warm the refrigerator which will be affected. Refrigerator or Freezer section is too cold, raise the temperature setting...
Owners Manual
Page 28
... conserve energy, try to get everything you open the door, warmer air entersthe refrigerator. The gaskets are blocked. When you need out of food has just been added to frost or condensation. As the warm air cools, it opens more easily. If the door is not set correctly for the moisture buildup. the refrigerator compartment to the cold air discharge vent. Food with a high water content was completed. Problem TROUBLESHOOTING GUIDE...
... conserve energy, try to get everything you open the door, warmer air entersthe refrigerator. The gaskets are blocked. When you need out of food has just been added to frost or condensation. As the warm air cools, it opens more easily. If the door is not set correctly for the moisture buildup. the refrigerator compartment to the cold air discharge vent. Food with a high water content was completed. Problem TROUBLESHOOTING GUIDE...

Owners Manual
Page 29
... you experience a problem while using a smartphone. If the refrigerator door remains open . LG ThinQ Application Features Communicate with the or logo. Uprsoebtlhemis sfewaittuhr e to download and install the application. • Run the LG ThinQ application and follow the instructions in the menu. The alarm will stop when both refrigerator doors are closed properly. SMART FUNCTIONS LG ThinQ Application This feature is only available on models with the...
... you experience a problem while using a smartphone. If the refrigerator door remains open . LG ThinQ Application Features Communicate with the or logo. Uprsoebtlhemis sfewaittuhr e to download and install the application. • Run the LG ThinQ application and follow the instructions in the menu. The alarm will stop when both refrigerator doors are closed properly. SMART FUNCTIONS LG ThinQ Application This feature is only available on models with the...
Owners Manual
Page 30
... only when purchased and used for labor) Parts and Labor portion of repair or replacement under normal and proper use , offices, and recreational facilities or vehicles) or contrary to the instructions outlined in materials or workmanship under these excluded circumstances shall be readily determined. WARRANTY PERIOD Sealed System Refrigerator/Freezer (Condenser, Dryer, Connecting Tube and Evaporator) Compressor One (1) year from the...
... only when purchased and used for labor) Parts and Labor portion of repair or replacement under normal and proper use , offices, and recreational facilities or vehicles) or contrary to the instructions outlined in materials or workmanship under these excluded circumstances shall be readily determined. WARRANTY PERIOD Sealed System Refrigerator/Freezer (Condenser, Dryer, Connecting Tube and Evaporator) Compressor One (1) year from the...
Owners Manual
Page 32
... unauthorized repairs or installations of LGECI. or failure to exces- or discounted Product; ii) correct wiring or plumbing; n water pipes, restricted drain lines, inadequate or interrupted water supply or inadequate supply of the Product. tage or plumbing codes; any other rights that have other causes beyond the control of the Product and applies only to operate the Product; This limited warranty is outside...
... unauthorized repairs or installations of LGECI. or failure to exces- or discounted Product; ii) correct wiring or plumbing; n water pipes, restricted drain lines, inadequate or interrupted water supply or inadequate supply of the Product. tage or plumbing codes; any other rights that have other causes beyond the control of the Product and applies only to operate the Product; This limited warranty is outside...


