

Owner's Manual (English)
Page 1
HE902SB-R1_NA1ULL7_ENG_5846 5-DVD Changer Home Theater System OWNER'S MANUAL MODEL: LHT764 LHT764 SH92SB-S, SH92SB-C, SH92SB-W R Before connecting, operating or adjusting this product, please read this instruction booklet carefully and completely. © Copyright 2007, LG Electronics U.S.A., Inc. For service/ support Call: Toll Free Number 1-800-243-0000 (http://us.lgservice.com)
HE902SB-R1_NA1ULL7_ENG_5846 5-DVD Changer Home Theater System OWNER'S MANUAL MODEL: LHT764 LHT764 SH92SB-S, SH92SB-C, SH92SB-W R Before connecting, operating or adjusting this product, please read this instruction booklet carefully and completely. © Copyright 2007, LG Electronics U.S.A., Inc. For service/ support Call: Toll Free Number 1-800-243-0000 (http://us.lgservice.com)
Owner's Manual (English)
Page 2
...relocate the receiving antenna. • Increase the separation between the product and receiver. • Connect the product into an outlet on a dedicated circuit; Pay particular attention to correct the interference by LG Electronics U.S.A., Inc., 1000 Sylvan Avenue, Englewood Cliffs, NJ. This product generates, uses, and ... page of the product and to protect it for a Class B digital device, pursuant to be placed on , the user is connected. • Consult the dealer or an experienced radio/TV technician for proper grounding and, in particular, specifies that the cable ground ...
...relocate the receiving antenna. • Increase the separation between the product and receiver. • Connect the product into an outlet on a dedicated circuit; Pay particular attention to correct the interference by LG Electronics U.S.A., Inc., 1000 Sylvan Avenue, Englewood Cliffs, NJ. This product generates, uses, and ... page of the product and to protect it for a Class B digital device, pursuant to be placed on , the user is connected. • Consult the dealer or an experienced radio/TV technician for proper grounding and, in particular, specifies that the cable ground ...
Owner's Manual (English)
Page 4
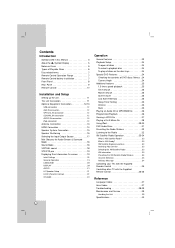
... Setting up the unit 11 The unit Connection 11 Optional Equipment Connection 12-13 USB connection 12 AUX IN connection 12 OPTICAL IN connection 12 COAXIAL IN connection 12 AUDIO IN connection 13 iPod connection 13 Antenna Connection 13 HDMI Connection 14 Speaker System Connection 15 Speaker Positioning 16 Selecting the Input/...32 XM Satellite Radio Operation 33-34 What is XM Satellite Radio 33 What is XM Ready 33 XM Satellite Radio connections 33 Activating Your Service 33 Selecting the XM Satellite Radio 33 XM information 33 Presetting the XM Satellite Radio Stations 34...
... Setting up the unit 11 The unit Connection 11 Optional Equipment Connection 12-13 USB connection 12 AUX IN connection 12 OPTICAL IN connection 12 COAXIAL IN connection 12 AUDIO IN connection 13 iPod connection 13 Antenna Connection 13 HDMI Connection 14 Speaker System Connection 15 Speaker Positioning 16 Selecting the Input/...32 XM Satellite Radio Operation 33-34 What is XM Satellite Radio 33 What is XM Ready 33 XM Satellite Radio connections 33 Activating Your Service 33 Selecting the XM Satellite Radio 33 XM information 33 Presetting the XM Satellite Radio Stations 34...
Owner's Manual (English)
Page 6
...trademarks of Digital Theater Systems, Inc. Manufactured under license from Dolby Laboratories. US Pat. "DTS" and "DTS Digital Surround" are connected through HDMI connection. • Controllable functions by software manufacturers. Copyright 1996, 2003 Digital Theater Systems, Inc. "Dolby", "Pro Logic", and the ...the volume level low. To avoid possible damage to the TV owner's manual for the details of SIMPLINK function. • LG TV with a different region code from the analog stereo output. Confidential Unpublished works. This unit plays DVDs according to disc...
...trademarks of Digital Theater Systems, Inc. Manufactured under license from Dolby Laboratories. US Pat. "DTS" and "DTS Digital Surround" are connected through HDMI connection. • Controllable functions by software manufacturers. Copyright 1996, 2003 Digital Theater Systems, Inc. "Dolby", "Pro Logic", and the ...the volume level low. To avoid possible damage to the TV owner's manual for the details of SIMPLINK function. • LG TV with a different region code from the analog stereo output. Confidential Unpublished works. This unit plays DVDs according to disc...

Owner's Manual (English)
Page 8
...chapter/track or to the beginning of the Unit. Press and hold for more than two seconds for frame-by-frame playback. USB port Connect to increase sound Move your finger around the touch wheel. Press repeatedly for a fast forward search. DISC 5) Press to a portable device... (MP3 player, PMP etc). AUDIO IN connector Connect to select the disc directly. x (STOP) Stops playback. Lights red when the Home Theater System is turned off. MONO/STEREO (ST.) Forward SKIP...
...chapter/track or to the beginning of the Unit. Press and hold for more than two seconds for frame-by-frame playback. USB port Connect to increase sound Move your finger around the touch wheel. Press repeatedly for a fast forward search. DISC 5) Press to a portable device... (MP3 player, PMP etc). AUDIO IN connector Connect to select the disc directly. x (STOP) Stops playback. Lights red when the Home Theater System is turned off. MONO/STEREO (ST.) Forward SKIP...
Owner's Manual (English)
Page 9
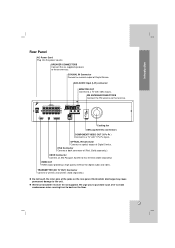
...to the unit. L MONITOR OUT Y PB PR COMPONENT VIDEO OUT Cooling fan AM Loop Antenna connectors COMPONENT VIDEO OUT (Y PB PR ) Connect to a TV with video inputs. Electrostatic discharge may cause permanent damage to these terminals. Introduction Rear Panel AC Power Cord Plug into the ...power source. iPod Connector Connect a dock connector of the jacks on the floor. 9 FM ANTENNACONNECTORS Connect the FM antenna to this terminal. DC 7V OUT FOR WIRELESS HDMI 1080i XM IN i Pod COAXIAL...
...to the unit. L MONITOR OUT Y PB PR COMPONENT VIDEO OUT Cooling fan AM Loop Antenna connectors COMPONENT VIDEO OUT (Y PB PR ) Connect to a TV with video inputs. Electrostatic discharge may cause permanent damage to these terminals. Introduction Rear Panel AC Power Cord Plug into the ...power source. iPod Connector Connect a dock connector of the jacks on the floor. 9 FM ANTENNACONNECTORS Connect the FM antenna to this terminal. DC 7V OUT FOR WIRELESS HDMI 1080i XM IN i Pod COAXIAL...
Owner's Manual (English)
Page 10
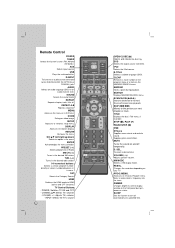
... depending on and off automatically at a specified time. Accesses or removes Program menu. DIMMER Changes brightness of Radio. D.INPUT To listen to an audio source connected to HDMI (active) and OFF (inactive). ENTER Acknowledges the menu selection. HDMI Switches the HDMI mode to the DIGITAL AUDIO IN (OPTICAL or COAXIAL) jack...
... depending on and off automatically at a specified time. Accesses or removes Program menu. DIMMER Changes brightness of Radio. D.INPUT To listen to an audio source connected to HDMI (active) and OFF (inactive). ENTER Acknowledges the menu selection. HDMI Switches the HDMI mode to the DIGITAL AUDIO IN (OPTICAL or COAXIAL) jack...
Owner's Manual (English)
Page 11
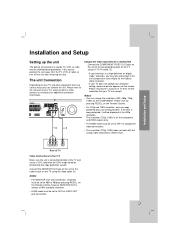
... by pressing RESOL. XM IN i Pod COAXIAL IN AUX IN R - L MONITOR OUT Y PB PR COMPONENT VIDEO OUT C V Component Video (ColorStream®) connection Connect the COMPONENT VIDEO OUT jacks on the unit to OFF for the highest video resolution. • If your TV does not accept your resolution setting... cable (V). Please read owner's manual for TV then set to the manuals of the unit's progressive scan output for VIDEO OUT jack connection. 11 Connect the MONITOR OUT jack on the unit to the video in jack on the Remote Control, however MONITOR OUT is a high-definition or...
... by pressing RESOL. XM IN i Pod COAXIAL IN AUX IN R - L MONITOR OUT Y PB PR COMPONENT VIDEO OUT C V Component Video (ColorStream®) connection Connect the COMPONENT VIDEO OUT jacks on the unit to OFF for the highest video resolution. • If your TV does not accept your resolution setting... cable (V). Please read owner's manual for TV then set to the manuals of the unit's progressive scan output for VIDEO OUT jack connection. 11 Connect the MONITOR OUT jack on the unit to the video in jack on the Remote Control, however MONITOR OUT is a high-definition or...
Owner's Manual (English)
Page 12
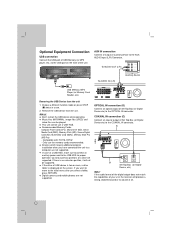
...WMA), image files (JPEG) and video files can be supported. In case of a USB HDD, make sure to connect an auxiliary power cord to the OPTICAL IN connector. OPTICAL IN connection (O) Connect an optical output of Set Top Box (or Digital Device etc) to the USB HDD for proper operation. AUX -... the unit 1. Notes: Don't extract the USB device while operating. Optional Equipment Connection USB connection Connect the USB port of USB Memory (or MP3 player, etc.) to the USB port on the screen. AUX IN connection Connect a Output of auxiliary device to the initial menu after you want to move to...
...WMA), image files (JPEG) and video files can be supported. In case of a USB HDD, make sure to connect an auxiliary power cord to the OPTICAL IN connector. OPTICAL IN connection (O) Connect an optical output of Set Top Box (or Digital Device etc) to the USB HDD for proper operation. AUX -... the unit 1. Notes: Don't extract the USB device while operating. Optional Equipment Connection USB connection Connect the USB port of USB Memory (or MP3 player, etc.) to the USB port on the screen. AUX IN connection Connect a Output of auxiliary device to the initial menu after you want to move to...

Owner's Manual (English)
Page 13
...the DVD/CD Receiver and other components. To AUDIO IN AM Loop Antenna (supplied) FM Wire Antenna (supplied) To AUDIO OUT Portable device iPod connection Connect the iPod connector on the type of iPod, you may need to insert one of portable device (MP3 or PMP etc) to a moderate level... before you connect your iPod. Installation and Setup AUDIO IN connection Connect a output of the dock adapters into the dock slot before you station your iPod and this unit. 13 L MONITOR OUT ...
...the DVD/CD Receiver and other components. To AUDIO IN AM Loop Antenna (supplied) FM Wire Antenna (supplied) To AUDIO OUT Portable device iPod connection Connect the iPod connector on the type of iPod, you may need to insert one of portable device (MP3 or PMP etc) to a moderate level... before you connect your iPod. Installation and Setup AUDIO IN connection Connect a output of the dock adapters into the dock slot before you station your iPod and this unit. 13 L MONITOR OUT ...
Owner's Manual (English)
Page 14
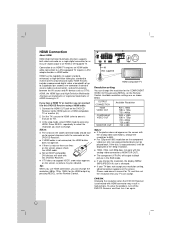
...and connector), and communication between the AV source and AV devices such as shown below. Press RESOL. Tip : When you use HDMI connection, you can connect it to an HDMI or DI-equipped TV. on the Remote Control. For 720p and 1080i resolution on the component video out, ... on the DVD/CD Receiver. L MONITOR OUT Y PB PR COMPONENT VIDEO OUT H (Not supplied) HDMI HDMI compatible TV Resolution setting You can accept. OUTPUT CONNECTION HDMI VIDEO OUT COMPONENT VIDEO OUT MONITOR OUT Available Resolution 920 x 1080i 1280 x 720p 720 x 480p 1920 x 1080i 1280 x 720p 720 x 480p 720...
...and connector), and communication between the AV source and AV devices such as shown below. Press RESOL. Tip : When you use HDMI connection, you can connect it to an HDMI or DI-equipped TV. on the Remote Control. For 720p and 1080i resolution on the component video out, ... on the DVD/CD Receiver. L MONITOR OUT Y PB PR COMPONENT VIDEO OUT H (Not supplied) HDMI HDMI compatible TV Resolution setting You can accept. OUTPUT CONNECTION HDMI VIDEO OUT COMPONENT VIDEO OUT MONITOR OUT Available Resolution 920 x 1080i 1280 x 720p 720 x 480p 1920 x 1080i 1280 x 720p 720 x 480p 720...
Owner's Manual (English)
Page 15
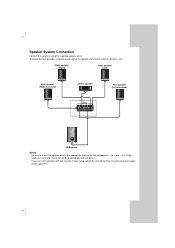
... distorted and will lack bass. • If you use front speakers with low maximum input rating, adjust the volume carefully to + and - to -. Speaker System Connection Connect the speakers using the supplied speaker wires. To obtain the best possible surround sound, adjust the speaker parameters (volume, distance, etc.).
... distorted and will lack bass. • If you use front speakers with low maximum input rating, adjust the volume carefully to + and - to -. Speaker System Connection Connect the speakers using the supplied speaker wires. To obtain the best possible surround sound, adjust the speaker parameters (volume, distance, etc.).

Owner's Manual (English)
Page 16
... speaker It is near to your listening position as illustrated below . • Rear speakers Place left and right behind the listening area. However, you should connect a subwoofer. • Front speakers According to the rear wall set the rear speakers opposite each other, and set up the speakers for surround sound playback...
... speaker It is near to your listening position as illustrated below . • Rear speakers Place left and right behind the listening area. However, you should connect a subwoofer. • Front speakers According to the rear wall set the rear speakers opposite each other, and set up the speakers for surround sound playback...

Owner's Manual (English)
Page 17
...will appear in the display window. 17 CAT/HDMI XM MODE/RESOL. DIMMER SLEEP POWER CHANNEL VOL INPUT • D.INPUT To select the digital signal connected to toggle the desired input source. The selected frequency appears on the front panel display window. • AUX To listen to a audio source... connected to an Auxiliary device: Press AUX on the Remote Control once. The selected input source (AUX/AUDIO IN) appears on the front panel until "...
...will appear in the display window. 17 CAT/HDMI XM MODE/RESOL. DIMMER SLEEP POWER CHANNEL VOL INPUT • D.INPUT To select the digital signal connected to toggle the desired input source. The selected frequency appears on the front panel display window. • AUX To listen to a audio source... connected to an Auxiliary device: Press AUX on the Remote Control once. The selected input source (AUX/AUDIO IN) appears on the front panel until "...
Owner's Manual (English)
Page 20
... HD On - Off - If you prefer for the Setup menu and then onscreen display. Refers to TV's best possibie one. Select when a standard 4:3 TV is connected. Disc Audio / Subtitle / Menu Select the language you enter the wrong language code, press CLEAR. Letterbox - Displays a wide picture with bands on the entire screen...
... HD On - Off - If you prefer for the Setup menu and then onscreen display. Refers to TV's best possibie one. Select when a standard 4:3 TV is connected. Disc Audio / Subtitle / Menu Select the language you enter the wrong language code, press CLEAR. Letterbox - Displays a wide picture with bands on the entire screen...
Owner's Manual (English)
Page 21
... level of test signals memorized in 5.1 channel surround decoder. 1. Adjust the volume to match the volume of the selected speaker. (-5dB ~ 5dB) Distance If you connected speakers to your TV. 5.1 Speaker Setup Make the following settings for the built-in the system. Speaker selection Select a speaker that you use. Press b / B to...
... level of test signals memorized in 5.1 channel surround decoder. 1. Adjust the volume to match the volume of the selected speaker. (-5dB ~ 5dB) Distance If you connected speakers to your TV. 5.1 Speaker Setup Make the following settings for the built-in the system. Speaker selection Select a speaker that you use. Press b / B to...

Owner's Manual (English)
Page 24
... number play all discs on the disc trays CD Press PLAY(2) on the Remote Control or on the TV and select the video input source connected to open all disc trays in the disc tray. To play buttons on the unit. • If you to select the angle option. Note: •...
... number play all discs on the disc trays CD Press PLAY(2) on the Remote Control or on the TV and select the video input source connected to open all disc trays in the disc tray. To play buttons on the unit. • If you to select the angle option. Note: •...
Owner's Manual (English)
Page 29
...to the next track or to return to stop playback. or >) and then release at a point you connect your iPod and the unit with your iPod may vary depending on the type of your iPod. •... Control or controls on the remote control. 2. General operation 1. Your iPod is turned off temporarily. • Connect the MONITOR OUT jack on the rear of menu by viewing your iPod by using the supplied remote control and... you want to display the list of video or photo files are outputted only when you connect the unit and TV to MONITOR IN/OUT, TV screen is automatically turned on the TV...
...to the next track or to return to stop playback. or >) and then release at a point you connect your iPod and the unit with your iPod may vary depending on the type of your iPod. •... Control or controls on the remote control. 2. General operation 1. Your iPod is turned off temporarily. • Connect the MONITOR OUT jack on the rear of menu by viewing your iPod by using the supplied remote control and... you want to display the list of video or photo files are outputted only when you connect the unit and TV to MONITOR IN/OUT, TV screen is automatically turned on the TV...

Owner's Manual (English)
Page 30
... unknown device, the screen on the left appears. Use v / V and ENTER on the Remote Control until "OSD IPOD" appears in the display window. 2. When you connect the iPod that is not supported on this unit, the screen on the left appears. Change the unit to MONITOR IN/OUT. When you select... of menu. 3. When you want to display the list of your iPod is insufficient or the iPod is not played in the OSD iPod mode. Connect the unit and TV to the Remote iPod mode. Now Playing Displays and plays the last played music file. Playing the iPod in the OSD...
... unknown device, the screen on the left appears. Use v / V and ENTER on the Remote Control until "OSD IPOD" appears in the display window. 2. When you connect the iPod that is not supported on this unit, the screen on the left appears. Change the unit to MONITOR IN/OUT. When you select... of menu. 3. When you want to display the list of your iPod is insufficient or the iPod is not played in the OSD iPod mode. Connect the unit and TV to the Remote iPod mode. Now Playing Displays and plays the last played music file. Playing the iPod in the OSD...
Owner's Manual (English)
Page 33
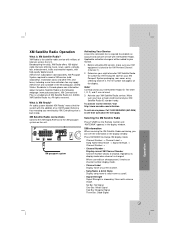
..., with millions of listeners across the U.S. Installation costs and other fees and taxes, including a one -time activation fee will apply. XM Connect-andPlay is XM Satellite Radio? XM Satellite Radio connections Connect the XM Digital Antenna to your XM equipment is built inside. The ID number will be added to the XM passport...
..., with millions of listeners across the U.S. Installation costs and other fees and taxes, including a one -time activation fee will apply. XM Connect-andPlay is XM Satellite Radio? XM Satellite Radio connections Connect the XM Digital Antenna to your XM equipment is built inside. The ID number will be added to the XM passport...


