
Owners Manual
Page 2
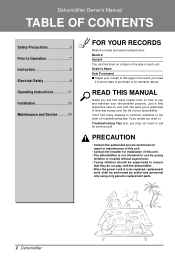
...is to be replaced, replacement work shall be performed by authorized personnel only using only genuine replacement parts. 2 Dehumidifier Dehumidifier Owner's Manual TABLE OF CONTENTS Safety Precautions 3 Prior to Operation 7 Instruction 8 Electrical Safety 9 Operating Instructions 11 Installation 13 Maintenance and Service...8226; The dehumidifier is not intended for warranty issues. Dealer's Name Date Purchased s Staple your dehumidifier properly. READ THIS MANUAL Inside you will find them on a label on your part can find many answers to common problems in the chart of ...
...is to be replaced, replacement work shall be performed by authorized personnel only using only genuine replacement parts. 2 Dehumidifier Dehumidifier Owner's Manual TABLE OF CONTENTS Safety Precautions 3 Prior to Operation 7 Instruction 8 Electrical Safety 9 Operating Instructions 11 Installation 13 Maintenance and Service...8226; The dehumidifier is not intended for warranty issues. Dealer's Name Date Purchased s Staple your dehumidifier properly. READ THIS MANUAL Inside you will find them on a label on your part can find many answers to common problems in the chart of ...
Owners Manual
Page 3
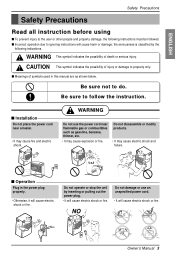
... sure to do. CAUTION This symbol indicates the possibility of death or serious injury. s Operation Plug in this manual are as gasoline, benzene, thinner, etc. • It may cause explosion or fire. NO Owner's Manual 3 WARNING Do not use an unspecified power cord. • It will cause electric shock or fire. Gasolin...
... sure to do. CAUTION This symbol indicates the possibility of death or serious injury. s Operation Plug in this manual are as gasoline, benzene, thinner, etc. • It may cause explosion or fire. NO Owner's Manual 3 WARNING Do not use an unspecified power cord. • It will cause electric shock or fire. Gasolin...
Owners Manual
Page 5
ENERGY STAR ENERGY STAR Owner's Manual 5 Hold the plug by the head when taking it out. • It may cause failure of appliance or performance deterioration. Do not block the inlet ...
ENERGY STAR ENERGY STAR Owner's Manual 5 Hold the plug by the head when taking it out. • It may cause failure of appliance or performance deterioration. Do not block the inlet ...
Owners Manual
Page 7
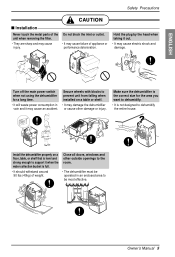
... the metal parts of the unit is being cleaned. Do not use water to Operation Preparing for installation. 2. Do not use an extension cord. 5. Owner's Manual 7 Such usage could be inadequate. 3. There is a possibility of injury if the unit's power is accidently turned on while the interior of the unit when...
... the metal parts of the unit is being cleaned. Do not use water to Operation Preparing for installation. 2. Do not use an extension cord. 5. Owner's Manual 7 Such usage could be inadequate. 3. There is a possibility of injury if the unit's power is accidently turned on while the interior of the unit when...
Owners Manual
Page 8
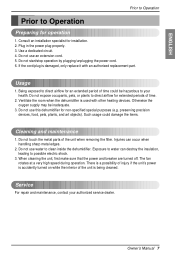
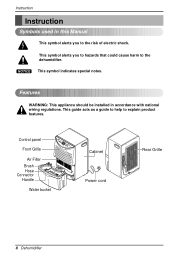
Features WARNING: This appliance should be installed in this Manual This symbol alerts you to hazards that could cause harm to the dehumidifier. This guide acts as a guide to help to the risk of electric ...
Features WARNING: This appliance should be installed in this Manual This symbol alerts you to hazards that could cause harm to the dehumidifier. This guide acts as a guide to help to the risk of electric ...
Owners Manual
Page 9
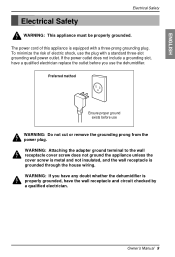
WARNING: If you use the dehumidifier. Owner's Manual 9 The power cord of electric shock, use WARNING: Do not cut or remove the grounding prong from the power plug. To minimize the risk of ...
WARNING: If you use the dehumidifier. Owner's Manual 9 The power cord of electric shock, use WARNING: Do not cut or remove the grounding prong from the power plug. To minimize the risk of ...
Owners Manual
Page 11
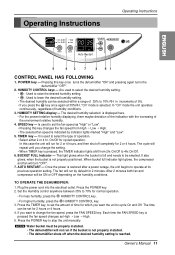
...be set the fan speed as High ¡ Low ¡ High. 5. If you press the key once again at its previous operation setting. Owner's Manual 11 On/Off High Low Timer Speed % Present % Setee Auto Restart Humidity Control Bucket full 5 43 7 2 61 CONTROL PANEL HAS FOLLOWING 1. On/Off...pressing again turns the dehumidifier "OFF". 2. Each time the FAN SPEED key is not properly positioned. Is used to stop the unit manually. TO OPERATE THE DEHUMIDIFIER: 1. Operating Instructions Operating Instructions ENGLISH 4 hr. After 2 minutes both fan and compressor will turn "OFF". 7.
...be set the fan speed as High ¡ Low ¡ High. 5. If you press the key once again at its previous operation setting. Owner's Manual 11 On/Off High Low Timer Speed % Present % Setee Auto Restart Humidity Control Bucket full 5 43 7 2 61 CONTROL PANEL HAS FOLLOWING 1. On/Off...pressing again turns the dehumidifier "OFF". 2. Each time the FAN SPEED key is not properly positioned. Is used to stop the unit manually. TO OPERATE THE DEHUMIDIFIER: 1. Operating Instructions Operating Instructions ENGLISH 4 hr. After 2 minutes both fan and compressor will turn "OFF". 7.
Owners Manual
Page 12
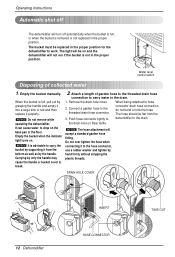
... proper position. Water level control switch Disposing of garden hose to the threaded drain hose connection to carry water to the drain. 1. Empty the bucket manually. DRAIN HOLE COVER 12 Dehumidifier INSERT HOSE-CONNECTOR TAKE OUT Operating Instructions Automatic shut off The dehumidifier will turn off automatically when the bucket is...
... proper position. Water level control switch Disposing of garden hose to the threaded drain hose connection to carry water to the drain. 1. Empty the bucket manually. DRAIN HOLE COVER 12 Dehumidifier INSERT HOSE-CONNECTOR TAKE OUT Operating Instructions Automatic shut off The dehumidifier will turn off automatically when the bucket is...
Owners Manual
Page 13
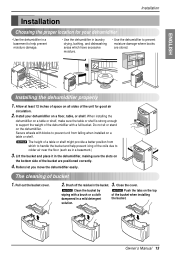
... the unit for your dehumidifier on a floor, table, or shelf. NOTICE Push the tabs on all sides of the bucket when installing the bucket. Owner's Manual 13 Pull out the bucket cover. 2. Do not sit or stand on a table or shelf. NOTICE The height of bucket 1. NOTICE Clean the bucket by...
... the unit for your dehumidifier on a floor, table, or shelf. NOTICE Push the tabs on all sides of the bucket when installing the bucket. Owner's Manual 13 Pull out the bucket cover. 2. Do not sit or stand on a table or shelf. NOTICE The height of bucket 1. NOTICE Clean the bucket by...
Owners Manual
Page 15
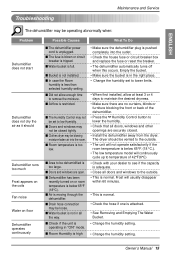
...; This is pushed completely into the room. s Area to low Humidity. Empty the bucket. • Make sure the bucket is in all the way. Owner's Manual 15 s The fuse is blown or circuit breaker is too large. s Water bucket is not installed. s Bucket is full. s Dehumidifier has been recently turned on...
...; This is pushed completely into the room. s Area to low Humidity. Empty the bucket. • Make sure the bucket is in all the way. Owner's Manual 15 s The fuse is blown or circuit breaker is too large. s Water bucket is not installed. s Bucket is full. s Dehumidifier has been recently turned on...


