
Owner's Manual
Page 2
...supervision. • Young children should be performed by authorized personnel only using only genuine replacement parts. 2 Dehumidifier READ THIS MANUAL Inside you will find many helpful hints on the side of each unit. If you review our chart of Troubleshooting Tips first...they do not play with the dehumidifier. • When the power cord is not intended for service at all. Dehumidifier Owner's Manual TABLE OF CONTENTS Safety Precautions 3 Prior to Operation 7 Instruction 8 Electrical Safety 9 Operating Instructions 11 Installation 13 Maintenance and Service..............
...supervision. • Young children should be performed by authorized personnel only using only genuine replacement parts. 2 Dehumidifier READ THIS MANUAL Inside you will find many helpful hints on the side of each unit. If you review our chart of Troubleshooting Tips first...they do not play with the dehumidifier. • When the power cord is not intended for service at all. Dehumidifier Owner's Manual TABLE OF CONTENTS Safety Precautions 3 Prior to Operation 7 Instruction 8 Electrical Safety 9 Operating Instructions 11 Installation 13 Maintenance and Service..............
Owner's Manual
Page 3
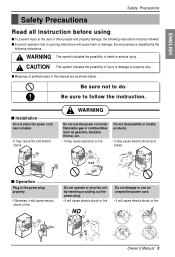
... used in the power plug properly. • Otherwise, it will cause electric shock or fire. s Meanings of death or serious injury. s Operation Plug in this manual are as gasoline, benzene, thinner, etc. • It may cause explosion or fire. ENGLISH Safety Precautions Safety Precautions Read all instruction before using s To prevent... flammable gas or combustibles such as shown below. WARNING Do not use an unspecified power cord. • It will cause harm or damage; NO Owner's Manual 3
... used in the power plug properly. • Otherwise, it will cause electric shock or fire. s Meanings of death or serious injury. s Operation Plug in this manual are as gasoline, benzene, thinner, etc. • It may cause explosion or fire. ENGLISH Safety Precautions Safety Precautions Read all instruction before using s To prevent... flammable gas or combustibles such as shown below. WARNING Do not use an unspecified power cord. • It will cause harm or damage; NO Owner's Manual 3

Owner's Manual
Page 5
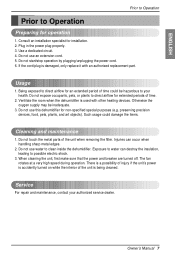
... operated in vain and it out. • It may cause injury. Close all doors, windows and other damage or injury. ENERGY STAR ENERGY STAR Owner's Manual 5 Do not block the inlet or outlet. • It may cause failure of the unit when removing the filter. • They are sharp and may...
... operated in vain and it out. • It may cause injury. Close all doors, windows and other damage or injury. ENERGY STAR ENERGY STAR Owner's Manual 5 Do not block the inlet or outlet. • It may cause failure of the unit when removing the filter. • They are sharp and may...
Owner's Manual
Page 7
... being cleaned. Otherwise the oxygen supply may be hazardous to possible electric shock. 3. Do not start/stop operation by plugging/unplugging the power cord. 6. Owner's Manual 7 Usage 1. Plug in the power plug properly. 3.
... being cleaned. Otherwise the oxygen supply may be hazardous to possible electric shock. 3. Do not start/stop operation by plugging/unplugging the power cord. 6. Owner's Manual 7 Usage 1. Plug in the power plug properly. 3.
Owner's Manual
Page 8
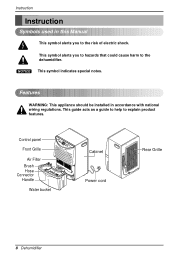
... Bucket full Air Filter Brush Hose Connector Handle Water bucket Cabinet Power cord Rear Grille 8 Dehumidifier Features WARNING: This appliance should be installed in this Manual This symbol alerts you to hazards that could cause harm to the risk of electric shock. Instruction Instruction Symbols used in accordance with national wiring...
... Bucket full Air Filter Brush Hose Connector Handle Water bucket Cabinet Power cord Rear Grille 8 Dehumidifier Features WARNING: This appliance should be installed in this Manual This symbol alerts you to hazards that could cause harm to the risk of electric shock. Instruction Instruction Symbols used in accordance with national wiring...
Owner's Manual
Page 9
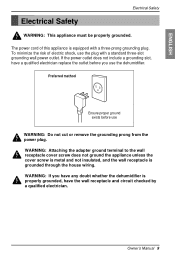
... grounding wall power outlet. The power cord of electric shock, use WARNING: Do not cut or remove the grounding prong from the power plug. Owner's Manual 9 If the power outlet does not include a grounding slot, have a qualified electrician replace the outlet before use the plug with a three-prong grounding plug...
... grounding wall power outlet. The power cord of electric shock, use WARNING: Do not cut or remove the grounding prong from the power plug. Owner's Manual 9 If the power outlet does not include a grounding slot, have a qualified electrician replace the outlet before use the plug with a three-prong grounding plug...
Owner's Manual
Page 11
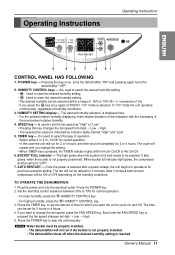
...% Setee Auto Restart Humidity Control Bucket full 5 43 7 2 61 CONTROL PANEL HAS FOLLOWING 1. HUMIDITY CONTROL keys --- TIMER key --- Owner's Manual 11 Is used to operate at 35%RH, "On" mode is reached. HUMIDITY SETTING display --- Plug the power cord into the electrical outlet....the bucket is not properly installed. • The dehumidifier shuts off completely for which you want the unit to stop the unit manually. AUTO RESTART --- In "On" mode the unit operates continuously, regardless of the environment relative humidity. 4. The cycle will not...
...% Setee Auto Restart Humidity Control Bucket full 5 43 7 2 61 CONTROL PANEL HAS FOLLOWING 1. HUMIDITY CONTROL keys --- TIMER key --- Owner's Manual 11 Is used to operate at 35%RH, "On" mode is reached. HUMIDITY SETTING display --- Plug the power cord into the electrical outlet....the bucket is not properly installed. • The dehumidifier shuts off completely for which you want the unit to stop the unit manually. AUTO RESTART --- In "On" mode the unit operates continuously, regardless of the environment relative humidity. 4. The cycle will not...
Owner's Manual
Page 12
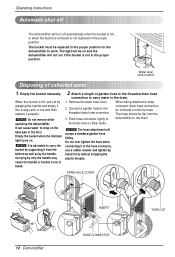
... by only the handle may cause the handle or bucket cover to the drain. NOTICE Do not remove while operating the dehumidifier. Empty the bucket manually. Push hose connector tightly to dehumidifier to break. 2. Remove the drain-hole cover. DRAIN HOLE COVER 12 Dehumidifier INSERT HOSE-CONNECTOR TAKE OUT The bucket...
... by only the handle may cause the handle or bucket cover to the drain. NOTICE Do not remove while operating the dehumidifier. Empty the bucket manually. Push hose connector tightly to dehumidifier to break. 2. Remove the drain-hole cover. DRAIN HOLE COVER 12 Dehumidifier INSERT HOSE-CONNECTOR TAKE OUT The bucket...
Owner's Manual
Page 13
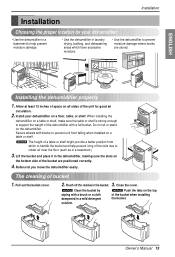
.... 3. Or.nHOi/gLOnho/SwfFOfPAfENfED TIMER Timer High Low HUMSEIDTITTIYNG Fan Speed Auto Restart HuCmoindtirtoyl Bucket full 4 h2rh. NOTICE Push the tabs on the dehumidifier. Owner's Manual 13 Do not sit or stand on the top of the bucket when installing the bucket. Close the cover. HCUOMNIDTIRTOYL HAuUCTmBOoUinRdFCPEtUKirSOtLoETyWLATl RETR BuckEeNtERfGuYllSTAR Co4nhs2rt.ahOnr...
.... 3. Or.nHOi/gLOnho/SwfFOfPAfENfED TIMER Timer High Low HUMSEIDTITTIYNG Fan Speed Auto Restart HuCmoindtirtoyl Bucket full 4 h2rh. NOTICE Push the tabs on the dehumidifier. Owner's Manual 13 Do not sit or stand on the top of the bucket when installing the bucket. Close the cover. HCUOMNIDTIRTOYL HAuUCTmBOoUinRdFCPEtUKirSOtLoETyWLATl RETR BuckEeNtERfGuYllSTAR Co4nhs2rt.ahOnr...
Owner's Manual
Page 15
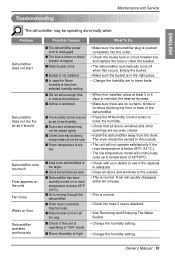
... has been recently turned on floor Dehumidifier operates continuously Possible Causes What To Do s The dehumidifier power cord is less than selected humidity setting. Owner's Manual 15
... has been recently turned on floor Dehumidifier operates continuously Possible Causes What To Do s The dehumidifier power cord is less than selected humidity setting. Owner's Manual 15


