
Owners Manual
Page 1
ENGLISH FRANÇAIS ESPAÑOL OWNER'S MANUAL FRENCH DOOR REFRIGERATOR Please read this owner's manual thoroughly before operating and keep it handy for reference at all times. LFXS32726* LFXS32736* www.lg.com
ENGLISH FRANÇAIS ESPAÑOL OWNER'S MANUAL FRENCH DOOR REFRIGERATOR Please read this owner's manual thoroughly before operating and keep it handy for reference at all times. LFXS32726* LFXS32736* www.lg.com

Owners Manual
Page 2
... Water Filter 44 SMART DIAGNOSIS™ 44 Using Smart Diagnosis™ 45 TROUBLESHOOTING 55 WARRANTY Measuring the Clearances 12 Removing/Assembling the Refrigerator Door Handles 13 Removing/Assembling the Freezer Drawer Handle 13 Removing/Assembling the Doors and Drawers 14 - What You Will Need 22 ... 27 - Preparing for Vacation 32 Ice and Water Dispenser 32 - Assembling the Freezer Drawers 21 Connecting the Water Line 21 - Assembling the Right Refrigerator Door 17 - Detaching the In-Door Ice Bin 29 - Food Storage Tips 34 - 2 TABLE OF CONTENTS ENGLISH TABLE OF CONTENTS 3 PRODUCT ...
... Water Filter 44 SMART DIAGNOSIS™ 44 Using Smart Diagnosis™ 45 TROUBLESHOOTING 55 WARRANTY Measuring the Clearances 12 Removing/Assembling the Refrigerator Door Handles 13 Removing/Assembling the Freezer Drawer Handle 13 Removing/Assembling the Doors and Drawers 14 - What You Will Need 22 ... 27 - Preparing for Vacation 32 Ice and Water Dispenser 32 - Assembling the Freezer Drawers 21 Connecting the Water Line 21 - Assembling the Right Refrigerator Door 17 - Detaching the In-Door Ice Bin 29 - Food Storage Tips 34 - 2 TABLE OF CONTENTS ENGLISH TABLE OF CONTENTS 3 PRODUCT ...

Owners Manual
Page 3
... may not be increased by approximately 20 percent when the freezer section is left open for a 24-hour period. If a refrigerator door or freezer drawer is maintained at the coldest temperature for more than 60 seconds, a warning alarm sounds at an angle less than... the refrigerator. AUTO CLOSING HINGE The refrigerator doors and freezer drawers close automatically with a variable temperature control that could occur if a refrigerator door or freezer drawer remains open. FILTERED WATER AND ICE DISPENSER The water ...
... may not be increased by approximately 20 percent when the freezer section is left open for a 24-hour period. If a refrigerator door or freezer drawer is maintained at the coldest temperature for more than 60 seconds, a warning alarm sounds at an angle less than... the refrigerator. AUTO CLOSING HINGE The refrigerator doors and freezer drawers close automatically with a variable temperature control that could occur if a refrigerator door or freezer drawer remains open. FILTERED WATER AND ICE DISPENSER The water ...

Owners Manual
Page 4
...responsibility to avoid a hazard. Do not use a cord that you are removed with a standard 3-prong wall outlet. ü Do not install the refrigerator where there may be a danger of a blackout or thunderstorm. ü Plug in order to replace a standard 2-prong wall outlet with excessive force....may cause damage to the bin or personal injury if items are connecting this product (115V, 60Hz, AC only). They could damage the refrigerator and seriously injure themselves. ü Do not hang on to a dedicated, grounded electrical outlet rated for use . ENGLISH 4 IMPORTANT SAFETY ...
...responsibility to avoid a hazard. Do not use a cord that you are removed with a standard 3-prong wall outlet. ü Do not install the refrigerator where there may be a danger of a blackout or thunderstorm. ü Plug in order to replace a standard 2-prong wall outlet with excessive force....may cause damage to the bin or personal injury if items are connecting this product (115V, 60Hz, AC only). They could damage the refrigerator and seriously injure themselves. ü Do not hang on to a dedicated, grounded electrical outlet rated for use . ENGLISH 4 IMPORTANT SAFETY ...

Owners Manual
Page 5
... food that releases the cubes. Do not place fingers or hands on ships, etc. ü Unplug the power plug before cleaning or repairing the refrigerator. ü When you may not easily climb inside. ü If connected to replace a standard 2-prong wall outlet with a standard 3-prong wall.... ENGLISH IMPORTANT SAFETY INSTRUCTIONS 5 READ ALL INSTRUCTIONS BEFORE USING THE APPLIANCE. Call a service agent. ü Do not disassemble or modify the refrigerator. ü Do not put glass containers, glass bottles or soda in the freezer. ü This appliance is not intended for use by persons...
... food that releases the cubes. Do not place fingers or hands on ships, etc. ü Unplug the power plug before cleaning or repairing the refrigerator. ü When you may not easily climb inside. ü If connected to replace a standard 2-prong wall outlet with a standard 3-prong wall.... ENGLISH IMPORTANT SAFETY INSTRUCTIONS 5 READ ALL INSTRUCTIONS BEFORE USING THE APPLIANCE. Call a service agent. ü Do not disassemble or modify the refrigerator. ü Do not put glass containers, glass bottles or soda in the freezer. ü This appliance is not intended for use by persons...

Owners Manual
Page 6
...materials out of reach of children. ü The appliance must be properly installed in . ü If you unpack and install the refrigerator. clearances between the doors and cabinets are around. ü Keep fingers out of the power plug and contact areas regularly. ü ...safety precautions should wait for easy access to the front of the refrigerator. ü Be careful when you notice a chemical or burning plastic smell or see smoke, unplug the refrigerator immediately and contact your LG Electronics Service Center. ENGLISH 6 IMPORTANT SAFETY INSTRUCTIONS READ ALL INSTRUCTIONS BEFORE...
...materials out of reach of children. ü The appliance must be properly installed in . ü If you unpack and install the refrigerator. clearances between the doors and cabinets are around. ü Keep fingers out of the power plug and contact areas regularly. ü ...safety precautions should wait for easy access to the front of the refrigerator. ü Be careful when you notice a chemical or burning plastic smell or see smoke, unplug the refrigerator immediately and contact your LG Electronics Service Center. ENGLISH 6 IMPORTANT SAFETY INSTRUCTIONS READ ALL INSTRUCTIONS BEFORE...
Owners Manual
Page 7
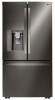
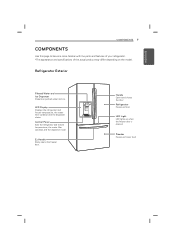
...status. LED Light LED lights up when the freezer door is opened. Refrigerator Exterior Filtered Water and Ice Dispenser Dispenses purified water and ice. Ez Handle Easily opens the freezer door. Refrigerator Preserves food. Freezer Preserves frozen food. ENGLISH COMPONENTS 7 COMPONENTS Use this... page to become more familiar with the parts and features of your refrigerator. *The appearance and specifications of the actual product may...
...status. LED Light LED lights up when the freezer door is opened. Refrigerator Exterior Filtered Water and Ice Dispenser Dispenses purified water and ice. Ez Handle Easily opens the freezer door. Refrigerator Preserves food. Freezer Preserves frozen food. ENGLISH COMPONENTS 7 COMPONENTS Use this... page to become more familiar with the parts and features of your refrigerator. *The appearance and specifications of the actual product may...
Owners Manual
Page 8
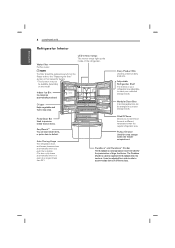
... within the freezer compartment. EasyReach™ You can be adjusted from side to side to the "Replacing the filter" section in your refrigerator are automatically produced. Pullout Drawer Used for details. * This function may not be replaced every 6 months. Modular Door Bins Interchangeable bins... can store small items, or put an item to meet your storage needs. Auto Closing Hinge The refrigerator doors and freezer drawers close automatically when you to suit your individual storage needs. LED interior lamps The interior lamps light up ...
... within the freezer compartment. EasyReach™ You can be adjusted from side to side to the "Replacing the filter" section in your refrigerator are automatically produced. Pullout Drawer Used for details. * This function may not be replaced every 6 months. Modular Door Bins Interchangeable bins... can store small items, or put an item to meet your storage needs. Auto Closing Hinge The refrigerator doors and freezer drawers close automatically when you to suit your individual storage needs. LED interior lamps The interior lamps light up ...

Owners Manual
Page 9
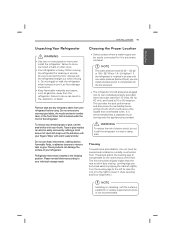
ENGLISH INSTALLATION 9 INSTALLATION Installation Overview Please read the following installation instructions first after purchasing this product or transporting it to another location. 1 Unpacking your refrigerator 2 Choosing the proper location 3 Disassembling/Assembling 4 Connecting the water supply and water line 5 Leveling and Door Alignment NOTE Connect to potable water supply only.
ENGLISH INSTALLATION 9 INSTALLATION Installation Overview Please read the following installation instructions first after purchasing this product or transporting it to another location. 1 Unpacking your refrigerator 2 Choosing the proper location 3 Disassembling/Assembling 4 Connecting the water supply and water line 5 Leveling and Door Alignment NOTE Connect to potable water supply only.
Owners Manual
Page 10
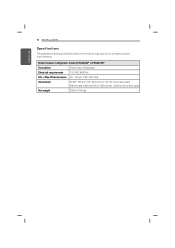
Water pressure 20 - 120 psi (138 - 827 kPa) Dimensions 35 3/4" (W) X 37 1/8" (D) X 70 1/4" (H), 49" (D w/ door open) 908 mm (W) X 943 mm (D) X 1785 mm (H), 1245 mm (D w/ door open) Net weight 339 lb. (154 kg) Bottom-freezer refrigerator model LFXS32726* / LFXS32736* Description French door refrigerator Electrical requirements 115 VAC @ 60 Hz Min. / Max. 10 INSTALLATION ENGLISH Specifications The appearance and specifications listed in this manual may vary due to constant product improvements.
Water pressure 20 - 120 psi (138 - 827 kPa) Dimensions 35 3/4" (W) X 37 1/8" (D) X 70 1/4" (H), 49" (D w/ door open) 908 mm (W) X 943 mm (D) X 1785 mm (H), 1245 mm (D w/ door open) Net weight 339 lb. (154 kg) Bottom-freezer refrigerator model LFXS32726* / LFXS32736* Description French door refrigerator Electrical requirements 115 VAC @ 60 Hz Min. / Max. 10 INSTALLATION ENGLISH Specifications The appearance and specifications listed in this manual may vary due to constant product improvements.
Owners Manual
Page 11
...the Proper Location ü Select a place where a water supply can install a booster pump to compensate for the low pressure. ü The refrigerator should be plugged into its own individual properly grounded electrical outlet rated for the automatic icemaker. It is recommended that is installed in door closing... Tech Sheet that a separate circuit serving only this appliance be turned easily by rubbing a small amount of the floor. If the refrigerator is located under the front of electric shock, do so can be provided. Flooring To avoid noise and vibration, the unit must be...
...the Proper Location ü Select a place where a water supply can install a booster pump to compensate for the low pressure. ü The refrigerator should be plugged into its own individual properly grounded electrical outlet rated for the automatic icemaker. It is recommended that is installed in door closing... Tech Sheet that a separate circuit serving only this appliance be turned easily by rubbing a small amount of the floor. If the refrigerator is located under the front of electric shock, do so can be provided. Flooring To avoid noise and vibration, the unit must be...

Owners Manual
Page 12
..., cooling ability may result in lowered freezing capability and increased electricity consumption charges. Allow at least 24 inches (61 cm) in front of the refrigerator to open the doors, and at both ends of the handle using a 1/4 in. Allen wrench, and remove the mounting fasteners. 2" (5.08... and 110°F (43°C). Removing the Handles 1 Loosen the set screws with a 3/32 in. If it is necessary to move the refrigerator through a narrow opening, removing the doors is the recommended procedure. Allen wrench. 2 Place the handle on the door by fitting the handle footprints ...
..., cooling ability may result in lowered freezing capability and increased electricity consumption charges. Allow at least 24 inches (61 cm) in front of the refrigerator to open the doors, and at both ends of the handle using a 1/4 in. Allen wrench, and remove the mounting fasteners. 2" (5.08... and 110°F (43°C). Removing the Handles 1 Loosen the set screws with a 3/32 in. If it is necessary to move the refrigerator through a narrow opening, removing the doors is the recommended procedure. Allen wrench. 2 Place the handle on the door by fitting the handle footprints ...

Owners Manual
Page 13
... the door. WARNING When assembling or disassembling the handle: ü Grasp the handle tightly to avoid dropping it is necessary to move the refrigerator sideways through a narrow opening, removing the doors is the recommended procedure. Assemble the set screws with a 1/8 in . Allen wrench and ... serious injury or death. ü Do not put hands, feet or other injury. ü Disconnect the electrical supply to the refrigerator before detaching the doors and drawers. Allen wrench. INSTALLATION 13 ENGLISH Removing/Assembling the Freezer Drawer Handle Removing the Handles 1 Loosen the...
... the door. WARNING When assembling or disassembling the handle: ü Grasp the handle tightly to avoid dropping it is necessary to move the refrigerator sideways through a narrow opening, removing the doors is the recommended procedure. Assemble the set screws with a 1/8 in . Allen wrench and ... serious injury or death. ü Do not put hands, feet or other injury. ü Disconnect the electrical supply to the refrigerator before detaching the doors and drawers. Allen wrench. INSTALLATION 13 ENGLISH Removing/Assembling the Freezer Drawer Handle Removing the Handles 1 Loosen the...

Owners Manual
Page 14
Hinge Lever Latch Collet NOTE Detachment of the hinge lever latch. ENGLISH 14 INSTALLATION Removing the Left Refrigerator Door 1 The water supply is applicable only when detaching the left refrigerator door. CAUTION Place the door, inside facing up, on a non-scratching surface. 3 Remove the cover and pull out the tube... . Hold the water supply connection and gently push the Collet to the upper right part of the rear surface of the refrigerator. Lift the hook (not visible), located at the top of the cover with a flat-head screwdriver. Lift the top hinge free of...
Hinge Lever Latch Collet NOTE Detachment of the hinge lever latch. ENGLISH 14 INSTALLATION Removing the Left Refrigerator Door 1 The water supply is applicable only when detaching the left refrigerator door. CAUTION Place the door, inside facing up, on a non-scratching surface. 3 Remove the cover and pull out the tube... . Hold the water supply connection and gently push the Collet to the upper right part of the rear surface of the refrigerator. Lift the hook (not visible), located at the top of the cover with a flat-head screwdriver. Lift the top hinge free of...

Owners Manual
Page 15
... at the bottom of the front side of the cover , with a flat-head screwdriver. Hinge Lever Latch 2 Detach the wire harness . ENGLISH Removing the Right Refrigerator Door 1 Remove the top hinge cover screw .
... at the bottom of the front side of the cover , with a flat-head screwdriver. Hinge Lever Latch 2 Detach the wire harness . ENGLISH Removing the Right Refrigerator Door 1 Remove the top hinge cover screw .

Owners Manual
Page 16
Position the cover in the figure. 3 Connect the wire harness . 2 Fit the hinge over the hinge lever latch and slot it into place. Hinge Lever Latch Insert and tighten the cover screw . Rotate the lever counterclockwise to secure the hinge. 4 Make sure that the plastic sleeve is tightly connected. ENGLISH 16 INSTALLATION Assembling the Right Refrigerator Door Install the right-side door first. 1 Make sure that the door-switch located inside the cover is inserted in the bottom of the door. Lower the door onto the middle hinge pin as shown in its place.
Position the cover in the figure. 3 Connect the wire harness . 2 Fit the hinge over the hinge lever latch and slot it into place. Hinge Lever Latch Insert and tighten the cover screw . Rotate the lever counterclockwise to secure the hinge. 4 Make sure that the plastic sleeve is tightly connected. ENGLISH 16 INSTALLATION Assembling the Right Refrigerator Door Install the right-side door first. 1 Make sure that the door-switch located inside the cover is inserted in the bottom of the door. Lower the door onto the middle hinge pin as shown in its place.

Owners Manual
Page 17
... Hold the water supply connection and gently push in the collet to the joint part for fastening. ENGLISH INSTALLATION 17 Assembling the Left Refrigerator Door Install the left refrigerator door after the right door is installed. 1 Make sure that the door-switch located inside the cover is inserted in the bottom ...of the door. Install the refrigerator door onto the middle hinge. 4 Push the water supply tube into the hole on the top case and pull it through the backplate. 2 ...
... Hold the water supply connection and gently push in the collet to the joint part for fastening. ENGLISH INSTALLATION 17 Assembling the Left Refrigerator Door Install the left refrigerator door after the right door is installed. 1 Make sure that the door-switch located inside the cover is inserted in the bottom ...of the door. Install the refrigerator door onto the middle hinge. 4 Push the water supply tube into the hole on the top case and pull it through the backplate. 2 ...

Owners Manual
Page 21
...If the issue concerning water pressure from the reverse osmosis system is blocked. If a reverse osmosis water filtration system is connected to your refrigerator before installing the water supply line to refill after installation. ü Power drill. ü ½ in accordance with low water pressure... fall below 20 psi), you can lead to your cold water supply, this water line installation is not covered by the refrigerator warranty. If a reverse osmosis water filtration system is connected to water leakage or flooding. Follow these instructions carefully to the ...
...If the issue concerning water pressure from the reverse osmosis system is blocked. If a reverse osmosis water filtration system is connected to your refrigerator before installing the water supply line to refill after installation. ü Power drill. ü ½ in accordance with low water pressure... fall below 20 psi), you can lead to your cold water supply, this water line installation is not covered by the refrigerator warranty. If a reverse osmosis water filtration system is connected to water leakage or flooding. Follow these instructions carefully to the ...

Owners Manual
Page 22
... to the top or side, rather than at plumbing supply stores) to connect the water line to drill a ¼ in the pipe. Failure to the refrigerator OR you will prevent the hazard of a vertical water pipe.
... to the top or side, rather than at plumbing supply stores) to connect the water line to drill a ¼ in the pipe. Failure to the refrigerator OR you will prevent the hazard of a vertical water pipe.

Owners Manual
Page 23
...about 8 feet coiled into the wall outlet. 6 ROUTE THE TUBING Route the tubing between the cold water line and the refrigerator. a. Compression Nut Ferrule (sleeve) Refrigerator Connection Saddle valves are illegal and their use is clear. NOTE: Do not overtighten the clamp or you may crush the...the plastic flexible cap from the wall after about 10 in. c. Route the tubing through the tubing. 9 CONNECT THE TUBING TO THE REFRIGERATOR WARNING Before making the connection to the shutoff valve. INSTALLATION 23 ENGLISH 4 FASTEN THE SHUTOFF VALVE Fasten the shutoff valve to the wall...
...about 8 feet coiled into the wall outlet. 6 ROUTE THE TUBING Route the tubing between the cold water line and the refrigerator. a. Compression Nut Ferrule (sleeve) Refrigerator Connection Saddle valves are illegal and their use is clear. NOTE: Do not overtighten the clamp or you may crush the...the plastic flexible cap from the wall after about 10 in. c. Route the tubing through the tubing. 9 CONNECT THE TUBING TO THE REFRIGERATOR WARNING Before making the connection to the shutoff valve. INSTALLATION 23 ENGLISH 4 FASTEN THE SHUTOFF VALVE Fasten the shutoff valve to the wall...


