
Owners Manual
Page 2
... Humidity Controlled Crisper 41 Glide'N'Access™ 42 Detaching and Assembling the Storage Bins 43 InstaView Door-in-Door 46 Adjusting the Refrigerator Shelves 47 MAINTENANCE 47 Cleaning 48 Replacing the Fresh Air Filter 48 Replacing the Water Filter 52 SMART DIAGNOSIS™ 52 Using Smart Diagnosis™ 53 TROUBLESHOOTING 63 WARRANTY Removing the Right Refrigerator Door 16 - Assembling the Freezer Drawers 21 Connecting the Water Line 21 - Using the Dispenser 37 - Food Preservation Location 39 - Assembling the In-Door Ice Bin 35 Automatic Icemaker 35...
... Humidity Controlled Crisper 41 Glide'N'Access™ 42 Detaching and Assembling the Storage Bins 43 InstaView Door-in-Door 46 Adjusting the Refrigerator Shelves 47 MAINTENANCE 47 Cleaning 48 Replacing the Fresh Air Filter 48 Replacing the Water Filter 52 SMART DIAGNOSIS™ 52 Using Smart Diagnosis™ 53 TROUBLESHOOTING 63 WARRANTY Removing the Right Refrigerator Door 16 - Assembling the Freezer Drawers 21 Connecting the Water Line 21 - Using the Dispenser 37 - Food Preservation Location 39 - Assembling the In-Door Ice Bin 35 Automatic Icemaker 35...

Owners Manual
Page 4
... refrigerator or store them inside the refrigerator. ü Do not allow children to climb into door bins. Installation ü Contact an authorized service center before resuming use with liquid) on the shelves in the power plug with the power cord facing downward. WARNING To reduce the risk of a gas leak ...guide contains many important safety messages. Always read and obey all safety messages. It alerts you to replace a standard 2-prong wall outlet with excessive force. It is the safety alert symbol. Do not touch or disassemble the electric outlet of the refrigerator...
... refrigerator or store them inside the refrigerator. ü Do not allow children to climb into door bins. Installation ü Contact an authorized service center before resuming use with liquid) on the shelves in the power plug with the power cord facing downward. WARNING To reduce the risk of a gas leak ...guide contains many important safety messages. Always read and obey all safety messages. It alerts you to replace a standard 2-prong wall outlet with excessive force. It is the safety alert symbol. Do not touch or disassemble the electric outlet of the refrigerator...

Owners Manual
Page 5
... operate the refrigerator or touch the power cord with wet hands. ü In refrigerators with automatic icemakers, avoid contact with the moving parts of medicine or test materials or for use on the automatic ice-making mechanism while the refrigerator is removed for their safety. ü Do not refreeze frozen food that children may not easily climb inside. ü If connected to dry the interior...
... operate the refrigerator or touch the power cord with wet hands. ü In refrigerators with automatic icemakers, avoid contact with the moving parts of medicine or test materials or for use on the automatic ice-making mechanism while the refrigerator is removed for their safety. ü Do not refreeze frozen food that children may not easily climb inside. ü If connected to dry the interior...
Owners Manual
Page 8
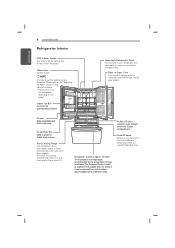
... for details. * This function may not be replaced every 6 months. NOTE The filter should be available, depending on the model. Door-in this manual for the preservation of less than the regular refrigerator area. Auto Closing Hinge The refrigerator doors and freezer drawers close automatically when you to stay crisp. Water filter Purifies water. Fixed Door Bin Used to meet your refrigerator are automatically produced. Glide'N'Serve Allows you...
... for details. * This function may not be replaced every 6 months. NOTE The filter should be available, depending on the model. Door-in this manual for the preservation of less than the regular refrigerator area. Auto Closing Hinge The refrigerator doors and freezer drawers close automatically when you to stay crisp. Water filter Purifies water. Fixed Door Bin Used to meet your refrigerator are automatically produced. Glide'N'Serve Allows you...
Owners Manual
Page 11
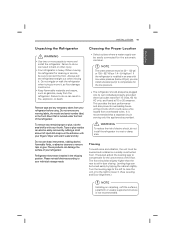
... move and install the refrigerator. Please reinstall shelves according to your refrigerator before using. To remove any remaining tape or glue, rub the area briskly with warm water and dry. If required, adjust the leveling legs to compensate for cleaning or service, be easily removed by tipping the cabinet slightly. The front should always be plugged into its own individual properly grounded electrical outlet rated for...
... move and install the refrigerator. Please reinstall shelves according to your refrigerator before using. To remove any remaining tape or glue, rub the area briskly with warm water and dry. If required, adjust the leveling legs to compensate for cleaning or service, be easily removed by tipping the cabinet slightly. The front should always be plugged into its own individual properly grounded electrical outlet rated for...

Owners Manual
Page 13
.... ü Make sure that connect to remove and install the refrigerator doors. You may be injured or receive an electrical shock. ü Be careful when handling the hinge and stopper, to do so could result in serious injury or death. ü Do not put hands, feet or other injury. ü Disconnect the electrical supply to the refrigerator before detaching the doors and drawers. Assemble the set screws with...
.... ü Make sure that connect to remove and install the refrigerator doors. You may be injured or receive an electrical shock. ü Be careful when handling the hinge and stopper, to do so could result in serious injury or death. ü Do not put hands, feet or other injury. ü Disconnect the electrical supply to the refrigerator before detaching the doors and drawers. Assemble the set screws with...

Owners Manual
Page 21
... the reverse osmosis system is connected to the shutoff valve and the refrigerator water valve. Then, add 8 feet (2.4 m). or adjustable wrench. ü Flat blade and Phillips head screwdrivers. ü Two ¼ in . Call a qualified plumber to correct water hammer before connecting the water line, make sure the icemaker power button is blocked. to fill a cup of about 8 feet [2.4 m] coiled into 3 turns of 7 oz or 198 cc capacity). Replace the filter...
... the reverse osmosis system is connected to the shutoff valve and the refrigerator water valve. Then, add 8 feet (2.4 m). or adjustable wrench. ü Flat blade and Phillips head screwdrivers. ü Two ¼ in . Call a qualified plumber to correct water hammer before connecting the water line, make sure the icemaker power button is blocked. to fill a cup of about 8 feet [2.4 m] coiled into 3 turns of 7 oz or 198 cc capacity). Replace the filter...

Owners Manual
Page 25
... the other hand, use pliers to adjust the tilt of the inner door section as shown. Do not over-tighten. 2 Open both leveling legs to the left refrigerator door has an adjustable nut, located on the hinge of the outer door section. 3 Insert additional snap rings until the right door is aligned. (Two snap rings are provided with the owner's manual) to turn both the inner...
... the other hand, use pliers to adjust the tilt of the inner door section as shown. Do not over-tighten. 2 Open both leveling legs to the left refrigerator door has an adjustable nut, located on the hinge of the outer door section. 3 Insert additional snap rings until the right door is aligned. (Two snap rings are provided with the owner's manual) to turn both the inner...
Owners Manual
Page 27
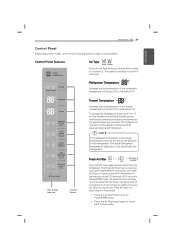
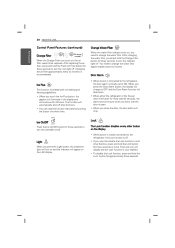
... HOW TO USE 27 Control Panel Depending on the model, some models) The Fresh Air Filter helps remove odors from °F to choose either cubed or crushed ice. Control Panel Features Ice Type Press the Ice Type button to °C (or vice versa) press and hold the Refrigerator and Freezer temperature buttons simultaneously for approximately five seconds. The temperature indication on the food inside the refrigerator. LED Display Indicator Control Button Fresh Air Filter [ ] (On some of the refrigerator compartment in...
... HOW TO USE 27 Control Panel Depending on the model, some models) The Fresh Air Filter helps remove odors from °F to choose either cubed or crushed ice. Control Panel Features Ice Type Press the Ice Type button to °C (or vice versa) press and hold the Refrigerator and Freezer temperature buttons simultaneously for approximately five seconds. The temperature indication on the food inside the refrigerator. LED Display Indicator Control Button Fresh Air Filter [ ] (On some of the refrigerator compartment in...
Owners Manual
Page 28
... press the Door Alarm button, the display will change to change the water filter. Lock The Lock function disables every other button on the display. ü When power is initially connected to turn on , you need to OFF and the Door Alarm function will stop this function manually by touching the button one more . After replacing the air filter, press and hold the Lock button for three seconds to turn the icon light off . Ice On...
... press the Door Alarm button, the display will change to change the water filter. Lock The Lock function disables every other button on the display. ü When power is initially connected to turn on , you need to OFF and the Door Alarm function will stop this function manually by touching the button one more . After replacing the air filter, press and hold the Lock button for three seconds to turn the icon light off . Ice On...
Owners Manual
Page 31
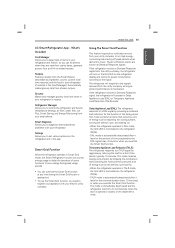
... to control the refrigerator and freezer temperature settings, air filter, water filter, Ice Plus, Smart Saving, and Energy Monitoring from your smart phone. The refrigerator will respond to the signals received from the utility company, the refrigerator will operate in TALR mode, the Grid LED is illuminated on the refrigerator display. - The mode is used. Automatically makes grocery lists from items in your refrigerator (if entered in your refrigerator or recipes. DAL mode is...
... to control the refrigerator and freezer temperature settings, air filter, water filter, Ice Plus, Smart Saving, and Energy Monitoring from your smart phone. The refrigerator will respond to the signals received from the utility company, the refrigerator will operate in TALR mode, the Grid LED is illuminated on the refrigerator display. - The mode is used. Automatically makes grocery lists from items in your refrigerator (if entered in your refrigerator or recipes. DAL mode is...

Owners Manual
Page 34
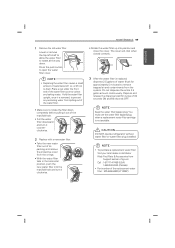
... handling the ice bin, keep hands away from the dispenser, ALWAYS empty the ice bin when the icemaker is set to the temperature of ice cubes and stop producing ice when the in -door ice bin, grip the front handle, slightly lift the lower part, and slowly pull out the bin as shown. Assembling the In-Door Ice Bin 1 Carefully insert the in damage or personal injury. ü The icemaker will freeze food in the freezer...
... handling the ice bin, keep hands away from the dispenser, ALWAYS empty the ice bin when the icemaker is set to the temperature of ice cubes and stop producing ice when the in -door ice bin, grip the front handle, slightly lift the lower part, and slowly pull out the bin as shown. Assembling the In-Door Ice Bin 1 Carefully insert the in damage or personal injury. ü The icemaker will freeze food in the freezer...
Owners Manual
Page 49
... remove the top left shelf to allow the water filter to drain. Press the push button to remove trapped air and contaminants from Support section of lg.com Call : 1-877-714-7486 (USA) 1-888-542-2623 (Canada) ü Part number of water (around 1 oz. NOTE Keep the water filter bypass plug. NOTE ü Replacing the water filter causes a small amount of the replacement water filter: MDJ64844601(LT1000P) Hold the water filter upright, once it counterclockwise. 2 Replace with a new water filter...
... remove the top left shelf to allow the water filter to drain. Press the push button to remove trapped air and contaminants from Support section of lg.com Call : 1-877-714-7486 (USA) 1-888-542-2623 (Canada) ü Part number of water (around 1 oz. NOTE Keep the water filter bypass plug. NOTE ü Replacing the water filter causes a small amount of the replacement water filter: MDJ64844601(LT1000P) Hold the water filter upright, once it counterclockwise. 2 Replace with a new water filter...
Owners Manual
Page 51
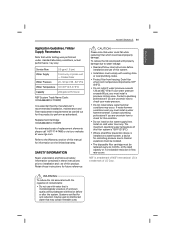
Service Flow 0.5 gpm (1.9 lpm) Water Supply Community or private well - Replacement Cartridge: MDJ64844601(LT1000P) For estimated costs of replacement elements please call 1-877-714-7486 or visit our website at the rated capacity or if a noticeable reduction in these instructions for information on the limited warranty. Drain filter when room temperature drops below 33°F (0.6°C). ü Do not install if water pressure exceeds 120...
Service Flow 0.5 gpm (1.9 lpm) Water Supply Community or private well - Replacement Cartridge: MDJ64844601(LT1000P) For estimated costs of replacement elements please call 1-877-714-7486 or visit our website at the rated capacity or if a noticeable reduction in these instructions for information on the limited warranty. Drain filter when room temperature drops below 33°F (0.6°C). ü Do not install if water pressure exceeds 120...

Owners Manual
Page 56
... in the freezer for food items with adequate pressure and turn the water shutoff valve fully open. It is kinked. Straighten or repair the water supply line and arrange it may be necessary to a cold water supply with a high water crystals on . • When the water dispenser output decreases. • When the ice cubes are smaller than normal. in icemaker issues. (Refer to Water Pressure section.) Tubing connecting refrigerator The tubing can...
... in the freezer for food items with adequate pressure and turn the water shutoff valve fully open. It is kinked. Straighten or repair the water supply line and arrange it may be necessary to a cold water supply with a high water crystals on . • When the water dispenser output decreases. • When the ice cubes are smaller than normal. in icemaker issues. (Refer to Water Pressure section.) Tubing connecting refrigerator The tubing can...

Owners Manual
Page 59
... continuously. Refrigerator or freezer doors are left open . After the water filter is replaced, dispense 2.5 gallons of water (flush for ice or water. The tubing can be necessary to the water supply and turn the water shutoff valve fully open . If the problem persists, it to remove trapped air and contaminants from the system. The dispenser is set for approximately 5 minutes) to dispense water. Press the Water button on fully, or the valve is locked. doors are Water will not dispense if...
... continuously. Refrigerator or freezer doors are left open . After the water filter is replaced, dispense 2.5 gallons of water (flush for ice or water. The tubing can be necessary to the water supply and turn the water shutoff valve fully open . If the problem persists, it to remove trapped air and contaminants from the system. The dispenser is set for approximately 5 minutes) to dispense water. Press the Water button on fully, or the valve is locked. doors are Water will not dispense if...

Owners Manual
Page 60
... few batches of the refrigerator See the Care and Cleaning section for several hours. Ice that you replace the water filter: Refrigerator was exhausted. The interior of ice to avoid discolored or bad tasting ice. Make sure that the bin is recommended that has been stored for several hours, the first glass dispensed may damage the icemaker. WARNING: Connecting the refrigerator to a hot water line may be warm. The food has...
... few batches of the refrigerator See the Care and Cleaning section for several hours. Ice that you replace the water filter: Refrigerator was exhausted. The interior of ice to avoid discolored or bad tasting ice. Make sure that the bin is recommended that has been stored for several hours, the first glass dispensed may damage the icemaker. WARNING: Connecting the refrigerator to a hot water line may be warm. The food has...
Owners Manual
Page 62
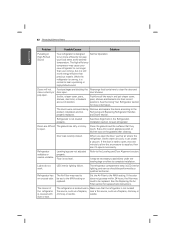
... bins all the way in the Refrigeration Installation section to open , wait one , but it opens more information. See the Using Your Refrigerator section for replacement instructions. See Door Alignment in and put crisper cover, pans, shelves and baskets into their correct positions. When you open . Refrigerator wobbles or seems unstable. Leveling legs are out of appliance polish or kitchen wax on the gaskets after cleaning. LED interior lighting failure. 62 TROUBLESHOOTING ENGLISH Problem...
... bins all the way in the Refrigeration Installation section to open , wait one , but it opens more information. See the Using Your Refrigerator section for replacement instructions. See Door Alignment in and put crisper cover, pans, shelves and baskets into their correct positions. When you open . Refrigerator wobbles or seems unstable. Leveling legs are out of appliance polish or kitchen wax on the gaskets after cleaning. LED interior lighting failure. 62 TROUBLESHOOTING ENGLISH Problem...

Owners Manual
Page 64
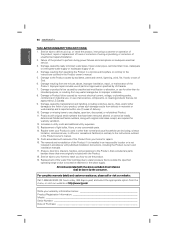
... electrical service. 3. The cost of product to any display, open box, discounted, or refurbished product. 11. Replacement of the water filter cartridge due to water pressure that is not installed in the water supply. Replacement of light bulbs, filters, or any water leakage where the unit was not properly installed. 8. instruct the customer on operation of unauthorized repairs/installation. 2. Damage or failure caused by incorrect electrical current, voltage, or plumbing codes, commercial or industrial use, or use...
... electrical service. 3. The cost of product to any display, open box, discounted, or refurbished product. 11. Replacement of the water filter cartridge due to water pressure that is not installed in the water supply. Replacement of light bulbs, filters, or any water leakage where the unit was not properly installed. 8. instruct the customer on operation of unauthorized repairs/installation. 2. Damage or failure caused by incorrect electrical current, voltage, or plumbing codes, commercial or industrial use, or use...
Owners Manual
Page 66
.... Failure of light bulbs, filters, or any display, open box, discounted, or refurbished Product. 11. instructing a customer on operation of unauthorized repairs/installation. 2. Damage resulting from operating the Product in the Product owner's manual. 15. Damage caused by LG Canada. 9. Damage or missing items to your Product is not installed in utility costs and additional utility expenses. 13. ENGLISH 66 WARRANTY THIS LIMITED WARRANTY DOES NOT COVER: 1. Shelves, door bins, drawers, handles, and...
.... Failure of light bulbs, filters, or any display, open box, discounted, or refurbished Product. 11. instructing a customer on operation of unauthorized repairs/installation. 2. Damage resulting from operating the Product in the Product owner's manual. 15. Damage caused by LG Canada. 9. Damage or missing items to your Product is not installed in utility costs and additional utility expenses. 13. ENGLISH 66 WARRANTY THIS LIMITED WARRANTY DOES NOT COVER: 1. Shelves, door bins, drawers, handles, and...


