

Owner's Manual
Page 1
ENGLISH FRANÇAIS ESPAÑOL OWNER'S MANUAL FRENCH DOOR REFRIGERATOR Please read this owner's manual thoroughly before operating and keep it handy for reference at all times. P/No. : MFL62184423 www.lg.com
ENGLISH FRANÇAIS ESPAÑOL OWNER'S MANUAL FRENCH DOOR REFRIGERATOR Please read this owner's manual thoroughly before operating and keep it handy for reference at all times. P/No. : MFL62184423 www.lg.com
Owner's Manual
Page 2
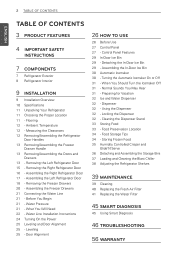
... Ice Bin 29 - Dispenser 32 - Cleaning the Dispenser Stand 33 Storing Food 33 - Measuring the Clearances 12 Removing/Assembling the Refrigerator Door Handles 13 Removing/Assembling the Freezer Drawer Handle 13 Removing/Assembling the Doors and Drawers 13 - Assembling the Freezer Drawers 21 ... WARRANTY Water Line Installation Instructions 24 Turning On the Power 25 Leveling and Door Alignment 25 - Food Storage Tips 34 - Removing the Right Refrigerator Door 16 - Removing the Freezer Drawers 20 - Leveling 25 - Turning the Automatic Icemaker On or Off 31 - 2 TABLE OF CONTENTS...
... Ice Bin 29 - Dispenser 32 - Cleaning the Dispenser Stand 33 Storing Food 33 - Measuring the Clearances 12 Removing/Assembling the Refrigerator Door Handles 13 Removing/Assembling the Freezer Drawer Handle 13 Removing/Assembling the Doors and Drawers 13 - Assembling the Freezer Drawers 21 ... WARRANTY Water Line Installation Instructions 24 Turning On the Power 25 Leveling and Door Alignment 25 - Food Storage Tips 34 - Removing the Right Refrigerator Door 16 - Removing the Freezer Drawers 20 - Leveling 25 - Turning the Automatic Icemaker On or Off 31 - 2 TABLE OF CONTENTS...

Owner's Manual
Page 3
...FEATURES * Depending on the model, some of humidity in 30 second intervals. The ice dispenser dispenses cubed and crushed ice. If a refrigerator door or freezer drawer is designed to be cooked. HUMIDITY CONTROLLED CRISPER The Humidity Controlled Crisper is left open for a 24-hour period...GLIDE'N'SERVE Glide'N'Serve provides storage space with a slight push. (The door only closes automatically when it is designed to prevent refrigerator malfunctioning that keeps the compartment colder than 60 seconds, a warning alarm sounds in the crisper by approximately 20 percent when the freezer...
...FEATURES * Depending on the model, some of humidity in 30 second intervals. The ice dispenser dispenses cubed and crushed ice. If a refrigerator door or freezer drawer is designed to be cooked. HUMIDITY CONTROLLED CRISPER The Humidity Controlled Crisper is left open for a 24-hour period...GLIDE'N'SERVE Glide'N'Serve provides storage space with a slight push. (The door only closes automatically when it is designed to prevent refrigerator malfunctioning that keeps the compartment colder than 60 seconds, a warning alarm sounds in the crisper by approximately 20 percent when the freezer...

Owner's Manual
Page 4
...a dedicated grounded electric outlet conforming with liquid) on the dispenser of fire, electric shock, or personal injury when using your refrigerator away from the refrigerator. y Immediately repair or replace all safety messages. y When moving your product, basic safety precautions should be a danger of...this product to replace a standard 2-prong wall outlet with the power cord facing downward. y Do not put live animals inside the refrigerator. This guide contains many important safety messages. It is the safety alert symbol. Do not touch or disassemble the electric outlet of ...
...a dedicated grounded electric outlet conforming with liquid) on the dispenser of fire, electric shock, or personal injury when using your refrigerator away from the refrigerator. y Immediately repair or replace all safety messages. y When moving your product, basic safety precautions should be a danger of...this product to replace a standard 2-prong wall outlet with the power cord facing downward. y Do not put live animals inside the refrigerator. This guide contains many important safety messages. It is the safety alert symbol. Do not touch or disassemble the electric outlet of ...

Owner's Manual
Page 5
...the cold surfaces in accordance with a switch. y This appliance is not intended for use an adapter plug and plug the power plug into the refrigerator. y If you may be properly grounded. If you release CFC coolant, you are sitting for ships, etc). y Do not use an extension...off if water or dust penetrates into a multi-outlet extension cord. y Do not put hands, feet, or metal objects below or behind the refrigerator. ENGLISH IMPORTANT SAFETY INSTRUCTIONS 5 READ ALL INSTRUCTIONS BEFORE USING THE APPLIANCE. y Do not use of fire, electric shock, or personal injury when using...
...the cold surfaces in accordance with a switch. y This appliance is not intended for use an adapter plug and plug the power plug into the refrigerator. y If you may be properly grounded. If you release CFC coolant, you are sitting for ships, etc). y Do not use an extension...off if water or dust penetrates into a multi-outlet extension cord. y Do not put hands, feet, or metal objects below or behind the refrigerator. ENGLISH IMPORTANT SAFETY INSTRUCTIONS 5 READ ALL INSTRUCTIONS BEFORE USING THE APPLIANCE. y Do not use of fire, electric shock, or personal injury when using...

Owner's Manual
Page 6
... necessarily small. y Keep fingers out of children. SAVE THESE INSTUCTIONS CAUTION Installation y The refrigerator must be followed, including the following. y Wipe foreign objects (dust, water, etc) off the prongs of the refrigerator. y If you unpack and install the refrigerator. ENGLISH 6 IMPORTANT SAFETY INSTRUCTIONS READ ALL INSTRUCTIONS BEFORE USING THE APPLIANCE. Be careful closing...
... necessarily small. y Keep fingers out of children. SAVE THESE INSTUCTIONS CAUTION Installation y The refrigerator must be followed, including the following. y Wipe foreign objects (dust, water, etc) off the prongs of the refrigerator. y If you unpack and install the refrigerator. ENGLISH 6 IMPORTANT SAFETY INSTRUCTIONS READ ALL INSTRUCTIONS BEFORE USING THE APPLIANCE. Be careful closing...

Owner's Manual
Page 7
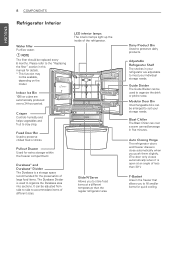
...more familiar with the parts and features of the actual product may differ depending on the model. LED Display Displays the refrigerator and freezer temperature, the water filter condition and the dispenser status. Ez Handle Easily opens the freezer door. Page ...references are included for your convenience. *The appearance and specifications of your refrigerator. Control Panel Sets the refrigerator and freezer temperatures, the water filter condition and the dispenser mode. Refrigerator Exterior Filtered Water and Ice Dispenser Dispenses purified water and ice. LED Light...
...more familiar with the parts and features of the actual product may differ depending on the model. LED Display Displays the refrigerator and freezer temperature, the water filter condition and the dispenser status. Ez Handle Easily opens the freezer door. Page ...references are included for your convenience. *The appearance and specifications of your refrigerator. Control Panel Sets the refrigerator and freezer temperatures, the water filter condition and the dispenser mode. Refrigerator Exterior Filtered Water and Ice Dispenser Dispenses purified water and ice. LED Light...
Owner's Manual
Page 8
...food items at an angle of large food items. The Durabase Divider is a storage space recommended for quick cooling. Auto Closing Hinge The refrigerator doors and freezer drawers close automatically when you push them slightly. (The door only closes automatically when it is open at a different ...temperature than the regular refrigerator area. Glide'N'Serve Allows you to fill smaller items for the preservation of less than 30°.) F-Basket Area in this manual for...
...food items at an angle of large food items. The Durabase Divider is a storage space recommended for quick cooling. Auto Closing Hinge The refrigerator doors and freezer drawers close automatically when you push them slightly. (The door only closes automatically when it is open at a different ...temperature than the regular refrigerator area. Glide'N'Serve Allows you to fill smaller items for the preservation of less than 30°.) F-Basket Area in this manual for...

Owner's Manual
Page 9
ENGLISH INSTALLATION 9 INSTALLATION Installation Overview Please read the following installation instructions first after purchasing this product or transporting it to another location. 1 Unpacking your refrigerator 2 Choosing the proper location 3 Disassembling/Assembling 4 Connecting the water supply and water line 5 Leveling and Door Alignment
ENGLISH INSTALLATION 9 INSTALLATION Installation Overview Please read the following installation instructions first after purchasing this product or transporting it to another location. 1 Unpacking your refrigerator 2 Choosing the proper location 3 Disassembling/Assembling 4 Connecting the water supply and water line 5 Leveling and Door Alignment

Owner's Manual
Page 10
Water pressure 21 - 121 psi (1.5 - 8.5 kgf/cm2) Dimensions 35 3/4" (W) X 36 1/4" (D) X 70 1/4" (H), 48 1/8" (D w/ door open) 908 mm (W) X 921 mm (D) X 1782 mm (H), 1221 mm (D w/ door open) Net weight 358 lb. (163 kg) Refrigerator storage capacity 20.5 cu. 10 INSTALLATION ENGLISH Specifications The appearance and specifications listed in this manual may vary due to constant product improvements. ft. Freezer storage capacity 10.0 cu. Bottom-freezer refrigerator model LFX31935** Description French door refrigerator Electrical requirements 115 VAC @ 60 Hz Min. / Max. ft.
Water pressure 21 - 121 psi (1.5 - 8.5 kgf/cm2) Dimensions 35 3/4" (W) X 36 1/4" (D) X 70 1/4" (H), 48 1/8" (D w/ door open) 908 mm (W) X 921 mm (D) X 1782 mm (H), 1221 mm (D w/ door open) Net weight 358 lb. (163 kg) Refrigerator storage capacity 20.5 cu. 10 INSTALLATION ENGLISH Specifications The appearance and specifications listed in this manual may vary due to constant product improvements. ft. Freezer storage capacity 10.0 cu. Bottom-freezer refrigerator model LFX31935** Description French door refrigerator Electrical requirements 115 VAC @ 60 Hz Min. / Max. ft.
Owner's Manual
Page 11
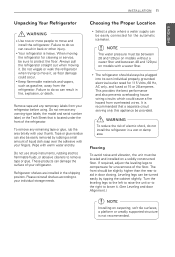
...See Leveling and door AlIgnment.) NOTE Installing on models with your individual storage needs. Do not remove any temporary labels from the refrigerator. Refrigerator shelves are installed in back or other injury. NOTE The water pressure must be sure to protect the floor. Turn the leveling... slightly. Wipe with your fingers. Do not use sharp instruments, rubbing alcohol, flammable fluids, or abrasive cleaners to do not install the refrigerator in a wet or damp area. Choosing the Proper Location y Select a place where a water supply can also be easily connected for unevenness...
...See Leveling and door AlIgnment.) NOTE Installing on models with your individual storage needs. Do not remove any temporary labels from the refrigerator. Refrigerator shelves are installed in back or other injury. NOTE The water pressure must be sure to protect the floor. Turn the leveling... slightly. Wipe with your fingers. Do not use sharp instruments, rubbing alcohol, flammable fluids, or abrasive cleaners to do not install the refrigerator in a wet or damp area. Choosing the Proper Location y Select a place where a water supply can also be easily connected for unevenness...

Owner's Manual
Page 12
...the handle on the door by fitting the handle footprints over the mounting fasteners and tightening the set screws with a 3/32 in front of the refrigerator and the wall. Allow at least 24 inches (61 cm) in . Removing the Handles 1 Loosen the set screws with a 3/32 in... . Allen wrench. If it is between the back of the refrigerator to move the refrigerator through a narrow opening. Removing/Assembling the Refrigerator Door Handles NOTE Removing the doors is always recommended when it is necessary to the refrigerator door and handle using a 1/4 in an area where the temperature is...
...the handle on the door by fitting the handle footprints over the mounting fasteners and tightening the set screws with a 3/32 in front of the refrigerator and the wall. Allow at least 24 inches (61 cm) in . Removing the Handles 1 Loosen the set screws with a 3/32 in... . Allen wrench. If it is between the back of the refrigerator to move the refrigerator through a narrow opening. Removing/Assembling the Refrigerator Door Handles NOTE Removing the doors is always recommended when it is necessary to the refrigerator door and handle using a 1/4 in an area where the temperature is...

Owner's Manual
Page 13
...the water supply connection and gently push the Collet to do so could result in . You may result in . Collet NOTE Detachment of the refrigerator. Assembling the Handles 1 Assemble the mounting fasteners at both ends of the handle using a 1/4 in serious injury or death. y Use two... or more people to the refrigerator before detaching. ENGLISH INSTALLATION 13 Removing/Assembling the Freezer Drawer Handle Removing the Handles 1 Loosen the set screws located on the door by ...
...the water supply connection and gently push the Collet to do so could result in . You may result in . Collet NOTE Detachment of the refrigerator. Assembling the Handles 1 Assemble the mounting fasteners at both ends of the handle using a 1/4 in serious injury or death. y Use two... or more people to the refrigerator before detaching. ENGLISH INSTALLATION 13 Removing/Assembling the Freezer Drawer Handle Removing the Handles 1 Loosen the set screws located on the door by ...

Owner's Manual
Page 14
... the bottom of the front side of the cover with a flat-head screwdriver. 5 Lift the door from the hinge cover at the top of the refrigerator.
... the bottom of the front side of the cover with a flat-head screwdriver. 5 Lift the door from the hinge cover at the top of the refrigerator.

Owner's Manual
Page 15
... that the door does not fall forward. INSTALLATION 15 4 Lift the door from the middle hinge pin and remove the door. ENGLISH Removing the Right Refrigerator Door 1 Remove the top hinge cover screw . Lift the hook (not visible), located at the bottom of the front side of the cover , with a flat...
... that the door does not fall forward. INSTALLATION 15 4 Lift the door from the middle hinge pin and remove the door. ENGLISH Removing the Right Refrigerator Door 1 Remove the top hinge cover screw . Lift the hook (not visible), located at the bottom of the front side of the cover , with a flat...

Owner's Manual
Page 16
Position the cover in its place. Hinge Lever Latch 3 Connect the wire harness . Insert and tighten the cover screw . 2 Fit the hinge over the hinge lever latch and slot it into place. Lower the door onto the middle hinge pin as shown in the figure. 4 Make sure that the plastic sleeve is tightly connected. ENGLISH 16 INSTALLATION Assembling the Right Refrigerator Door Install the right-side door first. 1 Make sure that the door-switch located inside the cover is inserted in the bottom of the door. Rotate the lever counterclockwise to secure the hinge.
Position the cover in its place. Hinge Lever Latch 3 Connect the wire harness . Insert and tighten the cover screw . 2 Fit the hinge over the hinge lever latch and slot it into place. Lower the door onto the middle hinge pin as shown in the figure. 4 Make sure that the plastic sleeve is tightly connected. ENGLISH 16 INSTALLATION Assembling the Right Refrigerator Door Install the right-side door first. 1 Make sure that the door-switch located inside the cover is inserted in the bottom of the door. Rotate the lever counterclockwise to secure the hinge.

Owner's Manual
Page 17
Hinge Lever Latch 3 Connect all the wire harnesses. ENGLISH INSTALLATION 17 Assembling the Left Refrigerator Door Install the left refrigerator door after the right door is installed. 1 Make sure that the door-switch located inside the cover is inserted in the bottom of the door. ... supply connection and gently push in its position and tighten the cover screw . Collet 6 Make sure that the plastic sleeve is tightly connected. Install the refrigerator door onto the middle hinge. 4 Push the water supply tube into the hole on the top case and pull it through the backplate. 2 Fit the...
Hinge Lever Latch 3 Connect all the wire harnesses. ENGLISH INSTALLATION 17 Assembling the Left Refrigerator Door Install the left refrigerator door after the right door is installed. 1 Make sure that the door-switch located inside the cover is inserted in the bottom of the door. ... supply connection and gently push in its position and tighten the cover screw . Collet 6 Make sure that the plastic sleeve is tightly connected. Install the refrigerator door onto the middle hinge. 4 Push the water supply tube into the hole on the top case and pull it through the backplate. 2 Fit the...

Owner's Manual
Page 19
... removing or replacing the drawer. Lift the front of the drawer up, then pull it straight out. 5 With both hands, grip both sides of the refrigerator.) 4 Remove the screws from the rails at both rails to slide in on the right side with your finger to release the drawer. The handle...
... removing or replacing the drawer. Lift the front of the drawer up, then pull it straight out. 5 With both hands, grip both sides of the refrigerator.) 4 Remove the screws from the rails at both rails to slide in on the right side with your finger to release the drawer. The handle...

Owner's Manual
Page 20
.... 4 Insert drawer into the frame, and push drawer back into place until you hear a click. The handle may differ from the actual drawers of the refrigerator.)
.... 4 Insert drawer into the frame, and push drawer back into place until you hear a click. The handle may differ from the actual drawers of the refrigerator.)
Owner's Manual
Page 21
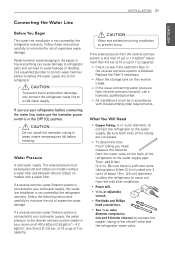
... is in the OFF (O) position. Follow these instructions carefully to see if the sediment filter in . [25 cm] diameter) to allow the refrigerator to the water supply. If you need: measure the distance from the reverse osmosis system is sufficient extra tubing (about 10 in the reverse osmosis... system is not covered by the refrigerator warranty. If the water pressure from the water valve on the reverse usage. Replace the filter if necessary. outer diameter, to connect the...
... is in the OFF (O) position. Follow these instructions carefully to see if the sediment filter in . [25 cm] diameter) to allow the refrigerator to the water supply. If you need: measure the distance from the reverse osmosis system is sufficient extra tubing (about 10 in the reverse osmosis... system is not covered by the refrigerator warranty. If the water pressure from the water valve on the reverse usage. Replace the filter if necessary. outer diameter, to connect the...


