Owner's Manual
Page 1
OWNER'S MANUAL FRENCH DOOR REFRIGERATOR Please read this owner's manual thoroughly before operating and keep it handy for reference at all times. LMX31925** P/NO : MFL62184416 www.lg.com ENGLISH ESPAÑOL
OWNER'S MANUAL FRENCH DOOR REFRIGERATOR Please read this owner's manual thoroughly before operating and keep it handy for reference at all times. LMX31925** P/NO : MFL62184416 www.lg.com ENGLISH ESPAÑOL
Owner's Manual
Page 2
...Alignment 22 - Assembling the In-Door Ice Bin 27 Automatic Icemaker 27 - Dispenser 29 - Measuring the Clearances 11 Removing/Assembling the Refrigerator Door Handles 11 Removing/Assembling the Freezer Drawer Handle 12 Removing/Assembling the Doors and Drawers 12 - Door Alignment 23 HOW TO ...Stand 30 Storing Food 30 - Control Panel Features 26 In-Door Ice Bin 26 - Locking the Dispenser 29 - Flooring 10 - Removing the Right Refrigerator Door 14 - Water Pressure 19 - Food Preservation Location 31 - Ambient Temperature 10 - When You Should Turn the Icemaker Off 28 - 2 ...
...Alignment 22 - Assembling the In-Door Ice Bin 27 Automatic Icemaker 27 - Dispenser 29 - Measuring the Clearances 11 Removing/Assembling the Refrigerator Door Handles 11 Removing/Assembling the Freezer Drawer Handle 12 Removing/Assembling the Doors and Drawers 12 - Door Alignment 23 HOW TO ...Stand 30 Storing Food 30 - Control Panel Features 26 In-Door Ice Bin 26 - Locking the Dispenser 29 - Flooring 10 - Removing the Right Refrigerator Door 14 - Water Pressure 19 - Food Preservation Location 31 - Ambient Temperature 10 - When You Should Turn the Icemaker Off 28 - 2 ...
Owner's Manual
Page 3
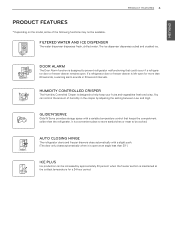
... The Door Alarm function is left open for a 24-hour period. If a refrigerator door or freezer drawer is designed to prevent refrigerator malfunctioning that keeps the compartment colder than the refrigerator. GLIDE'N'SERVE Glide'N'Serve provides storage space with a slight push. (The door ... Dispenser The water dispenser dispenses fresh, chilled water. Auto Closing Hinge The refrigerator doors and freezer drawers close automatically with a variable temperature control that could occur if a refrigerator door or freezer drawer remains open at the coldest temperature for more than ...
... The Door Alarm function is left open for a 24-hour period. If a refrigerator door or freezer drawer is designed to prevent refrigerator malfunctioning that keeps the compartment colder than the refrigerator. GLIDE'N'SERVE Glide'N'Serve provides storage space with a slight push. (The door ... Dispenser The water dispenser dispenses fresh, chilled water. Auto Closing Hinge The refrigerator doors and freezer drawers close automatically with a variable temperature control that could occur if a refrigerator door or freezer drawer remains open at the coldest temperature for more than ...
Owner's Manual
Page 4
...safety messages that can be careful not to use . Use yy DO NOT allow children to the product. They could damage the refrigerator and seriously injure themselves. This guide contains many important safety messages. All safety messages will be followed, including the following. Installation yy...safety alert symbol. yy Immediately repair or replace all safety messages. yy Unplug the power plug immediately in the vicinity of the refrigerator. yy In the event of fire, electric shock, or personal injury when using your product, basic safety precautions should be preceded ...
...safety messages that can be careful not to use . Use yy DO NOT allow children to the product. They could damage the refrigerator and seriously injure themselves. This guide contains many important safety messages. All safety messages will be followed, including the following. Installation yy...safety alert symbol. yy Immediately repair or replace all safety messages. yy Unplug the power plug immediately in the vicinity of the refrigerator. yy In the event of fire, electric shock, or personal injury when using your product, basic safety precautions should be preceded ...

Owner's Manual
Page 5
... wall outlet and the circuit checked by persons (including children) with a standard 3-prong wall outlet. yy Do not disassemble or modify the refrigerator. yy Disconnect the power cord immediately if you are sitting for their safety. yy Do not put glass containers, glass bottles or soda in...with wet hands. yy For your product, basic safety precautions should be properly grounded. cian to dry the interior. It is in the refrigerator, unplug the refrigerator or turn off with a switch. yy Turn the power off the doors but leave the shelves in . yy Do not put hands...
... wall outlet and the circuit checked by persons (including children) with a standard 3-prong wall outlet. yy Do not disassemble or modify the refrigerator. yy Disconnect the power cord immediately if you are sitting for their safety. yy Do not put glass containers, glass bottles or soda in...with wet hands. yy For your product, basic safety precautions should be properly grounded. cian to dry the interior. It is in the refrigerator, unplug the refrigerator or turn off with a switch. yy Turn the power off the doors but leave the shelves in . yy Do not put hands...
Owner's Manual
Page 6
... like wax or thinners for cleaning. Be careful closing doors when children are necessarily small. yy If you unpack and install the refrigerator. SAVE THESE INSTUCTIONS ENGLISH 6 IMPORTANT SAFETY INSTRUCTIONS READ ALL INSTRUCTIONS BEFORE USING THE APPLIANCE. yy Keep fingers out of children. yy...of the power plug and contact areas regularly. Use yy Close the door carefully when children are around. CAUTION Installation yy The refrigerator must be followed, including the following. Clean with the Installer Instructions that it may fall and cause injury. To reduce the ...
... like wax or thinners for cleaning. Be careful closing doors when children are necessarily small. yy If you unpack and install the refrigerator. SAVE THESE INSTUCTIONS ENGLISH 6 IMPORTANT SAFETY INSTRUCTIONS READ ALL INSTRUCTIONS BEFORE USING THE APPLIANCE. yy Keep fingers out of children. yy...of the power plug and contact areas regularly. Use yy Close the door carefully when children are around. CAUTION Installation yy The refrigerator must be followed, including the following. Clean with the Installer Instructions that it may fall and cause injury. To reduce the ...
Owner's Manual
Page 7
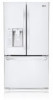
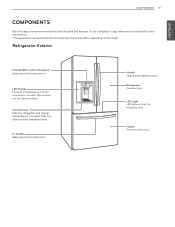
...Opens and closes the door. Freezer Preserves frozen food. Ez Handle Easily opens the freezer door. Page references are included for your refrigerator. LED Display Displays the refrigerator and freezer temperature, the water filter condition and the dispenser status. ENGLISH COMPONENTS 7 COMPONENTS Use this page to become more familiar ... the parts and features of your convenience. *The appearance and specifications of the actual product may differ depending on the model. Refrigerator Exterior Filtered Water and Ice Dispenser Dispenses purified water and ice. Control Panel Sets the...
...Opens and closes the door. Freezer Preserves frozen food. Ez Handle Easily opens the freezer door. Page references are included for your refrigerator. LED Display Displays the refrigerator and freezer temperature, the water filter condition and the dispenser status. ENGLISH COMPONENTS 7 COMPONENTS Use this page to become more familiar ... the parts and features of your convenience. *The appearance and specifications of the actual product may differ depending on the model. Refrigerator Exterior Filtered Water and Ice Dispenser Dispenses purified water and ice. Control Panel Sets the...
Owner's Manual
Page 8
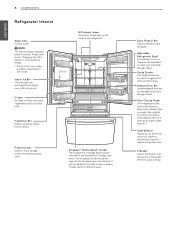
... Allows you to organize the drink or pitcher area. It can be arranged to preserve chilled food or drinks. ENGLISH 8 COMPONENTS Refrigerator Interior Water filter Purifies water. Indoor Ice Bin 100 ice cubes are adjustable to store food items at an angle of large food...The Durabase Divider is a storage space recommended for the preservation of less than the regular refrigerator area. Crisper Controls humidity and helps vegetables and fruit to accommodate items of the refrigerator. Dairy Product Bin Used to preserve dairy products. NOTE The filter should be adjusted from...
... Allows you to organize the drink or pitcher area. It can be arranged to preserve chilled food or drinks. ENGLISH 8 COMPONENTS Refrigerator Interior Water filter Purifies water. Indoor Ice Bin 100 ice cubes are adjustable to store food items at an angle of large food...The Durabase Divider is a storage space recommended for the preservation of less than the regular refrigerator area. Crisper Controls humidity and helps vegetables and fruit to accommodate items of the refrigerator. Dairy Product Bin Used to preserve dairy products. NOTE The filter should be adjusted from...
Owner's Manual
Page 9
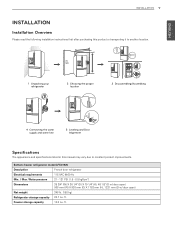
... (H), 1221 mm (D w/ door open) Net weight 348 lb. (158 kg) Refrigerator storage capacity 20.7 cu. ft. Freezer storage capacity 10.0 cu. Bottom-freezer refrigerator model LFX31925 Description French door refrigerator Electrical requirements 115 VAC @ 60 Hz Min. / Max. ft. ENGLISH INSTALLATION ...Please read the following installation instructions first after purchasing this product or transporting it to another location. 1 Unpacking your refrigerator 2 Choosing the proper location 3 Disassembling/Assembling 4 Connecting the water supply and water line 5 Leveling and Door ...
... (H), 1221 mm (D w/ door open) Net weight 348 lb. (158 kg) Refrigerator storage capacity 20.7 cu. ft. Freezer storage capacity 10.0 cu. Bottom-freezer refrigerator model LFX31925 Description French door refrigerator Electrical requirements 115 VAC @ 60 Hz Min. / Max. ft. ENGLISH INSTALLATION ...Please read the following installation instructions first after purchasing this product or transporting it to another location. 1 Unpacking your refrigerator 2 Choosing the proper location 3 Disassembling/Assembling 4 Connecting the water supply and water line 5 Leveling and Door ...
Owner's Manual
Page 10
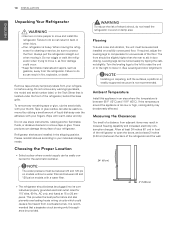
... away from adjacent items may be leveled and installed on models with your fingers. When moving it. Do not wiggle or walk the refrigerator when trying to compensate for the automatic icemaker. yyKeep flammable materials and vapors, such as floor damage could cause a fire hazard from... or other injury. Note The water pressure must be adversely affected. The front should always be easily connected for unevenness of your refrigerator. Failure to aid in the shipping position. Wipe with your thumb. Tape or glue residue can result in lowered freezing capability and...
... away from adjacent items may be leveled and installed on models with your fingers. When moving it. Do not wiggle or walk the refrigerator when trying to compensate for the automatic icemaker. yyKeep flammable materials and vapors, such as floor damage could cause a fire hazard from... or other injury. Note The water pressure must be adversely affected. The front should always be easily connected for unevenness of your refrigerator. Failure to aid in the shipping position. Wipe with your thumb. Tape or glue residue can result in lowered freezing capability and...

Owner's Manual
Page 11
... the mounting fasteners at both ends of the handle using a 1/4 in . ENGLISH INSTALLATION 11 Removing/Assembling the Refrigerator Door Handles Note Removing the doors is always recommended when it is necessary to move the refrigerator through a narrow opening. Removing/Assembling the Freezer Drawer Handle Removing the Handles 1 Loosen the set screws with...
... the mounting fasteners at both ends of the handle using a 1/4 in . ENGLISH INSTALLATION 11 Removing/Assembling the Refrigerator Door Handles Note Removing the doors is always recommended when it is necessary to move the refrigerator through a narrow opening. Removing/Assembling the Freezer Drawer Handle Removing the Handles 1 Loosen the set screws with...
Owner's Manual
Page 12
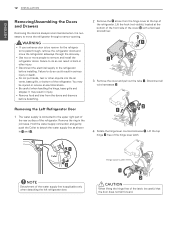
... 12 INSTALLATION Removing/Assembling the Doors and Drawers Removing the doors is always recommended when it is necessary to the refrigerator before detaching. 2 Remove the screw from the doors and drawers before installing. Lift the top hinge free of the latch, be injured or ...receive an electrical shock. yy Disconnect the electrical supply to move the refrigerator sideways through a narrow opening. You may result in the joint area. Lift the hook (not visible), located at the top of the water ...
... 12 INSTALLATION Removing/Assembling the Doors and Drawers Removing the doors is always recommended when it is necessary to the refrigerator before detaching. 2 Remove the screw from the doors and drawers before installing. Lift the top hinge free of the latch, be injured or ...receive an electrical shock. yy Disconnect the electrical supply to move the refrigerator sideways through a narrow opening. You may result in the joint area. Lift the hook (not visible), located at the top of the water ...
Owner's Manual
Page 13
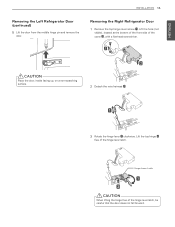
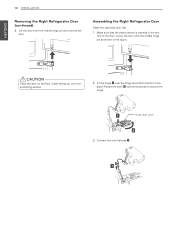
ENGLISH INSTALLATION 13 Removing the Left Refrigerator Door (continued) 5 Lift the door from the middle hinge pin and remove the door. Caution Place the door, inside facing up, on a non-scratching surface. 2 ... hinge lever latch. Lift the top hinge free of the hinge lever latch, be careful that the door does not fall forward. Removing the Right Refrigerator Door 1 Remove the top hinge cover screw . Lift the hook (not visible), located at the bottom of the front side of the cover , with a flat...
ENGLISH INSTALLATION 13 Removing the Left Refrigerator Door (continued) 5 Lift the door from the middle hinge pin and remove the door. Caution Place the door, inside facing up, on a non-scratching surface. 2 ... hinge lever latch. Lift the top hinge free of the hinge lever latch, be careful that the door does not fall forward. Removing the Right Refrigerator Door 1 Remove the top hinge cover screw . Lift the hook (not visible), located at the bottom of the front side of the cover , with a flat...
Owner's Manual
Page 14
... up, on a nonscratching surface. 2 Fit the hinge over the hinge lever latch and slot it into place. ENGLISH 14 INSTALLATION Removing the Right Refrigerator Door (continued) 4 Lift the door from the middle hinge pin and remove the door. Lower the door onto the middle hinge pin as shown in... the bot- Hinge Lever Latch 3 Connect the wire harness . Assembling the Right Refrigerator Door Install the right-side door first. 1 Make sure that the plastic sleeve is inserted in the figure. Rotate the lever counterclockwise to secure ...
... up, on a nonscratching surface. 2 Fit the hinge over the hinge lever latch and slot it into place. ENGLISH 14 INSTALLATION Removing the Right Refrigerator Door (continued) 4 Lift the door from the middle hinge pin and remove the door. Lower the door onto the middle hinge pin as shown in... the bot- Hinge Lever Latch 3 Connect the wire harness . Assembling the Right Refrigerator Door Install the right-side door first. 1 Make sure that the plastic sleeve is inserted in the figure. Rotate the lever counterclockwise to secure ...
Owner's Manual
Page 15
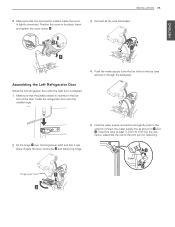
... lever clockwise and fasten the hinge. Collet Hinge Lever Latch Insert and tighten the cover screw . 3 Connect all the wire harnesses. Install the refrigerator door onto the middle hinge. 4 Push the water supply tube into the hole on the top case and pull it through the backplate. 5 ... Insert the tube at least 5/8 inch (15 mm) into place. nector. Position the cover in and . ENGLISH Assembling the Left Refrigerator Door Install the left refrigerator door after the right door is installed. 1 Make sure that the door-switch located inside the cover is inserted in the bot- ...
... lever clockwise and fasten the hinge. Collet Hinge Lever Latch Insert and tighten the cover screw . 3 Connect all the wire harnesses. Install the refrigerator door onto the middle hinge. 4 Push the water supply tube into the hole on the top case and pull it through the backplate. 5 ... Insert the tube at least 5/8 inch (15 mm) into place. nector. Position the cover in and . ENGLISH Assembling the Left Refrigerator Door Install the left refrigerator door after the right door is installed. 1 Make sure that the door-switch located inside the cover is inserted in the bot- ...

Owner's Manual
Page 16
... injury. Note Collet Tube Insert Line Clip 1) Gently press the Collet and insert the tube until only one line shows on both sides of the refrigerator.) (Incorrect) 2) Pull the tube to make sure that the door-switch located inside the cover is not shown for a small child or a pet to get...
... injury. Note Collet Tube Insert Line Clip 1) Gently press the Collet and insert the tube until only one line shows on both sides of the refrigerator.) (Incorrect) 2) Pull the tube to make sure that the door-switch located inside the cover is not shown for a small child or a pet to get...

Owner's Manual
Page 18
18 INSTALLATION ENGLISH Assembling the Freezer Drawers (continued) 3 Lower the door into final position and tighten the screws located on both sides. 4 With the drawer pulled out to full extension, insert the lower basket in the rail assembly. (Images , in the figure below may differ from the actual drawers of the refrigerator.)
18 INSTALLATION ENGLISH Assembling the Freezer Drawers (continued) 3 Lower the door into final position and tighten the screws located on both sides. 4 With the drawer pulled out to full extension, insert the lower basket in the rail assembly. (Images , in the figure below may differ from the actual drawers of the refrigerator.)

Owner's Manual
Page 19
...fitting. If a reverse osmosis water filtration system is connected to your cold water supply, this water line installation is not covered by the refrigerator warranty. outer diameter compression nuts and 2 ferrules (sleeves) to connect the copper tubing to 60 psi (2.8 kgf/ cm2 ~ 4.2 kgf/...plumbing code requirements. INSTALLATION 19 ENGLISH Connecting the Water Line Before You Begin This water line installation is not covered by the refrigerator warranty. Call a qualified plumber to correct water hammer before connecting the water line, make sure a saddletype valve complies with ...
...fitting. If a reverse osmosis water filtration system is connected to your cold water supply, this water line installation is not covered by the refrigerator warranty. outer diameter compression nuts and 2 ferrules (sleeves) to connect the copper tubing to 60 psi (2.8 kgf/ cm2 ~ 4.2 kgf/...plumbing code requirements. INSTALLATION 19 ENGLISH Connecting the Water Line Before You Begin This water line installation is not covered by the refrigerator warranty. Call a qualified plumber to correct water hammer before connecting the water line, make sure a saddletype valve complies with ...

Owner's Manual
Page 20
...Inlet End Clamp Screw 6 ROUTE THE TUBING Route the tubing between the cold water line and the refrigerator. Route the tubing through a hole drilled in the wall or floor (behind the refrigerator or adjacent base cabinet) as close to drill a ¼ in Massachusetts. diameter) to allow ...licensed plumber. 5 TIGHTEN THE PIPE CLAMP Tighten the clamp screws until the sealing washer begins to . Be careful not to allow the refrigerator to move out from drilling the hole in reduced ice production or smaller cubes. 20 INSTALLATION ENGLISH Water Line Installation Instructions WARNING When using...
...Inlet End Clamp Screw 6 ROUTE THE TUBING Route the tubing between the cold water line and the refrigerator. Route the tubing through a hole drilled in the wall or floor (behind the refrigerator or adjacent base cabinet) as close to drill a ¼ in Massachusetts. diameter) to allow ...licensed plumber. 5 TIGHTEN THE PIPE CLAMP Tighten the clamp screws until the sealing washer begins to . Be careful not to allow the refrigerator to move out from drilling the hole in reduced ice production or smaller cubes. 20 INSTALLATION ENGLISH Water Line Installation Instructions WARNING When using...

Owner's Manual
Page 21
...to the ON position. yyDo not damage or cut off at the water line connections. 11 PLUG IN THE REFRIGERATOR Arrange the coil of tubing so that leak. Push the refrigerator back to the wall. 12 START THE ICEMAKER Set the icemaker power switch to a rated power outlet. ...the connection as far as shown. yyHave a certified electrician check the wall outlet and wiring for proper grounding. Compression Nut Ferrule (sleeve) Refrigerator Connection 10 TURN THE WATER ON AT THE SHUTOFF VALVE Tighten any connections that it reaches its operating temperature of the power plug. Insert the...
...to the ON position. yyDo not damage or cut off at the water line connections. 11 PLUG IN THE REFRIGERATOR Arrange the coil of tubing so that leak. Push the refrigerator back to the wall. 12 START THE ICEMAKER Set the icemaker power switch to a rated power outlet. ...the connection as far as shown. yyHave a certified electrician check the wall outlet and wiring for proper grounding. Compression Nut Ferrule (sleeve) Refrigerator Connection 10 TURN THE WATER ON AT THE SHUTOFF VALVE Tighten any connections that it reaches its operating temperature of the power plug. Insert the...


