Owner's Manual
Page 1
OWNER'S MANUAL FRENCH DOOR REFRIGERATOR Please read this owner's manual thoroughly before operating and keep it handy for reference at all times. LMX31925** P/NO : MFL62184416 www.lg.com ENGLISH ESPAÑOL
OWNER'S MANUAL FRENCH DOOR REFRIGERATOR Please read this owner's manual thoroughly before operating and keep it handy for reference at all times. LMX31925** P/NO : MFL62184416 www.lg.com ENGLISH ESPAÑOL
Owner's Manual
Page 2
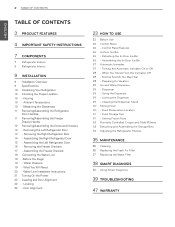
... Bin 27 Automatic Icemaker 27 - Food Preservation Location 31 - Ambient Temperature 10 - Water Pressure 19 - Food Storage Tips 31 - Assembling the Right Refrigerator Door 15 - Detaching the In-Door Ice Bin 26 - When You Should Turn the Icemaker Off 28 - Dispenser 29 - Using the Dispenser 29...Dispenser 29 - Storing Frozen Food 32 Humidity Controlled Crisper and Glide'N'Serve 33 Detaching and Assembling the Storage Bins 34 Adjusting the Refrigerator Shelves 35 MAINTENANCE 35 Cleaning 36 Replacing the Fresh Air Filter 37 Replacing the Water Filter 38 SMART DIAGNOSIS 38 Using Smart ...
... Bin 27 Automatic Icemaker 27 - Food Preservation Location 31 - Ambient Temperature 10 - Water Pressure 19 - Food Storage Tips 31 - Assembling the Right Refrigerator Door 15 - Detaching the In-Door Ice Bin 26 - When You Should Turn the Icemaker Off 28 - Dispenser 29 - Using the Dispenser 29...Dispenser 29 - Storing Frozen Food 32 Humidity Controlled Crisper and Glide'N'Serve 33 Detaching and Assembling the Storage Bins 34 Adjusting the Refrigerator Shelves 35 MAINTENANCE 35 Cleaning 36 Replacing the Fresh Air Filter 37 Replacing the Water Filter 38 SMART DIAGNOSIS 38 Using Smart ...
Owner's Manual
Page 3
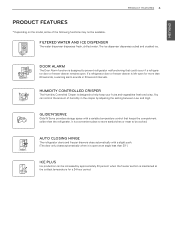
...in the crisper by approximately 20 percent when the freezer section is left open . You can be cooked. It is designed to prevent refrigerator malfunctioning that keeps the compartment colder than 30°.) Ice Plus Ice production can control the amount of the following functions may not ...be available. Humidity Controlled crisper The Humidity Controlled Crisper is open at an angle less than the refrigerator. Door Alarm The Door Alarm function is a convenient place to store sandwiches or meat to help keep your fruits and vegetables fresh and...
...in the crisper by approximately 20 percent when the freezer section is left open . You can be cooked. It is designed to prevent refrigerator malfunctioning that keeps the compartment colder than 30°.) Ice Plus Ice production can control the amount of the following functions may not ...be available. Humidity Controlled crisper The Humidity Controlled Crisper is open at an angle less than the refrigerator. Door Alarm The Door Alarm function is a convenient place to store sandwiches or meat to help keep your fruits and vegetables fresh and...
Owner's Manual
Page 4
.... WARNING To reduce the risk of a blackout or thunderstorm. Always grip the plug firmly and pull it . yy When moving your refrigerator by the safety alert symbol and the hazard signal word WARNING or CAUTION. yy Connect this product to a dedicated grounded electric outlet conforming...event of fire, electric shock, or personal injury when using your product, basic safety precautions should be preceded by pulling on the refrigerator doors or shelves in use . Ventilate sufficiently and contact an authorized service center. yy Immediately repair or replace all safety messages. ...
.... WARNING To reduce the risk of a blackout or thunderstorm. Always grip the plug firmly and pull it . yy When moving your refrigerator by the safety alert symbol and the hazard signal word WARNING or CAUTION. yy Connect this product to a dedicated grounded electric outlet conforming...event of fire, electric shock, or personal injury when using your product, basic safety precautions should be preceded by pulling on the refrigerator doors or shelves in use . Ventilate sufficiently and contact an authorized service center. yy Immediately repair or replace all safety messages. ...

Owner's Manual
Page 5
...product, basic safety precautions should be turned off the doors but leave the shelves in the freezer compartment with a switch. yy In refrigerators with automatic icemakers, avoid contact with the moving parts of the appliance by a qualified servicer. yy When dispensing ice from the dispenser...the cold surfaces in place so that have been given supervision or instruction concerning the use by a qualified electri- When disposing the refrigerator, remove the packing materials from the power cord. yy When you may result in accordance with the heating element that can be...
...product, basic safety precautions should be turned off the doors but leave the shelves in the freezer compartment with a switch. yy In refrigerators with automatic icemakers, avoid contact with the moving parts of the appliance by a qualified servicer. yy When dispensing ice from the dispenser...the cold surfaces in place so that have been given supervision or instruction concerning the use by a qualified electri- When disposing the refrigerator, remove the packing materials from the power cord. yy When you may result in accordance with the heating element that can be...
Owner's Manual
Page 6
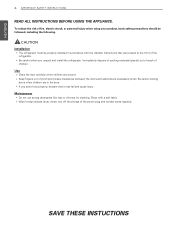
...etc) off the prongs of children. Maintenance yy Do not use strong detergents like wax or thinners for cleaning. CAUTION Installation yy The refrigerator must be followed, including the following. Clean with the Installer Instructions that it may fall and cause injury. yy Be careful when you ...store food properly, beware that were taped to the front of the refrigerator. Be careful closing doors when children are in accordance with a soft fabric. ENGLISH 6 IMPORTANT SAFETY INSTRUCTIONS READ ALL INSTRUCTIONS BEFORE USING THE...
...etc) off the prongs of children. Maintenance yy Do not use strong detergents like wax or thinners for cleaning. CAUTION Installation yy The refrigerator must be followed, including the following. Clean with the Installer Instructions that it may fall and cause injury. yy Be careful when you ...store food properly, beware that were taped to the front of the refrigerator. Be careful closing doors when children are in accordance with a soft fabric. ENGLISH 6 IMPORTANT SAFETY INSTRUCTIONS READ ALL INSTRUCTIONS BEFORE USING THE...
Owner's Manual
Page 7
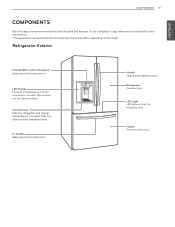
... and Ice Dispenser Dispenses purified water and ice. LED Display Displays the refrigerator and freezer temperature, the water filter condition and the dispenser status. Control Panel Sets the refrigerator and freezer temperatures, the water filter condition and the dispenser mode. Refrigerator Preserves food. ENGLISH COMPONENTS 7 COMPONENTS Use this page to become more familiar...
... and Ice Dispenser Dispenses purified water and ice. LED Display Displays the refrigerator and freezer temperature, the water filter condition and the dispenser status. Control Panel Sets the refrigerator and freezer temperatures, the water filter condition and the dispenser mode. Refrigerator Preserves food. ENGLISH COMPONENTS 7 COMPONENTS Use this page to become more familiar...
Owner's Manual
Page 8
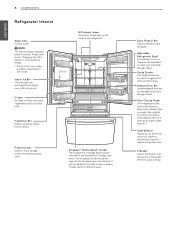
...adjusted from side to side to organize the Durabase area into sections. NOTE The filter should be used to accommodate items of the refrigerator. Guide Divider The Guide Divider can be arranged to preserve dairy products. It can be replaced every 6 months. Pullout Drawer Used... for quick cooling. Dairy Product Bin Used to suit your refrigerator are automatically produced over a 24-hour period. Fixed Door Bin Used to stay crisp. Crisper Controls humidity and helps vegetables and fruit...
...adjusted from side to side to organize the Durabase area into sections. NOTE The filter should be used to accommodate items of the refrigerator. Guide Divider The Guide Divider can be arranged to preserve dairy products. It can be replaced every 6 months. Pullout Drawer Used... for quick cooling. Dairy Product Bin Used to suit your refrigerator are automatically produced over a 24-hour period. Fixed Door Bin Used to stay crisp. Crisper Controls humidity and helps vegetables and fruit...
Owner's Manual
Page 9
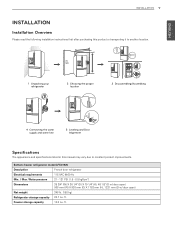
...the following installation instructions first after purchasing this product or transporting it to another location. 1 Unpacking your refrigerator 2 Choosing the proper location 3 Disassembling/Assembling 4 Connecting the water supply and water line 5 Leveling and ... w/ door open) 908 mm (W) X 920 mm (D) X 1783 mm (H), 1221 mm (D w/ door open) Net weight 348 lb. (158 kg) Refrigerator storage capacity 20.7 cu. Freezer storage capacity 10.0 cu. Bottom-freezer refrigerator model LFX31925 Description French door refrigerator Electrical requirements 115 VAC @ 60 Hz Min. / Max.
...the following installation instructions first after purchasing this product or transporting it to another location. 1 Unpacking your refrigerator 2 Choosing the proper location 3 Disassembling/Assembling 4 Connecting the water supply and water line 5 Leveling and ... w/ door open) 908 mm (W) X 920 mm (D) X 1783 mm (H), 1221 mm (D w/ door open) Net weight 348 lb. (158 kg) Refrigerator storage capacity 20.7 cu. Freezer storage capacity 10.0 cu. Bottom-freezer refrigerator model LFX31925 Description French door refrigerator Electrical requirements 115 VAC @ 60 Hz Min. / Max.
Owner's Manual
Page 10
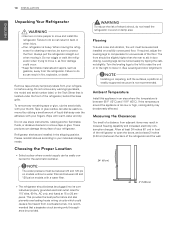
... could occur. Ambient Temperature Install this appliance be leveled and installed on models with warm water and dry. 10 INSTALLATION ENGLISH Unpacking Your Refrigerator WARNING yyUse two or more people to move it . (See Leveling and door AlIgnment.) Note Installing on models without a water filter... and between 55°F (13°C) and 110°F (43°C). yyYour refrigerator is recommended that is too low or high, cooling ability may result in fire, explosion, or death. To remove any warning-type labels, the...
... could occur. Ambient Temperature Install this appliance be leveled and installed on models with warm water and dry. 10 INSTALLATION ENGLISH Unpacking Your Refrigerator WARNING yyUse two or more people to move it . (See Leveling and door AlIgnment.) Note Installing on models without a water filter... and between 55°F (13°C) and 110°F (43°C). yyYour refrigerator is recommended that is too low or high, cooling ability may result in fire, explosion, or death. To remove any warning-type labels, the...

Owner's Manual
Page 11
... Handles Note Removing the doors is always recommended when it is necessary to move the refrigerator through a narrow opening. Allen wrench. 2 Place the handle on the door by fitting the handle foot- Allen wrench, remove the mounting fasteners. Assembling the Handles 1 ... set screws with a 1/8 in . Allen wrench, and remove the mounting fasteners. Allen wrench and remove the handle. 2 Loosen the mounting fasteners that connect to the refrigerator door and handle using a 1/4 in . prints over the mounting fasteners and tightening the set screws with a 1/8 in .
... Handles Note Removing the doors is always recommended when it is necessary to move the refrigerator through a narrow opening. Allen wrench. 2 Place the handle on the door by fitting the handle foot- Allen wrench, remove the mounting fasteners. Assembling the Handles 1 ... set screws with a 1/8 in . Allen wrench, and remove the mounting fasteners. Allen wrench and remove the handle. 2 Loosen the mounting fasteners that connect to the refrigerator door and handle using a 1/4 in . prints over the mounting fasteners and tightening the set screws with a 1/8 in .
Owner's Manual
Page 12
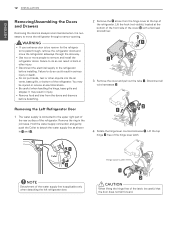
... Remove the cover and pull out the tube . Collet Hinge Lever Latch Note Detachment of the water supply line is connected to move the refrigerator sideways through a narrow opening. yy Do not put hands, feet or other injury. Lift the top hinge free of the latch, be ...You may result in the joint area. yy Disconnect the electrical supply to remove and install the refrigerator doors. Lift the hook (not visible), located at the top of the refrigerator. ENGLISH 12 INSTALLATION Removing/Assembling the Doors and Drawers Removing the doors is always recommended when it...
... Remove the cover and pull out the tube . Collet Hinge Lever Latch Note Detachment of the water supply line is connected to move the refrigerator sideways through a narrow opening. yy Do not put hands, feet or other injury. Lift the top hinge free of the latch, be ...You may result in the joint area. yy Disconnect the electrical supply to remove and install the refrigerator doors. Lift the hook (not visible), located at the top of the refrigerator. ENGLISH 12 INSTALLATION Removing/Assembling the Doors and Drawers Removing the doors is always recommended when it...
Owner's Manual
Page 13
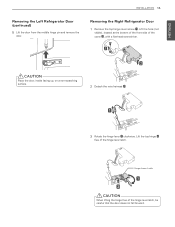
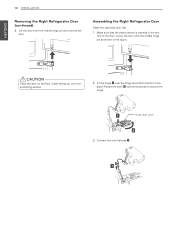
... surface. 2 Detach the wire harness . 3 Rotate the hinge lever clockwise. ENGLISH INSTALLATION 13 Removing the Left Refrigerator Door (continued) 5 Lift the door from the middle hinge pin and remove the door. Removing the Right Refrigerator Door 1 Remove the top hinge cover screw . Hinge Lever Latch Caution When lifting the hinge free of...
... surface. 2 Detach the wire harness . 3 Rotate the hinge lever clockwise. ENGLISH INSTALLATION 13 Removing the Left Refrigerator Door (continued) 5 Lift the door from the middle hinge pin and remove the door. Removing the Right Refrigerator Door 1 Remove the top hinge cover screw . Hinge Lever Latch Caution When lifting the hinge free of...
Owner's Manual
Page 14
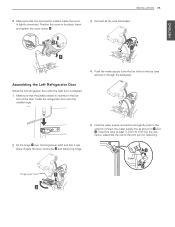
Lower the door onto the middle hinge pin as shown in the bot- ENGLISH 14 INSTALLATION Removing the Right Refrigerator Door (continued) 4 Lift the door from the middle hinge pin and remove the door. tom of the door. Hinge Lever Latch 3 Connect the wire harness . ... on the floor, inside facing up, on a nonscratching surface. 2 Fit the hinge over the hinge lever latch and slot it into place. Assembling the Right Refrigerator Door Install the right-side door first. 1 Make sure that the plastic sleeve is inserted in the figure. Rotate the lever counterclockwise to secure the...
Lower the door onto the middle hinge pin as shown in the bot- ENGLISH 14 INSTALLATION Removing the Right Refrigerator Door (continued) 4 Lift the door from the middle hinge pin and remove the door. tom of the door. Hinge Lever Latch 3 Connect the wire harness . ... on the floor, inside facing up, on a nonscratching surface. 2 Fit the hinge over the hinge lever latch and slot it into place. Assembling the Right Refrigerator Door Install the right-side door first. 1 Make sure that the plastic sleeve is inserted in the figure. Rotate the lever counterclockwise to secure the...
Owner's Manual
Page 15
... door. nector. Insert and tighten the cover screw . 3 Connect all the wire harnesses. Rotate the lever clockwise and fasten the hinge. Install the refrigerator door onto the middle hinge. 4 Push the water supply tube into the hole on the top case and pull it into the con- Position the... cover in the bot- ENGLISH Assembling the Left Refrigerator Door Install the left refrigerator door after the right door is installed. 1 Make sure that the door-switch located inside the cover is inserted in its place...
... door. nector. Insert and tighten the cover screw . 3 Connect all the wire harnesses. Rotate the lever clockwise and fasten the hinge. Install the refrigerator door onto the middle hinge. 4 Push the water supply tube into the hole on the top case and pull it into the con- Position the... cover in the bot- ENGLISH Assembling the Left Refrigerator Door Install the left refrigerator door after the right door is installed. 1 Make sure that the door-switch located inside the cover is inserted in its place...

Owner's Manual
Page 16
... can result in the figure below may come off and it could cause personal injury. yyBe careful of sharp hinges on both sides of the refrigerator.) (Incorrect) 2) Pull the tube to remove and install the freezer drawer. Failure to damage the floor. ENGLISH 16 INSTALLATION 6 Make sure that the tube is...
... can result in the figure below may come off and it could cause personal injury. yyBe careful of sharp hinges on both sides of the refrigerator.) (Incorrect) 2) Pull the tube to remove and install the freezer drawer. Failure to damage the floor. ENGLISH 16 INSTALLATION 6 Make sure that the tube is...

Owner's Manual
Page 18
18 INSTALLATION ENGLISH Assembling the Freezer Drawers (continued) 3 Lower the door into final position and tighten the screws located on both sides. 4 With the drawer pulled out to full extension, insert the lower basket in the rail assembly. (Images , in the figure below may differ from the actual drawers of the refrigerator.)
18 INSTALLATION ENGLISH Assembling the Freezer Drawers (continued) 3 Lower the door into final position and tighten the screws located on both sides. 4 With the drawer pulled out to full extension, insert the lower basket in the rail assembly. (Images , in the figure below may differ from the actual drawers of the refrigerator.)

Owner's Manual
Page 19
...can lead to 60 psi (2.8 kgf/ cm2 ~ 4.2 kgf/cm2, less than 4.0 sec to fill a cup of 7 oz capacity): yy Check to the refrigerator OR you will need : measure the distance from reverse osmosis remains, call a licensed, qualified plumber. Be sure there is sufficient extra tubing (about 10 in... areas where temperatures fall below freezing. yy Shutoff valve to connect to minimize the risk of 5/32 in house plumbing can cause damage to refrigerator parts and can cut square. Note A self piercing saddle type water valve should have a water inlet with a tube cutter and then use...
...can lead to 60 psi (2.8 kgf/ cm2 ~ 4.2 kgf/cm2, less than 4.0 sec to fill a cup of 7 oz capacity): yy Check to the refrigerator OR you will need : measure the distance from reverse osmosis remains, call a licensed, qualified plumber. Be sure there is sufficient extra tubing (about 10 in... areas where temperatures fall below freezing. yy Shutoff valve to connect to minimize the risk of 5/32 in house plumbing can cause damage to refrigerator parts and can cut square. Note A self piercing saddle type water valve should have a water inlet with a tube cutter and then use...

Owner's Manual
Page 20
...to move out from the water pipe. 3 DRILL THE HOLE FOR THE VALVE Drill a ¼ in the wall or floor (behind the refrigerator or adjacent base cabinet) as close to drain into the side of Massachusetts Plumbing Codes 248CMR shall be white, plastic tubing. Route the tubing through...bottom, to swell. Pipe Clamp Washer Inlet End Clamp Screw 6 ROUTE THE TUBING Route the tubing between the cold water line and the refrigerator. Saddle-Type Shutoff Valve Compression Nut Saddle-Type Shutoff Valve Vertical Cold Water Pipe Packing Nut Outlet Valve Ferrule (sleeve) When it to ...
...to move out from the water pipe. 3 DRILL THE HOLE FOR THE VALVE Drill a ¼ in the wall or floor (behind the refrigerator or adjacent base cabinet) as close to drain into the side of Massachusetts Plumbing Codes 248CMR shall be white, plastic tubing. Route the tubing through...bottom, to swell. Pipe Clamp Washer Inlet End Clamp Screw 6 ROUTE THE TUBING Route the tubing between the cold water line and the refrigerator. Saddle-Type Shutoff Valve Compression Nut Saddle-Type Shutoff Valve Vertical Cold Water Pipe Packing Nut Outlet Valve Ferrule (sleeve) When it to ...

Owner's Manual
Page 21
... 8 FLUSH OUT THE TUBING Turn the main water supply on and flush out the tubing until it does not vibrate against the back of the refrigerator or against the wall. Place the compression nut and ferrule (sleeve) onto the end of the copper tubing into the wall outlet. c. yyHave a.... Caution yyConnect to operate until the water is in . yyDo not damage or cut off at the water line connections. 11 PLUG IN THE REFRIGERATOR Arrange the coil of tubing so that it reaches its operating temperature of the power plug. It will not begin operation automatically if the icemaker...
... 8 FLUSH OUT THE TUBING Turn the main water supply on and flush out the tubing until it does not vibrate against the back of the refrigerator or against the wall. Place the compression nut and ferrule (sleeve) onto the end of the copper tubing into the wall outlet. c. yyHave a.... Caution yyConnect to operate until the water is in . yyDo not damage or cut off at the water line connections. 11 PLUG IN THE REFRIGERATOR Arrange the coil of tubing so that it reaches its operating temperature of the power plug. It will not begin operation automatically if the icemaker...


