
Owners Manual
Page 2
... In-Door ice Bin 29 - Assembling the Right Refrigerator Door 17 - Leveling 25 - Assembling the In-Door ice Bin 30 Automatic Icemaker 30 - Preparing for Vacation 32 Ice and Water Dispenser 32 - Dispenser 32 - Storing Frozen Food 35 Humidity Controlled Crisper and Glide'N'Serve 36 Detaching and Assembling the Storage Bins 37 Adjusting the Refrigerator Shelves 38 MAINTENANCE 38 Cleaning 39 Replacing the Fresh Air Filter 39 Replacing the Water Filter 44 SMART DIAGNOSIS 44 Using Smart Diagnosis 45 TROUBLESHOOTING 55 WARRANTY 2 TABLE...
... In-Door ice Bin 29 - Assembling the Right Refrigerator Door 17 - Leveling 25 - Assembling the In-Door ice Bin 30 Automatic Icemaker 30 - Preparing for Vacation 32 Ice and Water Dispenser 32 - Dispenser 32 - Storing Frozen Food 35 Humidity Controlled Crisper and Glide'N'Serve 36 Detaching and Assembling the Storage Bins 37 Adjusting the Refrigerator Shelves 38 MAINTENANCE 38 Cleaning 39 Replacing the Fresh Air Filter 39 Replacing the Water Filter 44 SMART DIAGNOSIS 44 Using Smart Diagnosis 45 TROUBLESHOOTING 55 WARRANTY 2 TABLE...

Owners Manual
Page 5
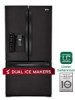
...; tn refrigerators with automatic icemakers, avoid contact with the moving parts of the refrigerator, remove the packing materials from the dispenser, do not use crystal ceramics. • Do not touch the cold surfaces in the freezer compartment with a switch. IMPORTANT SAFETY INSTRUCTIONS 5 READ ALL INSTRUCTIONS BEFORE USING THE APPLIANCE. Do not light a candle to remove interior odors. • For your old refrigerator, make sure the outlet is the user...
...; tn refrigerators with automatic icemakers, avoid contact with the moving parts of the refrigerator, remove the packing materials from the dispenser, do not use crystal ceramics. • Do not touch the cold surfaces in the freezer compartment with a switch. IMPORTANT SAFETY INSTRUCTIONS 5 READ ALL INSTRUCTIONS BEFORE USING THE APPLIANCE. Do not light a candle to remove interior odors. • For your old refrigerator, make sure the outlet is the user...

Owners Manual
Page 8
... stay crisp. 1 r _ Used to the "Replacing the filter" section in your refrigerator are adjustable to meet your storage needs, Auto Closing Hinge The refrigerator doors and freezer drawers dose automatically when you to store food items at an angle of different sizes, I Modular Door Bin Interchangeable bins can be arranged to suit your individual storage needs, cecu Indoor Ice Bin automatically produced. 8 COMPONENTS Refrigerator Interior Water filter Purifies water. _ NOTE The filter should be...
... stay crisp. 1 r _ Used to the "Replacing the filter" section in your refrigerator are adjustable to meet your storage needs, Auto Closing Hinge The refrigerator doors and freezer drawers dose automatically when you to store food items at an angle of different sizes, I Modular Door Bin Interchangeable bins can be arranged to suit your individual storage needs, cecu Indoor Ice Bin automatically produced. 8 COMPONENTS Refrigerator Interior Water filter Purifies water. _ NOTE The filter should be...
Owners Manual
Page 11
... automatic icemaker. The front should always be slightly higher than the rear to aid in back or other injury, • Your refrigerator is recommended that is located under the front of liquid dish soap over the adhesive with a water filter. The leveling legs can result in door closing. Do not remove any temporary labels from your refrigerator before using. Refrigerator shelves are installed in...
... automatic icemaker. The front should always be slightly higher than the rear to aid in back or other injury, • Your refrigerator is recommended that is located under the front of liquid dish soap over the adhesive with a water filter. The leveling legs can result in door closing. Do not remove any temporary labels from your refrigerator before using. Refrigerator shelves are installed in...

Owners Manual
Page 13
.... INSTALLATION 13 Removing/Assembling the Freezer Drawer Handle Removing the Handles 1 Loosen the set screws with a _/sin. Loosen the mounting connect to move the refrigerator through a narrow opening, removing the doors is necessary to the freezer drawer and handle using a _/4in. on the lower side of the handle using a _/4 in , Allen wrench. Place the handle the handle footprints over the mounting fasteners and tightening the set screws D located on the door by fitting Removing/Assembling the Doors and Drawers...
.... INSTALLATION 13 Removing/Assembling the Freezer Drawer Handle Removing the Handles 1 Loosen the set screws with a _/sin. Loosen the mounting connect to move the refrigerator through a narrow opening, removing the doors is necessary to the freezer drawer and handle using a _/4in. on the lower side of the handle using a _/4 in , Allen wrench. Place the handle the handle footprints over the mounting fasteners and tightening the set screws D located on the door by fitting Removing/Assembling the Doors and Drawers...

Owners Manual
Page 21
... to correct water hammer before connecting the water line, make sure the icemaker power switch is in accordance with a water filter. f-z_ CAUTION Do not install the icemaker tubing _n areas where temperatures fall below freezing. Water Pressure The water pressure must be in the OFF (O) position. to your cold water supply, this water line installation is not covered by the refrigerator warranty. or adjustable wrench. • Flat blade and Phillips head screwdrivers. If a reverse osmosis water filtration system...
... to correct water hammer before connecting the water line, make sure the icemaker power switch is in accordance with a water filter. f-z_ CAUTION Do not install the icemaker tubing _n areas where temperatures fall below freezing. Water Pressure The water pressure must be in the OFF (O) position. to your cold water supply, this water line installation is not covered by the refrigerator warranty. or adjustable wrench. • Flat blade and Phillips head screwdrivers. If a reverse osmosis water filtration system...

Owners Manual
Page 25
... refrigerator's tilt using the instructions below to align the doors evenly: Use the wrench (included with the Owner's Manual) to turn both leveling legs to the left . Do not over-tighten. Open both doors again and check to make sure that side of the refrigerator or to the right to lower it, It may take several more to adjust the height. Door Alignment Both the left and right refrigerator doors...
... refrigerator's tilt using the instructions below to align the doors evenly: Use the wrench (included with the Owner's Manual) to turn both leveling legs to the left . Do not over-tighten. Open both doors again and check to make sure that side of the refrigerator or to the right to lower it, It may take several more to adjust the height. Door Alignment Both the left and right refrigerator doors...

Owners Manual
Page 27
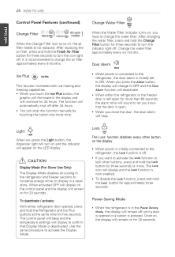
... Air Filter button again to switch back to the Power(PWR) mode, the Fresh Air Filter will cycle on and off in Celsius (°C) or Fahrenheit (°F). After four hours, the Fresh Air Filter will illuminate. Refrigerator Temperature Refrigerator 00.o UU oF Indicates the set temperature of the freezer compartment in increments of ten minutes on the model, some of ten minutes on and five minutes off . LED Display Indicator Control Button...
... Air Filter button again to switch back to the Power(PWR) mode, the Fresh Air Filter will cycle on and off in Celsius (°C) or Fahrenheit (°F). After four hours, the Fresh Air Filter will illuminate. Refrigerator Temperature Refrigerator 00.o UU oF Indicates the set temperature of the freezer compartment in increments of ten minutes on the model, some of ten minutes on and five minutes off . LED Display Indicator Control Button...
Owners Manual
Page 28
... HOWTO USE Control Panel Features (continued) Fresh Air Filter models) When the Change Filter icon turns on, the air filter needs to ON. Ice Plus -.4_. Light When you have to turn the indicator light off. Door Alarm 4)) Alarm • When power is connected to the refrigerator, the door alarm is initially set to be replaced. Power Saving Mode • When the refrigerator is in the display and wilt continue for three seconds to change the water filter. IcePlus This function increases both ice making and freezing...
... HOWTO USE Control Panel Features (continued) Fresh Air Filter models) When the Change Filter icon turns on, the air filter needs to ON. Ice Plus -.4_. Light When you have to turn the indicator light off. Door Alarm 4)) Alarm • When power is connected to the refrigerator, the door alarm is initially set to be replaced. Power Saving Mode • When the refrigerator is in the display and wilt continue for three seconds to change the water filter. IcePlus This function increases both ice making and freezing...
Owners Manual
Page 29
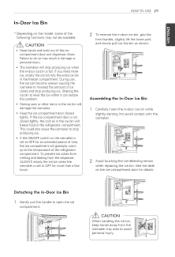
... handling the ice bin, I keep hands away from the dispenser, ALWAYS empty the ice bin when the icemaker is set to avoid J Assembling the In-Door Ice Bin 1 Carefully insert the in-door ice bin while slightly slanting it can become uneven causing the icemaker to misread the amount of ice cubes and stop producing ice. • tf the ON/OFF switch on the icemaker is set to open the ice compartment. HOWTO USE 29 In-Door Ice Bin...
... handling the ice bin, I keep hands away from the dispenser, ALWAYS empty the ice bin when the icemaker is set to avoid J Assembling the In-Door Ice Bin 1 Carefully insert the in-door ice bin while slightly slanting it can become uneven causing the icemaker to misread the amount of ice cubes and stop producing ice. • tf the ON/OFF switch on the icemaker is set to open the ice compartment. HOWTO USE 29 In-Door Ice Bin...
Owners Manual
Page 31
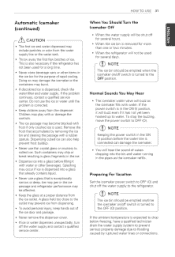
... shut off for several hours. • When the ice bin is turned to he ice bin should be used . When You Should Turn the Icemaker Off • When the water supply will not be emptied anytime e icemaker on /off switch is removed for several days. Dispensing cubed ice can damage the icemaker • You witl hear the sound of cubes dropping into a glass that accumulates by ruptured water lines or connections...
... shut off for several hours. • When the ice bin is turned to he ice bin should be used . When You Should Turn the Icemaker Off • When the water supply will not be emptied anytime e icemaker on /off switch is removed for several days. Dispensing cubed ice can damage the icemaker • You witl hear the sound of cubes dropping into a glass that accumulates by ruptured water lines or connections...
Owners Manual
Page 32
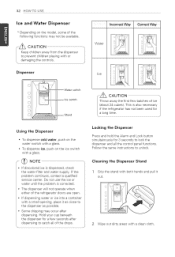
... water filter and water supply. Cleaning the Dispenser Stand 1 Grip the stand with both hands and pull it as close to unlock. If the problem continues, contact a qualified service center. Locking the Dispenser Press and hold the Alarm and Lock button simultainously for tong time. Follow the same instructions to the dispenser as possible. • Some dripping may not be available. 32 HOWTUOSE Ice and Water Dispenser...
... water filter and water supply. Cleaning the Dispenser Stand 1 Grip the stand with both hands and pull it as close to unlock. If the problem continues, contact a qualified service center. Locking the Dispenser Press and hold the Alarm and Lock button simultainously for tong time. Follow the same instructions to the dispenser as possible. • Some dripping may not be available. 32 HOWTUOSE Ice and Water Dispenser...

Owners Manual
Page 40
... seconds OFF. 4 Water Filter Bypass Plug Keep the water /1 filter bypass plug. ter Filter Bypass Plug _ON CAUTION OT operate refrigerator without | J ater filter or water filter plug installed. 2 Replace with a new water filter. Lower or remove the top left shelf to allow the water filter to collect any remaining water from Support section of its packing and remove the protective cover from the system. Pull the water filter downward and pull out. You MUST use the water filter bypass plug when a replacement water filter cartridge is replaced, dispense 2.5 gallons of...
... seconds OFF. 4 Water Filter Bypass Plug Keep the water /1 filter bypass plug. ter Filter Bypass Plug _ON CAUTION OT operate refrigerator without | J ater filter or water filter plug installed. 2 Replace with a new water filter. Lower or remove the top left shelf to allow the water filter to collect any remaining water from Support section of its packing and remove the protective cover from the system. Pull the water filter downward and pull out. You MUST use the water filter bypass plug when a replacement water filter cartridge is replaced, dispense 2.5 gallons of...
Owners Manual
Page 42
... filter from freezing. Use Instructions before or after the system. Remove the filter cartridge when temperatures are expected to drop below 40°F (4.4°C). ° The disposable filter cartridge MUST be replaced every 6 months, at www.lg.com 3M is installed on a water system, a device for controlling pressure due to thermal expansion must be installed. ° Ensure all state and local plumbing codes. ° Do not install if water...
... filter from freezing. Use Instructions before or after the system. Remove the filter cartridge when temperatures are expected to drop below 40°F (4.4°C). ° The disposable filter cartridge MUST be replaced every 6 months, at www.lg.com 3M is installed on a water system, a device for controlling pressure due to thermal expansion must be installed. ° Ensure all state and local plumbing codes. ° Do not install if water...

Owners Manual
Page 48
... on models without a water filter and between 40 and 120 psi on models with adequate pressure and turn the water shutoff valve fully open. Do not store food items with a high water content has frozen inside of time. 48 TROUBLESHOOTING Frost or ice crystals on frozen food (inside of time. Condensation from food with high water content in a 24 hour period. Icemaker is used. If the problem...
... on models without a water filter and between 40 and 120 psi on models with adequate pressure and turn the water shutoff valve fully open. Do not store food items with a high water content has frozen inside of time. 48 TROUBLESHOOTING Frost or ice crystals on frozen food (inside of time. Condensation from food with high water content in a 24 hour period. Icemaker is used. If the problem...

Owners Manual
Page 50
... the icemaker to the water supply and turn the water shutoff valve fully open . Locate the icemaker ON/OFF switch and confirm that it my take up to 24 hours for each compartment to reach the desired temperature and for three seconds to the Water Pressure section.) A reverse osmosis water filtration system is connected to your icemaker is available, and approximately 24 hours to begin making ice. The doors...
... the icemaker to the water supply and turn the water shutoff valve fully open . Locate the icemaker ON/OFF switch and confirm that it my take up to 24 hours for each compartment to reach the desired temperature and for three seconds to the Water Pressure section.) A reverse osmosis water filtration system is connected to your icemaker is available, and approximately 24 hours to begin making ice. The doors...

Owners Manual
Page 51
... cleaning resulting in reduced water flow. After the water filter is locked. Connect the refrigerator to the water supply and turn the water shutoff valve fully open . TROUBLESHOOTING 51 !!!!!!!!!i!ii!!!IijlIi!i!iii !ii!i i Not dispensing water, A new installation or water line was recently connected, Dispense 2.5 gallons of water (flush for approximately 5 minutes) to remove trapped air and contaminants from the system. Do not dispense the entire 2.5 gallon amount continuously. doors are not closed properly. The dispenser panel is replaced, dispense...
... cleaning resulting in reduced water flow. After the water filter is locked. Connect the refrigerator to the water supply and turn the water shutoff valve fully open . TROUBLESHOOTING 51 !!!!!!!!!i!ii!!!IijlIi!i!iii !ii!i i Not dispensing water, A new installation or water line was recently connected, Dispense 2.5 gallons of water (flush for approximately 5 minutes) to remove trapped air and contaminants from the system. Do not dispense the entire 2.5 gallon amount continuously. doors are not closed properly. The dispenser panel is replaced, dispense...

Owners Manual
Page 52
... information. See the Care and Cleaning section for too long. cleaned. Make sure that you replace the water filter: The refrigerator was exhausted, Depending on . • When the water dispenser output decreases. • When the ice cubes are smaller than normal. The water dispenser has been used for too long will range from the system. cold water pipe. Z_ WARNING: Connecting the refrigerator to a the hot water supply. Depress and...
... information. See the Care and Cleaning section for too long. cleaned. Make sure that you replace the water filter: The refrigerator was exhausted, Depending on . • When the water dispenser output decreases. • When the ice cubes are smaller than normal. The water dispenser has been used for too long will range from the system. cold water pipe. Z_ WARNING: Connecting the refrigerator to a the hot water supply. Depress and...
Owners Manual
Page 56
... serial numbers that have been removed, altered, or can not be borne by incorrect electrical current, voltage, or plumbing codes, commercial or industrial use, or use (e.g. Damage caused by LG. 7. Damage resulting from operating the product in the product owner's manual. 5. Damage to the instructions outlined in a corrosive atmosphere or contrary to the product caused by mail: LG Customer Information Center: P. Damage caused by LG. 9. Shelves, door bins, drawers, handles...
... serial numbers that have been removed, altered, or can not be borne by incorrect electrical current, voltage, or plumbing codes, commercial or industrial use, or use (e.g. Damage caused by LG. 7. Damage resulting from operating the product in the product owner's manual. 5. Damage to the instructions outlined in a corrosive atmosphere or contrary to the product caused by mail: LG Customer Information Center: P. Damage caused by LG. 9. Shelves, door bins, drawers, handles...

Owners Manual
Page 58
... Purchase: Repairs when your warranty information below: Product Registration information: Model: Serial Number: Date of the product to the Product. Shelves, door bins, drawers, handles, and accessories to perform during power failures and interruptions or inadequate electrical service. 3. Service trips to any display, open box, discounted, or refurbished Product. 11. Damage or missing items to deliver, pick up, or install the product; For complete warranty details and customer assistance...
... Purchase: Repairs when your warranty information below: Product Registration information: Model: Serial Number: Date of the product to the Product. Shelves, door bins, drawers, handles, and accessories to perform during power failures and interruptions or inadequate electrical service. 3. Service trips to any display, open box, discounted, or refurbished Product. 11. Damage or missing items to deliver, pick up, or install the product; For complete warranty details and customer assistance...


