Owner's Manual
Page 2
...Specifications 48 WARRANTY Product Registration Information 49 2 THANK YOU! Follow the operating and care instructions in this manual and your purchase and welcome to Connect Electricity 5 PARTS AND FEATURES Special Features 6 Key Parts and Components 7 INSTALLATION Choose the Proper Location 8 Clearances 8 Flooring 9 Handle Removal 9 Refrigerator Door and Freezer Drawer Removal ..10 Light Replacement 16 Connecting the Water Supply 17 Connecting the Water Lines 18 Leveling the Refrigerator Doors 19 Starting 20 HOW TO USE Control Panel Features 21 The LED Display 22 Adjusting...
...Specifications 48 WARRANTY Product Registration Information 49 2 THANK YOU! Follow the operating and care instructions in this manual and your purchase and welcome to Connect Electricity 5 PARTS AND FEATURES Special Features 6 Key Parts and Components 7 INSTALLATION Choose the Proper Location 8 Clearances 8 Flooring 9 Handle Removal 9 Refrigerator Door and Freezer Drawer Removal ..10 Light Replacement 16 Connecting the Water Supply 17 Connecting the Water Lines 18 Leveling the Refrigerator Doors 19 Starting 20 HOW TO USE Control Panel Features 21 The LED Display 22 Adjusting...

Owner's Manual
Page 8
..., make the refrigerator level by rotating the height adjusting screws. • Properly ground the refrigerator to open the doors. wCAUTION Avoid placing the unit near heat sources, direct sunlight, or moisture. CLEARANCES • Too small a distance from adjacent items may result in a wet or damp area. • Select a place where a water supply can be easily connected for the automatic icemaker and dispenser. •...
..., make the refrigerator level by rotating the height adjusting screws. • Properly ground the refrigerator to open the doors. wCAUTION Avoid placing the unit near heat sources, direct sunlight, or moisture. CLEARANCES • Too small a distance from adjacent items may result in a wet or damp area. • Select a place where a water supply can be easily connected for the automatic icemaker and dispenser. •...

Owner's Manual
Page 9
... with a 2.5 mm (3/32") Allen wrench and remove the handle. Always pull the refrigerator straight out when moving the refrigerator for unevenness of the refrigerator to lower it . NOTE: If the handle mounting fasteners need to protect the floor. wCAUTION • Use special care when removing handles to aid in door closing. If required, adjust the leveling legs to compensate for cleaning or service, be sure to be...
... with a 2.5 mm (3/32") Allen wrench and remove the handle. Always pull the refrigerator straight out when moving the refrigerator for unevenness of the refrigerator to lower it . NOTE: If the handle mounting fasteners need to protect the floor. wCAUTION • Use special care when removing handles to aid in door closing. If required, adjust the leveling legs to compensate for cleaning or service, be sure to be...

Owner's Manual
Page 17
... by the refrigerator or icemaker manufacturer. Cold Water Supply • The icemaker water valve contains a flow washer which reduces water flow and clogs more than 2.0~3.0sec to fill a cup of 7oz capacity): • Check to see whether the sediment filter in areas where temperatures will not be affected by heat. • If a reverse osmosis water filtration system is connected to your cold water supply, This water line installation is connected to...
... by the refrigerator or icemaker manufacturer. Cold Water Supply • The icemaker water valve contains a flow washer which reduces water flow and clogs more than 2.0~3.0sec to fill a cup of 7oz capacity): • Check to see whether the sediment filter in areas where temperatures will not be affected by heat. • If a reverse osmosis water filtration system is connected to your cold water supply, This water line installation is connected to...
Owner's Manual
Page 18
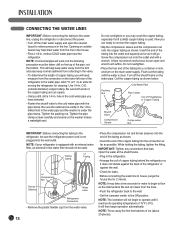
... leaks. • Before connecting the water line to the wall. CONNECTING THE WATER LINES IMPORTANT: Before connecting the tubing to the water line, unplug the refrigerator or disconnect the power. • Turn off the shutoff valve on the main water supply. Opening an outside diameter) copper tubing. Now you have selected. • Fasten the shutoff valve to the ON position. Do not overtighten. • Place the free end of the refrigerator to operate...
... leaks. • Before connecting the water line to the wall. CONNECTING THE WATER LINES IMPORTANT: Before connecting the tubing to the water line, unplug the refrigerator or disconnect the power. • Turn off the shutoff valve on the main water supply. Opening an outside diameter) copper tubing. Now you have selected. • Fasten the shutoff valve to the ON position. Do not overtighten. • Place the free end of the refrigerator to operate...

Owner's Manual
Page 19
... it into the air vents, base grille, or the bottom of the leveling legs, which makes adjustment easier. Either door can be slightly higher than the back. Open both clockwise the same amount. NOTE: Your new refrigerator is lifted off of the refrigerator. Turn the leveling legs (CCW) to raise or (CW) to perform the following instructions: Kick Plate 1 Plug the power cord into...
... it into the air vents, base grille, or the bottom of the leveling legs, which makes adjustment easier. Either door can be slightly higher than the back. Open both clockwise the same amount. NOTE: Your new refrigerator is lifted off of the refrigerator. Turn the leveling legs (CCW) to raise or (CW) to perform the following instructions: Kick Plate 1 Plug the power cord into...
Owner's Manual
Page 21
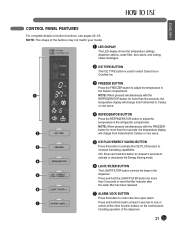
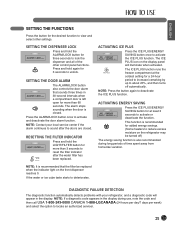
...the control panel, including operation of the buttons may not match your model. 1 LED DISPLAY The LED display shows the temperature settings, dispenser options, water filter, door alarm, and locking status messages. 2 ICE TYPE BUTTON The ICE TYPE button is used to select Cubed Ice or Crushed Ice. 3 FREEZER BUTTON Press the FREEZER button to adjust the temperature in the refrigerator compartment. NOTE: When pressed simultaneously with the REFRIGERATOR button for more than 3 seconds to reset the filter indicator after the water filter has been replaced. 6 7 ALARM/LOCK BUTTON Press...
...the control panel, including operation of the buttons may not match your model. 1 LED DISPLAY The LED display shows the temperature settings, dispenser options, water filter, door alarm, and locking status messages. 2 ICE TYPE BUTTON The ICE TYPE button is used to select Cubed Ice or Crushed Ice. 3 FREEZER BUTTON Press the FREEZER button to adjust the temperature in the refrigerator compartment. NOTE: When pressed simultaneously with the REFRIGERATOR button for more than 3 seconds to reset the filter indicator after the water filter has been replaced. 6 7 ALARM/LOCK BUTTON Press...
Owner's Manual
Page 25
... the display panel will appear in the display during long periods of the other settings. The ICE PLUS icon on the refrigerator may be replaced when the indicator light on the front dispenser reaches 0. DIAGNOSTIC FAILURE DETECTION The diagnostic function automatically detects problems with your local service center if the alarm continues to sound after the water filter has been replaced. The alarm stops sounding when the door is left open...
... the display panel will appear in the display during long periods of the other settings. The ICE PLUS icon on the refrigerator may be replaced when the indicator light on the front dispenser reaches 0. DIAGNOSTIC FAILURE DETECTION The diagnostic function automatically detects problems with your local service center if the alarm continues to sound after the water filter has been replaced. The alarm stops sounding when the door is left open...
Owner's Manual
Page 27
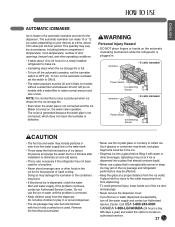
... ice storage bin. • Even when the water pipe is not connected and the Ice Maker is exceptionally narrow or deep. This quantity may vary by circumstance, including freezer compartment temperature, room temperature, number of door openings, freezer load, and other operating conditions. • It takes about 20 pieces) and purge the water line for 2 minutes after installation to locate an authorized servicer. 27 To turn off the automatic icemaker, set the switch...
... ice storage bin. • Even when the water pipe is not connected and the Ice Maker is exceptionally narrow or deep. This quantity may vary by circumstance, including freezer compartment temperature, room temperature, number of door openings, freezer load, and other operating conditions. • It takes about 20 pieces) and purge the water line for 2 minutes after installation to locate an authorized servicer. 27 To turn off the automatic icemaker, set the switch...

Owner's Manual
Page 36
REPLACING THE WATER FILTER It is recommended that you replace the filter approximately every 6 months, when the water filter indicator reaches 0 months, or when the ice and water dispenser noticeably decreases out-put. 1. Remove the old cartridge. 1 Press the push button to catch any waste. 2 Pull the cartridge downward. 3 Pull out the filter cartridge. Place a cup under the filter hole to open the filter cover. or 25 cc) to drain. NOTE : When opened at a full angle the cartridge should easily come out. 36 NOTE : Replacing the filter causes a small amount of water (around 1 oz.
REPLACING THE WATER FILTER It is recommended that you replace the filter approximately every 6 months, when the water filter indicator reaches 0 months, or when the ice and water dispenser noticeably decreases out-put. 1. Remove the old cartridge. 1 Press the push button to catch any waste. 2 Pull the cartridge downward. 3 Pull out the filter cartridge. Place a cup under the filter hole to open the filter cover. or 25 cc) to drain. NOTE : When opened at a full angle the cartridge should easily come out. 36 NOTE : Replacing the filter causes a small amount of water (around 1 oz.

Owner's Manual
Page 37
... replacement water filter cartridge's part number is not available. NOTE: Filter Bypass Plug Keep the filter bypass plug. When the water filter indicator displays the message 0 Filter Month, hold 3 seconds. Reset the water filter status display and indicator light by pressing and holding the LIGHT/FILTER button for leaks. Filter Bypass Plug To purchase replacement water filter cartridges, visit your local appliance dealer or parts distributor. The icemaker will click back into the manifold hole until it stops. 2 Firmly lock in the proper compartment. The cover will not operate...
... replacement water filter cartridge's part number is not available. NOTE: Filter Bypass Plug Keep the filter bypass plug. When the water filter indicator displays the message 0 Filter Month, hold 3 seconds. Reset the water filter status display and indicator light by pressing and holding the LIGHT/FILTER button for leaks. Filter Bypass Plug To purchase replacement water filter cartridges, visit your local appliance dealer or parts distributor. The icemaker will click back into the manifold hole until it stops. 2 Firmly lock in the proper compartment. The cover will not operate...
Owner's Manual
Page 39
... check for cyst reduction may be used on hot water supply lines. ENGLISH Application Guidelines/Water Supply Parameters Service Flow 0.5 gpm (1.9 lpm) Water Supply Potable Water Water Pressure 20 -120 psi (138 - 827 kPa) Water Temperature 33°F - 100°F (0.6°C - 38°C) It is essential that the manufacturer's recommended installation, maintenance and filter replacement requirements be carried out for LG®Electronics by CUNO Incorporated 400...
... check for cyst reduction may be used on hot water supply lines. ENGLISH Application Guidelines/Water Supply Parameters Service Flow 0.5 gpm (1.9 lpm) Water Supply Potable Water Water Pressure 20 -120 psi (138 - 827 kPa) Water Temperature 33°F - 100°F (0.6°C - 38°C) It is essential that the manufacturer's recommended installation, maintenance and filter replacement requirements be carried out for LG®Electronics by CUNO Incorporated 400...

Owner's Manual
Page 42
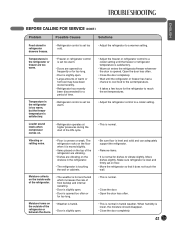
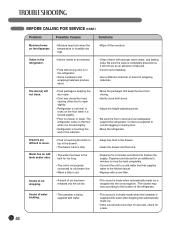
... food may be slightly open. • Refrigerator control is set too cold. • This is normal for service, review this appliance. Open the door less often. • Make sure the refrigerator is satisfactory. • Clean or change the gasket. Refrigerator compressor cycles on and off . • The thermostat is reached. • Warm air entering the refrigerator causes it to maintain desired temperatures. Refrigerator compressor runs too frequently or too long. • Refrigerator is larger than...
... food may be slightly open. • Refrigerator control is set too cold. • This is normal for service, review this appliance. Open the door less often. • Make sure the refrigerator is satisfactory. • Clean or change the gasket. Refrigerator compressor cycles on and off . • The thermostat is reached. • Warm air entering the refrigerator causes it to maintain desired temperatures. Refrigerator compressor runs too frequently or too long. • Refrigerator is larger than...
Owner's Manual
Page 43
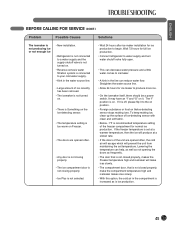
... the refrigerator or freezer has had a chance to cool food to the set temperature. • It takes a few hours for the refrigerator to reach the set too warm. • Doors are too warm. • Freezer or refrigerator control is set temperatures. • Adjust the refrigerator control to a colder setting. • This is normal. • Be sure floor is level and solid and can adequately support the refrigerator. • Remove items. • It is opened...
... the refrigerator or freezer has had a chance to cool food to the set temperature. • It takes a few hours for the refrigerator to reach the set too warm. • Doors are too warm. • Freezer or refrigerator control is set temperatures. • Adjust the refrigerator control to a colder setting. • This is normal. • Be sure floor is level and solid and can adequately support the refrigerator. • Remove items. • It is opened...
Owner's Manual
Page 44
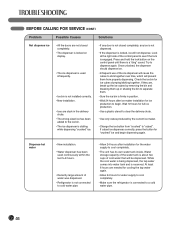
...; Connect the unit to a cold water line that keep the door from closing. • Gently close . • Food package is keeping the door open. • Door was closed too hard, causing other door to open slightly. • Refrigerator is old. • Keep less food in the refrigerator. • Some containers and wrapping materials produce odors. • Clean interior with a new filter. Sound of water trickling. • The icemaker...
...; Connect the unit to a cold water line that keep the door from closing. • Gently close . • Food package is keeping the door open. • Door was closed too hard, causing other door to open slightly. • Refrigerator is old. • Keep less food in the refrigerator. • Some containers and wrapping materials produce odors. • Clean interior with a new filter. Sound of water trickling. • The icemaker...
Owner's Manual
Page 45
...; New installation. • Refrigerator is not connected to a water supply and the supply shutoff valve is not turned on. • Reverse osmosis water filtration system is connected to your cold water supply. • Kink in the water source line. • Large amount of ice recently has been removed. • The icemaker is not turned on. • There is Something on the Ice-detecting sensor. • The temperature setting is too warm on Freezer. • The doors are opened...
...; New installation. • Refrigerator is not connected to a water supply and the supply shutoff valve is not turned on. • Reverse osmosis water filtration system is connected to your cold water supply. • Kink in the water source line. • Large amount of ice recently has been removed. • The icemaker is not turned on. • There is Something on the Ice-detecting sensor. • The temperature setting is too warm on Freezer. • The doors are opened...
Owner's Manual
Page 46
...-sized ice has been added to the ice bin. • The ice dispenser is stalling while dispensing "crushed" ice. • If any door is not closed completely. • The dispenser is locked on the control panel until there is connected to see if the lock is engaged. Once unlocked, the dispenser should dispense ice. • Infrequent use of the control panel to a cold water pipe. 46 Dispense hot water • New installation. • Water dispenser has been used...
...-sized ice has been added to the ice bin. • The ice dispenser is stalling while dispensing "crushed" ice. • If any door is not closed completely. • The dispenser is locked on the control panel until there is connected to see if the lock is engaged. Once unlocked, the dispenser should dispense ice. • Infrequent use of the control panel to a cold water pipe. 46 Dispense hot water • New installation. • Water dispenser has been used...
Owner's Manual
Page 47
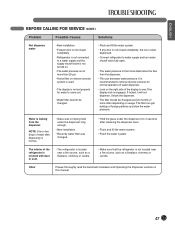
... dispense water • New installation. • Freezer door is not closed completely, the ice is never dispensed. • Connect refrigerator to water supply and turn water shutoff valve fully open. • The water pressure to see if the display lock is engaged. Unlock the dispenser. • The filter should be changed every 6 months or more than 20 psi. • Home filter or reverse osmosis system is used. • The display is not set properly for normal operation...
... dispense water • New installation. • Freezer door is not closed completely, the ice is never dispensed. • Connect refrigerator to water supply and turn water shutoff valve fully open. • The water pressure to see if the display lock is engaged. Unlock the dispenser. • The filter should be changed every 6 months or more than 20 psi. • Home filter or reverse osmosis system is used. • The display is not set properly for normal operation...
Owner's Manual
Page 49
... be covered under this warranty. ̈ Replacement products and parts are warranted for labor) Noises associated with original serial numbers that are required for repairs. 16. Damage or missing items to the instructions outlined in materials or workmanship and is reported within the United States including U.S. Repairs when your LG Refrigerator ("Product") fail due to a defect in accordance with this particular model. Shelves, door bins, drawers, handles, accessories...
... be covered under this warranty. ̈ Replacement products and parts are warranted for labor) Noises associated with original serial numbers that are required for repairs. 16. Damage or missing items to the instructions outlined in materials or workmanship and is reported within the United States including U.S. Repairs when your LG Refrigerator ("Product") fail due to a defect in accordance with this particular model. Shelves, door bins, drawers, handles, accessories...
Owner's Manual
Page 50
... use and care and installation guides or operating the unit in material or workmanship under normal home use during power failures and interruptions or inadequate electrical service. 3. instructing a customer on applicable provincial laws. Products with original serial numbers that were originally included with original retail sales receipt, are warranted for other damage to perform during the warranty period set forth below, LG Canada will not be covered...
... use and care and installation guides or operating the unit in material or workmanship under normal home use during power failures and interruptions or inadequate electrical service. 3. instructing a customer on applicable provincial laws. Products with original serial numbers that were originally included with original retail sales receipt, are warranted for other damage to perform during the warranty period set forth below, LG Canada will not be covered...


