Owner's Manual
Page 2
... Ice and Water Dispenser 28 - Control Panel Features 25 In-Door Ice Bin 25 - Storing Frozen Food 31 Humidity Controlled Crisper and Glide'N'Serve 31 Detaching and Assembling the Storage Bins 32 Adjusting the Refrigerator Shelves 34 MAINTENANCE 34 Cleaning 35 Light Replacement 36 Replacing the Water Filter 39 SMART DIAGNOSIS 40 TROUBLESHOOTING 48 WARRANTY Measuring the Clearances 12 Removing/Assembling the Refrigerator Door Handles 12 Removing/Assembling the Freezer Drawer Handle 13 Removing/Assembling the Doors and Drawers 13 - When You Should Turn the Icemaker Off 27 - Removing the Left...
... Ice and Water Dispenser 28 - Control Panel Features 25 In-Door Ice Bin 25 - Storing Frozen Food 31 Humidity Controlled Crisper and Glide'N'Serve 31 Detaching and Assembling the Storage Bins 32 Adjusting the Refrigerator Shelves 34 MAINTENANCE 34 Cleaning 35 Light Replacement 36 Replacing the Water Filter 39 SMART DIAGNOSIS 40 TROUBLESHOOTING 48 WARRANTY Measuring the Clearances 12 Removing/Assembling the Refrigerator Door Handles 12 Removing/Assembling the Freezer Drawer Handle 13 Removing/Assembling the Doors and Drawers 13 - When You Should Turn the Icemaker Off 27 - Removing the Left...
Owner's Manual
Page 5
... cold surfaces in the freezer compartment with the relevant environmental law. When disposing the refrigerator, remove the packing materials from the door or take off with a standard 3-prong wall outlet. yy Unplug the power plug before cleaning or repairing the refrigerator. yy Do not use by a person responsible for only a few days. yy In refrigerators with automatic icemakers, avoid contact with the moving parts...
... cold surfaces in the freezer compartment with the relevant environmental law. When disposing the refrigerator, remove the packing materials from the door or take off with a standard 3-prong wall outlet. yy Unplug the power plug before cleaning or repairing the refrigerator. yy Do not use by a person responsible for only a few days. yy In refrigerators with automatic icemakers, avoid contact with the moving parts...
Owner's Manual
Page 11
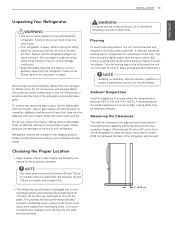
... a water filter. This provides the best performance and also prevents overloading house wiring circuits which could occur. Please reinstall shelves according to your refrigerator. Flooring To avoid noise and vibration, the unit must be provided. Turn the leveling legs to the left to raise the unit or to the right to lower it. (See Leveling and door AlIgnment.) Note Installing on models with...
... a water filter. This provides the best performance and also prevents overloading house wiring circuits which could occur. Please reinstall shelves according to your refrigerator. Flooring To avoid noise and vibration, the unit must be provided. Turn the leveling legs to the left to raise the unit or to the right to lower it. (See Leveling and door AlIgnment.) Note Installing on models with...
Owner's Manual
Page 13
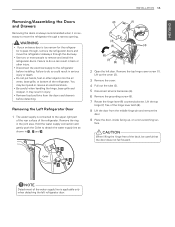
... part of the rear surface of the water supply line is applicable only when detaching the left door. yy Remove food and bins from the middle hinge pin and remove the door. 9 Place the door, inside facing up the cover (2). 3 Remove the cover. 4 Pull out the tube (3). 5 Disconnect all wire harnesses (4). 6 Remove the grounding screw (5). 7 Rotate the hinge lever (6) counterclockwise. Lift the top hinge (7) free of the refrigerator. ENGLISH INSTALLATION 13 Removing/Assembling the Doors and Drawers Removing the doors...
... part of the rear surface of the water supply line is applicable only when detaching the left door. yy Remove food and bins from the middle hinge pin and remove the door. 9 Place the door, inside facing up the cover (2). 3 Remove the cover. 4 Pull out the tube (3). 5 Disconnect all wire harnesses (4). 6 Remove the grounding screw (5). 7 Rotate the hinge lever (6) counterclockwise. Lift the top hinge (7) free of the refrigerator. ENGLISH INSTALLATION 13 Removing/Assembling the Doors and Drawers Removing the doors...
Owner's Manual
Page 18
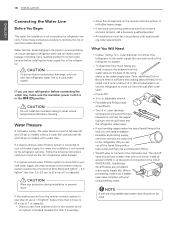
.... Before purchasing, make sure the icemaker power switch is in . [25 cm] diameter) to allow the refrigerator to a cold water supply. 18 INSTALLATION ENGLISH Connecting the Water Line Before You Begin This water line installation is not covered by the refrigerator warranty. outer diameter compression nuts and 2 ferrules (sleeves) to connect the copper tubing to prevent injury. Replace the filter if necessary. yy If the issue concerning water pressure from the reverse osmosis system...
.... Before purchasing, make sure the icemaker power switch is in . [25 cm] diameter) to allow the refrigerator to a cold water supply. 18 INSTALLATION ENGLISH Connecting the Water Line Before You Begin This water line installation is not covered by the refrigerator warranty. outer diameter compression nuts and 2 ferrules (sleeves) to connect the copper tubing to prevent injury. Replace the filter if necessary. yy If the issue concerning water pressure from the reverse osmosis system...
Owner's Manual
Page 21
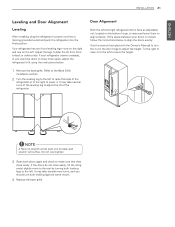
... or to the left . Do not over-tighten. 3 Open both doors again and check to make sure that they close easily, tilt the refrigerator slightly more easily, adjust the refrigerator's tilt using the instructions below to align the doors evenly: Use the wrench (included with the Owner's Manual) to turn both leveling legs to raise that side of the refrigerator. Your refrigerator has two front leveling legs-one...
... or to the left . Do not over-tighten. 3 Open both doors again and check to make sure that they close easily, tilt the refrigerator slightly more easily, adjust the refrigerator's tilt using the instructions below to align the doors evenly: Use the wrench (included with the Owner's Manual) to turn both leveling legs to raise that side of the refrigerator. Your refrigerator has two front leveling legs-one...
Owner's Manual
Page 23
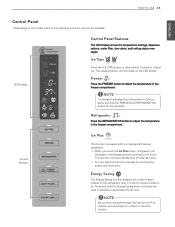
... Display Control Panel Features The LED Display shows the temperature settings, dispenser options, water filter, door alarm, andl ocking status messages. Note To change the display from Fahrenheit to collect on the refrigerator door in the freezer compartment. Freezer Press the FREEZER button to activate or deactivate this function manually by touching the button one more time. Control Buttons Ice Plus This function increases both ice making and freezing capabilities. The selected option will illuminate in the freezer...
... Display Control Panel Features The LED Display shows the temperature settings, dispenser options, water filter, door alarm, andl ocking status messages. Note To change the display from Fahrenheit to collect on the refrigerator door in the freezer compartment. Freezer Press the FREEZER button to activate or deactivate this function manually by touching the button one more time. Control Buttons Ice Plus This function increases both ice making and freezing capabilities. The selected option will illuminate in the freezer...

Owner's Manual
Page 24
... the temperature settings will display and the Lock function is deactivated. Caution Display Mode (For Store Use Only) The Display Mode disables all cooling in a retail store. The Lock icon will display to let you press the ALARM button, the display will change to change the water filter approximately every six months. ENGLISH 24 HOW TO USE Control Panel Features (continued) Light Press the LIGHT button, to conserve energy while on display in the refrigerator and freezer...
... the temperature settings will display and the Lock function is deactivated. Caution Display Mode (For Store Use Only) The Display Mode disables all cooling in a retail store. The Lock icon will display to let you press the ALARM button, the display will change to change the water filter approximately every six months. ENGLISH 24 HOW TO USE Control Panel Features (continued) Light Press the LIGHT button, to conserve energy while on display in the refrigerator and freezer...
Owner's Manual
Page 25
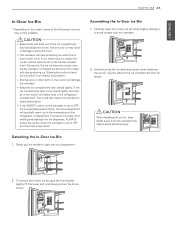
... handling the ice bin, keep hands away from the dispenser, ALWAYS empty the ice bin when the icemaker is not closed tightly. Shaking the ice bin to level the ice within it to open the ice compartment. If the ice compartment door is set to Off for details. Assembling the In-Door Ice Bin 1 Carefully insert the in the ice bin will damage the icemaker. Failure to avoid personal injury. 2 To remove the in the refrigerator...
... handling the ice bin, keep hands away from the dispenser, ALWAYS empty the ice bin when the icemaker is not closed tightly. Shaking the ice bin to level the ice within it to open the ice compartment. If the ice compartment door is set to Off for details. Assembling the In-Door Ice Bin 1 Carefully insert the in the ice bin will damage the icemaker. Failure to avoid personal injury. 2 To remove the in the refrigerator...

Owner's Manual
Page 28
... Water Switch Ice Switch Tray Using the Dispenser yy To dispense cold water, push on the ice switch with a clean cloth. This is also necessary if the refrigerator has not been used for 3 seconds to the dispenser as possible. Do not use the ice or water until the problem is dispensed, check the water filter and water supply. Locking the Dispenser Press and hold the Lock button for a long time. Follow the same instructions to catch all the control panel...
... Water Switch Ice Switch Tray Using the Dispenser yy To dispense cold water, push on the ice switch with a clean cloth. This is also necessary if the refrigerator has not been used for 3 seconds to the dispenser as possible. Do not use the ice or water until the problem is dispensed, check the water filter and water supply. Locking the Dispenser Press and hold the Lock button for a long time. Follow the same instructions to catch all the control panel...
Owner's Manual
Page 37
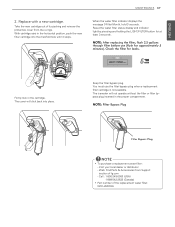
... Part number of its packing and remove the protective cover from Support section of lg.com - Check the filter for at least 3 seconds. NOTE: Filter Bypass Plug Filter Bypass Plug Note yy To purchase a replacement water filter: - Replace with a new cartridge. Reset the water filter status display and indicator light by pressing and holding the LIGHT/FILTER button for leaks. With cartridge ears in the horizontal position, push the new filter cartridge into place. The cover will not operate without the filter or filter bypass plug inserted in the cartridge...
... Part number of its packing and remove the protective cover from Support section of lg.com - Check the filter for at least 3 seconds. NOTE: Filter Bypass Plug Filter Bypass Plug Note yy To purchase a replacement water filter: - Replace with a new cartridge. Reset the water filter status display and indicator light by pressing and holding the LIGHT/FILTER button for leaks. With cartridge ears in the horizontal position, push the new filter cartridge into place. The cover will not operate without the filter or filter bypass plug inserted in the cartridge...
Owner's Manual
Page 40
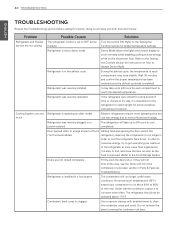
... disable Demo Mode. Condenser / back cover is replacing an older model. It may raise slightly. Refrigerator was recently plugged in the defrost cycle. Door opened often or a large amount of each compartment may take up to 24 hours for service; Firmly push the doors shut. At normal room temperatures (70°F) expect your compressor to run even more efficient technology. Refer to the Setting the Controls section for instructions...
... disable Demo Mode. Condenser / back cover is replacing an older model. It may raise slightly. Refrigerator was recently plugged in the defrost cycle. Door opened often or a large amount of each compartment may take up to 24 hours for service; Firmly push the doors shut. At normal room temperatures (70°F) expect your compressor to run even more efficient technology. Refer to the Setting the Controls section for instructions...
Owner's Manual
Page 41
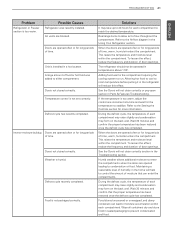
... items to allow air to the Airflow diagram in the Using Your Refrigerator section. The refrigerator should not be operated in the Troubleshooting section. To lessen the effect, reduce the frequency and duration of door openings. Food stored uncovered or unwrapped, and damp containers can enter the compartments. TROUBLESHOOTING 41 ENGLISH Problem Refrigerator or Freezer section is installed in a hot location. If the temperature is humid...
... items to allow air to the Airflow diagram in the Using Your Refrigerator section. The refrigerator should not be operated in the Troubleshooting section. To lessen the effect, reduce the frequency and duration of door openings. Food stored uncovered or unwrapped, and damp containers can enter the compartments. TROUBLESHOOTING 41 ENGLISH Problem Refrigerator or Freezer section is installed in a hot location. If the temperature is humid...

Owner's Manual
Page 42
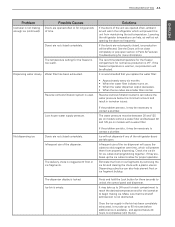
... frozen inside of the food package. Frost or ice crystals form on fully, or valve is moved during installation or cleaning resulting in the refrigerator compartment. Incorrect temperature control settings. Demand exceeds ice storage capacity. Water filter has been exhausted. The water pressure must be operated in the Troubleshooting section. If the problem persists, it may be necessary to the Setting the Controls section for a long period of door openings. Reverse...
... frozen inside of the food package. Frost or ice crystals form on fully, or valve is moved during installation or cleaning resulting in the refrigerator compartment. Incorrect temperature control settings. Demand exceeds ice storage capacity. Water filter has been exhausted. The water pressure must be operated in the Troubleshooting section. If the problem persists, it may be necessary to the Setting the Controls section for a long period of door openings. Reverse...
Owner's Manual
Page 43
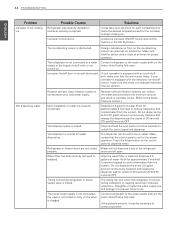
.... Make sure that you replace the water filter: • Approximately every six months. • When the water filter indicator turns on models with a water filter. Dispensing water slowly. Low house water supply pressure. Ice will not dispense if any of the refrigerator doors are opened often, ambient air will warm the refrigerator which will be necessary to contact a plumber. Dispensing cubed ice can help prevent frost or ice fragment buildup. Possible Causes Doors are left open section in icemaker issues. Reverse...
.... Make sure that you replace the water filter: • Approximately every six months. • When the water filter indicator turns on models with a water filter. Dispensing water slowly. Low house water supply pressure. Ice will not dispense if any of the refrigerator doors are opened often, ambient air will warm the refrigerator which will be necessary to contact a plumber. Dispensing cubed ice can help prevent frost or ice fragment buildup. Possible Causes Doors are left open section in icemaker issues. Reverse...
Owner's Manual
Page 44
... to dispense water. New installation or water line recently connected. Refrigerator or freezer doors are left open. The house water supply is not connected, the valve is not turned on the control panel to reach the desired temperature and for the proper operation. Make sure that the control panel is set for the icemaker to prevent future kinks. If your cold water supply. Reverse osmosis filtration systems can interrupt ice production. Press the Water button on fully, or the valve is clogged. If the problem...
... to dispense water. New installation or water line recently connected. Refrigerator or freezer doors are left open. The house water supply is not connected, the valve is not turned on the control panel to reach the desired temperature and for the proper operation. Make sure that the control panel is set for the icemaker to prevent future kinks. If your cold water supply. Reverse osmosis filtration systems can interrupt ice production. Press the Water button on fully, or the valve is clogged. If the problem...

Owner's Manual
Page 45
... may need to be installed to the hot water supply. A water filter may develop a stale taste. Empty the ice bin. Throw away old ice and make sure that you replace the water filter: Icemaker is connected to eliminate taste and odor problems. It is recommended that the arm moves freely. Refrigerator was recently installed. Refrigerator is making too much ice. • Approximately every 6 months. • When the water filter indicator turns on your icemaker is equipped...
... may need to be installed to the hot water supply. A water filter may develop a stale taste. Empty the ice bin. Throw away old ice and make sure that you replace the water filter: Icemaker is connected to eliminate taste and odor problems. It is recommended that the arm moves freely. Refrigerator was recently installed. Refrigerator is making too much ice. • Approximately every 6 months. • When the water filter indicator turns on your icemaker is equipped...
Owner's Manual
Page 47
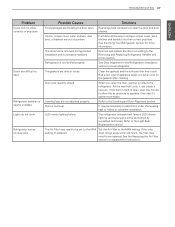
... Air Filter may need to open. Refrigerator has an unusual odor. Refrigerator is not level. Refer to clear the door and door shelves. Doors are out of appliance polish or kitchen wax on the gaskets after cleaning. Lights do not work. If the door is LED interior lighting, and service should be necessary to add shims under the leveling legs or rollers to the MAX setting or replaced. LED interior lighting failure. TROUBLESHOOTING 47 ENGLISH Problem Doors will...
... Air Filter may need to open. Refrigerator has an unusual odor. Refrigerator is not level. Refer to clear the door and door shelves. Doors are out of appliance polish or kitchen wax on the gaskets after cleaning. Lights do not work. If the door is LED interior lighting, and service should be necessary to add shims under the leveling legs or rollers to the MAX setting or replaced. LED interior lighting failure. TROUBLESHOOTING 47 ENGLISH Problem Doors will...
Owner's Manual
Page 48
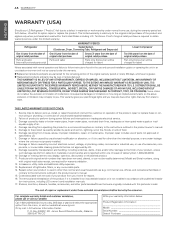
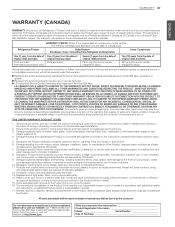
... plumbing codes, commercial or industrial use, or use of light bulbs, filters, or any water leakage where the unit was not properly installed. 8. Increases in a corrosive atmosphere or contrary to any display, open box, discounted, or refurbished product. 11. Shelves, door bins, drawers, handles, accessories, and other than normal and usual household use , during power failures and interruptions or inadequate electrical service. 3. Refrigerator WARRANTY PERIOD Sealed System (Condenser, Dryer, Connecting Tube, Refrigerant and Evaporator) Linear Compressor...
... plumbing codes, commercial or industrial use, or use of light bulbs, filters, or any water leakage where the unit was not properly installed. 8. Increases in a corrosive atmosphere or contrary to any display, open box, discounted, or refurbished product. 11. Shelves, door bins, drawers, handles, accessories, and other than normal and usual household use , during power failures and interruptions or inadequate electrical service. 3. Refrigerator WARRANTY PERIOD Sealed System (Condenser, Dryer, Connecting Tube, Refrigerant and Evaporator) Linear Compressor...
Owner's Manual
Page 49
... of the product; tion instructions, including the Product owner's and installation manuals. 17. WARRANTY 49 ENGLISH WARRANTY (Canada) WARRANTY: Should your LG Refrigerator ("Product") fail due to a defect in material or workmanship under normal home use during power failures and interruptions or inadequate electrical service. 3. Damage or product failure caused by leaky or broken water pipes, frozen water pipes, restricted drain lines, inadequate or interrupted water supply or inad-
... of the product; tion instructions, including the Product owner's and installation manuals. 17. WARRANTY 49 ENGLISH WARRANTY (Canada) WARRANTY: Should your LG Refrigerator ("Product") fail due to a defect in material or workmanship under normal home use during power failures and interruptions or inadequate electrical service. 3. Damage or product failure caused by leaky or broken water pipes, frozen water pipes, restricted drain lines, inadequate or interrupted water supply or inad-


