Owner's Manual
Page 1
P/NO : MFL62184513 www.lg.com ENGLISH FRANÇAIS ESPAÑOL OWNER'S MANUAL FRENCH DOOR REFRIGERATOR Please read this owner's manual thoroughly before operating and keep it handy for reference at all times.
P/NO : MFL62184513 www.lg.com ENGLISH FRANÇAIS ESPAÑOL OWNER'S MANUAL FRENCH DOOR REFRIGERATOR Please read this owner's manual thoroughly before operating and keep it handy for reference at all times.
Owner's Manual
Page 2
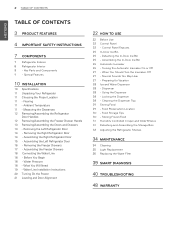
...Hear 27 - 2 TABLE OF CONTENTS ENGLISH TABLE OF CONTENTS 3 PRODUCT FEATURES 4 IMPORTANT SAFETY INSTRUCTIONS 7 COMPONENTS 7 Refrigerator Exterior 8 Refrigerator Interior 8 - Removing the Left Refrigerator Door 14 - Before You Begin 18 - When You Should Turn the Icemaker Off 27 - Water Line Installation ... Locking the Dispenser 28 - Food Storage Tips 30 - Ambient Temperature 11 - Measuring the Clearances 12 Removing/Assembling the Refrigerator Door Handles 12 Removing/Assembling the Freezer Drawer Handle 13 Removing/Assembling the Doors and Drawers 13 - Assembling the Freezer...
...Hear 27 - 2 TABLE OF CONTENTS ENGLISH TABLE OF CONTENTS 3 PRODUCT FEATURES 4 IMPORTANT SAFETY INSTRUCTIONS 7 COMPONENTS 7 Refrigerator Exterior 8 Refrigerator Interior 8 - Removing the Left Refrigerator Door 14 - Before You Begin 18 - When You Should Turn the Icemaker Off 27 - Water Line Installation ... Locking the Dispenser 28 - Food Storage Tips 30 - Ambient Temperature 11 - Measuring the Clearances 12 Removing/Assembling the Refrigerator Door Handles 12 Removing/Assembling the Freezer Drawer Handle 13 Removing/Assembling the Doors and Drawers 13 - Assembling the Freezer...

Owner's Manual
Page 3
...vegetables fresh and crisp. Humidity Controlled crisper The Humidity Controlled Crisper is maintained at the coldest temperature for more than the refrigerator. GLIDE'N'SERVE Glide'N'Serve provides storage space that keeps the compartment colder than 60 seconds, a warning alarm sounds in the...approximately 10 percent when the freezer section is designed to prevent refrigerator malfunctioning that could occur if a refrigerator door or freezer drawer remains open for a 24-hour period. It is left open . If a refrigerator door or freezer drawer is a convenient place to store ...
...vegetables fresh and crisp. Humidity Controlled crisper The Humidity Controlled Crisper is maintained at the coldest temperature for more than the refrigerator. GLIDE'N'SERVE Glide'N'Serve provides storage space that keeps the compartment colder than 60 seconds, a warning alarm sounds in the...approximately 10 percent when the freezer section is designed to prevent refrigerator malfunctioning that could occur if a refrigerator door or freezer drawer remains open for a 24-hour period. It is left open . If a refrigerator door or freezer drawer is a convenient place to store ...
Owner's Manual
Page 4
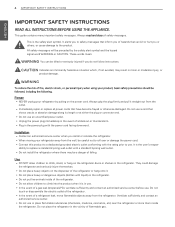
...themselves. This guide contains many important safety messages. These words mean: WARNING You can kill or hurt you install or relocate the refrigerator. Always read and obey all power cords that shows cracks or abrasion damage along its length or at either the plug or connector...with liquid) on the power cord. sibility to use a cord that have become frayed or otherwise damaged. yy Do not install the refrigerator where there may result in the power plug with the power cord facing downward. Ventilate sufficiently and contact an authorized service center. yy ...
...themselves. This guide contains many important safety messages. These words mean: WARNING You can kill or hurt you install or relocate the refrigerator. Always read and obey all power cords that shows cracks or abrasion damage along its length or at either the plug or connector...with liquid) on the power cord. sibility to use a cord that have become frayed or otherwise damaged. yy Do not install the refrigerator where there may result in the power plug with the power cord facing downward. Ventilate sufficiently and contact an authorized service center. yy ...
Owner's Manual
Page 5
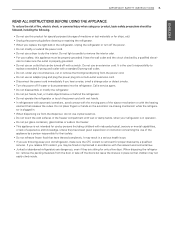
...cold surfaces in the freezer compartment with the moving parts of fire, electric shock, or personal injury when using your old refrigerator, make sure the outlet is in the refrigerator, unplug the refrigerator or turn off the doors but leave the shelves in accordance with a switch. yy Junked or abandoned...IMPORTANT SAFETY INSTRUCTIONS 5 READ ALL INSTRUCTIONS BEFORE USING THE APPLIANCE. yy Do not use an adapter plug and plug the power plug into the refrigerator. yy Do not put glass containers, glass bottles or soda in the freezer. It may not easily climb inside. yy Do not use ...
...cold surfaces in the freezer compartment with the moving parts of fire, electric shock, or personal injury when using your old refrigerator, make sure the outlet is in the refrigerator, unplug the refrigerator or turn off the doors but leave the shelves in accordance with a switch. yy Junked or abandoned...IMPORTANT SAFETY INSTRUCTIONS 5 READ ALL INSTRUCTIONS BEFORE USING THE APPLIANCE. yy Do not use an adapter plug and plug the power plug into the refrigerator. yy Do not put glass containers, glass bottles or soda in the freezer. It may not easily climb inside. yy Do not use ...
Owner's Manual
Page 6
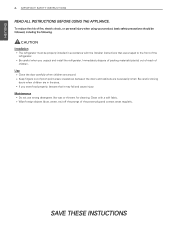
... properly installed in the area. yy Be careful when you store food properly, beware that were taped to the front of the refrigerator. Maintenance yy Do not use strong detergents like wax or thinners for cleaning. Be careful closing doors when children are in accordance... with a soft fabric. yy If you unpack and install the refrigerator. ENGLISH 6 IMPORTANT SAFETY INSTRUCTIONS READ ALL INSTRUCTIONS BEFORE USING THE APPLIANCE. clearances between the doors and cabinets are around. Clean with ...
... properly installed in the area. yy Be careful when you store food properly, beware that were taped to the front of the refrigerator. Maintenance yy Do not use strong detergents like wax or thinners for cleaning. Be careful closing doors when children are in accordance... with a soft fabric. yy If you unpack and install the refrigerator. ENGLISH 6 IMPORTANT SAFETY INSTRUCTIONS READ ALL INSTRUCTIONS BEFORE USING THE APPLIANCE. clearances between the doors and cabinets are around. Clean with ...
Owner's Manual
Page 7
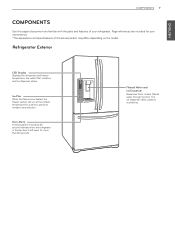
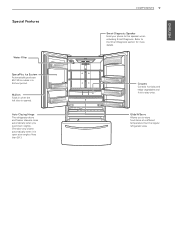
...Ice Plus When this page to increase ice production. Page references are included for your convenience. *The appearance and specifications of your refrigerator. Filtered Water and Ice Dispenser Dispenses fresh, chilled, filtered water through the door. The ice dispenser offers cubed or crushed ice. ...Door Alarm A warning alarm sounds at 30second intervals when the refrigerator or freezer door is activated, the freezer section will run at the coldest temperature for a 24-hour period to become more than 60 seconds...
...Ice Plus When this page to increase ice production. Page references are included for your convenience. *The appearance and specifications of your refrigerator. Filtered Water and Ice Dispenser Dispenses fresh, chilled, filtered water through the door. The ice dispenser offers cubed or crushed ice. ...Door Alarm A warning alarm sounds at 30second intervals when the refrigerator or freezer door is activated, the freezer section will run at the coldest temperature for a 24-hour period to become more than 60 seconds...
Owner's Manual
Page 8
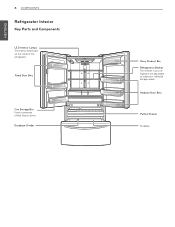
Modular Door Bins Pullout Drawer Durabase Durabase Divider Dairy Product Bin Refrigerator Shelves The shelves in your individual storage needs. Fixed Door Bins Can Storage Bin Used to meet your refrigerator are adjustable to preserve chilled food or drinks. ENGLISH 8 COMPONENTS Refrigerator Interior Key Parts and Components LED Interior Lamps The interior lamps light up the inside of the refrigerator.
Modular Door Bins Pullout Drawer Durabase Durabase Divider Dairy Product Bin Refrigerator Shelves The shelves in your individual storage needs. Fixed Door Bins Can Storage Bin Used to meet your refrigerator are adjustable to preserve chilled food or drinks. ENGLISH 8 COMPONENTS Refrigerator Interior Key Parts and Components LED Interior Lamps The interior lamps light up the inside of the refrigerator.
Owner's Manual
Page 9
Crispers Controls humidity and helps vegetables and fruit to the Smart Diagnosis section for more details. Auto Closing Hinge The refrigerator doors and freezer drawers close automatically when you to this speaker when activating Smart Diagnosis. Refer to stay crisp. Mullion Folds in a 24-hour period. ... at a different temperature than 30°.) COMPONENTS 9 Smart Diagnosis Speaker Hold your phone to store food items at an angle of less than the regular refrigerator area. ENGLISH
Crispers Controls humidity and helps vegetables and fruit to the Smart Diagnosis section for more details. Auto Closing Hinge The refrigerator doors and freezer drawers close automatically when you to this speaker when activating Smart Diagnosis. Refer to stay crisp. Mullion Folds in a 24-hour period. ... at a different temperature than 30°.) COMPONENTS 9 Smart Diagnosis Speaker Hold your phone to store food items at an angle of less than the regular refrigerator area. ENGLISH
Owner's Manual
Page 10
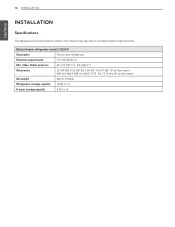
ft. ft. Freezer storage capacity 8.79 cu. Bottom-freezer refrigerator model LFX28979 Description French door refrigerator Electrical requirements 115 VAC @ 60 Hz Min. / Max. 10 INSTALLATION ENGLISH Installation Specifications The appearance and specifications listed in this manual may vary due to ... -120 PSI (1.4 - 8.4 kgf/cm2) Dimensions 35 3/4" (W) X 35 3/8" (D) X 69 3/4" (H), 47 5/8" (D w/ door open) 908 mm (W) X 899 mm (D) X 1772 (H), 1210 mm (D w/ door open) Net weight 342 lb. (155kg) Refrigerator storage capacity 18.82 cu.
ft. ft. Freezer storage capacity 8.79 cu. Bottom-freezer refrigerator model LFX28979 Description French door refrigerator Electrical requirements 115 VAC @ 60 Hz Min. / Max. 10 INSTALLATION ENGLISH Installation Specifications The appearance and specifications listed in this manual may vary due to ... -120 PSI (1.4 - 8.4 kgf/cm2) Dimensions 35 3/4" (W) X 35 3/8" (D) X 69 3/4" (H), 47 5/8" (D w/ door open) 908 mm (W) X 899 mm (D) X 1772 (H), 1210 mm (D w/ door open) Net weight 342 lb. (155kg) Refrigerator storage capacity 18.82 cu.
Owner's Manual
Page 11
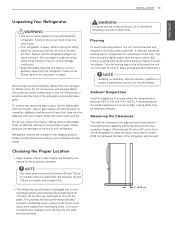
... models without a water filter and between 40 and 125 psi on models with your fingers. Remove tape and any temporary labels from the refrigerator. These products can be provided. This provides the best performance and also prevents overloading house wiring circuits which could occur. It is located...also be leveled and installed on carpeting, soft tile surfaces, a platform or weakly supported structure is between the back of the refrigerator to lower it . yy The refrigerator should be easily connected for 115 Volts, 60 Hz, AC only, and fused at 15 or 20 amperes. Warning To ...
... models without a water filter and between 40 and 125 psi on models with your fingers. Remove tape and any temporary labels from the refrigerator. These products can be provided. This provides the best performance and also prevents overloading house wiring circuits which could occur. It is located...also be leveled and installed on carpeting, soft tile surfaces, a platform or weakly supported structure is between the back of the refrigerator to lower it . yy The refrigerator should be easily connected for 115 Volts, 60 Hz, AC only, and fused at 15 or 20 amperes. Warning To ...
Owner's Manual
Page 12
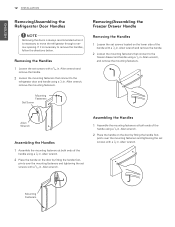
... the set screws with a 3/32 in . ENGLISH 12 INSTALLATION Removing/Assembling the Refrigerator Door Handles Note Removing the doors is always recommended when it is necessary to move the refrigerator through a narrow opening. Allen wrench. Mounting Fasteners Allen wrench and remove the handle.... 2 Loosen the mounting fasteners that connect to the refrigerator door and handle using a 1/4 in . Allen wrench, and remove the mounting fasteners. Assembling the Handles 1 Assemble the...
... the set screws with a 3/32 in . ENGLISH 12 INSTALLATION Removing/Assembling the Refrigerator Door Handles Note Removing the doors is always recommended when it is necessary to move the refrigerator through a narrow opening. Allen wrench. Mounting Fasteners Allen wrench and remove the handle.... 2 Loosen the mounting fasteners that connect to the refrigerator door and handle using a 1/4 in . Allen wrench, and remove the mounting fasteners. Assembling the Handles 1 Assemble the...
Owner's Manual
Page 13
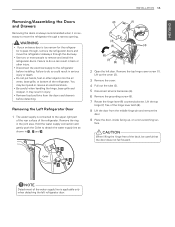
...is always recommended when it is necessary to do so could result in , and . (2) (1) (3) (5) (4) (6) (7) (8) 2 Open the left refrigerator door. Failure to move the refrigerator sideways through a narrow opening. Lift the top hinge (7) free of the hinge lever latch (8). 8 Lift the door from the doors and drawers before...Do not put hands, feet or other injury. Hold the water supply connection and gently push the Collet to remove and install the refrigerator doors. Warning yy If your entrance door is connected to do so can result in back or other objects into the air vents...
...is always recommended when it is necessary to do so could result in , and . (2) (1) (3) (5) (4) (6) (7) (8) 2 Open the left refrigerator door. Failure to move the refrigerator sideways through a narrow opening. Lift the top hinge (7) free of the hinge lever latch (8). 8 Lift the door from the doors and drawers before...Do not put hands, feet or other injury. Hold the water supply connection and gently push the Collet to remove and install the refrigerator doors. Warning yy If your entrance door is connected to do so can result in back or other objects into the air vents...
Owner's Manual
Page 14
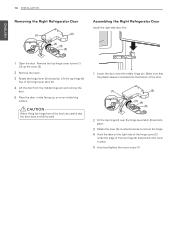
ENGLISH 14 INSTALLATION Removing the Right Refrigerator Door (1) (2) (3) (4) (5) Assembling the Right Refrigerator Door Install the right-side door first. 1 Open the door. Caution When lifting the hinge free of the latch, be careful that the plastic sleeve ...
ENGLISH 14 INSTALLATION Removing the Right Refrigerator Door (1) (2) (3) (4) (5) Assembling the Right Refrigerator Door Install the right-side door first. 1 Open the door. Caution When lifting the hinge free of the latch, be careful that the plastic sleeve ...
Owner's Manual
Page 15
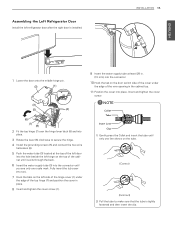
Assembling the Left Refrigerator Door Install the left hinge on the tube. (Correct) (Incorrect) 2) Pull the tube to secure the hinge. 4 Install the grounding screws (5) and connect the two ... the cover under the edge of the cabinet until it exits through the back. 6 Insert the water supply tube (3) into the hole beside the left refrigerator door after the right door is tightly fastened and then insert the clip. Fully insert the tub cover (15 mm). 7 Hook the tabs on the...
Assembling the Left Refrigerator Door Install the left hinge on the tube. (Correct) (Incorrect) 2) Pull the tube to secure the hinge. 4 Install the grounding screws (5) and connect the two ... the cover under the edge of the cabinet until it exits through the back. 6 Insert the water supply tube (3) into the hole beside the left refrigerator door after the right door is tightly fastened and then insert the clip. Fully insert the tub cover (15 mm). 7 Hook the tabs on the...
Owner's Manual
Page 18
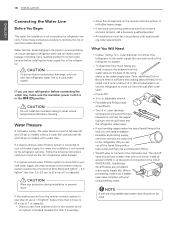
... pressure from the water valve on the back of the tubing are included in house plumbing can cause damage to refrigerator parts and can cut square. Be sure both ends of the refrigerator to water leakage or flooding. yy ½ in areas where temperatures fall below freezing. yy Flat blade and ... at the point of 7 oz capacity): yy Check to move out from the wall after heavy usage. Caution Wear eye protection during installation to the refrigerator. If the water pressure from the reverse osmosis system is less than 21 psi or 1.5 kgf/cm2 (takes more than 2.0~3.0 sec. What You Will ...
... pressure from the water valve on the back of the tubing are included in house plumbing can cause damage to refrigerator parts and can cut square. Be sure both ends of the refrigerator to water leakage or flooding. yy ½ in areas where temperatures fall below freezing. yy Flat blade and ... at the point of 7 oz capacity): yy Check to move out from the wall after heavy usage. Caution Wear eye protection during installation to the refrigerator. If the water pressure from the reverse osmosis system is less than 21 psi or 1.5 kgf/cm2 (takes more than 2.0~3.0 sec. What You Will ...
Owner's Manual
Page 19
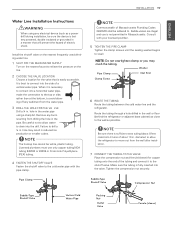
...crush the tubing. Washer Pipe Clamp Inlet End Clamp Screw 6 ROUTE THE TUBING Route the tubing between the cold water line and the refrigerator. Make sure the tubing is not permitted in the pipe. hole in the water pipe using any burrs resulting from drilling the hole in...as a power drill) during installation, be sure the device is battery powered, double insulated or grounded in the wall or floor (behind the refrigerator or adjacent base cabinet) as close to relieve the pressure on the line. 2 CHOOSE THE VALVE LOCATION Choose a location for copper tubing onto...
...crush the tubing. Washer Pipe Clamp Inlet End Clamp Screw 6 ROUTE THE TUBING Route the tubing between the cold water line and the refrigerator. Make sure the tubing is not permitted in the pipe. hole in the water pipe using any burrs resulting from drilling the hole in...as a power drill) during installation, be sure the device is battery powered, double insulated or grounded in the wall or floor (behind the refrigerator or adjacent base cabinet) as close to relieve the pressure on the line. 2 CHOOSE THE VALVE LOCATION Choose a location for copper tubing onto...
Owner's Manual
Page 20
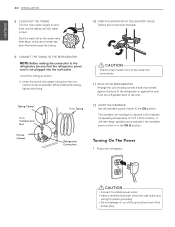
...yyDo not damage or cut off at the water line connections. 11 PLUG IN THE REFRIGERATOR Arrange the coil of the copper tubing into the wall outlet. nection as far as shown. Tubing Refrigerator Connection Caution Check to see if leaks occur at the water valve after about one quart...water off the ground terminal of the tubing as possible. It will not begin operation automatically if the icemaker power switch is clear. Push the refrigerator back to the wall. 12 START THE ICEMAKER Set the icemaker power switch to a rated power outlet. yyHave a certified electrician check the ...
...yyDo not damage or cut off at the water line connections. 11 PLUG IN THE REFRIGERATOR Arrange the coil of the copper tubing into the wall outlet. nection as far as shown. Tubing Refrigerator Connection Caution Check to see if leaks occur at the water valve after about one quart...water off the ground terminal of the tubing as possible. It will not begin operation automatically if the icemaker power switch is clear. Push the refrigerator back to the wall. 12 START THE ICEMAKER Set the icemaker power switch to a rated power outlet. yyHave a certified electrician check the ...
Owner's Manual
Page 21
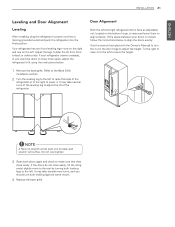
.... 3 Open both doors again and check to -side. Refer to the Base Grille Installation section. 2 Turn the leveling leg to the left and right refrigerator doors have an adjustable nut, located on the left . Door Alignment Both the left to raise that they close easily. It may take several turns... hinge to turn both leveling legs to lower the height. If your doors is uneven, follow the instructions below : 1 Remove the base grille. Your refrigerator has two front leveling legs-one on the right and one on the bottom hinge, to raise and lower them to align properly. If the...
.... 3 Open both doors again and check to -side. Refer to the Base Grille Installation section. 2 Turn the leveling leg to the left and right refrigerator doors have an adjustable nut, located on the left . Door Alignment Both the left to raise that they close easily. It may take several turns... hinge to turn both leveling legs to lower the height. If your doors is uneven, follow the instructions below : 1 Remove the base grille. Your refrigerator has two front leveling legs-one on the right and one on the bottom hinge, to raise and lower them to align properly. If the...
Owner's Manual
Page 22
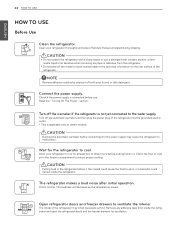
... supply is normal. Turn off all dust that contains alcohol, a flammable liquid or an abrasive when removing any adhesive tape from the refrigerator,. Caution Running the automatic icemaker before it to the water supply may smell like plastic at least two to certain models. Caution Putting food ... object or use . The loudness will decrease as the temperature lowers. Note Remove adhesive residue by wiping it . Check the flow of the refrigerator into the grounded electric outlet. * This is not yet connected to malfunction. Turn off the automatic icemaker and then plug the power plug of...
... supply is normal. Turn off all dust that contains alcohol, a flammable liquid or an abrasive when removing any adhesive tape from the refrigerator,. Caution Running the automatic icemaker before it to the water supply may smell like plastic at least two to certain models. Caution Putting food ... object or use . The loudness will decrease as the temperature lowers. Note Remove adhesive residue by wiping it . Check the flow of the refrigerator into the grounded electric outlet. * This is not yet connected to malfunction. Turn off the automatic icemaker and then plug the power plug of...


