Owner's Manual
Page 1
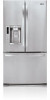
LFX28978** LFX25978** P/No.: MFL62184410 www.lg.com ENGLISH FRANÇAIS ESPAÑOL OWNER'S MANUAL FRENCH DOOR REFRIGERATOR Please read this owner's manual thoroughly before operating and keep it handy for reference at all times.
LFX28978** LFX25978** P/No.: MFL62184410 www.lg.com ENGLISH FRANÇAIS ESPAÑOL OWNER'S MANUAL FRENCH DOOR REFRIGERATOR Please read this owner's manual thoroughly before operating and keep it handy for reference at all times.
Owner's Manual
Page 2
Your new LG French Door Refrigerator combines advanced cooling technology with many years of Foods 29 Shelf Height Adjustment 30 Removing and Replacing Components 31 CARE AND CLEANING Cleaning the Refrigerator 35 General Information 35 Replacing the Water Filter 36 TROUBLESHOOTING Before Calling for Service 41 SPECIFICATIONS Key... 27 Storing Foods 28 Location of reliable service. IMPORTANT SAFETY INFORMATION Basic Safety Precautions 3 CFC Disposal 4 How to the LG family. Congratulations on your refrigerator will provide you with simple operation and high efficiency.
Your new LG French Door Refrigerator combines advanced cooling technology with many years of Foods 29 Shelf Height Adjustment 30 Removing and Replacing Components 31 CARE AND CLEANING Cleaning the Refrigerator 35 General Information 35 Replacing the Water Filter 36 TROUBLESHOOTING Before Calling for Service 41 SPECIFICATIONS Key... 27 Storing Foods 28 Location of reliable service. IMPORTANT SAFETY INFORMATION Basic Safety Precautions 3 CFC Disposal 4 How to the LG family. Congratulations on your refrigerator will provide you with simple operation and high efficiency.
Owner's Manual
Page 3
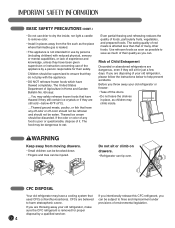
... and tell you don't follow instructions. Be careful closing doors when children are in the area. • Unplug your refrigerator before using your refrigerator is in operation, do not touch the cold surfaces in accordance with the Installer Instructions that were taped to the light ...the plug firmly and pull it straight out from the wall, be preceded by pulling on the automatic icemaking mechanism while the refrigerator is the safety alert symbol. ENGLISH BASIC SAFETY PRECAUTIONS This guide contains many important safety messages. wCAUTION Indicates an imminently hazardous ...
... and tell you don't follow instructions. Be careful closing doors when children are in the area. • Unplug your refrigerator before using your refrigerator is in operation, do not touch the cold surfaces in accordance with the Installer Instructions that were taped to the light ...the plug firmly and pull it straight out from the wall, be preceded by pulling on the automatic icemaking mechanism while the refrigerator is the safety alert symbol. ENGLISH BASIC SAFETY PRECAUTIONS This guide contains many important safety messages. wCAUTION Indicates an imminently hazardous ...
Owner's Manual
Page 4
...where flammable gas is leaked. • This appliance is removed for just a few days. CFCs are throwing away your old refrigerator, make sure the CFC refrigerant is not intended for their quality as much of Agriculture in places away from moving drawers. • Small children can be ...knocked down. • Fingers and toes can tip over. Risk of your old refrigerator or freezer: • Take off -color should not be refrozen and should not be injured. Before you are believed to remove odor. •...
...where flammable gas is leaked. • This appliance is removed for just a few days. CFCs are throwing away your old refrigerator, make sure the CFC refrigerant is not intended for their quality as much of Agriculture in places away from moving drawers. • Small children can be ...knocked down. • Fingers and toes can tip over. Risk of your old refrigerator or freezer: • Take off -color should not be refrozen and should not be injured. Before you are believed to remove odor. •...
Owner's Manual
Page 5
... models have it replaced with a switch or pull chain. However, if you are finished, reconnect the refrigerator to the electrical source and reset the control (Thermostat, Refrigerator Control, or Freezer Control, depending on the model) to use an extension cord. Do not, under certain...have LED interior lighting and service should always be performed by a qualified technician. It is recommended that the electrical rating of the refrigerator. Use a receptacle which could cause a fire hazard from the power cord. USE OF EXTENSION CORDS Because of potential safety hazards under...
... models have it replaced with a switch or pull chain. However, if you are finished, reconnect the refrigerator to the electrical source and reset the control (Thermostat, Refrigerator Control, or Freezer Control, depending on the model) to use an extension cord. Do not, under certain...have LED interior lighting and service should always be performed by a qualified technician. It is recommended that the electrical rating of the refrigerator. Use a receptacle which could cause a fire hazard from the power cord. USE OF EXTENSION CORDS Because of potential safety hazards under...
Owner's Manual
Page 6
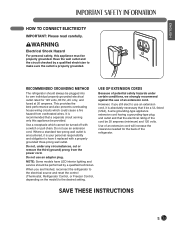
...FEATURES 1 CONTROL PANEL LED DISPLAY SCREEN Simple electronic controls are user-friendly. The in-door design creates more shelf 6 space. 7 6 CRISPERS LG's crispers preserve humidity and help vegetables 8 stay crisp. 9 7 GLIDE'N'SERVE Provides storage space with a variable temperature control that keeps the compartment ... more . 3 2 2 ICE PLUS 4 When this feature is activated, the freezer section will run at 30-second intervals when the refrigerator or freezer door is left door is automatically closed within 30° of the items listed below may have some or all of the ...
...FEATURES 1 CONTROL PANEL LED DISPLAY SCREEN Simple electronic controls are user-friendly. The in-door design creates more shelf 6 space. 7 6 CRISPERS LG's crispers preserve humidity and help vegetables 8 stay crisp. 9 7 GLIDE'N'SERVE Provides storage space with a variable temperature control that keeps the compartment ... more . 3 2 2 ICE PLUS 4 When this feature is activated, the freezer section will run at 30-second intervals when the refrigerator or freezer door is left door is automatically closed within 30° of the items listed below may have some or all of the ...
Owner's Manual
Page 7
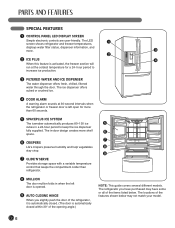
... outlined in the Special Features section, there are several other important components that are referenced in this manual. 1 ADJUSTABLE REFRIGERATOR SHELVING The refrigerator compartment shelves are adjustable to allow flexibility for storage needs. 2 GALLON STORAGE BINS Three interchangeable bins can be arranged to... suit your storage needs. 4 LED INTERIOR LAMPS Refrigerator interior is lit by the LED array. 5 CAN STORAGE BIN 6 FIXED DOOR BINS 3 REMOVABLE ICE STORAGE BIN The ice storage ...
... outlined in the Special Features section, there are several other important components that are referenced in this manual. 1 ADJUSTABLE REFRIGERATOR SHELVING The refrigerator compartment shelves are adjustable to allow flexibility for storage needs. 2 GALLON STORAGE BINS Three interchangeable bins can be arranged to... suit your storage needs. 4 LED INTERIOR LAMPS Refrigerator interior is lit by the LED array. 5 CAN STORAGE BIN 6 FIXED DOOR BINS 3 REMOVABLE ICE STORAGE BIN The ice storage ...
Owner's Manual
Page 8
... 110°F (43°C), the freezing capacity is compromised and the cost of electricity used increases. • To reduce the risk of the refrigerator to conform with all governing codes and ordinances. If the temperature around the appliance is too low or too high, cooling ability may result in... front of electric shock, do not install the refrigerator in a wet or damp area. • Select a place where a water supply can be adversely affected. • If this appliance in an area where...
... 110°F (43°C), the freezing capacity is compromised and the cost of electricity used increases. • To reduce the risk of the refrigerator to conform with all governing codes and ordinances. If the temperature around the appliance is too low or too high, cooling ability may result in... front of electric shock, do not install the refrigerator in a wet or damp area. • Select a place where a water supply can be adversely affected. • If this appliance in an area where...
Owner's Manual
Page 9
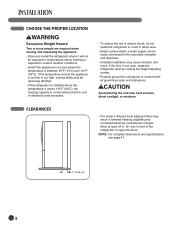
... • Carpeting and soft tile surfaces are not recommended. • Never install the refrigerator on a platform or weakly supported structure. Do not wiggle or walk the refrigerator when trying to move the refrigerator through a narrow opening. wCAUTION • Use special care when removing handles to prevent ...that the doors be sure to protect the floor. The front should be level. Always pull the refrigerator straight out when moving the refrigerator for unevenness of the refrigerator to take the weight off the feet. ENGLISH FLOORING • To minimize noise and vibration, the...
... • Carpeting and soft tile surfaces are not recommended. • Never install the refrigerator on a platform or weakly supported structure. Do not wiggle or walk the refrigerator when trying to move the refrigerator through a narrow opening. wCAUTION • Use special care when removing handles to prevent ...that the doors be sure to protect the floor. The front should be level. Always pull the refrigerator straight out when moving the refrigerator for unevenness of the refrigerator to take the weight off the feet. ENGLISH FLOORING • To minimize noise and vibration, the...
Owner's Manual
Page 10
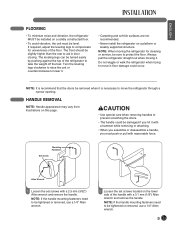
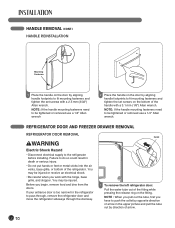
... Electric Shock Hazard • Disconnect electrical supply to pass through, remove the refrigerator door and move the refrigerator sideways through the doorway. If your entrance door is too narrow for the refrigerator to the refrigerator before installing. NOTE: If the handle mounting fasteners need to be injured or... tighten the set screws on the bottom of the handle with a 3.1 mm (1/8") Allen wrench. Collet 1 To remove the left refrigerator door: Pull the water tube out of the refrigerator. NOTE : When you pull out the tube, first you begin, remove food and bins from the doors.
... Electric Shock Hazard • Disconnect electrical supply to pass through, remove the refrigerator door and move the refrigerator sideways through the doorway. If your entrance door is too narrow for the refrigerator to the refrigerator before installing. NOTE: If the handle mounting fasteners need to be injured or... tighten the set screws on the bottom of the handle with a 3.1 mm (1/8") Allen wrench. Collet 1 To remove the left refrigerator door: Pull the water tube out of the refrigerator. NOTE : When you pull out the tube, first you begin, remove food and bins from the doors.
Owner's Manual
Page 11
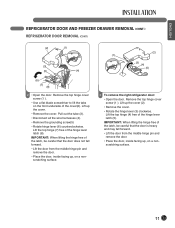
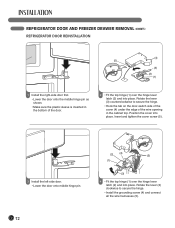
... the door. • Place the door, inside facing up , on a nonscratching surface. (2) (1) (3) (4) (5) 3 To remove the right refrigerator door: • Open the door. Lift up the cover (2). • Remove the cover. • Rotate the hinge lever (3) clockwise. IMPORTANT...Remove the top hinge cover screw (1 ). • Use a flat blade screwdriver to lift the tabs on a nonscratching surface. 11 ENGLISH REFRIGERATOR DOOR AND FREEZER DRAWER REMOVAL (CONT.) REFRIGERATOR DOOR REMOVAL (CONT.) (2) (1) (3) (5) (4) (6) (7) (8) 2 • Open the door. Pull out the tube (3). • ...
... the door. • Place the door, inside facing up , on a nonscratching surface. (2) (1) (3) (4) (5) 3 To remove the right refrigerator door: • Open the door. Lift up the cover (2). • Remove the cover. • Rotate the hinge lever (3) clockwise. IMPORTANT...Remove the top hinge cover screw (1 ). • Use a flat blade screwdriver to lift the tabs on a nonscratching surface. 11 ENGLISH REFRIGERATOR DOOR AND FREEZER DRAWER REMOVAL (CONT.) REFRIGERATOR DOOR REMOVAL (CONT.) (2) (1) (3) (5) (4) (6) (7) (8) 2 • Open the door. Pull out the tube (3). • ...
Owner's Manual
Page 12
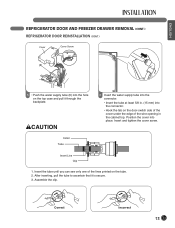
... onto middle hinge pin. (2) (4) (5) (1) (3) 4 • Fit the top hinge (1) over the hinge lever latch (2) and into place. Position the cover into place. REFRIGERATOR DOOR AND FREEZER DRAWER REMOVAL (CONT.) REFRIGERATOR DOOR REINSTALLATION (4) (5) (3) (2) (1) 1 Install the right-side door first. • Lower the door onto the middle hinge pin as shown. • Make sure...
... onto middle hinge pin. (2) (4) (5) (1) (3) 4 • Fit the top hinge (1) over the hinge lever latch (2) and into place. Position the cover into place. REFRIGERATOR DOOR AND FREEZER DRAWER REMOVAL (CONT.) REFRIGERATOR DOOR REINSTALLATION (4) (5) (3) (2) (1) 1 Install the right-side door first. • Lower the door onto the middle hinge pin as shown. • Make sure...
Owner's Manual
Page 13
...-switch side of the cover under the edge of the lines printed on the top case and pull it is secure. 3. Correct Incorrect 13 ENGLISH REFRIGERATOR DOOR AND FREEZER DRAWER REMOVAL (CONT.) REFRIGERATOR DOOR REINSTALLATION (CONT.) Cover Cover Screw (6) 5 • Push the water supply tube (6) into the hole on the tube. 2.
...-switch side of the cover under the edge of the lines printed on the top case and pull it is secure. 3. Correct Incorrect 13 ENGLISH REFRIGERATOR DOOR AND FREEZER DRAWER REMOVAL (CONT.) REFRIGERATOR DOOR REINSTALLATION (CONT.) Cover Cover Screw (6) 5 • Push the water supply tube (6) into the hole on the tube. 2.
Owner's Manual
Page 14
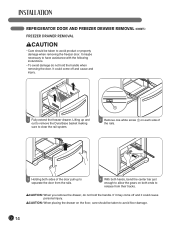
.... 3 Holding both hands, bend the center bar just enough to allow the gears on the floor, care should be taken to avoid floor damage. 14 REFRIGERATOR DOOR AND FREEZER DRAWER REMOVAL (CONT.) FREEZER DRAWER REMOVAL wCAUTION • Care should be taken to avoid product or property damage when removing the freezer...
.... 3 Holding both hands, bend the center bar just enough to allow the gears on the floor, care should be taken to avoid floor damage. 14 REFRIGERATOR DOOR AND FREEZER DRAWER REMOVAL (CONT.) FREEZER DRAWER REMOVAL wCAUTION • Care should be taken to avoid product or property damage when removing the freezer...
Owner's Manual
Page 15
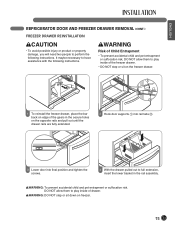
... NOT allow them to perform the following instructions. wWARNING: DO NOT step or sit down on edge of the gears in the rail assembly. ENGLISH REFRIGERATOR DOOR AND FREEZER DRAWER REMOVAL (CONT.) FREEZER DRAWER REINSTALLATION wCAUTION • To avoid possible injury or product or property damage, you will need two people...
... NOT allow them to perform the following instructions. wWARNING: DO NOT step or sit down on edge of the gears in the rail assembly. ENGLISH REFRIGERATOR DOOR AND FREEZER DRAWER REMOVAL (CONT.) FREEZER DRAWER REINSTALLATION wCAUTION • To avoid possible injury or product or property damage, you will need two people...
Owner's Manual
Page 16
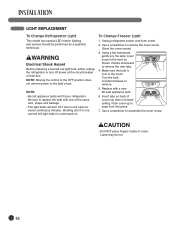
... Use a screwdriver to remove. 5. Turn the bulb counterclockwise to remove the cover screw. (Save the cover screw) 3. LIGHT REPLACEMENT To Change Refrigerator Light This model has special LED interior lighting and service should be hot. 16 NOTE: • Not all appliance bulbs will light bulbs to replace...2. Be sure to come back on back of cover. wWARNING Electrical Shock Hazard Before replacing a burned-out light bulb, either unplug the refrigerator or turn off power at the circuit breaker or fuse box. NOTE: Moving the control to the OFF position does not remove power to ...
... Use a screwdriver to remove. 5. Turn the bulb counterclockwise to remove the cover screw. (Save the cover screw) 3. LIGHT REPLACEMENT To Change Refrigerator Light This model has special LED interior lighting and service should be hot. 16 NOTE: • Not all appliance bulbs will light bulbs to replace...2. Be sure to come back on back of cover. wWARNING Electrical Shock Hazard Before replacing a burned-out light bulb, either unplug the refrigerator or turn off power at the circuit breaker or fuse box. NOTE: Moving the control to the OFF position does not remove power to ...
Owner's Manual
Page 17
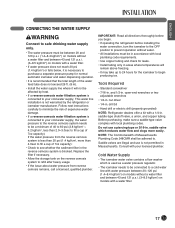
... osmosis water filtration system is connected to your licensed plumber. drill bit • Hand drill or electric drill (properly grounded) NOTE: Refrigerator dealers offer a kit with a 1/4-in Massachusetts. Saddle valves are illegal and use a piercing-type or 3/16-in areas where temperatures... reverse osmosis water filtration system is connected to your cold water supply, This water line installation is not warranted by the refrigerator or icemaker manufacturer. ENGLISH CONNECTING THE WATER SUPPLY wWARNING Connect to safe drinking water supply only. • The water pressure...
... osmosis water filtration system is connected to your licensed plumber. drill bit • Hand drill or electric drill (properly grounded) NOTE: Refrigerator dealers offer a kit with a 1/4-in Massachusetts. Saddle valves are illegal and use a piercing-type or 3/16-in areas where temperatures... reverse osmosis water filtration system is connected to your cold water supply, This water line installation is not warranted by the refrigerator or icemaker manufacturer. ENGLISH CONNECTING THE WATER SUPPLY wWARNING Connect to safe drinking water supply only. • The water pressure...
Owner's Manual
Page 18
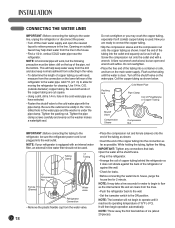
...Place the free end of Polyethelyne or Copper Tubing Shutoff Valve Compression Sleeve Compression Nut IMPORTANT: Before connecting the tubing to the refrigerator, be sure the refrigerator power cord is equipped with an internal water filter, an external in-line water filter should not be taken: drill on...valve to the cold water pipe with a wrench. CONNECTING THE WATER LINES IMPORTANT: Before connecting the tubing to the water line, unplug the refrigerator or disconnect the power. • Turn off the shutoff valve on the main water supply. O.D. (outside faucet may take a few batches...
...Place the free end of Polyethelyne or Copper Tubing Shutoff Valve Compression Sleeve Compression Nut IMPORTANT: Before connecting the tubing to the refrigerator, be sure the refrigerator power cord is equipped with an internal water filter, an external in-line water filter should not be taken: drill on...valve to the cold water pipe with a wrench. CONNECTING THE WATER LINES IMPORTANT: Before connecting the tubing to the water line, unplug the refrigerator or disconnect the power. • Turn off the shutoff valve on the main water supply. O.D. (outside faucet may take a few batches...
Owner's Manual
Page 19
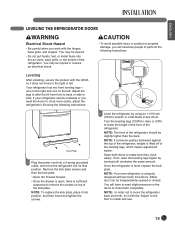
...; Once the drawer is open, there is lifted off of the leveling legs, which makes adjustment easier. NOTE: The front of the refrigerator should be independently opened or closed. You will need two people to make sure they close them completely. NOTE: To replace the kick plate..., place it into position, and then insert and tighten the screws. 2 Level the refrigerator by turning both doors to perform the following instructions: Kick Plate 1 Plug the power cord into a 3-prong grounded outlet, and move to ...
...; Once the drawer is open, there is lifted off of the leveling legs, which makes adjustment easier. NOTE: The front of the refrigerator should be independently opened or closed. You will need two people to make sure they close them completely. NOTE: To replace the kick plate..., place it into position, and then insert and tighten the screws. 2 Level the refrigerator by turning both doors to perform the following instructions: Kick Plate 1 Plug the power cord into a 3-prong grounded outlet, and move to ...
Owner's Manual
Page 20
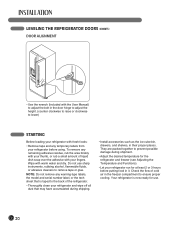
...any remaining adhesive residue, rub the area briskly with your thumb, or rub a small amount of liquid dish soap over the adhesive with your refrigerator before putting food in their proper places. Wipe with warm water and dry. They are packed together to prevent possible damage during shipment. •... back of cold air in the door hinge to adjust the height. (counter clockwise to raise or clockwise to lower) STARTING Before loading your refrigerator with fresh foods: • Remove tape and any warning-type labels, the model and serial number label, or the tech sheet that may...
...any remaining adhesive residue, rub the area briskly with your thumb, or rub a small amount of liquid dish soap over the adhesive with your refrigerator before putting food in their proper places. Wipe with warm water and dry. They are packed together to prevent possible damage during shipment. •... back of cold air in the door hinge to adjust the height. (counter clockwise to raise or clockwise to lower) STARTING Before loading your refrigerator with fresh foods: • Remove tape and any warning-type labels, the model and serial number label, or the tech sheet that may...


