Owner's Manual (English)
Page 2
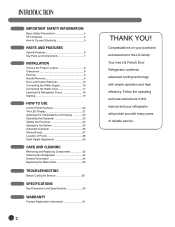
...provide you with simple operation and high efficiency. Your new LG French Door Refrigerator combines advanced cooling technology with many years of Foods 28 Shelf Height Adjustment 29 CARE AND CLEANING Removing and Replacing Components 30 Cleaning the Refrigerator 34 General Information 34 Replacing the Water Filter 35 TROUBLESHOOTING... and Display 22 Operating the Dispenser 23 Setting the Functions 24 Spaceplus Ice System 25 Automatic Icemaker 26 Storing Foods 27 Location of reliable service. IMPORTANT SAFETY INFORMATION Basic Safety Precautions 3 CFC Disposal 4 How to the...
...provide you with simple operation and high efficiency. Your new LG French Door Refrigerator combines advanced cooling technology with many years of Foods 28 Shelf Height Adjustment 29 CARE AND CLEANING Removing and Replacing Components 30 Cleaning the Refrigerator 34 General Information 34 Replacing the Water Filter 35 TROUBLESHOOTING... and Display 22 Operating the Dispenser 23 Setting the Functions 24 Spaceplus Ice System 25 Automatic Icemaker 26 Storing Foods 27 Location of reliable service. IMPORTANT SAFETY INFORMATION Basic Safety Precautions 3 CFC Disposal 4 How to the...
Owner's Manual (English)
Page 3
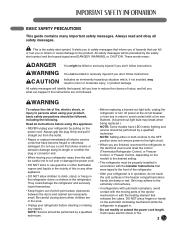
...break when being replaced.) NOTE: Some models have become frayed or otherwise damaged. Skin may result in the area. • Unplug your refrigerator away from the outlet. • Repair or replace immediately all electric service cords that have LED interior lighting and service should be killed... NOTE: Service should be performed by the safety alert symbol and the hazard signal word DANGER, WARNING, or CAUTION. They could damage the refrigerator and seriously injure themselves. • Keep fingers out of injury, and tell you or others or cause damage to the extremely cold surfaces....
...break when being replaced.) NOTE: Some models have become frayed or otherwise damaged. Skin may result in the area. • Unplug your refrigerator away from the outlet. • Repair or replace immediately all electric service cords that have LED interior lighting and service should be killed... NOTE: Service should be performed by the safety alert symbol and the hazard signal word DANGER, WARNING, or CAUTION. They could damage the refrigerator and seriously injure themselves. • Keep fingers out of injury, and tell you or others or cause damage to the extremely cold surfaces....
Owner's Manual (English)
Page 4
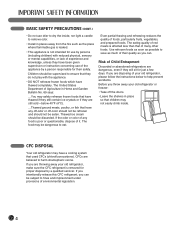
...refrozen and should be subject to fines and imprisonment under provisions of experience and knowledge, unless they are throwing away your old refrigerator, please follow the instructions below 40°F (4°C). ...Thawed ground meats, poultry, or fish that have thawed completely....person responsible for proper disposal by a qualified servicer. Risk of Child Entrapment Discarded or abandoned refrigerators are disposing of your old refrigerator, make sure the CFC refrigerant is affected less than that children may have been given supervision or instruction concerning use of ...
...refrozen and should be subject to fines and imprisonment under provisions of experience and knowledge, unless they are throwing away your old refrigerator, please follow the instructions below 40°F (4°C). ...Thawed ground meats, poultry, or fish that have thawed completely....person responsible for proper disposal by a qualified servicer. Risk of Child Entrapment Discarded or abandoned refrigerators are disposing of your old refrigerator, make sure the CFC refrigerant is affected less than that children may have been given supervision or instruction concerning use of ...
Owner's Manual (English)
Page 5
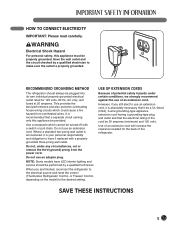
RECOMMENDED GROUNDING METHOD The refrigerator should be turned off with a properly grounded three-prong wall outlet. This provides the best performance and also...) and 120 volts. Do not use an adapter plug. However, if you are finished, reconnect the refrigerator to the electrical source and reset the control (Thermostat, Refrigerator Control, or Freezer Control, depending on the model) to make sure the outlet is recommended that the electrical..., cut or remove the third (ground) prong from overheated wires. USE OF EXTENSION CORDS Because of the refrigerator.
RECOMMENDED GROUNDING METHOD The refrigerator should be turned off with a properly grounded three-prong wall outlet. This provides the best performance and also...) and 120 volts. Do not use an adapter plug. However, if you are finished, reconnect the refrigerator to the electrical source and reset the control (Thermostat, Refrigerator Control, or Freezer Control, depending on the model) to make sure the outlet is recommended that the electrical..., cut or remove the third (ground) prong from overheated wires. USE OF EXTENSION CORDS Because of the refrigerator.
Owner's Manual (English)
Page 6
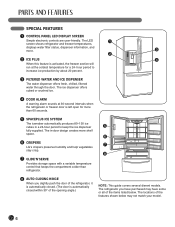
The in-door design creates more shelf space. 6 6 CRISPERS 7 LG's crispers preserve humidity and help vegetables stay crisp. 8 7 GLIDE'N'SERVE Provides storage space with a variable temperature control that keeps the compartment colder than 60 ... door of the features shown below may have purchased may not match your model. 6 The LED 1 screen shows refrigerator and freezer temperatures, displays water filter status, dispenser information, and more than refrigerator. 8 AUTO CLOSING HINGE When you have some or all of the opening angle.) NOTE: This guide covers several...
The in-door design creates more shelf space. 6 6 CRISPERS 7 LG's crispers preserve humidity and help vegetables stay crisp. 8 7 GLIDE'N'SERVE Provides storage space with a variable temperature control that keeps the compartment colder than 60 ... door of the features shown below may have purchased may not match your model. 6 The LED 1 screen shows refrigerator and freezer temperatures, displays water filter status, dispenser information, and more than refrigerator. 8 AUTO CLOSING HINGE When you have some or all of the opening angle.) NOTE: This guide covers several...
Owner's Manual (English)
Page 7
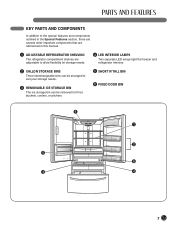
... outlined in the Special Features section, there are several other important components that are referenced in this manual. 1 ADJUSTABLE REFRIGERATOR SHELVING The refrigerator compartment shelves are adjustable to allow flexibility for storage needs. 4 LED INTERIOR LAMPS Two separate LED arrays light the freezer and... refrigerator interiors. 2 GALLON STORAGE BINS Three interchangeable bins can be arranged to suit your storage needs. 3 REMOVABLE ICE STORAGE BIN ...
... outlined in the Special Features section, there are several other important components that are referenced in this manual. 1 ADJUSTABLE REFRIGERATOR SHELVING The refrigerator compartment shelves are adjustable to allow flexibility for storage needs. 4 LED INTERIOR LAMPS Two separate LED arrays light the freezer and... refrigerator interiors. 2 GALLON STORAGE BINS Three interchangeable bins can be arranged to suit your storage needs. 3 REMOVABLE ICE STORAGE BIN ...
Owner's Manual (English)
Page 8
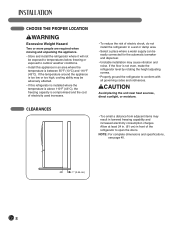
...LOCATION wWARNING Excessive Weight Hazard Two or more people are required when moving and unpacking the appliance. • Store and install the refrigerator where it will not be exposed to temperatures below freezing or exposed to conform with all governing codes and ordinances. wCAUTION Avoid placing...8226; Install this appliance in a wet or damp area. • Select a place where a water supply can be adversely affected. • If this refrigerator is installed where the temperature is above 110°F (43°C), the freezing capacity is between 55°F (13°C) and 110°F (43...
...LOCATION wWARNING Excessive Weight Hazard Two or more people are required when moving and unpacking the appliance. • Store and install the refrigerator where it will not be exposed to temperatures below freezing or exposed to conform with all governing codes and ordinances. wCAUTION Avoid placing...8226; Install this appliance in a wet or damp area. • Select a place where a water supply can be adversely affected. • If this refrigerator is installed where the temperature is above 110°F (43°C), the freezing capacity is between 55°F (13°C) and 110°F (43...
Owner's Manual (English)
Page 9
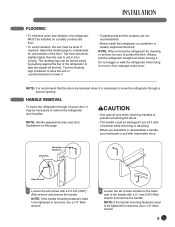
... be turned easily by pushing against the top of the floor. NOTE: When moving it. NOTE: It is necessary to move the refrigerator through a house door, it may vary from illustrations on a platform or weakly supported structure. FLOORING • To minimize noise and vibration, the... refrigerator MUST be installed on a solidly constructed floor. • To avoid vibration, the unit must push or pull with a 3.1 mm (1/8") Allen wrench and ...
... be turned easily by pushing against the top of the floor. NOTE: When moving it. NOTE: It is necessary to move the refrigerator through a house door, it may vary from illustrations on a platform or weakly supported structure. FLOORING • To minimize noise and vibration, the... refrigerator MUST be installed on a solidly constructed floor. • To avoid vibration, the unit must push or pull with a 3.1 mm (1/8") Allen wrench and ...

Owner's Manual (English)
Page 10
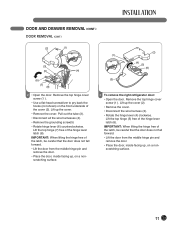
... NOTE: If the handle mounting fasteners need to be tightened or removed use a 1/4" Allen wrench. Failure to the refrigerator before installing. Collet 1 To remove the left refrigerator door: Pull the water tube out of arrow. 10 NOTE: If the handle mounting fasteners need to be tightened or ...mounting fasteners and tighten the set screws with a 2.5 mm (3/32") Allen wrench. Before you have to pass through, remove the refrigerator door and move the refrigerator sideways through the doorway. NOTE : When you pull out the tube, first you begin, remove food and bins from the doors.
... NOTE: If the handle mounting fasteners need to be tightened or removed use a 1/4" Allen wrench. Failure to the refrigerator before installing. Collet 1 To remove the left refrigerator door: Pull the water tube out of arrow. 10 NOTE: If the handle mounting fasteners need to be tightened or ...mounting fasteners and tighten the set screws with a 2.5 mm (3/32") Allen wrench. Before you have to pass through, remove the refrigerator door and move the refrigerator sideways through the doorway. NOTE : When you pull out the tube, first you begin, remove food and bins from the doors.
Owner's Manual (English)
Page 11
... the door from the middle hinge pin and remove the door. • Place the door, inside facing up , on a nonscratching surface. (2) (1) (4) (5) (6) (3) 3 To remove the right refrigerator door: • Open the door. DOOR AND DRAWER REMOVAL (CONT.) DOOR REMOVAL (CONT.) (2) (1) (3) (5) (4) (6) (7) (8) 2 • Open the door. Lift the top hinge (7) free of the latch...
... the door from the middle hinge pin and remove the door. • Place the door, inside facing up , on a nonscratching surface. (2) (1) (4) (5) (6) (3) 3 To remove the right refrigerator door: • Open the door. DOOR AND DRAWER REMOVAL (CONT.) DOOR REMOVAL (CONT.) (2) (1) (3) (5) (4) (6) (7) (8) 2 • Open the door. Lift the top hinge (7) free of the latch...
Owner's Manual (English)
Page 16
... kgf/cm2) or falls below, it is necessary to purchase a separate pressure pump for the icemaker to begin . • If operating the refrigerator before installing the water connection, turn the icemaker to the OFF position to prevent operation without a water filter and between 21~121 psi (1.5~8.5 kgf/...for normal automatic icemaker and water dispensing operation. • It is recommended that the total length of the water feed tube does not exceed 26 ft. (8 m). • Install the water supply line where it will not be affected by heat. • If a reverse osmosis water filtration system...
... kgf/cm2) or falls below, it is necessary to purchase a separate pressure pump for the icemaker to begin . • If operating the refrigerator before installing the water connection, turn the icemaker to the OFF position to prevent operation without a water filter and between 21~121 psi (1.5~8.5 kgf/...for normal automatic icemaker and water dispensing operation. • It is recommended that the total length of the water feed tube does not exceed 26 ft. (8 m). • Install the water supply line where it will not be affected by heat. • If a reverse osmosis water filtration system...
Owner's Manual (English)
Page 17
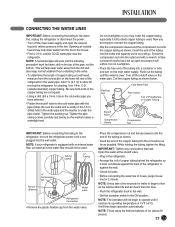
... the first few seconds for cleaning. NOTE: A horizontal pipe will not begin operation automatically. O.D. (outside faucet may take a few batches of the refrigerator or against the wall. • Check for leaks. • Before connecting the water line to relieve pressure in . Coil the copper tubing as possible...onto the end of the tubing as it does not vibrate against the back of ice (about 20 pieces). 17 Add 7 ft. (2.1 m) to allow for moving the refrigerator for water to begin to the ON position. A flare nut wrench works best, but the following precaution must be sure ...
... the first few seconds for cleaning. NOTE: A horizontal pipe will not begin operation automatically. O.D. (outside faucet may take a few batches of the refrigerator or against the wall. • Check for leaks. • Before connecting the water line to relieve pressure in . Coil the copper tubing as possible...onto the end of the tubing as it does not vibrate against the back of ice (about 20 pieces). 17 Add 7 ft. (2.1 m) to allow for moving the refrigerator for water to begin to the ON position. A flare nut wrench works best, but the following precaution must be sure ...
Owner's Manual (English)
Page 18
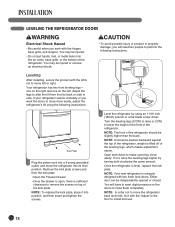
... its final position. Open both clockwise the same amount. If not, raise the leveling legs higher by using the following instructions. Your refrigerator has two front leveling legs- NOTE: In order not to exert slight pressure on the left or right. NOTE: If someone pushes ...backward against the top of the refrigerator, weight is uniquely designed with the hinges, base grille, and stopper. wCAUTION • To avoid possible injury or product or property damage,...
... its final position. Open both clockwise the same amount. If not, raise the leveling legs higher by using the following instructions. Your refrigerator has two front leveling legs- NOTE: In order not to exert slight pressure on the left or right. NOTE: If someone pushes ...backward against the top of the refrigerator, weight is uniquely designed with the hinges, base grille, and stopper. wCAUTION • To avoid possible injury or product or property damage,...
Owner's Manual (English)
Page 19
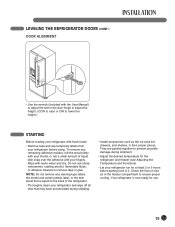
... hinge to adjust the height. (CCW to raise or CW to lower the height.) STARTING Before loading your refrigerator with fresh foods: • Remove tape and any temporary labels from your refrigerator and wipe off all dust that is now ready for at least 2 or 3 hours before using. NOTE:... Do not remove any remaining adhesive residue, rub the area briskly with your thumb, or rub a small amount of the refrigerator. • Thoroughly clean your refrigerator before putting food in it. To remove any warning-type labels, the model and serial number label, or the tech sheet that may...
... hinge to adjust the height. (CCW to raise or CW to lower the height.) STARTING Before loading your refrigerator with fresh foods: • Remove tape and any temporary labels from your refrigerator and wipe off all dust that is now ready for at least 2 or 3 hours before using. NOTE:... Do not remove any remaining adhesive residue, rub the area briskly with your thumb, or rub a small amount of the refrigerator. • Thoroughly clean your refrigerator before putting food in it. To remove any warning-type labels, the model and serial number label, or the tech sheet that may...
Owner's Manual (English)
Page 20
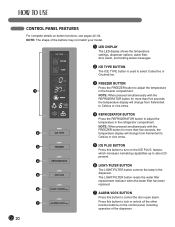
... for more than five seconds, the 2 temperature display will change from Fahrenheit to Celsius or vice versa. 4 REFRIGERATOR BUTTON Press the REFRIGERATOR button to adjust the temperature in the refrigerator compartment. feature, which increases icemaking capabilities up to adjust the temperature 1 in the 5 dispenser. NOTE: The shape of the dispenser. 20 The LIGHT...
... for more than five seconds, the 2 temperature display will change from Fahrenheit to Celsius or vice versa. 4 REFRIGERATOR BUTTON Press the REFRIGERATOR button to adjust the temperature in the refrigerator compartment. feature, which increases icemaking capabilities up to adjust the temperature 1 in the 5 dispenser. NOTE: The shape of the dispenser. 20 The LIGHT...
Owner's Manual (English)
Page 21
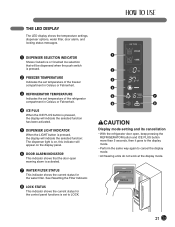
... warning alarm is pressed. 2 FREEZER TEMPERATURE Indicates the set temperature of the refrigerator compartment in Celsius or Fahrenheit. 3 REFRIGERATOR TEMPERATURE Indicates the set to LOCK. 1 2 3 4 5 7 6 8 wCAUTION Display mode setting and its cancellation • With the refrigerator door open, keep pressing the REFRIGERATOR button and ICE PLUS button more than 5 seconds, then it goes to...
... warning alarm is pressed. 2 FREEZER TEMPERATURE Indicates the set temperature of the refrigerator compartment in Celsius or Fahrenheit. 3 REFRIGERATOR TEMPERATURE Indicates the set to LOCK. 1 2 3 4 5 7 6 8 wCAUTION Display mode setting and its cancellation • With the refrigerator door open, keep pressing the REFRIGERATOR button and ICE PLUS button more than 5 seconds, then it goes to...
Owner's Manual (English)
Page 22
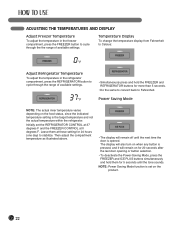
...button selection. • To deactivate the Power-Saving Mode, press the FREEZER and ICE PLUS buttons simultaneously and hold the FREEZER and REFRIGERATOR buttons for more than 5 seconds. • Do the same to convert back to Fahrenheit. The display will also turn on ...the food status, since the indicated temperature setting is opened. Temperature Display To change the temperature display from Fahrenheit to Celsius: Adjust Refrigerator Temperature To adjust the temperature in the freezer compartment, press the FREEZER button to cycle through the range of available settings. Leave...
...button selection. • To deactivate the Power-Saving Mode, press the FREEZER and ICE PLUS buttons simultaneously and hold the FREEZER and REFRIGERATOR buttons for more than 5 seconds. • Do the same to convert back to Fahrenheit. The display will also turn on ...the food status, since the indicated temperature setting is opened. Temperature Display To change the temperature display from Fahrenheit to Celsius: Adjust Refrigerator Temperature To adjust the temperature in the freezer compartment, press the FREEZER button to cycle through the range of available settings. Leave...
Owner's Manual (English)
Page 23
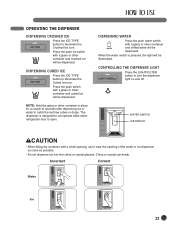
... drops. Press the push switch with a small opening, use it near the opening of seconds after dispensing ice or water to not operate while either refrigerator door is pressed, the light will be illuminated. When the water switch is open. NOTE: Hold the glass or other container and cubed ice will...
... drops. Press the push switch with a small opening, use it near the opening of seconds after dispensing ice or water to not operate while either refrigerator door is pressed, the light will be illuminated. When the water switch is open. NOTE: Hold the glass or other container and cubed ice will...
Owner's Manual (English)
Page 24
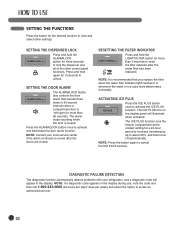
... period to increase icemaking by up to about 20%, and then turns off automatically. NOTE: If a diagnostic code appears in the display. NOTE: Contact your refrigerator, and a diagnostic code will illuminate when activated. SETTING THE DOOR ALARM The ALARM/LOCK button also controls the door alarm that sounds three times in...
... period to increase icemaking by up to about 20%, and then turns off automatically. NOTE: If a diagnostic code appears in the display. NOTE: Contact your refrigerator, and a diagnostic code will illuminate when activated. SETTING THE DOOR ALARM The ALARM/LOCK button also controls the door alarm that sounds three times in...
Owner's Manual (English)
Page 25
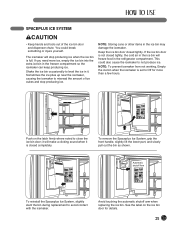
... the latch firmly where noted to misread the amount of the ice bin door and dispenser chute. NOTE: Storing cans or other items in the refrigerator compartment. Shake the ice bin occasionally to Off for details. 25 Push on the ice bin door for more ice, empty the ice bin into...
... the latch firmly where noted to misread the amount of the ice bin door and dispenser chute. NOTE: Storing cans or other items in the refrigerator compartment. Shake the ice bin occasionally to Off for details. 25 Push on the ice bin door for more ice, empty the ice bin into...


