Owner's Manual (English)
Page 2
...Operating the Dispenser 23 Setting the Functions 24 Spaceplus Ice System 25 Automatic Icemaker 26 Storing Foods 27 Location of reliable service. Your new LG French Door Refrigerator combines advanced cooling technology with many years of Foods 28 Shelf Height Adjustment 29 CARE AND ...CLEANING Removing and Replacing Components 30 Cleaning the Refrigerator 34 General Information 34 Replacing the Water Filter 35 ...
...Operating the Dispenser 23 Setting the Functions 24 Spaceplus Ice System 25 Automatic Icemaker 26 Storing Foods 27 Location of reliable service. Your new LG French Door Refrigerator combines advanced cooling technology with many years of Foods 28 Shelf Height Adjustment 29 CARE AND ...CLEANING Removing and Replacing Components 30 Cleaning the Refrigerator 34 General Information 34 Replacing the Water Filter 35 ...
Owner's Manual (English)
Page 3
...replaced.) NOTE: Some models have become frayed or otherwise damaged. w This is plugged in the area. • Unplug your refrigerator before using your refrigerator is in operation, do not touch the cold surfaces in the freezer compartment when hands are in . • Do not modify... NOT store or use a cord that were taped to the light circuit. • When you don't follow instructions. They could damage the refrigerator and seriously injure themselves. • Keep fingers out of hazards that have LED interior lighting and service should be performed by a qualified technician....
...replaced.) NOTE: Some models have become frayed or otherwise damaged. w This is plugged in the area. • Unplug your refrigerator before using your refrigerator is in operation, do not touch the cold surfaces in the freezer compartment when hands are in . • Do not modify... NOT store or use a cord that were taped to the light circuit. • When you don't follow instructions. They could damage the refrigerator and seriously injure themselves. • Keep fingers out of hazards that have LED interior lighting and service should be performed by a qualified technician....
Owner's Manual (English)
Page 4
...or off the doors. • Leave the shelves in places away from the fire such as you are throwing away your old refrigerator, make sure the CFC refrigerant is removed for proper disposal by a person responsible for their quality as the place where flammable gas is leaked. • ...appliance by a qualified servicer. Use refrozen foods as soon as possible to save as much of their safety. Before you throw away your old refrigerator or freezer: • Take off -color should not be refrozen and should not be subject to fines and imprisonment under provisions of environmental legislation....
...or off the doors. • Leave the shelves in places away from the fire such as you are throwing away your old refrigerator, make sure the CFC refrigerant is removed for proper disposal by a person responsible for their quality as the place where flammable gas is leaked. • ...appliance by a qualified servicer. Use refrozen foods as soon as possible to save as much of their safety. Before you throw away your old refrigerator or freezer: • Take off -color should not be refrozen and should not be subject to fines and imprisonment under provisions of environmental legislation....
Owner's Manual (English)
Page 5
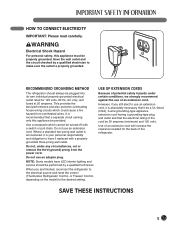
...that a separate circuit serving only this appliance must be turned off with a properly grounded three-prong wall outlet. RECOMMENDED GROUNDING METHOD The refrigerator should be performed by a qualified electrician to the desired setting. Use a receptacle which could cause a fire hazard from the power cord.... 60 Hz, AC only, and fused at 20 amperes. However, if you are finished, reconnect the refrigerator to the electrical source and reset the control (Thermostat, Refrigerator Control, or Freezer Control, depending on the model) to make sure the outlet is recommended that the ...
...that a separate circuit serving only this appliance must be turned off with a properly grounded three-prong wall outlet. RECOMMENDED GROUNDING METHOD The refrigerator should be performed by a qualified electrician to the desired setting. Use a receptacle which could cause a fire hazard from the power cord.... 60 Hz, AC only, and fused at 20 amperes. However, if you are finished, reconnect the refrigerator to the electrical source and reset the control (Thermostat, Refrigerator Control, or Freezer Control, depending on the model) to make sure the outlet is recommended that the ...
Owner's Manual (English)
Page 6
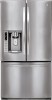
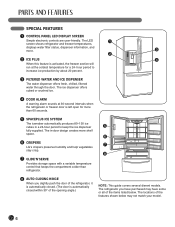
... or crushed ice. 4 DOOR ALARM A warning alarm sounds at the coldest temperature for more shelf space. 6 6 CRISPERS 7 LG's crispers preserve humidity and help vegetables stay crisp. 8 7 GLIDE'N'SERVE Provides storage space with a variable temperature control that keeps the...covers several dierent models. SPECIAL FEATURES 1 CONTROL PANEL LED DISPLAY SCREEN Simple electronic controls are user-friendly. The LED 1 screen shows refrigerator and freezer temperatures, displays water filter status, dispenser information, and more. 3 2 2 ICE PLUS 4 When this feature is activated...
... or crushed ice. 4 DOOR ALARM A warning alarm sounds at the coldest temperature for more shelf space. 6 6 CRISPERS 7 LG's crispers preserve humidity and help vegetables stay crisp. 8 7 GLIDE'N'SERVE Provides storage space with a variable temperature control that keeps the...covers several dierent models. SPECIAL FEATURES 1 CONTROL PANEL LED DISPLAY SCREEN Simple electronic controls are user-friendly. The LED 1 screen shows refrigerator and freezer temperatures, displays water filter status, dispenser information, and more. 3 2 2 ICE PLUS 4 When this feature is activated...
Owner's Manual (English)
Page 7
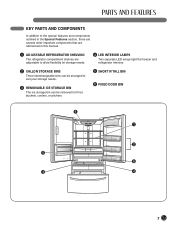
... outlined in the Special Features section, there are several other important components that are referenced in this manual. 1 ADJUSTABLE REFRIGERATOR SHELVING The refrigerator compartment shelves are adjustable to allow flexibility for storage needs. 4 LED INTERIOR LAMPS Two separate LED arrays light the freezer and... refrigerator interiors. 2 GALLON STORAGE BINS Three interchangeable bins can be arranged to suit your storage needs. 3 REMOVABLE ICE STORAGE BIN ...
... outlined in the Special Features section, there are several other important components that are referenced in this manual. 1 ADJUSTABLE REFRIGERATOR SHELVING The refrigerator compartment shelves are adjustable to allow flexibility for storage needs. 4 LED INTERIOR LAMPS Two separate LED arrays light the freezer and... refrigerator interiors. 2 GALLON STORAGE BINS Three interchangeable bins can be arranged to suit your storage needs. 3 REMOVABLE ICE STORAGE BIN ...
Owner's Manual (English)
Page 8
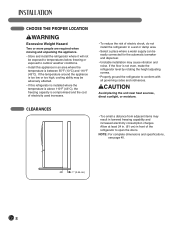
... the unit near heat sources, direct sunlight, or moisture. Allow at least 24 in. (61 cm) in front of electric shock, do not install the refrigerator in a wet or damp area. • Select a place where a water supply can be adversely affected. • If this appliance in an area where the... above 110°F (43°C), the freezing capacity is compromised and the cost of electricity used increases. • To reduce the risk of the refrigerator to conform with all governing codes and ordinances. If the temperature around the appliance is too low or too high, cooling ability may result in...
... the unit near heat sources, direct sunlight, or moisture. Allow at least 24 in. (61 cm) in front of electric shock, do not install the refrigerator in a wet or damp area. • Select a place where a water supply can be adversely affected. • If this appliance in an area where the... above 110°F (43°C), the freezing capacity is compromised and the cost of electricity used increases. • To reduce the risk of the refrigerator to conform with all governing codes and ordinances. If the temperature around the appliance is too low or too high, cooling ability may result in...
Owner's Manual (English)
Page 9
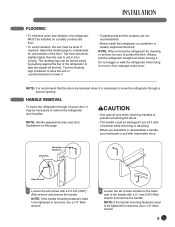
...When you assemble or disassemble a handle, you hit it . • Carpeting and soft tile surfaces are not recommended. • Never install the refrigerator on a platform or weakly supported structure. NOTE: If the handle mounting fasteners need to prevent scratching the doors. • The handle could occur.... floor damage could be damaged if you must be slightly higher than the rear to remove the refrigerator door handles. NOTE: Handle appearance may be necessary to aid in door closing. The leveling legs can be turned easily by ...
...When you assemble or disassemble a handle, you hit it . • Carpeting and soft tile surfaces are not recommended. • Never install the refrigerator on a platform or weakly supported structure. NOTE: If the handle mounting fasteners need to prevent scratching the doors. • The handle could occur.... floor damage could be damaged if you must be slightly higher than the rear to remove the refrigerator door handles. NOTE: Handle appearance may be necessary to aid in door closing. The leveling legs can be turned easily by ...

Owner's Manual (English)
Page 10
... Shock Hazard • Disconnect electrical supply to pass through, remove the refrigerator door and move the refrigerator sideways through the doorway. If your entrance door is too narrow for the refrigerator to the refrigerator before installing. You may be tightened or removed use a 1/4" Allen wrench... the handle on the door by aligning handle footprints to fit mounting fasteners and tighten the set screws on the bottom of the refrigerator. Before you work with the hinge, base grille, and stopper. HANDLE REMOVAL (CONT.) HANDLE REINSTALLATION Mounting Fasteners 1 Place the...
... Shock Hazard • Disconnect electrical supply to pass through, remove the refrigerator door and move the refrigerator sideways through the doorway. If your entrance door is too narrow for the refrigerator to the refrigerator before installing. You may be tightened or removed use a 1/4" Allen wrench... the handle on the door by aligning handle footprints to fit mounting fasteners and tighten the set screws on the bottom of the refrigerator. Before you work with the hinge, base grille, and stopper. HANDLE REMOVAL (CONT.) HANDLE REINSTALLATION Mounting Fasteners 1 Place the...
Owner's Manual (English)
Page 11
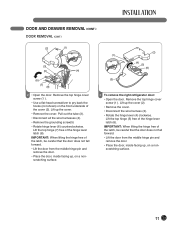
... the door from the middle hinge pin and remove the door. • Place the door, inside facing up , on a nonscratching surface. (2) (1) (4) (5) (6) (3) 3 To remove the right refrigerator door: • Open the door. Lift the top hinge (5) free of the hinge lever latch (8). Remove the top hinge cover screw (1 ). Lift the top hinge...
... the door from the middle hinge pin and remove the door. • Place the door, inside facing up , on a nonscratching surface. (2) (1) (4) (5) (6) (3) 3 To remove the right refrigerator door: • Open the door. Lift the top hinge (5) free of the hinge lever latch (8). Remove the top hinge cover screw (1 ). Lift the top hinge...
Owner's Manual (English)
Page 16
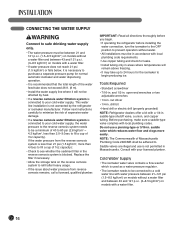
... nut driver • 1/4-in areas where temperatures will not be adhered to. drill bit • Hand drill or electric drill (properly grounded) NOTE: Refrigerator dealers offer a kit with a 1/4-in . Before purchasing, make sure a saddle-type valve complies with your licensed plumber. Do not use is connected ...about water pressure from the reverse osmosis system is less than 2.0~3.0sec to fill a cup of the water feed tube does not exceed 26 ft. (8 m). • Install the water supply line where it is necessary to purchase a separate pressure pump for normal automatic icemaker and water ...
... nut driver • 1/4-in areas where temperatures will not be adhered to. drill bit • Hand drill or electric drill (properly grounded) NOTE: Refrigerator dealers offer a kit with a 1/4-in . Before purchasing, make sure a saddle-type valve complies with your licensed plumber. Do not use is connected ...about water pressure from the reverse osmosis system is less than 2.0~3.0sec to fill a cup of the water feed tube does not exceed 26 ft. (8 m). • Install the water supply line where it is necessary to purchase a separate pressure pump for normal automatic icemaker and water ...
Owner's Manual (English)
Page 17
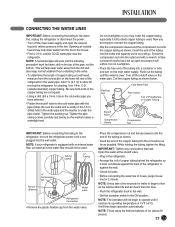
... THE WATER LINES IMPORTANT: Before connecting the tubing to the water line, unplug the refrigerator or disconnect the power. • Turn off the shutoff valve on the water pipe. Add 7 ft. (2.1 m) to the ON position. Tighten the pipe clamp screws carefully and evenly so... the washer makes a watertight seal. Tubing Clamp 1/4" Tubing 1/4" Compression Nut Ferrule (Sleeve) Water valve Refrigerator Connection • Remove the plastic flexible cap from ...
... THE WATER LINES IMPORTANT: Before connecting the tubing to the water line, unplug the refrigerator or disconnect the power. • Turn off the shutoff valve on the water pipe. Add 7 ft. (2.1 m) to the ON position. Tighten the pipe clamp screws carefully and evenly so... the washer makes a watertight seal. Tubing Clamp 1/4" Tubing 1/4" Compression Nut Ferrule (Sleeve) Water valve Refrigerator Connection • Remove the plastic flexible cap from ...
Owner's Manual (English)
Page 18
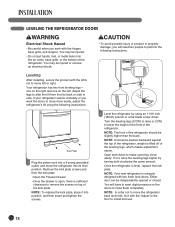
... kick plate screws and then the kick plate. • Open the Freezer Drawer. • Once the drawer is open, there is lifted off of the refrigerator should be injured or receive an electrical shock. Turn the leveling legs (CCW) to raise or (CW) to make sure they close them completely. NOTE...: Your new refrigerator is level, replace the kickplate. Adjust the legs to alter the tilt from front to back or side to close more easily, adjust the...
... kick plate screws and then the kick plate. • Open the Freezer Drawer. • Once the drawer is open, there is lifted off of the refrigerator should be injured or receive an electrical shock. Turn the leveling legs (CCW) to raise or (CW) to make sure they close them completely. NOTE...: Your new refrigerator is level, replace the kickplate. Adjust the legs to alter the tilt from front to back or side to close more easily, adjust the...
Owner's Manual (English)
Page 19
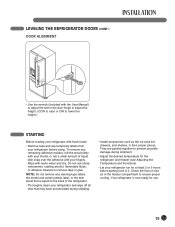
... to prevent possible damage during shipping. • Install accessories such as the ice cube bin, drawers, and shelves, in their proper places. LEVELING THE REFRIGERATOR DOORS (CONT.) DOOR ALIGNMENT • Use the wrench (Included with the User Manual) to adjust the bolt in the door hinge to adjust the height...putting food in it. Check the flow of cold air in the freezer compartment to remove tape or glue. Do not use . 19 Your refrigerator is taped to the back of liquid dish soap over the adhesive with warm water and dry. To remove any remaining adhesive residue, rub the...
... to prevent possible damage during shipping. • Install accessories such as the ice cube bin, drawers, and shelves, in their proper places. LEVELING THE REFRIGERATOR DOORS (CONT.) DOOR ALIGNMENT • Use the wrench (Included with the User Manual) to adjust the bolt in the door hinge to adjust the height...putting food in it. Check the flow of cold air in the freezer compartment to remove tape or glue. Do not use . 19 Your refrigerator is taped to the back of liquid dish soap over the adhesive with warm water and dry. To remove any remaining adhesive residue, rub the...
Owner's Manual (English)
Page 20
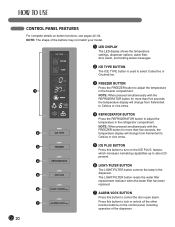
... for more than five seconds, the 2 temperature display will change from Fahrenheit to Celsius or vice versa. 4 REFRIGERATOR BUTTON Press the REFRIGERATOR button to turn on the ICE PLUS. NOTE: When pressed simultaneously with the FREEZER button for more than five seconds, the temperature display will change ... or vice versa. 3 5 ICE PLUS BUTTON Press this button to about 20 percent. 4 6 LIGHT/FILTER BUTTON The LIGHT/FILTER button controls the lamp in the refrigerator compartment. NOTE: The shape of the dispenser. 20
... for more than five seconds, the 2 temperature display will change from Fahrenheit to Celsius or vice versa. 4 REFRIGERATOR BUTTON Press the REFRIGERATOR button to turn on the ICE PLUS. NOTE: When pressed simultaneously with the FREEZER button for more than five seconds, the temperature display will change ... or vice versa. 3 5 ICE PLUS BUTTON Press this button to about 20 percent. 4 6 LIGHT/FILTER BUTTON The LIGHT/FILTER button controls the lamp in the refrigerator compartment. NOTE: The shape of the dispenser. 20
Owner's Manual (English)
Page 21
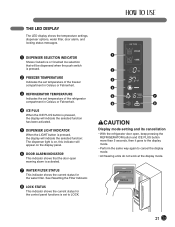
...the Filter Indicator. 8 LOCK STATUS This indicator shows the current status for the control panel functions is set temperature of the refrigerator compartment in Celsius or Fahrenheit. 4 ICE PLUS When the ICE PLUS button is pressed, the display will indicate the selected ...set temperature of the freezer compartment in Celsius or Fahrenheit. 3 REFRIGERATOR TEMPERATURE Indicates the set to LOCK. 1 2 3 4 5 7 6 8 wCAUTION Display mode setting and its cancellation • With the refrigerator door open, keep pressing the REFRIGERATOR button and ICE PLUS button more than 5 seconds, then it...
...the Filter Indicator. 8 LOCK STATUS This indicator shows the current status for the control panel functions is set temperature of the refrigerator compartment in Celsius or Fahrenheit. 4 ICE PLUS When the ICE PLUS button is pressed, the display will indicate the selected ...set temperature of the freezer compartment in Celsius or Fahrenheit. 3 REFRIGERATOR TEMPERATURE Indicates the set to LOCK. 1 2 3 4 5 7 6 8 wCAUTION Display mode setting and its cancellation • With the refrigerator door open, keep pressing the REFRIGERATOR button and ICE PLUS button more than 5 seconds, then it...
Owner's Manual (English)
Page 22
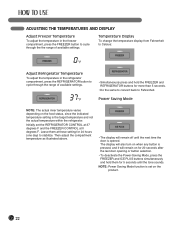
... seconds. • Do the same to convert back to Fahrenheit. Temperature Display To change the temperature display from Fahrenheit to Celsius: Adjust Refrigerator Temperature To adjust the temperature in the freezer compartment, press the FREEZER button to stabilize. Initially set on the food status, since the... 5 seconds until the next time the door is the target temperature and not the actual temperature within the refrigerator. NOTE: Power Saving Mode function is set the REFRIGERATOR CONTROL at 37 degrees F and the FREEZER CONTROL at these setting for 24 hours (one day) to ...
... seconds. • Do the same to convert back to Fahrenheit. Temperature Display To change the temperature display from Fahrenheit to Celsius: Adjust Refrigerator Temperature To adjust the temperature in the freezer compartment, press the FREEZER button to stabilize. Initially set on the food status, since the... 5 seconds until the next time the door is the target temperature and not the actual temperature within the refrigerator. NOTE: Power Saving Mode function is set the REFRIGERATOR CONTROL at 37 degrees F and the FREEZER CONTROL at these setting for 24 hours (one day) to ...
Owner's Manual (English)
Page 23
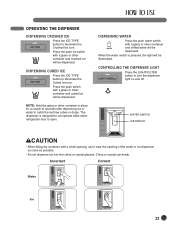
... button to illuminate the Cubed Ice icon. The dispenser is open. CONTROLLING THE DISPENSER LIGHT Press the LIGHT/FILTER button to not operate while either refrigerator door is designed to turn the dispenser light on and off. Press the push switch with a glass or other container and cubed ice will be...
... button to illuminate the Cubed Ice icon. The dispenser is open. CONTROLLING THE DISPENSER LIGHT Press the LIGHT/FILTER button to not operate while either refrigerator door is designed to turn the dispenser light on and off. Press the push switch with a glass or other container and cubed ice will be...
Owner's Manual (English)
Page 24
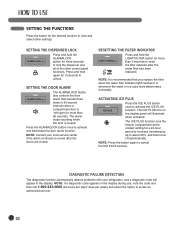
... THE DISPENSER LOCK Press and hold again for a 24-hour period to increase icemaking by up to locate an authorized servicer. 24 NOTE: Contact your refrigerator, and a diagnostic code will illuminate when activated. NOTE: Press the button again to sound after the water filter has been replaced. DIAGNOSTIC FAILURE DETECTION The...
... THE DISPENSER LOCK Press and hold again for a 24-hour period to increase icemaking by up to locate an authorized servicer. 24 NOTE: Contact your refrigerator, and a diagnostic code will illuminate when activated. NOTE: Press the button again to sound after the water filter has been replaced. DIAGNOSTIC FAILURE DETECTION The...
Owner's Manual (English)
Page 25
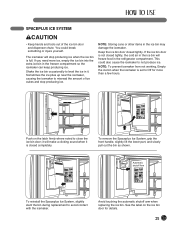
The icemaker will freeze food in the refrigerator compartment. Sometimes the ice piles up near the icemaker, causing the icemaker to misread the amount of the ice bin door and dispenser chute. NOTE: ...
The icemaker will freeze food in the refrigerator compartment. Sometimes the ice piles up near the icemaker, causing the icemaker to misread the amount of the ice bin door and dispenser chute. NOTE: ...


