
Owner's Manual
Page 2
...7 INSTALLATION Choose the Proper Location 8 Clearances 8 Flooring 9 Handle Removal 9 Door and Drawer Removal 10 Connecting the Water Supply 16 Connecting the Water Lines 16 Leveling the Refrigerator Doors 18 Starting 19 HOW TO USE Control Panel Features 20 The LCD Display 21 Adjusting the... Foods 27 Location of reliable service. IMPORTANT SAFETY INFORMATION Basic Safety Precautions 3 CFC Disposal 4 How to the LG family. Your new LG French Door Refrigerator combines advanced cooling technology with many years of Foods 28 Shelf Height Adjustment 29 CARE AND CLEANING...
...7 INSTALLATION Choose the Proper Location 8 Clearances 8 Flooring 9 Handle Removal 9 Door and Drawer Removal 10 Connecting the Water Supply 16 Connecting the Water Lines 16 Leveling the Refrigerator Doors 18 Starting 19 HOW TO USE Control Panel Features 20 The LCD Display 21 Adjusting the... Foods 27 Location of reliable service. IMPORTANT SAFETY INFORMATION Basic Safety Precautions 3 CFC Disposal 4 How to the LG family. Your new LG French Door Refrigerator combines advanced cooling technology with many years of Foods 28 Shelf Height Adjustment 29 CARE AND CLEANING...
Owner's Manual
Page 13
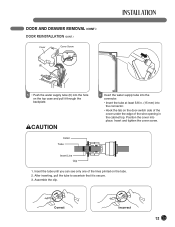
... tube to ascertain that it through the backplate. wCAUTION Collet Tube 6 Insert the water supply tube into the connector. • Hook the tab on the tube. 2. Insert the tube until you can see only one of the lines printed on the door-switch side of the cover under the edge of the... at least 5/8 in the cabinet top. Assemble the clip. Position the cover into the hole on the top case and pull it is secure. 3. Insert Line Clip 1. Insert and tighten the cover screw. DOOR AND DRAWER REMOVAL (CONT.) DOOR REINSTALLATION (CONT.) Cover Cover Screw (6) 5 • Push the...
... tube to ascertain that it through the backplate. wCAUTION Collet Tube 6 Insert the water supply tube into the connector. • Hook the tab on the tube. 2. Insert the tube until you can see only one of the lines printed on the door-switch side of the cover under the edge of the... at least 5/8 in the cabinet top. Assemble the clip. Position the cover into the hole on the top case and pull it is secure. 3. Insert Line Clip 1. Insert and tighten the cover screw. DOOR AND DRAWER REMOVAL (CONT.) DOOR REINSTALLATION (CONT.) Cover Cover Screw (6) 5 • Push the...
Owner's Manual
Page 16
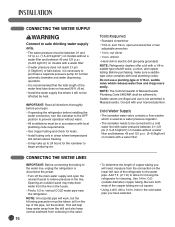
...The icemaker needs to be connected to a cold water line with water pressure between 21~121 psi (1.5~8.5 kgf/cm2) on models without a water filter and between 43 and 121 p.s.i. (3~8.5 kgf/cm2) on models with a water filter. • If water pressure does not reach 21 psi (1.5kgf/cm2... Required • Standard screwdriver • 7/16-in Massachusetts. CONNECTING THE WATER LINES IMPORTANT: Before connecting the tubing to the water line, unplug the refrigerator or disconnect the power. • Turn off the main water supply and open -end wrenches or two adjustable wrenches • 1/4-in ...
...The icemaker needs to be connected to a cold water line with water pressure between 21~121 psi (1.5~8.5 kgf/cm2) on models without a water filter and between 43 and 121 p.s.i. (3~8.5 kgf/cm2) on models with a water filter. • If water pressure does not reach 21 psi (1.5kgf/cm2... Required • Standard screwdriver • 7/16-in Massachusetts. CONNECTING THE WATER LINES IMPORTANT: Before connecting the tubing to the water line, unplug the refrigerator or disconnect the power. • Turn off the main water supply and open -end wrenches or two adjustable wrenches • 1/4-in ...
Owner's Manual
Page 17
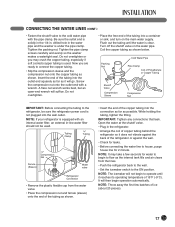
...and evenly so the washer makes a watertight seal. Insert the end of the tubing into a container or sink, and turn on the water pipe. CONNECTING THE WATER LINES (CONT.) • Fasten the shutoff valve to connect the copper tubing. • Slip the compression sleeve and the compression nut onto the...works best, but an open-end wrench will then begin to operate until the water is not plugged into the connection as far as shown. Open the water at the shutoff valve. • Plug in -line water filter should not be sure the refrigerator power cord is clear. NOTE: The ...
...and evenly so the washer makes a watertight seal. Insert the end of the tubing into a container or sink, and turn on the water pipe. CONNECTING THE WATER LINES (CONT.) • Fasten the shutoff valve to connect the copper tubing. • Slip the compression sleeve and the compression nut onto the...works best, but an open-end wrench will then begin to operate until the water is not plugged into the connection as far as shown. Open the water at the shutoff valve. • Plug in -line water filter should not be sure the refrigerator power cord is clear. NOTE: The ...
Owner's Manual
Page 26
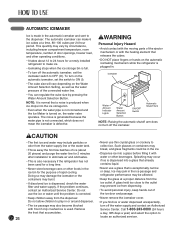
... or hands on the Water Amount Selection Setting, as well as the water pressure of the connected water line. • You can make ice. • Icemaking stops when the ice storage bin is full. • To turn off the icemaker. lcemaker Water Amount Indicator Lights Water Amount Selection Button ON/...used for a long time. • Never store beverage cans or other operating conditions. • It takes about 20 pieces) and purge the water line for the purpose of rapid cooling. To turn on the automatic icemaker, set the icemaker switch to eliminate air and odd tastes. • ...
... or hands on the Water Amount Selection Setting, as well as the water pressure of the connected water line. • You can make ice. • Icemaking stops when the ice storage bin is full. • To turn off the icemaker. lcemaker Water Amount Indicator Lights Water Amount Selection Button ON/...used for a long time. • Never store beverage cans or other operating conditions. • It takes about 20 pieces) and purge the water line for the purpose of rapid cooling. To turn on the automatic icemaker, set the icemaker switch to eliminate air and odd tastes. • ...
Owner's Manual
Page 38
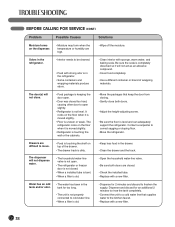
...• When a filter is old. • Keep less food in the tank for too long. • The unit is not properly connected to cold water line. • When a filter is old. • Dispense for 2 minutes and discard to freshen the supply. Contact a carpenter to move. Dispense and discard... for an additional 2 minutes to rinse the tank completely. • Connect the unit to a cold water line that keep the door from closing. • Gently close . • Food package is keeping the door open. • Door was closed too hard...
...• When a filter is old. • Keep less food in the tank for too long. • The unit is not properly connected to cold water line. • When a filter is old. • Dispense for 2 minutes and discard to freshen the supply. Contact a carpenter to move. Dispense and discard... for an additional 2 minutes to rinse the tank completely. • Connect the unit to a cold water line that keep the door from closing. • Gently close . • Food package is keeping the door open. • Door was closed too hard...
Owner's Manual
Page 39
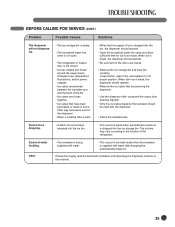
...are jammed between the icemaker arm and the back of ice is dropped into the bin, the dispenser should operate. • Open the household water line valve and allow sufficient time for ice to prevent the cubes from freezing together. • Only the ice cubes made by the icemaker should...FOR SERVICE (CONT.) Problem Possible Causes Solutions The dispenser will not dispense ice. • The ice storage bin is empty. • The household water-line valve is not open. • The refrigerator or freezer door is not closed . • Remove the ice storage bin and thaw the contents.
...are jammed between the icemaker arm and the back of ice is dropped into the bin, the dispenser should operate. • Open the household water line valve and allow sufficient time for ice to prevent the cubes from freezing together. • Only the ice cubes made by the icemaker should...FOR SERVICE (CONT.) Problem Possible Causes Solutions The dispenser will not dispense ice. • The ice storage bin is empty. • The household water-line valve is not open. • The refrigerator or freezer door is not closed . • Remove the ice storage bin and thaw the contents.


