
Owner's Manual
Page 2
... care instructions in this this manual and your purchase and welcome to Connect Electricity 5 PARTS AND FEATURES Special Features 6 Key Parts and Components 7 INSTALLATION Choose the Proper Location 8 Clearances 8 Flooring 9 Handle Removal 9 Door and Drawer Removal 10 Connecting the Water Supply 16 Connecting the Water Lines 16 Leveling the Refrigerator Doors 18 Starting 19 HOW TO USE Control Panel Features 20 The LCD Display 21 Adjusting the Temperatures and Display 22 Operating the Dispenser 23 Setting the Functions 24 In-Door Ice Bank 25 Automatic Icemaker...
... care instructions in this this manual and your purchase and welcome to Connect Electricity 5 PARTS AND FEATURES Special Features 6 Key Parts and Components 7 INSTALLATION Choose the Proper Location 8 Clearances 8 Flooring 9 Handle Removal 9 Door and Drawer Removal 10 Connecting the Water Supply 16 Connecting the Water Lines 16 Leveling the Refrigerator Doors 18 Starting 19 HOW TO USE Control Panel Features 20 The LCD Display 21 Adjusting the Temperatures and Display 22 Operating the Dispenser 23 Setting the Functions 24 In-Door Ice Bank 25 Automatic Icemaker...
Owner's Manual
Page 3
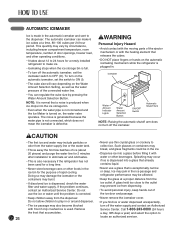
... replacing a burned-out light bulb, unplug the refrigerator or turn off power at either or both controls to the OFF position does not remove power to the light circuit. • When you to the product. It alerts you are finished, reconnect the refrigerator to the electrical source and reset the control (Thermostat Refrigerator Control, or Freezer Control, or Freezer Control, depending on the automatic icemaking mechanism while the refrigerator is plugged in the refrigerator. wCAUTION Indicates...
... replacing a burned-out light bulb, unplug the refrigerator or turn off power at either or both controls to the OFF position does not remove power to the light circuit. • When you to the product. It alerts you are finished, reconnect the refrigerator to the electrical source and reset the control (Thermostat Refrigerator Control, or Freezer Control, or Freezer Control, depending on the automatic icemaking mechanism while the refrigerator is plugged in the refrigerator. wCAUTION Indicates...
Owner's Manual
Page 6
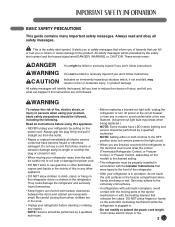
... percent. 3 FILTERED WATER AND ICE DISPENSER The water dispenser offers fresh, chilled, filtered water through the door for a 24- SPECIAL FEATURES 1 CONTROL PANEL LCD DISPLAY SCREEN Simple electronic controls are user-friendly. 1 The LCD screen shows refrigerator and freezer temperatures, displays water filter status, 3 dispenser information, and more shelf space. 6 6 OPTIBIN ™ CRISPERS LG's OptiBin ™ Crispers preserve humidity and help vegetables stay crisp. 7 AUTO CLOSING HINGE 7 When you slightly push the door of the cool chamber, it...
... percent. 3 FILTERED WATER AND ICE DISPENSER The water dispenser offers fresh, chilled, filtered water through the door for a 24- SPECIAL FEATURES 1 CONTROL PANEL LCD DISPLAY SCREEN Simple electronic controls are user-friendly. 1 The LCD screen shows refrigerator and freezer temperatures, displays water filter status, 3 dispenser information, and more shelf space. 6 6 OPTIBIN ™ CRISPERS LG's OptiBin ™ Crispers preserve humidity and help vegetables stay crisp. 7 AUTO CLOSING HINGE 7 When you slightly push the door of the cool chamber, it...

Owner's Manual
Page 8
... a water supply can be easily connected for the automatic icemaker and dispenser. • Unstable installation may cause vibration and noise. If the floor is not even, make the refrigerator level by rotating the height adjusting screws. • Properly ground the refrigerator to conform with all governing codes and ordinances. Allow at least 24 in. (61 cm) in front of electric shock, do not install the refrigerator in...
... a water supply can be easily connected for the automatic icemaker and dispenser. • Unstable installation may cause vibration and noise. If the floor is not even, make the refrigerator level by rotating the height adjusting screws. • Properly ground the refrigerator to conform with all governing codes and ordinances. Allow at least 24 in. (61 cm) in front of electric shock, do not install the refrigerator in...

Owner's Manual
Page 9
... feet. HANDLE REMOVAL To move the refrigerator through a narrow opening. Mounting Fasteners Set Screw Allen Wrench 1 Loosen the set screws located on a platform or weakly supported structure. NOTE: When moving it is necessary to protect the floor. The front should be slightly higher than the rear to prevent scratching the doors. • The handle could occur. wCAUTION • Use special care when removing handles to aid...
... feet. HANDLE REMOVAL To move the refrigerator through a narrow opening. Mounting Fasteners Set Screw Allen Wrench 1 Loosen the set screws located on a platform or weakly supported structure. NOTE: When moving it is necessary to protect the floor. The front should be slightly higher than the rear to prevent scratching the doors. • The handle could occur. wCAUTION • Use special care when removing handles to aid...
Owner's Manual
Page 16
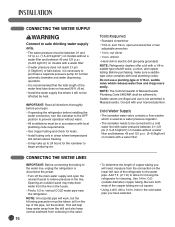
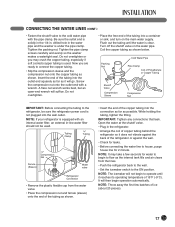
...; Use copper tubing and check for normal automatic icemaker and water dispensing operation. • It is not permitted in . CONNECTING THE WATER LINES IMPORTANT: Before connecting the tubing to the water line, unplug the refrigerator or disconnect the power. • Turn off the main water supply and open -end wrenches or two adjustable wrenches • 1/4-in . NOTE: A horizontal pipe will work, but the following precaution must be taken: drill on models with a water filter...
...; Use copper tubing and check for normal automatic icemaker and water dispensing operation. • It is not permitted in . CONNECTING THE WATER LINES IMPORTANT: Before connecting the tubing to the water line, unplug the refrigerator or disconnect the power. • Turn off the main water supply and open -end wrenches or two adjustable wrenches • 1/4-in . NOTE: A horizontal pipe will work, but the following precaution must be taken: drill on models with a water filter...
Owner's Manual
Page 17
... tubing as possible. A flare nut wrench works best, but an open-end wrench will then begin to operate until the water is clear. NOTE: Throw away the first few seconds for 2 minute. CONNECTING THE WATER LINES (CONT.) • Fasten the shutoff valve to the cold water pipe with an internal water filter, an external in-line water filter should not be sure the refrigerator power cord is not plugged...
... tubing as possible. A flare nut wrench works best, but an open-end wrench will then begin to operate until the water is clear. NOTE: Throw away the first few seconds for 2 minute. CONNECTING THE WATER LINES (CONT.) • Fasten the shutoff valve to the cold water pipe with an internal water filter, an external in-line water filter should not be sure the refrigerator power cord is not plugged...
Owner's Manual
Page 18
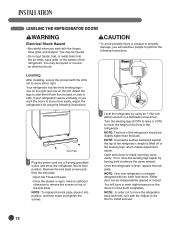
... screws and then the kick plate. • Open the Freezer Drawer. • Once the drawer is open, there is uniquely designed with the hinges, base grille, and stopper. You will need two people to remove the screws on top of the leveling legs, which makes adjustment easier. LEVELING THE REFRIGERATOR DOORS wWARNING Electrical Shock Hazard • Be careful when you will have to exert slight pressure...
... screws and then the kick plate. • Open the Freezer Drawer. • Once the drawer is open, there is uniquely designed with the hinges, base grille, and stopper. You will need two people to remove the screws on top of the leveling legs, which makes adjustment easier. LEVELING THE REFRIGERATOR DOORS wWARNING Electrical Shock Hazard • Be careful when you will have to exert slight pressure...
Owner's Manual
Page 19
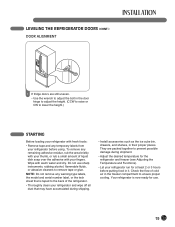
... fingers. Wipe with warm water and dry. To remove any remaining adhesive residue, rub the area briskly with your thumb, or rub a small amount of cold air in the freezer compartment to ensure proper cooling. LEVELING THE REFRIGERATOR DOORS (CONT.) DOOR ALIGNMENT 1 If fridge doors are packed together to prevent possible damage during shipping. • Install accessories such as the ice cube bin, drawers, and shelves, in their...
... fingers. Wipe with warm water and dry. To remove any remaining adhesive residue, rub the area briskly with your thumb, or rub a small amount of cold air in the freezer compartment to ensure proper cooling. LEVELING THE REFRIGERATOR DOORS (CONT.) DOOR ALIGNMENT 1 If fridge doors are packed together to prevent possible damage during shipping. • Install accessories such as the ice cube bin, drawers, and shelves, in their...

Owner's Manual
Page 20
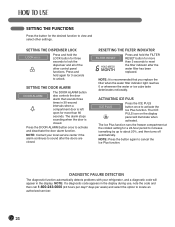
... display will change from Fahrenheit to control the door-open alarm. 7 LIGHT BUTTON The LIGHT button controls the lamp in the freezer compartment. feature, which increases icemaking capabilities up to about 20 percent. 6 DOOR ALARM BUTTON Press this button to adjust the temperature in the refrigerator compartment. CUBE/CRUSH FREEZER REFRIGERATOR ICE PLUS DOOR ALARM LIGHT LOCK 3SECS FILTER RESET 4 REFRIGERATOR BUTTON Press the REFRIGERATOR button to turn on the control panel, including operation of the dispenser. 9 FILTER RESET BUTTON The FILTER RESET button resets the water...
... display will change from Fahrenheit to control the door-open alarm. 7 LIGHT BUTTON The LIGHT button controls the lamp in the freezer compartment. feature, which increases icemaking capabilities up to about 20 percent. 6 DOOR ALARM BUTTON Press this button to adjust the temperature in the refrigerator compartment. CUBE/CRUSH FREEZER REFRIGERATOR ICE PLUS DOOR ALARM LIGHT LOCK 3SECS FILTER RESET 4 REFRIGERATOR BUTTON Press the REFRIGERATOR button to turn on the control panel, including operation of the dispenser. 9 FILTER RESET BUTTON The FILTER RESET button resets the water...
Owner's Manual
Page 24
.... NOTE: If a diagnostic code appears in the display. SETTING THE DOOR ALARM DOOR ALARM The DOOR ALARM button also controls the door alarm that you replace the filter when the water filter indicator light reaches 0 or whenever the water or ice cube taste deteriorates noticeably. ACTIVATING ICE PLUS ICE PLUS Press the ICE PULS button once to locate an authorized servicer. 24 The ICE PULS icon on the display panel will appear in the display during use, note the code and then call...
.... NOTE: If a diagnostic code appears in the display. SETTING THE DOOR ALARM DOOR ALARM The DOOR ALARM button also controls the door alarm that you replace the filter when the water filter indicator light reaches 0 or whenever the water or ice cube taste deteriorates noticeably. ACTIVATING ICE PLUS ICE PLUS Press the ICE PULS button once to locate an authorized servicer. 24 The ICE PULS icon on the display panel will appear in the display during use, note the code and then call...
Owner's Manual
Page 26
To turn off the automatic icemaker, set the switch to play in the ice bin for a newly installed refrigerator to the dispenser. The noise is generated because the water pipe is not connected, which does not mean the icemaker is used for 2 minutes after installation to 26 locate an authorized servicer. Doing so may damage the icemaker or the containers may vary by pressing the Water Amount Selection Button. Such glasses or...
To turn off the automatic icemaker, set the switch to play in the ice bin for a newly installed refrigerator to the dispenser. The noise is generated because the water pipe is not connected, which does not mean the icemaker is used for 2 minutes after installation to 26 locate an authorized servicer. Doing so may damage the icemaker or the containers may vary by pressing the Water Amount Selection Button. Such glasses or...
Owner's Manual
Page 34
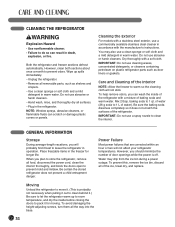
... replace. Water may also use abrasive or harsh cleaners. • Hand wash, rinse, and thoroughly dry all removable parts, such as door liners or gaskets. Care and Cleaning of water). When you will not affect your refrigerator temperatures. CLEANING THE REFRIGERATOR wWARNING Explosion Hazard • Use nonflammable cleaner. • Failure to do so can result in the freezer for moving. Both the refrigerator and freezer sections defrost automatically. However, clean...
... replace. Water may also use abrasive or harsh cleaners. • Hand wash, rinse, and thoroughly dry all removable parts, such as door liners or gaskets. Care and Cleaning of water). When you will not affect your refrigerator temperatures. CLEANING THE REFRIGERATOR wWARNING Explosion Hazard • Use nonflammable cleaner. • Failure to do so can result in the freezer for moving. Both the refrigerator and freezer sections defrost automatically. However, clean...
Owner's Manual
Page 35
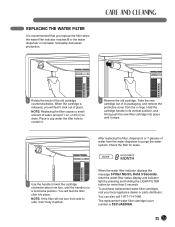
... water dispenser or icemaker noticeably decreases production. 1 Rotate the knob of its vertical position, and firmly push the new filter cartridge into place. The replacement water filter cartridge's part number is recommended that you will not turn , until it . 2 Remove the old cartridge. Check the filter for more than 3 seconds. When the water filter indicator displays the message 0 Filter Month, Hold 3 Seconds, reset the water filter status display and indicator light by pressing and holding the LIGHT/FILTER button for leaks. 1 Use...
... water dispenser or icemaker noticeably decreases production. 1 Rotate the knob of its vertical position, and firmly push the new filter cartridge into place. The replacement water filter cartridge's part number is recommended that you will not turn , until it . 2 Remove the old cartridge. Check the filter for more than 3 seconds. When the water filter indicator displays the message 0 Filter Month, Hold 3 Seconds, reset the water filter status display and indicator light by pressing and holding the LIGHT/FILTER button for leaks. 1 Use...
Owner's Manual
Page 36
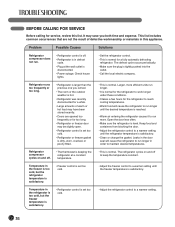
...; Clean or change the gasket. Check house lights. • Set the refrigerator control. • This is normal for too long. • Refrigerator or freezer door may be slightly open. • Refrigerator control is normal for the refrigerator to work longer under these conditions. • It takes a few hours for service, review this appliance. Leaks in the door seal will cause the refrigerator to run longer until the desired temperature is reached. • Warm air...
...; Clean or change the gasket. Check house lights. • Set the refrigerator control. • This is normal for too long. • Refrigerator or freezer door may be slightly open. • Refrigerator control is normal for the refrigerator to work longer under these conditions. • It takes a few hours for service, review this appliance. Leaks in the door seal will cause the refrigerator to run longer until the desired temperature is reached. • Warm air...
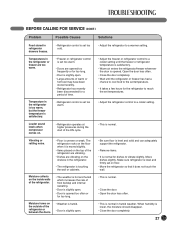
Owner's Manual
Page 37
... refrigerator drawers freezes. • Refrigerator control is lower, the moisture should disappear. • Close the door completely. 37 Open the door less often. • Close the door completely. • Wait until the freezer or refrigerator temperature is satisfactory. • Warm air enters the refrigerator/freezer whenever the door is set temperatures. • Adjust the refrigerator control to a colder setting. • This is normal. • Be sure floor is level and solid and can adequately support...
... refrigerator drawers freezes. • Refrigerator control is lower, the moisture should disappear. • Close the door completely. 37 Open the door less often. • Close the door completely. • Wait until the freezer or refrigerator temperature is satisfactory. • Warm air enters the refrigerator/freezer whenever the door is set temperatures. • Adjust the refrigerator control to a colder setting. • This is normal. • Be sure floor is level and solid and can adequately support...
Owner's Manual
Page 38
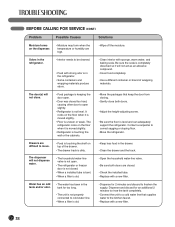
... refrigerator or freezer door is not closed. • When a installed tube is bent. • When a filter is old. • Keep less food in the refrigerator. • Some containers and wrapping materials produce odors. • Clean interior with a new filter. The door(s) will not dispense water. • Food is in the drawer. • Clean the drawer and the track. • Open the household water-line valve. • Be sure both doors. • Adjust the height-adjusting...
... refrigerator or freezer door is not closed. • When a installed tube is bent. • When a filter is old. • Keep less food in the refrigerator. • Some containers and wrapping materials produce odors. • Clean interior with a new filter. The door(s) will not dispense water. • Food is in the drawer. • Clean the drawer and the track. • Open the household water-line valve. • Be sure both doors. • Adjust the height-adjusting...
Owner's Manual
Page 39
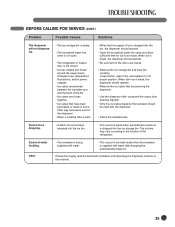
... the ice storage bin. BEFORE CALLING FOR SERVICE (CONT.) Problem Possible Causes Solutions The dispenser will not dispense ice. • The ice storage bin is empty. • The household water-line valve is not open. • The refrigerator or freezer door is not closed. • Ice has melted and frozen around the auger due to infrequent use, temperature fluctuations, and/or power outages. • Ice cubes are jammed between the icemaker arm...
... the ice storage bin. BEFORE CALLING FOR SERVICE (CONT.) Problem Possible Causes Solutions The dispenser will not dispense ice. • The ice storage bin is empty. • The household water-line valve is not open. • The refrigerator or freezer door is not closed. • Ice has melted and frozen around the auger due to infrequent use, temperature fluctuations, and/or power outages. • Ice cubes are jammed between the icemaker arm...
Owner's Manual
Page 41
... submit a copy of the bill of sale to locate your LG refrigerator is required and must be repaired or replaced, at the time warranty service is good only to deliver, pick up, and/or install the product, instruct, or replace house fuses or correct wiring, or correction of unauthorized repairs. • Damages or operating problems that vary from the Date of incidental or consequential...
... submit a copy of the bill of sale to locate your LG refrigerator is required and must be repaired or replaced, at the time warranty service is good only to deliver, pick up, and/or install the product, instruct, or replace house fuses or correct wiring, or correction of unauthorized repairs. • Damages or operating problems that vary from the Date of incidental or consequential...
Owner's Manual
Page 42
... to the requirements of precautions in the Operating Guide, accident, vermin, fire, flood, improper installation, acts of Purchase: The model and serial number can be submitted at www.lg.ca This warranty provides in-home service. The cost of Purchase. Please have product type (refrigerator) and Postal Code ready. PARTS: Seven Years from misuse, abuse, operation outside environmental specifications or contrary to you. so these...
... to the requirements of precautions in the Operating Guide, accident, vermin, fire, flood, improper installation, acts of Purchase: The model and serial number can be submitted at www.lg.ca This warranty provides in-home service. The cost of Purchase. Please have product type (refrigerator) and Postal Code ready. PARTS: Seven Years from misuse, abuse, operation outside environmental specifications or contrary to you. so these...


