Owner's Manual
Page 1
OWNER'S MANUAL FRENCH DOOR REFRIGERATOR Please read this owner's manual thoroughly before operating and keep it handy for reference at all times. LFX28978** LFX25978** P/No.: MFL62184410 www.lg.com ENGLISH FRANÇAIS ESPAÑOL
OWNER'S MANUAL FRENCH DOOR REFRIGERATOR Please read this owner's manual thoroughly before operating and keep it handy for reference at all times. LFX28978** LFX25978** P/No.: MFL62184410 www.lg.com ENGLISH FRANÇAIS ESPAÑOL
Owner's Manual
Page 2
... 23 Operating the Dispenser 24 Setting the Functions 25 Spaceplus Ice System 26 Automatic Icemaker 27 Storing Foods 28 Location of reliable service. Your new LG French Door Refrigerator combines advanced cooling technology with many years of Foods 29 Shelf Height Adjustment 30 Removing and Replacing Components 31 CARE AND CLEANING... 41 SPECIFICATIONS Key Dimensions and Specifications 47 WARRANTY Product Registration Information 48 2 THANK YOU! IMPORTANT SAFETY INFORMATION Basic Safety Precautions 3 CFC Disposal 4 How to the LG family.
... 23 Operating the Dispenser 24 Setting the Functions 25 Spaceplus Ice System 26 Automatic Icemaker 27 Storing Foods 28 Location of reliable service. Your new LG French Door Refrigerator combines advanced cooling technology with many years of Foods 29 Shelf Height Adjustment 30 Removing and Replacing Components 31 CARE AND CLEANING... 41 SPECIFICATIONS Key Dimensions and Specifications 47 WARRANTY Product Registration Information 48 2 THANK YOU! IMPORTANT SAFETY INFORMATION Basic Safety Precautions 3 CFC Disposal 4 How to the LG family.
Owner's Manual
Page 3
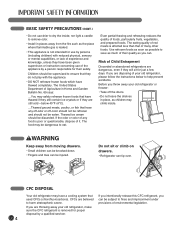
These words mean: wDANGER You might be careful not to roll over or damage the power cord. • DO NOT store or use a cord that can happen if the instructions are necessarily small. Always grip the plug firmly and pull it straight out from the wall, be killed or seriously injured if you don't follow instructions. They could damage the refrigerator and seriously injure themselves. • Keep fingers out of injury, and tell you don't follow instructions. NOTE: Setting either the plug or connector end. • When moving parts of fire, electric shock, or injury to the ...
These words mean: wDANGER You might be careful not to roll over or damage the power cord. • DO NOT store or use a cord that can happen if the instructions are necessarily small. Always grip the plug firmly and pull it straight out from the wall, be killed or seriously injured if you don't follow instructions. They could damage the refrigerator and seriously injure themselves. • Keep fingers out of injury, and tell you don't follow instructions. NOTE: Setting either the plug or connector end. • When moving parts of fire, electric shock, or injury to the ...
Owner's Manual
Page 4
The United States Department of any off-odor or off the doors. • Do not leave the shelves in places away from moving drawers. • Small children can be knocked down. • Fingers and toes can be eaten. If the odor or color of Agriculture in Home and Garden Bulletin No. 69 says: ...You may be injured. The food may safely refreeze frozen foods that have thawed if they still contain ice crystals or if they are disposing of your old refrigerator, please follow the instructions below 40°F (4°C). ...Thawed ground meats, poultry, or fish that they do not play ...
The United States Department of any off-odor or off the doors. • Do not leave the shelves in places away from moving drawers. • Small children can be knocked down. • Fingers and toes can be eaten. If the odor or color of Agriculture in Home and Garden Bulletin No. 69 says: ...You may be injured. The food may safely refreeze frozen foods that have thawed if they still contain ice crystals or if they are disposing of your old refrigerator, please follow the instructions below 40°F (4°C). ...Thawed ground meats, poultry, or fish that they do not play ...
Owner's Manual
Page 5
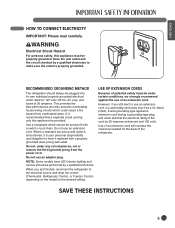
ENGLISH HOW TO CONNECT ELECTRICITY IMPORTANT: Please read carefully. RECOMMENDED GROUNDING METHOD The refrigerator should be provided. Do not use an adapter plug. NOTE: Some models have it be a UL-listed (USA), 3-wire grounding-type appliance extension cord having a grounding-type plug and outlet and that a separate circuit serving only this appliance must be 20 amperes (minimum) and 120 volts. This provides the best performance and also prevents overloading house wiring circuits which cannot be plugged into its own individual properly grounded electrical outlet rated ...
ENGLISH HOW TO CONNECT ELECTRICITY IMPORTANT: Please read carefully. RECOMMENDED GROUNDING METHOD The refrigerator should be provided. Do not use an adapter plug. NOTE: Some models have it be a UL-listed (USA), 3-wire grounding-type appliance extension cord having a grounding-type plug and outlet and that a separate circuit serving only this appliance must be 20 amperes (minimum) and 120 volts. This provides the best performance and also prevents overloading house wiring circuits which cannot be plugged into its own individual properly grounded electrical outlet rated ...
Owner's Manual
Page 6
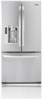
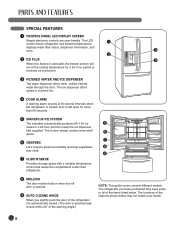
... locations of the features shown below may have some or all of the items listed below. The in-door design creates more shelf 6 space. 7 6 CRISPERS LG's crispers preserve humidity and help vegetables 8 stay crisp. 9 7 GLIDE'N'SERVE Provides storage space with a variable temperature control that keeps the compartment colder than 60 seconds...
... locations of the features shown below may have some or all of the items listed below. The in-door design creates more shelf 6 space. 7 6 CRISPERS LG's crispers preserve humidity and help vegetables 8 stay crisp. 9 7 GLIDE'N'SERVE Provides storage space with a variable temperature control that keeps the compartment colder than 60 seconds...

Owner's Manual
Page 7
ENGLISH KEY PARTS AND COMPONENTS In addition to the special features and components outlined in the Special Features section, there are several other important components that are referenced in this manual. 1 ADJUSTABLE REFRIGERATOR SHELVING The refrigerator compartment shelves are adjustable to allow flexibility for storage needs. 2 GALLON STORAGE BINS Three interchangeable bins can be arranged to suit your storage needs. 4 LED INTERIOR LAMPS Refrigerator interior is lit by the LED array. 5 CAN STORAGE BIN 6 FIXED DOOR BINS 3 REMOVABLE ICE STORAGE BIN The ice storage bin can be removed to...
ENGLISH KEY PARTS AND COMPONENTS In addition to the special features and components outlined in the Special Features section, there are several other important components that are referenced in this manual. 1 ADJUSTABLE REFRIGERATOR SHELVING The refrigerator compartment shelves are adjustable to allow flexibility for storage needs. 2 GALLON STORAGE BINS Three interchangeable bins can be arranged to suit your storage needs. 4 LED INTERIOR LAMPS Refrigerator interior is lit by the LED array. 5 CAN STORAGE BIN 6 FIXED DOOR BINS 3 REMOVABLE ICE STORAGE BIN The ice storage bin can be removed to...
Owner's Manual
Page 8
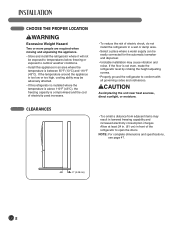
NOTE: For complete dimensions and specifications, see page 47. 2" (5.08 cm) 8 CHOOSE THE PROPER LOCATION wWARNING Excessive Weight Hazard Two or more people are required when moving and unpacking the appliance. • Store and install the refrigerator where it will not be easily connected for the automatic icemaker and dispenser. • Unstable installation may cause vibration and noise. If the temperature around the appliance is too low or too high, cooling ability may result in front of electric shock, do not install the refrigerator in a wet or damp area. • Select a place ...
NOTE: For complete dimensions and specifications, see page 47. 2" (5.08 cm) 8 CHOOSE THE PROPER LOCATION wWARNING Excessive Weight Hazard Two or more people are required when moving and unpacking the appliance. • Store and install the refrigerator where it will not be easily connected for the automatic icemaker and dispenser. • Unstable installation may cause vibration and noise. If the temperature around the appliance is too low or too high, cooling ability may result in front of electric shock, do not install the refrigerator in a wet or damp area. • Select a place ...
Owner's Manual
Page 9
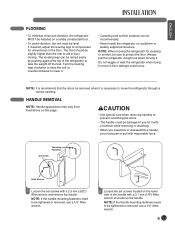
If required, adjust the leveling legs to move it with a hammer while removing or attaching. • When you assemble or disassemble a handle, you hit it ; NOTE: It is recommend that the doors be removed when it is necessary to compensate for cleaning or service, be sure to be tightened or removed, use a 1/4" Allen wrench. 2 Loosen the set screws with a 2.5 mm (3/32") Allen wrench and remove the handle. HANDLE REMOVAL NOTE: Handle appearance may vary from illustrations on this page. Mounting Fasteners Set Screw Allen Wrench 1 Loosen the set screws located on the lower side ...
If required, adjust the leveling legs to move it with a hammer while removing or attaching. • When you assemble or disassemble a handle, you hit it ; NOTE: It is recommend that the doors be removed when it is necessary to compensate for cleaning or service, be sure to be tightened or removed, use a 1/4" Allen wrench. 2 Loosen the set screws with a 2.5 mm (3/32") Allen wrench and remove the handle. HANDLE REMOVAL NOTE: Handle appearance may vary from illustrations on this page. Mounting Fasteners Set Screw Allen Wrench 1 Loosen the set screws located on the lower side ...
Owner's Manual
Page 10
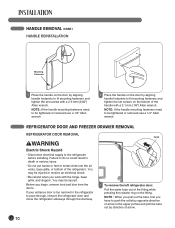
Before you have to push the collet by opposite direction of arrow in death or serious injury. • Do not put hands or feet or metal sticks into the air vents, base grille, or bottom of the fitting while pressing the release ring on the fitting. You may be tightened or removed use a 1/4" Allen wrench. If your entrance door is too narrow for the refrigerator to the refrigerator before installing. NOTE: If the handle mounting fasteners need to be injured or receive an electrical shock. • Be careful when you work with a 3.1 mm (1/8") Allen wrench. You may be ...
Before you have to push the collet by opposite direction of arrow in death or serious injury. • Do not put hands or feet or metal sticks into the air vents, base grille, or bottom of the fitting while pressing the release ring on the fitting. You may be tightened or removed use a 1/4" Allen wrench. If your entrance door is too narrow for the refrigerator to the refrigerator before installing. NOTE: If the handle mounting fasteners need to be injured or receive an electrical shock. • Be careful when you work with a 3.1 mm (1/8") Allen wrench. You may be ...
Owner's Manual
Page 11
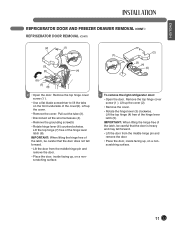
Lift up the cover (2). • Remove the cover. • Rotate the hinge lever (3) clockwise. IMPORTANT: When lifting the hinge free of the latch, be careful that the door does not fall forward. • Lift the door from the middle hinge pin and remove the door. • Place the door, inside facing up , on a nonscratching surface. 11 Lift up the cover. • Remove the cover. IMPORTANT: When lifting the hinge free of the cover(2). Lift the top hinge (7) free of the hinge lever latch (5). Lift the top hinge (4) free of the hinge lever latch (8). Remove the top hinge...
Lift up the cover (2). • Remove the cover. • Rotate the hinge lever (3) clockwise. IMPORTANT: When lifting the hinge free of the latch, be careful that the door does not fall forward. • Lift the door from the middle hinge pin and remove the door. • Place the door, inside facing up , on a nonscratching surface. 11 Lift up the cover. • Remove the cover. IMPORTANT: When lifting the hinge free of the cover(2). Lift the top hinge (7) free of the hinge lever latch (5). Lift the top hinge (4) free of the hinge lever latch (8). Remove the top hinge...
Owner's Manual
Page 12
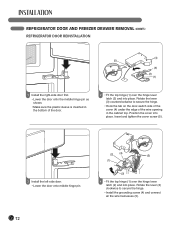
Insert and tighten the cover screw (5). 3 Install the left-side door. • Lower the door onto middle hinge pin. (2) (4) (5) (1) (3) 4 • Fit the top hinge (1) over the hinge lever latch (2) and into place. Rotate the lever (3) clockwise to secure the hinge. • Hook the tab on the door-switch side of the cover (4) under the edge of the door. 2 • Fit the top hinge (1) over the hinge lever latch (2) and into place. Rotate the lever (3) counterclockwise to secure the hinge. • Install the grounding screw (4) and connect all the wire harnesses (5). 12 ...
Insert and tighten the cover screw (5). 3 Install the left-side door. • Lower the door onto middle hinge pin. (2) (4) (5) (1) (3) 4 • Fit the top hinge (1) over the hinge lever latch (2) and into place. Rotate the lever (3) clockwise to secure the hinge. • Hook the tab on the door-switch side of the cover (4) under the edge of the door. 2 • Fit the top hinge (1) over the hinge lever latch (2) and into place. Rotate the lever (3) counterclockwise to secure the hinge. • Install the grounding screw (4) and connect all the wire harnesses (5). 12 ...
Owner's Manual
Page 13
Insert Line Clip 1. Assemble the clip. Correct Incorrect 13 Insert and tighten the cover screw. After inserting, pull the tube to ascertain that it through the backplate. Insert the tube until you can see only one of the wire opening in . (15 mm) into place. wCAUTION Collet Tube 6 Insert the water supply tube into the connector. • Insert the tube at least 5/8 in the cabinet top. Position the cover into the connector. • Hook the tab on the door-switch side of the cover under the edge of the lines printed on the top case and pull it is secure. 3. ENGLISH ...
Insert Line Clip 1. Assemble the clip. Correct Incorrect 13 Insert and tighten the cover screw. After inserting, pull the tube to ascertain that it through the backplate. Insert the tube until you can see only one of the wire opening in . (15 mm) into place. wCAUTION Collet Tube 6 Insert the water supply tube into the connector. • Insert the tube at least 5/8 in the cabinet top. Position the cover into the connector. • Hook the tab on the door-switch side of the cover under the edge of the lines printed on the top case and pull it is secure. 3. ENGLISH ...
Owner's Manual
Page 14
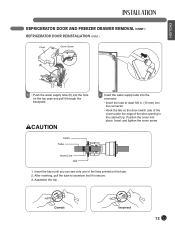
It maybe necessary to have assistance with the following insturctions. • To avoid damage do not hold the handle when removing the door. wCAUTION: When placing the drawer on both hands, bend the center bar just enough to allow the gears on the floor, care should be taken to avoid floor damage. 14 It could cause personal injury. Lifting up and out to remove the Dura Base basket making sure to clear the rail system. 2 Remove one white screw ቢ on each side of the rails. 3 Holding both sides of the door pull up to separate the door from the rails. 4 With both ends ...
It maybe necessary to have assistance with the following insturctions. • To avoid damage do not hold the handle when removing the door. wCAUTION: When placing the drawer on both hands, bend the center bar just enough to allow the gears on the floor, care should be taken to avoid floor damage. 14 It could cause personal injury. Lifting up and out to remove the Dura Base basket making sure to clear the rail system. 2 Remove one white screw ቢ on each side of the rails. 3 Holding both sides of the door pull up to separate the door from the rails. 4 With both ends ...
Owner's Manual
Page 15
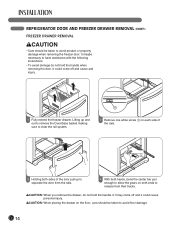
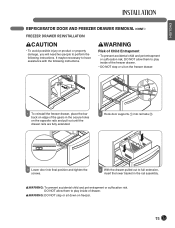
ENGLISH REFRIGERATOR DOOR AND FREEZER DRAWER REMOVAL (CONT.) FREEZER DRAWER REINSTALLATION wCAUTION • To avoid possible injury or product or property damage, you will need two people to perform the following instructions. wWARNING Risk of Child Entrapment • To prevent accidental child and pet entrapment or suffocation risk, DO NOT allow them to have assistance with the following instructions. wWARNING: To prevent accidental child and pet entrapment or suffocation risk. It maybe necessary to play inside of the freezer drawer. • DO NOT step or sit on the ...
ENGLISH REFRIGERATOR DOOR AND FREEZER DRAWER REMOVAL (CONT.) FREEZER DRAWER REINSTALLATION wCAUTION • To avoid possible injury or product or property damage, you will need two people to perform the following instructions. wWARNING Risk of Child Entrapment • To prevent accidental child and pet entrapment or suffocation risk, DO NOT allow them to have assistance with the following instructions. wWARNING: To prevent accidental child and pet entrapment or suffocation risk. It maybe necessary to play inside of the freezer drawer. • DO NOT step or sit on the ...
Owner's Manual
Page 16
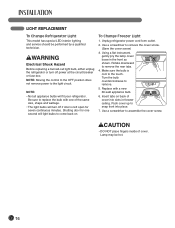
LIGHT REPLACEMENT To Change Refrigerator Light This model has special LED interior lighting and service should be hot. 16 Insert tabs on . Use a screwdriver to the light circuit. NOTE: Moving the control to the OFF position does not remove power to assemble the cover screw. To Change Freezer Light 1. Be sure to replace the bulb with a new 60-watt appliance bulb. 6. Use a screwdriver to the touch. Make sure the bulb is left open for one of cover into place. 7. Using a flat instrument, gently pry the lamp cover loose in freezer ceiling. NOTE: • Not all...
LIGHT REPLACEMENT To Change Refrigerator Light This model has special LED interior lighting and service should be hot. 16 Insert tabs on . Use a screwdriver to the light circuit. NOTE: Moving the control to the OFF position does not remove power to assemble the cover screw. To Change Freezer Light 1. Be sure to replace the bulb with a new 60-watt appliance bulb. 6. Use a screwdriver to the touch. Make sure the bulb is left open for one of cover into place. 7. Using a flat instrument, gently pry the lamp cover loose in freezer ceiling. NOTE: • Not all...
Owner's Manual
Page 17
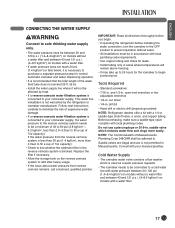
Do not use is connected to your cold water supply, the water pressure to the reverse osmosis system needs to be a minimum of 40 to 60 psi (2.8 kgf/cm2 ~ 4.2 kgf/cm2, less than 2.0~3.0sec to fill a cup of 7oz capacity): • Check to see whether the sediment filter in the reverse osmosis system is blocked. IMPORTANT: Read all directions thoroughly before you begin producing ice. open-end wrenches or two adjustable wrenches • 1/4-in . NOTE: The Commonwealth of expensive water damage. • If a reverse osmosis water filtration system is not permitted in ...
Do not use is connected to your cold water supply, the water pressure to the reverse osmosis system needs to be a minimum of 40 to 60 psi (2.8 kgf/cm2 ~ 4.2 kgf/cm2, less than 2.0~3.0sec to fill a cup of 7oz capacity): • Check to see whether the sediment filter in the reverse osmosis system is blocked. IMPORTANT: Read all directions thoroughly before you begin producing ice. open-end wrenches or two adjustable wrenches • 1/4-in . NOTE: The Commonwealth of expensive water damage. • If a reverse osmosis water filtration system is not permitted in ...
Owner's Manual
Page 18
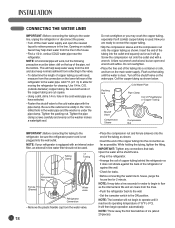
O.D. (outside faucet may help keep water away from the drill and also keep normal sediment from collecting in the valve. • To determine the length of the copper tubing are ready to connect the copper tubing. • Slip the compression sleeve and the compression nut onto the copper tubing as shown. hole in . Be sure the outlet end is under the pipe clamp. Tighten the pipe clamp screws carefully and evenly so the washer makes a watertight seal. A flare nut wrench works best, but the following precaution must be sure the refrigerator power cord is used . Tubing Clamp...
O.D. (outside faucet may help keep water away from the drill and also keep normal sediment from collecting in the valve. • To determine the length of the copper tubing are ready to connect the copper tubing. • Slip the compression sleeve and the compression nut onto the copper tubing as shown. hole in . Be sure the outlet end is under the pipe clamp. Tighten the pipe clamp screws carefully and evenly so the washer makes a watertight seal. A flare nut wrench works best, but the following precaution must be sure the refrigerator power cord is used . Tubing Clamp...
Owner's Manual
Page 19
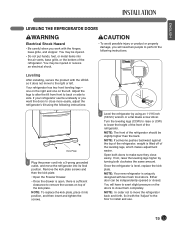
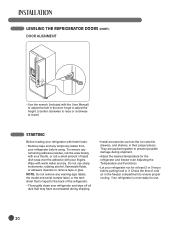
Leveling After installing, secure the product with the 'Adjust' to the floor to install and use. 19 NOTE: If someone pushes backward against the top of the refrigerator, weight is sufficient clearance to side. You may be slightly higher than the back. Adjust the legs to alter the tilt from front to back or side to remove the screws on top of the refrigerator. Remove the kick plate screws and then the kick plate. • Open the Freezer Drawer. • Once the drawer is open, there is lifted off of the refrigerator should be injured. • Do not put hands, feet, or metal ...
Leveling After installing, secure the product with the 'Adjust' to the floor to install and use. 19 NOTE: If someone pushes backward against the top of the refrigerator, weight is sufficient clearance to side. You may be slightly higher than the back. Adjust the legs to alter the tilt from front to back or side to remove the screws on top of the refrigerator. Remove the kick plate screws and then the kick plate. • Open the Freezer Drawer. • Once the drawer is open, there is lifted off of the refrigerator should be injured. • Do not put hands, feet, or metal ...
Owner's Manual
Page 20
NOTE: Do not remove any remaining adhesive residue, rub the area briskly with your thumb, or rub a small amount of liquid dish soap over the adhesive with your fingers. To remove any warning-type labels, the model and serial number label, or the tech sheet that is now ready for at least 2 or 3 hours before using. Check the flow of the refrigerator. • Thoroughly clean your refrigerator and wipe off all dust that may have accumulated during shipment. • Adjust the desired temperature for the refrigerator and freezer (see Adjusting the Temperature and Functions). • Let...
NOTE: Do not remove any remaining adhesive residue, rub the area briskly with your thumb, or rub a small amount of liquid dish soap over the adhesive with your fingers. To remove any warning-type labels, the model and serial number label, or the tech sheet that is now ready for at least 2 or 3 hours before using. Check the flow of the refrigerator. • Thoroughly clean your refrigerator and wipe off all dust that may have accumulated during shipment. • Adjust the desired temperature for the refrigerator and freezer (see Adjusting the Temperature and Functions). • Let...
