Owner's Manual
Page 1
OWNER'S MANUAL FRENCH DOOR REFRIGERATOR Please read this owner's manual thoroughly before operating and keep it handy for reference at all times. LFX28978** LFX25978** P/No.: MFL62184410 www.lg.com ENGLISH FRANÇAIS ESPAÑOL
OWNER'S MANUAL FRENCH DOOR REFRIGERATOR Please read this owner's manual thoroughly before operating and keep it handy for reference at all times. LFX28978** LFX25978** P/No.: MFL62184410 www.lg.com ENGLISH FRANÇAIS ESPAÑOL
Owner's Manual
Page 2
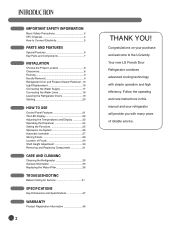
... Safety Precautions 3 CFC Disposal 4 How to the LG family. Follow the operating and care instructions in this manual and your purchase and welcome to Connect Electricity 5 PARTS AND FEATURES Special Features 6 Key Parts and Components 7 INSTALLATION Choose the Proper Location 8 Clearances 8 Flooring 9 Handle Removal 9 Refrigerator Door and Freezer Drawer Removal ..10 Light...
... Safety Precautions 3 CFC Disposal 4 How to the LG family. Follow the operating and care instructions in this manual and your purchase and welcome to Connect Electricity 5 PARTS AND FEATURES Special Features 6 Key Parts and Components 7 INSTALLATION Choose the Proper Location 8 Clearances 8 Flooring 9 Handle Removal 9 Refrigerator Door and Freezer Drawer Removal ..10 Light...
Owner's Manual
Page 3
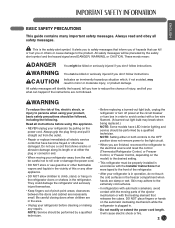
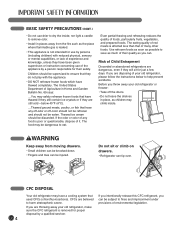
... or others or cause damage to avoid contact with the heating element that were taped to the desired setting. • This refrigerator must be preceded by a qualified technician. Always read and obey all instructions before cleaning or making any other flammable vapors and ...tell you don't follow instructions. These words mean: wDANGER You might be followed, including the following. Skin may result in the refrigerator. It alerts you to reduce the chance of pinch point areas; wCAUTION Indicates an imminently hazardous situation which, if not avoided, ...
... or others or cause damage to avoid contact with the heating element that were taped to the desired setting. • This refrigerator must be preceded by a qualified technician. Always read and obey all instructions before cleaning or making any other flammable vapors and ...tell you don't follow instructions. These words mean: wDANGER You might be followed, including the following. Skin may result in the refrigerator. It alerts you to reduce the chance of pinch point areas; wCAUTION Indicates an imminently hazardous situation which, if not avoided, ...
Owner's Manual
Page 4
...: ...You may be supervised to eat. Even partial thawing and refreezing reduces the quality of Child Entrapment Discarded or abandoned refrigerators are dangerous, even if they have any food is removed for use of many other foods. Risk of foods, particularly fruits...have a cooling system that have been given supervision or instruction concerning use by a qualified servicer. 4 CFCs are throwing away your old refrigerator, please follow the instructions below 40°F (4°C). ...Thawed ground meats, poultry, or fish that used CFCs (chlorofluorocarbons). Before ...
...: ...You may be supervised to eat. Even partial thawing and refreezing reduces the quality of Child Entrapment Discarded or abandoned refrigerators are dangerous, even if they have any food is removed for use of many other foods. Risk of foods, particularly fruits...have a cooling system that have been given supervision or instruction concerning use by a qualified servicer. 4 CFCs are throwing away your old refrigerator, please follow the instructions below 40°F (4°C). ...Thawed ground meats, poultry, or fish that used CFCs (chlorofluorocarbons). Before ...
Owner's Manual
Page 5
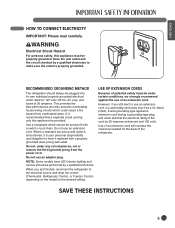
...extension cord will increase the clearance needed for 120 volts, 60 Hz, AC only, and fused at 20 amperes. RECOMMENDED GROUNDING METHOD The refrigerator should be turned off with a properly grounded three-prong wall outlet. Use a receptacle which could cause a fire hazard from the power cord... provides the best performance and also prevents overloading house wiring circuits which cannot be performed by a qualified electrician to use of the refrigerator. When you still elect to make sure the outlet is recommended that the electrical rating of the cord be provided. USE OF ...
...extension cord will increase the clearance needed for 120 volts, 60 Hz, AC only, and fused at 20 amperes. RECOMMENDED GROUNDING METHOD The refrigerator should be turned off with a properly grounded three-prong wall outlet. Use a receptacle which could cause a fire hazard from the power cord... provides the best performance and also prevents overloading house wiring circuits which cannot be performed by a qualified electrician to use of the refrigerator. When you still elect to make sure the outlet is recommended that the electrical rating of the cord be provided. USE OF ...
Owner's Manual
Page 6
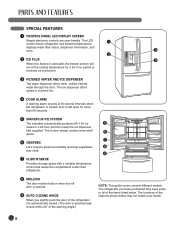
... not match your model. 6 SPECIAL FEATURES 1 CONTROL PANEL LED DISPLAY SCREEN Simple electronic controls are user-friendly. The LED screen shows refrigerator and freezer temperatures, 1 displays water filter status, dispenser information, and more. 3 2 2 ICE PLUS 4 When this feature is ...offers cubed or crushed ice. 4 DOOR ALARM A warning alarm sounds at the coldest temperature for more shelf 6 space. 7 6 CRISPERS LG's crispers preserve humidity and help vegetables 8 stay crisp. 9 7 GLIDE'N'SERVE Provides storage space with a variable temperature control that keeps the...
... not match your model. 6 SPECIAL FEATURES 1 CONTROL PANEL LED DISPLAY SCREEN Simple electronic controls are user-friendly. The LED screen shows refrigerator and freezer temperatures, 1 displays water filter status, dispenser information, and more. 3 2 2 ICE PLUS 4 When this feature is ...offers cubed or crushed ice. 4 DOOR ALARM A warning alarm sounds at the coldest temperature for more shelf 6 space. 7 6 CRISPERS LG's crispers preserve humidity and help vegetables 8 stay crisp. 9 7 GLIDE'N'SERVE Provides storage space with a variable temperature control that keeps the...

Owner's Manual
Page 7
... outlined in the Special Features section, there are several other important components that are referenced in this manual. 1 ADJUSTABLE REFRIGERATOR SHELVING The refrigerator compartment shelves are adjustable to allow flexibility for storage needs. 2 GALLON STORAGE BINS Three interchangeable bins can be arranged to... suit your storage needs. 4 LED INTERIOR LAMPS Refrigerator interior is lit by the LED array. 5 CAN STORAGE BIN 6 FIXED DOOR BINS 3 REMOVABLE ICE STORAGE BIN The ice storage ...
... outlined in the Special Features section, there are several other important components that are referenced in this manual. 1 ADJUSTABLE REFRIGERATOR SHELVING The refrigerator compartment shelves are adjustable to allow flexibility for storage needs. 2 GALLON STORAGE BINS Three interchangeable bins can be arranged to... suit your storage needs. 4 LED INTERIOR LAMPS Refrigerator interior is lit by the LED array. 5 CAN STORAGE BIN 6 FIXED DOOR BINS 3 REMOVABLE ICE STORAGE BIN The ice storage ...
Owner's Manual
Page 8
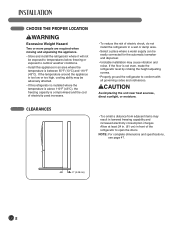
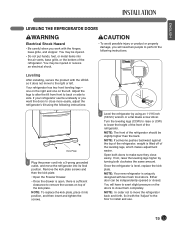
...cm) in lowered freezing capability and increased electricity consumption charges. If the floor is not even, make the refrigerator level by rotating the height adjusting screws. • Properly ground the refrigerator to open the doors. wCAUTION Avoid placing the unit near heat sources, direct sunlight, or moisture. If ...wWARNING Excessive Weight Hazard Two or more people are required when moving and unpacking the appliance. • Store and install the refrigerator where it will not be exposed to temperatures below freezing or exposed to outdoor weather conditions. • Install this...
...cm) in lowered freezing capability and increased electricity consumption charges. If the floor is not even, make the refrigerator level by rotating the height adjusting screws. • Properly ground the refrigerator to open the doors. wCAUTION Avoid placing the unit near heat sources, direct sunlight, or moisture. If ...wWARNING Excessive Weight Hazard Two or more people are required when moving and unpacking the appliance. • Store and install the refrigerator where it will not be exposed to temperatures below freezing or exposed to outdoor weather conditions. • Install this...
Owner's Manual
Page 9
... this page. NOTE: If the handle mounting fasteners need to aid in door closing. Always pull the refrigerator straight out when moving the refrigerator for unevenness of the refrigerator to prevent scratching the doors. • The handle could occur. NOTE: It is recommend that the doors be removed ... a narrow opening. floor damage could be damaged if you must be level. ENGLISH FLOORING • To minimize noise and vibration, the refrigerator MUST be installed on the lower side of the handle with a 3.1 mm (1/8") Allen wrench and remove the handle. NOTE: When moving it...
... this page. NOTE: If the handle mounting fasteners need to aid in door closing. Always pull the refrigerator straight out when moving the refrigerator for unevenness of the refrigerator to prevent scratching the doors. • The handle could occur. NOTE: It is recommend that the doors be removed ... a narrow opening. floor damage could be damaged if you must be level. ENGLISH FLOORING • To minimize noise and vibration, the refrigerator MUST be installed on the lower side of the handle with a 3.1 mm (1/8") Allen wrench and remove the handle. NOTE: When moving it...
Owner's Manual
Page 10
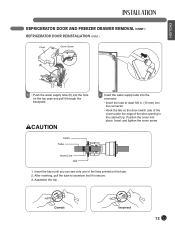
...while pressing the release ring on the fitting. Collet 1 To remove the left refrigerator door: Pull the water tube out of the refrigerator. You may be injured. REFRIGERATOR DOOR AND FREEZER DRAWER REMOVAL REFRIGERATOR DOOR REMOVAL wWARNING Electric Shock Hazard • Disconnect electrical supply to pass through, ...remove the refrigerator door and move the refrigerator sideways through the doorway. NOTE: If the handle mounting fasteners need to be tightened or removed use a 1/4" Allen ...
...while pressing the release ring on the fitting. Collet 1 To remove the left refrigerator door: Pull the water tube out of the refrigerator. You may be injured. REFRIGERATOR DOOR AND FREEZER DRAWER REMOVAL REFRIGERATOR DOOR REMOVAL wWARNING Electric Shock Hazard • Disconnect electrical supply to pass through, ...remove the refrigerator door and move the refrigerator sideways through the doorway. NOTE: If the handle mounting fasteners need to be tightened or removed use a 1/4" Allen ...
Owner's Manual
Page 11
...tube (3). • Disconnect all the wire harnesses (4). • Remove the grounding screw(5) • Rotate hinge lever (6) counterclockwise. ENGLISH REFRIGERATOR DOOR AND FREEZER DRAWER REMOVAL (CONT.) REFRIGERATOR DOOR REMOVAL (CONT.) (2) (1) (3) (5) (4) (6) (7) (8) 2 • Open the door. Lift up the cover. •... the door. • Place the door, inside facing up , on a nonscratching surface. (2) (1) (3) (4) (5) 3 To remove the right refrigerator door: • Open the door. Remove the top hinge cover screw (1 ). Lift up the cover (2). • Remove the cover. •...
...tube (3). • Disconnect all the wire harnesses (4). • Remove the grounding screw(5) • Rotate hinge lever (6) counterclockwise. ENGLISH REFRIGERATOR DOOR AND FREEZER DRAWER REMOVAL (CONT.) REFRIGERATOR DOOR REMOVAL (CONT.) (2) (1) (3) (5) (4) (6) (7) (8) 2 • Open the door. Lift up the cover. •... the door. • Place the door, inside facing up , on a nonscratching surface. (2) (1) (3) (4) (5) 3 To remove the right refrigerator door: • Open the door. Remove the top hinge cover screw (1 ). Lift up the cover (2). • Remove the cover. •...
Owner's Manual
Page 12
... into place. Rotate the lever (3) counterclockwise to secure the hinge. • Install the grounding screw (4) and connect all the wire harnesses (5). 12 REFRIGERATOR DOOR AND FREEZER DRAWER REMOVAL (CONT.) REFRIGERATOR DOOR REINSTALLATION (4) (5) (3) (2) (1) 1 Install the right-side door first. • Lower the door onto the middle hinge pin as shown. • Make sure...
... into place. Rotate the lever (3) counterclockwise to secure the hinge. • Install the grounding screw (4) and connect all the wire harnesses (5). 12 REFRIGERATOR DOOR AND FREEZER DRAWER REMOVAL (CONT.) REFRIGERATOR DOOR REINSTALLATION (4) (5) (3) (2) (1) 1 Install the right-side door first. • Lower the door onto the middle hinge pin as shown. • Make sure...
Owner's Manual
Page 13
... one of the wire opening in the cabinet top. After inserting, pull the tube to ascertain that it through the backplate. ENGLISH REFRIGERATOR DOOR AND FREEZER DRAWER REMOVAL (CONT.) REFRIGERATOR DOOR REINSTALLATION (CONT.) Cover Cover Screw (6) 5 • Push the water supply tube (6) into the connector. • Hook the tab on the door...
... one of the wire opening in the cabinet top. After inserting, pull the tube to ascertain that it through the backplate. ENGLISH REFRIGERATOR DOOR AND FREEZER DRAWER REMOVAL (CONT.) REFRIGERATOR DOOR REINSTALLATION (CONT.) Cover Cover Screw (6) 5 • Push the water supply tube (6) into the connector. • Hook the tab on the door...
Owner's Manual
Page 14
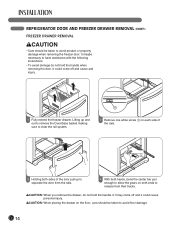
wCAUTION: When you remove the drawer, do not hold the handle. REFRIGERATOR DOOR AND FREEZER DRAWER REMOVAL (CONT.) FREEZER DRAWER REMOVAL wCAUTION • Care should be taken to avoid product or property damage when removing the freezer ...
wCAUTION: When you remove the drawer, do not hold the handle. REFRIGERATOR DOOR AND FREEZER DRAWER REMOVAL (CONT.) FREEZER DRAWER REMOVAL wCAUTION • Care should be taken to avoid product or property damage when removing the freezer ...
Owner's Manual
Page 15
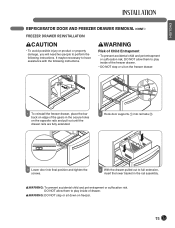
... them to play inside of the gears in the secure holes on freezer. 15 It maybe necessary to have assistance with the following instructions. ENGLISH REFRIGERATOR DOOR AND FREEZER DRAWER REMOVAL (CONT.) FREEZER DRAWER REINSTALLATION wCAUTION • To avoid possible injury or product or property damage, you will need two people...
... them to play inside of the gears in the secure holes on freezer. 15 It maybe necessary to have assistance with the following instructions. ENGLISH REFRIGERATOR DOOR AND FREEZER DRAWER REMOVAL (CONT.) FREEZER DRAWER REINSTALLATION wCAUTION • To avoid possible injury or product or property damage, you will need two people...
Owner's Manual
Page 16
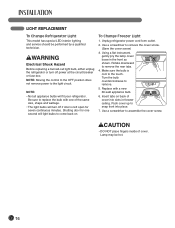
...to remove. 5. Lamp may be performed by a qualified technician. Shutting door for seven continuous minutes. Replace with one second will fit your refrigerator. Turn the bulb counterclockwise to assemble the cover screw. Insert tabs on . wCAUTION • DO NOT place fingers inside of the same ...sure to replace the bulb with a new 60-watt appliance bulb. 6. Use a screwdriver to the light circuit. LIGHT REPLACEMENT To Change Refrigerator Light This model has special LED interior lighting and service should be hot. 16 Push cover up to remove the rear tabs. 4. wWARNING...
...to remove. 5. Lamp may be performed by a qualified technician. Shutting door for seven continuous minutes. Replace with one second will fit your refrigerator. Turn the bulb counterclockwise to assemble the cover screw. Insert tabs on . wCAUTION • DO NOT place fingers inside of the same ...sure to replace the bulb with a new 60-watt appliance bulb. 6. Use a screwdriver to the light circuit. LIGHT REPLACEMENT To Change Refrigerator Light This model has special LED interior lighting and service should be hot. 16 Push cover up to remove the rear tabs. 4. wWARNING...
Owner's Manual
Page 17
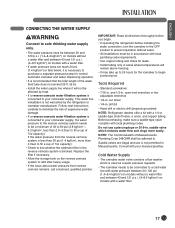
...in . open-end wrenches or two adjustable wrenches • 1/4-in . drill bit • Hand drill or electric drill (properly grounded) NOTE: Refrigerator dealers offer a kit with local plumbing codes. saddle valve which is less than 20 psi (1.4 kgf/cm2, more easily. Consult with your cold water...accordance with local plumbing code requirements. • Use copper tubing and check for the icemaker to begin . • If operating the refrigerator before installing the water connection, turn the icemaker to the OFF position to prevent operation without water. • All installations must be...
...in . open-end wrenches or two adjustable wrenches • 1/4-in . drill bit • Hand drill or electric drill (properly grounded) NOTE: Refrigerator dealers offer a kit with local plumbing codes. saddle valve which is less than 20 psi (1.4 kgf/cm2, more easily. Consult with your cold water...accordance with local plumbing code requirements. • Use copper tubing and check for the icemaker to begin . • If operating the refrigerator before installing the water connection, turn the icemaker to the OFF position to prevent operation without water. • All installations must be...
Owner's Manual
Page 18
...shown. • Insert the end of Polyethelyne or Copper Tubing Shutoff Valve Compression Sleeve Compression Nut IMPORTANT: Before connecting the tubing to the refrigerator, be used . Ferrule (Sleeve) Water valve NOTE: It may crush the copper tubing, especially if soft (coiled) copper tubing is used...ferrule (sleeve) onto the end of the tubing as shown below. IMPORTANT: Tighten any connections that leak. vertical COLD water pipe near the refrigerator. Refrigerator Connection • Remove the plastic flexible cap from the line in the house. • Find a 1/2-in the water pipe and the...
...shown. • Insert the end of Polyethelyne or Copper Tubing Shutoff Valve Compression Sleeve Compression Nut IMPORTANT: Before connecting the tubing to the refrigerator, be used . Ferrule (Sleeve) Water valve NOTE: It may crush the copper tubing, especially if soft (coiled) copper tubing is used...ferrule (sleeve) onto the end of the tubing as shown below. IMPORTANT: Tighten any connections that leak. vertical COLD water pipe near the refrigerator. Refrigerator Connection • Remove the plastic flexible cap from the line in the house. • Find a 1/2-in the water pipe and the...
Owner's Manual
Page 19
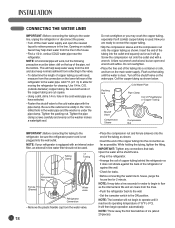
... makes adjustment easier. Leveling After installing, secure the product with the 'Adjust' to the floor to lower the height of the front of the refrigerator. Adjust the legs to alter the tilt from front to back or side to close them completely. Turn the leveling legs (CCW) to raise or...food doors. You may be injured. • Do not put hands, feet, or metal items into its final position. Open both doors to move the refrigerator back and forth, fix it with the LEGS so it into a 3-prong grounded outlet, and move to perform the following instructions: Kick Plate 1 Plug ...
... makes adjustment easier. Leveling After installing, secure the product with the 'Adjust' to the floor to lower the height of the front of the refrigerator. Adjust the legs to alter the tilt from front to back or side to close them completely. Turn the leveling legs (CCW) to raise or...food doors. You may be injured. • Do not put hands, feet, or metal items into its final position. Open both doors to move the refrigerator back and forth, fix it with the LEGS so it into a 3-prong grounded outlet, and move to perform the following instructions: Kick Plate 1 Plug ...
Owner's Manual
Page 20
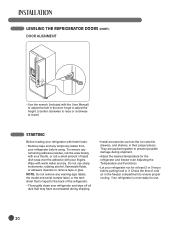
... that may have accumulated during shipping. • Install accessories such as the ice cube bin, drawers, and shelves, in their proper places. Your refrigerator is taped to the back of liquid dish soap over the adhesive with warm water and dry. Do not use . 20 Wipe with your...Manual) to adjust the bolt in the door hinge to adjust the height. (counter clockwise to raise or clockwise to lower) STARTING Before loading your refrigerator with fresh foods: • Remove tape and any temporary labels from your fingers. To remove any remaining adhesive residue, rub the area briskly with...
... that may have accumulated during shipping. • Install accessories such as the ice cube bin, drawers, and shelves, in their proper places. Your refrigerator is taped to the back of liquid dish soap over the adhesive with warm water and dry. Do not use . 20 Wipe with your...Manual) to adjust the bolt in the door hinge to adjust the height. (counter clockwise to raise or clockwise to lower) STARTING Before loading your refrigerator with fresh foods: • Remove tape and any temporary labels from your fingers. To remove any remaining adhesive residue, rub the area briskly with...


