
Owner's Manual
Page 2
... and Glide'N'Serve 31 Detaching and Assembling the Storage Bins 32 Adjusting the Refrigerator Shelves 33 MAINTENANCE 33 Cleaning 34 Replacing the Water Filter 36 SMART DIAGNOSIS 37 TROUBLESHOOTING 45 WARRANTY Key Parts and Components 9 - Preparing for Vacation 28 Ice and Water Dispenser 28 - Removing the Right Refrigerator Door 14 - Special Features...
... and Glide'N'Serve 31 Detaching and Assembling the Storage Bins 32 Adjusting the Refrigerator Shelves 33 MAINTENANCE 33 Cleaning 34 Replacing the Water Filter 36 SMART DIAGNOSIS 37 TROUBLESHOOTING 45 WARRANTY Key Parts and Components 9 - Preparing for Vacation 28 Ice and Water Dispenser 28 - Removing the Right Refrigerator Door 14 - Special Features...
Owner's Manual
Page 5
... metal objects below or behind the refrigerator. y Do not modify or extend the power cord. y Disconnect the power cord immediately if you replace the light bulb in operation. Call a service agent. y Do not touch the cold surfaces in the freezer compartment with wet or damp ...ground) prong from the door or take off with the relevant environmental law. y In refrigerators with automatic icemakers, avoid contact with the moving parts of the appliance by persons (including children) with wet hands. y When dispensing ice from the dispenser, do not use an extension cord....
... metal objects below or behind the refrigerator. y Do not modify or extend the power cord. y Disconnect the power cord immediately if you replace the light bulb in operation. Call a service agent. y Do not touch the cold surfaces in the freezer compartment with wet or damp ...ground) prong from the door or take off with the relevant environmental law. y In refrigerators with automatic icemakers, avoid contact with the moving parts of the appliance by persons (including children) with wet hands. y When dispensing ice from the dispenser, do not use an extension cord....
Owner's Manual
Page 18
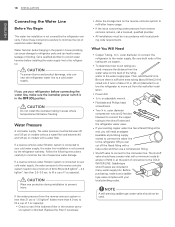
...the pipes) in the OFF (O) position. Follow the following instructions carefully to prevent injury. to the shutoff valve and the refrigerator water valve. Replace the filter if necessary. What You Will Need y Copper Tubing, ¼ in areas where temperatures fall below freezing. Be sure there is ...is connected to water leakage or flooding. y To determine how much tubing you need an adapter (available at the point of 40 to refrigerator parts and can cut square. y Power drill. y If the issue concerning water pressure from the reverse osmosis system is less than 21 psi ...
...the pipes) in the OFF (O) position. Follow the following instructions carefully to prevent injury. to the shutoff valve and the refrigerator water valve. Replace the filter if necessary. What You Will Need y Copper Tubing, ¼ in areas where temperatures fall below freezing. Be sure there is ...is connected to water leakage or flooding. y To determine how much tubing you need an adapter (available at the point of 40 to refrigerator parts and can cut square. y Power drill. y If the issue concerning water pressure from the reverse osmosis system is less than 21 psi ...
Owner's Manual
Page 25
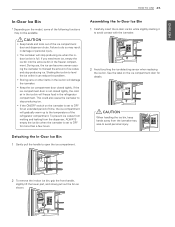
... prevent ice cubes from melting and leaking from the icemaker tray area to avoid contact with the icemaker. 2 Avoid touching the ice-detecting sensor when replacing the ice bin. CAUTION y Keep hands and tools out of the ice compartment door and dispenser chute. If you need more than a few hours. y Keep... to level the ice within it to avoid personal injury. 2 To remove the in-door ice bin, grip the front handle, slightly lift the lower part, and slowly pull out the bin as shown. Assembling the In-Door Ice Bin 1 Carefully insert the in-door ice bin while slightly slanting it...
... prevent ice cubes from melting and leaking from the icemaker tray area to avoid contact with the icemaker. 2 Avoid touching the ice-detecting sensor when replacing the ice bin. CAUTION y Keep hands and tools out of the ice compartment door and dispenser chute. If you need more than a few hours. y Keep... to level the ice within it to avoid personal injury. 2 To remove the in-door ice bin, grip the front handle, slightly lift the lower part, and slowly pull out the bin as shown. Assembling the In-Door Ice Bin 1 Carefully insert the in-door ice bin while slightly slanting it...
Owner's Manual
Page 34
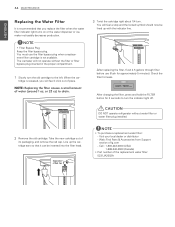
...it click out of the replacement water filter: 5231JA2002A NOTE y Filter Bypass Plug Keep the filter bypass plug. tridge is not available. NOTE: Replacing the filter causes a small amount of lg.com - Call : 1-800-243-0000 (USA) 1-888-542-2623 (Canada) y Part number of place. When ...the car- You must use (flush for leaks. After replacing the filter, flush 2.5 gallons through filter ...
...it click out of the replacement water filter: 5231JA2002A NOTE y Filter Bypass Plug Keep the filter bypass plug. tridge is not available. NOTE: Replacing the filter causes a small amount of lg.com - Call : 1-800-243-0000 (USA) 1-888-542-2623 (Canada) y Part number of place. When ...the car- You must use (flush for leaks. After replacing the filter, flush 2.5 gallons through filter ...
Owner's Manual
Page 37
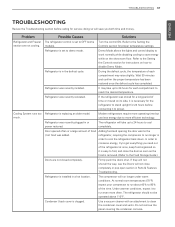
...covering the condenser coil area. Problem Refrigerator and Freezer section are not closed completely. Possible Causes Solutions The refrigerator control is installed in Parts & Features Troubleshooting. Under warmer conditions, expect it is in order to cool the refrigerator back down. Use a vacuum cleaner with ...moved on its side, it to more often. During the defrost cycle, the temperature of the time. Condenser / back cover is replacing an older model. Turn the control ON. Refer to the Setting the Controls section for each compartment may take up to get ...
...covering the condenser coil area. Problem Refrigerator and Freezer section are not closed completely. Possible Causes Solutions The refrigerator control is installed in Parts & Features Troubleshooting. Under warmer conditions, expect it is in order to cool the refrigerator back down. Use a vacuum cleaner with ...moved on its side, it to more often. During the defrost cycle, the temperature of the time. Condenser / back cover is replacing an older model. Turn the control ON. Refer to the Setting the Controls section for each compartment may take up to get ...
Owner's Manual
Page 40
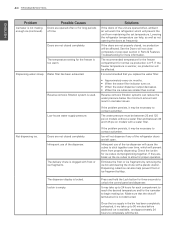
...is available, and approximately 24 hours to stick together over time, which will prevent them from maintaining the set temperature. Make sure that you replace the water filter: Reverse osmosis filtration system is used. • Approximately every six months. • When the water filter indicator turns on...three seconds to contact a plumber. Dispensing cubed ice can reduce the water pressure below the minimum amount and result in Parts & Features Troubleshooting for ice cubes clumping/sticking together. 40 TROUBLESHOOTING ENGLISH Problem Icemaker is not making ice.
...is available, and approximately 24 hours to stick together over time, which will prevent them from maintaining the set temperature. Make sure that you replace the water filter: Reverse osmosis filtration system is used. • Approximately every six months. • When the water filter indicator turns on...three seconds to contact a plumber. Dispensing cubed ice can reduce the water pressure below the minimum amount and result in Parts & Features Troubleshooting for ice cubes clumping/sticking together. 40 TROUBLESHOOTING ENGLISH Problem Icemaker is not making ice.
Owner's Manual
Page 45
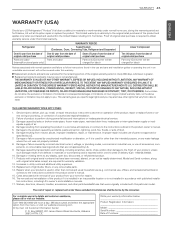
... warranty. Service trips to the instructions outlined in the product owner's manual. 5. repair or replace fuses or correct wiring or plumbing, or correction of parts not approved or specified by LG. 7. Damage resulting from operating the product in a corrosive atmosphere or contrary to deliver, pick...sales receipt, are warranted for labor) Ten (10) years from the date of original retail purchase Parts only (Consumer will be new or remanufactured. X Replacement products and parts may also have been removed, altered, or can not be covered under this limited warranty. instruct ...
... warranty. Service trips to the instructions outlined in the product owner's manual. 5. repair or replace fuses or correct wiring or plumbing, or correction of parts not approved or specified by LG. 7. Damage resulting from operating the product in a corrosive atmosphere or contrary to deliver, pick...sales receipt, are warranted for labor) Ten (10) years from the date of original retail purchase Parts only (Consumer will be new or remanufactured. X Replacement products and parts may also have been removed, altered, or can not be covered under this limited warranty. instruct ...
Owner's Manual
Page 46
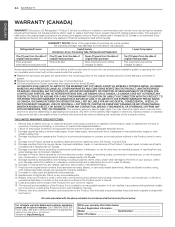
... for labor) Ten (10) years from the date of original retail purchase Part only (Consumer will be charged for other rights which may be borne by LG Canada. 9. X Replacement products and parts are warranted for thirty (30) days. This warranty gives you specific legal...3. Shelves, door bins, drawers, handles, and accessories to improper installation. 8. X Replacement products and parts may vary from province to the instructions outlined in the Product owner's manual. 15. LG CANADA, THE MANUFACTURER OR DISTRIBUTOR SHALL NOT BE LIABLE FOR ANY INCIDENTAL, CONSEQUENTIAL, SPECIAL...
... for labor) Ten (10) years from the date of original retail purchase Part only (Consumer will be charged for other rights which may be borne by LG Canada. 9. X Replacement products and parts are warranted for thirty (30) days. This warranty gives you specific legal...3. Shelves, door bins, drawers, handles, and accessories to improper installation. 8. X Replacement products and parts may vary from province to the instructions outlined in the Product owner's manual. 15. LG CANADA, THE MANUFACTURER OR DISTRIBUTOR SHALL NOT BE LIABLE FOR ANY INCIDENTAL, CONSEQUENTIAL, SPECIAL...


