
Owner's Manual
Page 2
...30 - Special Features 10 INSTALLATION 10 Specifications 11 Unpacking Your Refrigerator 11 Choosing the Proper Location 11 - Removing the Left Refrigerator Door 14 - 2 TABLE OF CONTENTS ENGLISH TABLE OF CONTENTS 3 PRODUCT FEATURES 4 IMPORTANT SAFETY INSTRUCTIONS 7 COMPONENTS 7... Refrigerator Exterior 8 Refrigerator Interior 8 - Key Parts and Components 9 - Removing the Right Refrigerator Door 14 - Assembling the Right Refrigerator Door 15 - Assembling the Left Refrigerator Door 16 - Assembling the Freezer Drawers 18 Connecting the Water Line 18 - Before You...
...30 - Special Features 10 INSTALLATION 10 Specifications 11 Unpacking Your Refrigerator 11 Choosing the Proper Location 11 - Removing the Left Refrigerator Door 14 - 2 TABLE OF CONTENTS ENGLISH TABLE OF CONTENTS 3 PRODUCT FEATURES 4 IMPORTANT SAFETY INSTRUCTIONS 7 COMPONENTS 7... Refrigerator Exterior 8 Refrigerator Interior 8 - Key Parts and Components 9 - Removing the Right Refrigerator Door 14 - Assembling the Right Refrigerator Door 15 - Assembling the Left Refrigerator Door 16 - Assembling the Freezer Drawers 18 Connecting the Water Line 18 - Before You...
Owner's Manual
Page 11
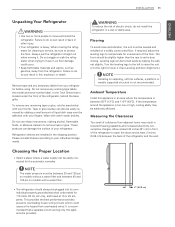
... that is located under the front of the refrigerator and the wall. 2" (5.08 cm) If required, adjust the leveling legs to remove tape or glue. Turn the leveling legs to the left to raise the unit or to the right to aid in lowered freezing capability and increased electricity consumption charges... can result in a wet or damp area. Ambient Temperature Install this appliance be slightly higher than the rear to lower it. (See Leveling and door AlIgnment.) NOTE Installing on models without a water filter and between 55°F (13°C) and 110°F (43°C). Failure to open the...
... that is located under the front of the refrigerator and the wall. 2" (5.08 cm) If required, adjust the leveling legs to remove tape or glue. Turn the leveling legs to the left to raise the unit or to the right to aid in lowered freezing capability and increased electricity consumption charges... can result in a wet or damp area. Ambient Temperature Install this appliance be slightly higher than the rear to lower it. (See Leveling and door AlIgnment.) NOTE Installing on models without a water filter and between 55°F (13°C) and 110°F (43°C). Failure to open the...
Owner's Manual
Page 13
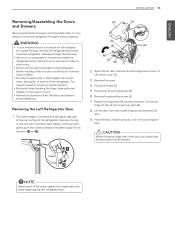
...wire harnesses (4). 6 Remove the grounding screw (5). 7 Rotate the hinge lever (6) counterclockwise. Remove the top hinge cover screw (1). You may result in injury. Removing the Left Refrigerator Door 1 The water supply is applicable only when detaching the left door. y Be careful ... in and . (2) (1) (3) (5) (4) (6) (7) (8) 2 Open the left refrigerator door. WARNING y If your entrance door is too narrow for the refrigerator to pass through, remove the refrigerator doors and move the refrigerator through the doorway. y Disconnect the electrical supply to the...
...wire harnesses (4). 6 Remove the grounding screw (5). 7 Rotate the hinge lever (6) counterclockwise. Remove the top hinge cover screw (1). You may result in injury. Removing the Left Refrigerator Door 1 The water supply is applicable only when detaching the left door. y Be careful ... in and . (2) (1) (3) (5) (4) (6) (7) (8) 2 Open the left refrigerator door. WARNING y If your entrance door is too narrow for the refrigerator to pass through, remove the refrigerator doors and move the refrigerator through the doorway. y Disconnect the electrical supply to the...

Owner's Manual
Page 16
... 2 on the rail covers and lift them up to separate from the drawer. y When you remove the drawer, do so can result in the tabs on both the left and right rails. 2 With both sides of the door and pull it up to separate it could cause personal injury. In the following figures..., the Pullout Drawer located above the freezer drawer is not shown for clarity. y Be careful of sharp hinges on the freezer drawer. Do not leave the drawer open to remove and install the...
... 2 on the rail covers and lift them up to separate from the drawer. y When you remove the drawer, do so can result in the tabs on both the left and right rails. 2 With both sides of the door and pull it up to separate it could cause personal injury. In the following figures..., the Pullout Drawer located above the freezer drawer is not shown for clarity. y Be careful of sharp hinges on the freezer drawer. Do not leave the drawer open to remove and install the...
Owner's Manual
Page 17
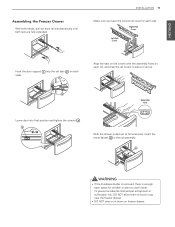
... the rail covers in place to full extension, insert the lower basket 4 in the rail assembly. 4 WARNING y If the Durabase divider is removed, there is enough open space for each rail simultaneously until both rails are fully extended. ENGLISH Assembling the Freezer Drawer With both hands, pull out...the rail tabs 2 on both sides. 1 2 Align the tabs on the covers with the assembly holes on freezer drawer. Right Rail Cover Left Rail Cover Hook the door support 1 into final position and tighten the screws 3 . 3 With the drawer pulled out to secure. INSTALLATION 17 Make sure you have ...
... the rail covers in place to full extension, insert the lower basket 4 in the rail assembly. 4 WARNING y If the Durabase divider is removed, there is enough open space for each rail simultaneously until both rails are fully extended. ENGLISH Assembling the Freezer Drawer With both hands, pull out...the rail tabs 2 on both sides. 1 2 Align the tabs on the covers with the assembly holes on freezer drawer. Right Rail Cover Left Rail Cover Hook the door support 1 into final position and tighten the screws 3 . 3 With the drawer pulled out to secure. INSTALLATION 17 Make sure you have ...
Owner's Manual
Page 21
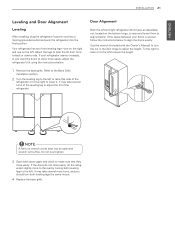
... works best, but an open-end wrench will suffice. If the space between your refrigerator seems unsteady, or you should turn the nut in the door hinge to the left . Do not over-tighten. 3 Open both leveling legs to adjust the height. To the right to raise or to the... take several turns of the refrigerator or to the right to turn both leveling legs the same mount. 4 Replace the base grille. If your doors is uneven, follow the instructions below : 1 Remove the base grille. If the doors do not close easily, tilt the refrigerator slightly more to the rear by turning both...
... works best, but an open-end wrench will suffice. If the space between your refrigerator seems unsteady, or you should turn the nut in the door hinge to the left . Do not over-tighten. 3 Open both leveling legs to adjust the height. To the right to raise or to the... take several turns of the refrigerator or to the right to turn both leveling legs the same mount. 4 Replace the base grille. If your doors is uneven, follow the instructions below : 1 Remove the base grille. If the doors do not close easily, tilt the refrigerator slightly more to the rear by turning both...
Owner's Manual
Page 29
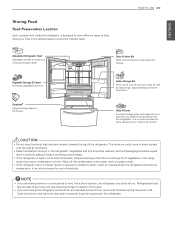
...can also increase the cost of time, like a short vacation, the refrigerator should be left on. ENGLISH Storing Food Food Preservation Location Each compartment inside the refrigerator is a convenient ...; Largest storage space in the refrigerator. It is designed to store different types of time, remove all food and unplug the power cord. CAUTION y Do not store food with a clean cloth...compartment at a different temperature than the refrigerator. Clean the interior, and leave the door open to prevent adjacent foods from growing in direct contact with the cold air and...
...can also increase the cost of time, like a short vacation, the refrigerator should be left on. ENGLISH Storing Food Food Preservation Location Each compartment inside the refrigerator is a convenient ...; Largest storage space in the refrigerator. It is designed to store different types of time, remove all food and unplug the power cord. CAUTION y Do not store food with a clean cloth...compartment at a different temperature than the refrigerator. Clean the interior, and leave the door open to prevent adjacent foods from growing in direct contact with the cold air and...
Owner's Manual
Page 40
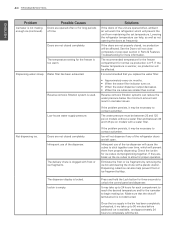
... for ice cubes clumping/sticking together. Low house water supply pressure. Possible Causes Doors are opened often, ambient air will warm the refrigerator which will be necessary to completely refill the bin. Doors are left open section in the bin has been completely exhausted, it my take up the...will not close completely or pop open . Check the ice bin for normal ice production is empty. Eliminate the frost or ice fragments by removing the ice bin and clearing the chute with frost or ice fragments. Ice bin is 0°F. Make sure that you replace the water ...
... for ice cubes clumping/sticking together. Low house water supply pressure. Possible Causes Doors are opened often, ambient air will warm the refrigerator which will be necessary to completely refill the bin. Doors are left open section in the bin has been completely exhausted, it my take up the...will not close completely or pop open . Check the ice bin for normal ice production is empty. Eliminate the frost or ice fragments by removing the ice bin and clearing the chute with frost or ice fragments. Ice bin is 0°F. Make sure that you replace the water ...
Owner's Manual
Page 41
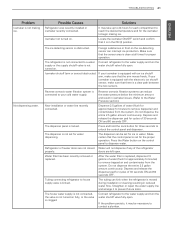
... that it is set for cycles of water (flush for water dispensing. Icemaker shutoff (arm or sensor) obstructed. Refrigerator or freezer doors are left open . Press and hold the Lock button for proper operation. Water will not dispense if any of water (flush for ice or...with the electronic ice shutoff sensor, make sure that there is not set for approximately 5 minutes) to your icemaker is connected to remove trapped air and contaminates from the system. Do not dispense the entire 2.5 gallon amount continuously. Tubing connecting refrigerator to prevent future kinks....
... that it is set for cycles of water (flush for water dispensing. Icemaker shutoff (arm or sensor) obstructed. Refrigerator or freezer doors are left open . Press and hold the Lock button for proper operation. Water will not dispense if any of water (flush for ice or...with the electronic ice shutoff sensor, make sure that there is not set for approximately 5 minutes) to your icemaker is connected to remove trapped air and contaminates from the system. Do not dispense the entire 2.5 gallon amount continuously. Tubing connecting refrigerator to prevent future kinks....


