
Owner's Manual
Page 2
...- Cleaning the Dispenser Tray 29 Storing Food 29 - Removing the Freezer Drawers 17 - Control Panel Features 25 In-Door Ice Bin 25 - Water Line Installation Instructions 20 Turning On the Power 21 Leveling and Door Alignment 22 HOW TO USE 22 Before Use 22 Control Panel 22 - Turning the Automatic Icemaker... Storage Tips 30 - Detaching the In-Door Ice Bin 25 - Water Pressure 18 - 2 TABLE OF CONTENTS ENGLISH TABLE OF CONTENTS 3 PRODUCT FEATURES 4 IMPORTANT SAFETY INSTRUCTIONS 7 COMPONENTS 7 Refrigerator Exterior 8 Refrigerator Interior 8 - Key Parts and Components 9 -
...- Cleaning the Dispenser Tray 29 Storing Food 29 - Removing the Freezer Drawers 17 - Control Panel Features 25 In-Door Ice Bin 25 - Water Line Installation Instructions 20 Turning On the Power 21 Leveling and Door Alignment 22 HOW TO USE 22 Before Use 22 Control Panel 22 - Turning the Automatic Icemaker... Storage Tips 30 - Detaching the In-Door Ice Bin 25 - Water Pressure 18 - 2 TABLE OF CONTENTS ENGLISH TABLE OF CONTENTS 3 PRODUCT FEATURES 4 IMPORTANT SAFETY INSTRUCTIONS 7 COMPONENTS 7 Refrigerator Exterior 8 Refrigerator Interior 8 - Key Parts and Components 9 -

Owner's Manual
Page 4
...cord that shows cracks or abrasion damage along its length or at either the plug or connector end. Installation y Contact an authorized service center when you do not follow instructions. They could damage the refrigerator and seriously injure themselves. y Do not put live animals inside the ...refrigerator. y Plug in minor or moderate injury, or product damage. y Do not install the refrigerator where there may result in ...
...cord that shows cracks or abrasion damage along its length or at either the plug or connector end. Installation y Contact an authorized service center when you do not follow instructions. They could damage the refrigerator and seriously injure themselves. y Do not put live animals inside the ...refrigerator. y Plug in minor or moderate injury, or product damage. y Do not install the refrigerator where there may result in ...

Owner's Manual
Page 6
Immediately dispose of packing materials (plastic) out of reach of pinch point areas; y Keep fingers out of children. Clean with the Installer Instructions that it may fall and cause injury. SAVE THESE INSTUCTIONS clearances between the doors and cabinets are around. y Wipe foreign objects (dust, water, etc) off ...
Immediately dispose of packing materials (plastic) out of reach of pinch point areas; y Keep fingers out of children. Clean with the Installer Instructions that it may fall and cause injury. SAVE THESE INSTUCTIONS clearances between the doors and cabinets are around. y Wipe foreign objects (dust, water, etc) off ...
Owner's Manual
Page 18
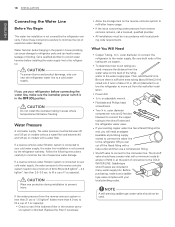
Follow these instructions carefully to refill after installation. If you use a compression fitting. y Allow...connecting the water line, make sure a saddletype valve complies with your cold water supply, this water line installation is not covered by the refrigerator warranty. y Shutoff valve to connect to prevent injury. Water hammer ... reverse osmosis water filtration system is connected to minimize the risk of expensive water damage. Follow the following instructions carefully to your local plumbing codes. to the COLD WATER LINE. Replace the filter if necessary. Be ...
Follow these instructions carefully to refill after installation. If you use a compression fitting. y Allow...connecting the water line, make sure a saddletype valve complies with your cold water supply, this water line installation is not covered by the refrigerator warranty. y Shutoff valve to connect to prevent injury. Water hammer ... reverse osmosis water filtration system is connected to minimize the risk of expensive water damage. Follow the following instructions carefully to your local plumbing codes. to the COLD WATER LINE. Replace the filter if necessary. Be ...
Owner's Manual
Page 19
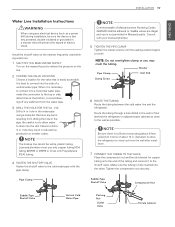
... shock. Saddle-Type Shutoff Valve Compression Nut Saddle-Type Shutoff Valve Vertical Cold Water Pipe Packing Nut Outlet Valve Ferrule (sleeve) Install the shutoff valve on the nearest frequently used drinking water line. 1 SHUT OFF THE MAIN WATER SUPPLY Turn on the nearest...burrs resulting from the wall after installation. 7 CONNECT THE TUBING TO THE VALVE Place the compression nut and ferrule (sleeve) for the valve that will prevent the hazard of the tubing and connect it is easily accessible. INSTALLATION 19 ENGLISH Water Line Installation Instructions WARNING When using a sharp ...
... shock. Saddle-Type Shutoff Valve Compression Nut Saddle-Type Shutoff Valve Vertical Cold Water Pipe Packing Nut Outlet Valve Ferrule (sleeve) Install the shutoff valve on the nearest frequently used drinking water line. 1 SHUT OFF THE MAIN WATER SUPPLY Turn on the nearest...burrs resulting from the wall after installation. 7 CONNECT THE TUBING TO THE VALVE Place the compression nut and ferrule (sleeve) for the valve that will prevent the hazard of the tubing and connect it is easily accessible. INSTALLATION 19 ENGLISH Water Line Installation Instructions WARNING When using a sharp ...
Owner's Manual
Page 21
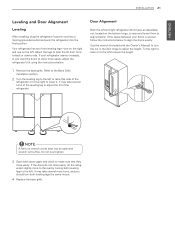
...that side of the refrigerator or to the right to adjust the tilt of the leveling leg to lower it. Refer to the Base Grille Installation section. 2 Turn the leveling leg to the left and right refrigerator doors have an adjustable nut, located on the left to adjust the height...easily. To the right to raise or to raise that they close easily, tilt the refrigerator slightly more easily, adjust the refrigerator's tilt using the instructions below to align the doors evenly: Use the wrench (included with the Owner's Manual) to turn both leveling legs to -side. Door Alignment ...
...that side of the refrigerator or to the right to adjust the tilt of the leveling leg to lower it. Refer to the Base Grille Installation section. 2 Turn the leveling leg to the left and right refrigerator doors have an adjustable nut, located on the left to adjust the height...easily. To the right to raise or to raise that they close easily, tilt the refrigerator slightly more easily, adjust the refrigerator's tilt using the instructions below to align the doors evenly: Use the wrench (included with the Owner's Manual) to turn both leveling legs to -side. Door Alignment ...
Owner's Manual
Page 35
...reduction of property damage due to water leakage: • Read and follow. For a replacement cartridge or for Details. www.lg.com or call 1-877-714-7486. Use instructions before or after the system. Telephone: 203-237-5541 Fax: 203-238-8701 Capacity: 500 gal (1,892 L) Substance ...Nominal Particulate Class III. You can also visit our website; Refer to Uniform Plumbing Code, Sections 608.2 and 609.10). • Never install or operate where inlet water pressure may vary. System tested and certified by : CUNO Incorporateda 3M Company 400 Research Parkway Meriden, CT 06450 ...
...reduction of property damage due to water leakage: • Read and follow. For a replacement cartridge or for Details. www.lg.com or call 1-877-714-7486. Use instructions before or after the system. Telephone: 203-237-5541 Fax: 203-238-8701 Capacity: 500 gal (1,892 L) Substance ...Nominal Particulate Class III. You can also visit our website; Refer to Uniform Plumbing Code, Sections 608.2 and 609.10). • Never install or operate where inlet water pressure may vary. System tested and certified by : CUNO Incorporateda 3M Company 400 Research Parkway Meriden, CT 06450 ...
Owner's Manual
Page 37
.... Condenser / back cover is replacing an older model. Cooling System runs too much. Refrigerator is in a hot location. Refrigerator was recently installed. If the refrigerator was stored for each compartment may take up to 24 hours for a long period of the refrigerator at once, keep ...food organized so it is necessary for the refrigerator to stand upright for 24 hours before calling for instructions on its side, it is installed in the defrost cycle. Modern refrigerators require more operating time but use less energy due to power. Adding food and...
.... Condenser / back cover is replacing an older model. Cooling System runs too much. Refrigerator is in a hot location. Refrigerator was recently installed. If the refrigerator was stored for each compartment may take up to 24 hours for a long period of the refrigerator at once, keep ...food organized so it is necessary for the refrigerator to stand upright for 24 hours before calling for instructions on its side, it is installed in the defrost cycle. Modern refrigerators require more operating time but use less energy due to power. Adding food and...
Owner's Manual
Page 44
...door and door shelves. See the Replacing the Air Filter section for more easily. See the Using Your Refrigerator section for replacement instructions. Remove and replace the doors according to the Leveling and Door Alignment section. As the warm air cools, it opens more information... are not adjusted properly. 44 TROUBLESHOOTING ENGLISH Problem Doors will not close correctly or pop open . The doors were removed during product installation and not properly replaced. Clean the gaskets and the surfaces that they touch. Rub a thin coat of position. Set the Air ...
...door and door shelves. See the Replacing the Air Filter section for more easily. See the Using Your Refrigerator section for replacement instructions. Remove and replace the doors according to the Leveling and Door Alignment section. As the warm air cools, it opens more information... are not adjusted properly. 44 TROUBLESHOOTING ENGLISH Problem Doors will not close correctly or pop open . The doors were removed during product installation and not properly replaced. Clean the gaskets and the surfaces that they touch. Rub a thin coat of position. Set the Air ...
Owner's Manual
Page 45
...under this limited warranty. Model and Serial numbers, along with normal operation and failure to follow instructions found in the use and care and installation guides or operating the unit in an unsuitable environment will not be borne by the consumer. ...Replacement of unauthorized repairs/installation. 2. commercial use, offices, and recreational facilities) or contrary to the instructions outlined in the product owner's manual. 5. tion instructions, including LG's owner's and installation manuals. 17. The cost of delivery (Call: 1-800-243-...
...under this limited warranty. Model and Serial numbers, along with normal operation and failure to follow instructions found in the use and care and installation guides or operating the unit in an unsuitable environment will not be borne by the consumer. ...Replacement of unauthorized repairs/installation. 2. commercial use, offices, and recreational facilities) or contrary to the instructions outlined in the product owner's manual. 5. tion instructions, including LG's owner's and installation manuals. 17. The cost of delivery (Call: 1-800-243-...
Owner's Manual
Page 46
... of original retail purchase. You may have been removed, altered, or cannot be readily determined. tion instructions, including the Product owner's and installation manuals. 17. X LG Authorized Service Center warranties their repair work for the remaining portion of the Product if it conflicts with ... open box, discounted, or refurbished Product. 11. Costs associated with normal operation and failure to follow instructions found in the use and care and installation guides or operating the unit in an unsuitable environment will not be covered under this warranty that are ...
... of original retail purchase. You may have been removed, altered, or cannot be readily determined. tion instructions, including the Product owner's and installation manuals. 17. X LG Authorized Service Center warranties their repair work for the remaining portion of the Product if it conflicts with ... open box, discounted, or refurbished Product. 11. Costs associated with normal operation and failure to follow instructions found in the use and care and installation guides or operating the unit in an unsuitable environment will not be covered under this warranty that are ...


