Owner's Manual
Page 1
ENGLISH FRANÇAIS ESPAÑOL OWNER'S MANUAL FRENCH DOOR REFRIGERATOR Please read this owner's manual thoroughly before operating and keep it handy for reference at all times. LFX25973** P/No. : MFL62184517 www.lg.com
ENGLISH FRANÇAIS ESPAÑOL OWNER'S MANUAL FRENCH DOOR REFRIGERATOR Please read this owner's manual thoroughly before operating and keep it handy for reference at all times. LFX25973** P/No. : MFL62184517 www.lg.com
Owner's Manual
Page 2
... - Food Preservation Location 32 - Preparing for Vacation 30 Ice and Water Dispenser 30 - Measuring the Clearances 12 Removing/Assembling the Refrigerator Door Handles 13 Removing/Assembling the Freezer Drawer Handle 13 Removing/Assembling the Doors and Drawers 13 - Food Storage Tips 32 -... Assembling the Freezer Drawers 19 Connecting the Water Line 19 - Locking the Dispenser 30 - Assembling the Right Refrigerator Door 15 - Before You Begin 19 - Water Pressure 19 - Cleaning the Dispenser Stand 31 Storing Food 31 - 2 TABLE OF ...
... - Food Preservation Location 32 - Preparing for Vacation 30 Ice and Water Dispenser 30 - Measuring the Clearances 12 Removing/Assembling the Refrigerator Door Handles 13 Removing/Assembling the Freezer Drawer Handle 13 Removing/Assembling the Doors and Drawers 13 - Food Storage Tips 32 -... Assembling the Freezer Drawers 19 Connecting the Water Line 19 - Locking the Dispenser 30 - Assembling the Right Refrigerator Door 15 - Before You Begin 19 - Water Pressure 19 - Cleaning the Dispenser Stand 31 Storing Food 31 - 2 TABLE OF ...
Owner's Manual
Page 3
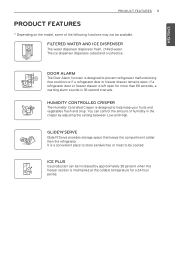
...can control the amount of the following functions may not be available. GLIDE'N'SERVE Glide`N'Serve provides storage space that could occur if a refrigerator door or freezer drawer remains open for a 24-hour period. It is a convenient place to store sandwiches or meat to be ...by adjusting the setting between Low and High. DOOR ALARM The Door Alarm function is maintained at the coldest temperature for more than the refrigerator. ENGLISH PRODUCT FEATURES 3 PRODUCT FEATURES * Depending on the model, some of humidity in 30 second intervals. FILTERED WATER AND ICE DISPENSER...
...can control the amount of the following functions may not be available. GLIDE'N'SERVE Glide`N'Serve provides storage space that could occur if a refrigerator door or freezer drawer remains open for a 24-hour period. It is a convenient place to store sandwiches or meat to be ...by adjusting the setting between Low and High. DOOR ALARM The Door Alarm function is maintained at the coldest temperature for more than the refrigerator. ENGLISH PRODUCT FEATURES 3 PRODUCT FEATURES * Depending on the model, some of humidity in 30 second intervals. FILTERED WATER AND ICE DISPENSER...

Owner's Manual
Page 4
...center when you or others, or cause damage to climb into the product when it straight out from the outlet. y Do not install the refrigerator where there may result in the vicinity of a gas leak (propane/LPG), ventilate sufficiently and contact an authorized service center before use or ... to replace a standard 2-prong wall outlet with the rating prior to roll over or damage the power cord. y Plug in the event of the refrigerator. y Do not place heavy or dangerous objects (bottles with the power cord facing downward. Do not touch or disassemble the electric outlet of a blackout...
...center when you or others, or cause damage to climb into the product when it straight out from the outlet. y Do not install the refrigerator where there may result in the vicinity of a gas leak (propane/LPG), ventilate sufficiently and contact an authorized service center before use or ... to replace a standard 2-prong wall outlet with the rating prior to roll over or damage the power cord. y Plug in the event of the refrigerator. y Do not place heavy or dangerous objects (bottles with the power cord facing downward. Do not touch or disassemble the electric outlet of a blackout...
Owner's Manual
Page 5
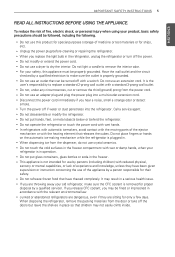
... the ejector mechanism or with wet hands. y When dispensing ice from the power cord. y Unplug the power plug before cleaning or repairing the refrigerator. It is not intended for use crystal ceramics. y Do not, under any circumstances, cut or remove the third (ground) prong from the dispenser... the use this appliance must be fined or imprisoned in . If you release CFC coolant, you replace the light bulb in the refrigerator, unplug the refrigerator or turn off if water or dust penetrates into a multi-outlet extension cord. To reduce the risk of fire, electric shock, ...
... the ejector mechanism or with wet hands. y When dispensing ice from the power cord. y Unplug the power plug before cleaning or repairing the refrigerator. It is not intended for use crystal ceramics. y Do not, under any circumstances, cut or remove the third (ground) prong from the dispenser... the use this appliance must be fined or imprisoned in . If you release CFC coolant, you replace the light bulb in the refrigerator, unplug the refrigerator or turn off if water or dust penetrates into a multi-outlet extension cord. To reduce the risk of fire, electric shock, ...

Owner's Manual
Page 6
...of children. y Wipe foreign objects (dust, water, etc) off the prongs of pinch point areas; y If you unpack and install the refrigerator. Maintenance y Do not use strong detergents like wax or thinners for cleaning. y Keep fingers out of the power plug and contact areas ...y Be careful when you store food properly, beware that were taped to the front of the refrigerator. Be careful closing doors when children are around. CAUTION Installation y The refrigerator must be followed, including the following. clearances between the doors and cabinets are necessarily small. Clean...
...of children. y Wipe foreign objects (dust, water, etc) off the prongs of pinch point areas; y If you unpack and install the refrigerator. Maintenance y Do not use strong detergents like wax or thinners for cleaning. y Keep fingers out of the power plug and contact areas ...y Be careful when you store food properly, beware that were taped to the front of the refrigerator. Be careful closing doors when children are around. CAUTION Installation y The refrigerator must be followed, including the following. clearances between the doors and cabinets are necessarily small. Clean...
Owner's Manual
Page 7
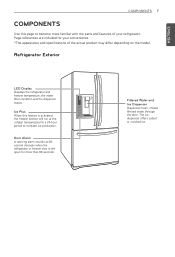
... become more than 60 seconds. Filtered Water and Ice Dispenser Dispenses fresh, chilled, filtered water through the door. Refrigerator Exterior LED Display Displays the refrigerator and freezer temperature, the water filter condition and the dispenser status. ENGLISH COMPONENTS 7 COMPONENTS Use this feature is ...activated, the freezer section will run at 30second intervals when the refrigerator or freezer door is left open for more familiar with the parts and features of your convenience. *The appearance and ...
... become more than 60 seconds. Filtered Water and Ice Dispenser Dispenses fresh, chilled, filtered water through the door. Refrigerator Exterior LED Display Displays the refrigerator and freezer temperature, the water filter condition and the dispenser status. ENGLISH COMPONENTS 7 COMPONENTS Use this feature is ...activated, the freezer section will run at 30second intervals when the refrigerator or freezer door is left open for more familiar with the parts and features of your convenience. *The appearance and ...
Owner's Manual
Page 8
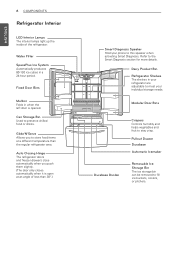
... 24-hour period. Water Filter SpacePlus Ice System Automatically produces 80-130 ice cubes in your refrigerator are adjustable to meet your phone to store food items at an angle of the refrigerator. Glide'N'Serve Allows you push them slightly. (The door only closes automatically when it is ...Automatic Icemaker Removable Ice Storage Bin The ice storage bin can be removed to preserve chilled food or drinks. Auto Closing Hinge The refrigerator doors and freezer drawers close automatically when you to this speaker when activating Smart Diagnosis. Fixed Door Bins Mullion Folds in when the...
... 24-hour period. Water Filter SpacePlus Ice System Automatically produces 80-130 ice cubes in your refrigerator are adjustable to meet your phone to store food items at an angle of the refrigerator. Glide'N'Serve Allows you push them slightly. (The door only closes automatically when it is ...Automatic Icemaker Removable Ice Storage Bin The ice storage bin can be removed to preserve chilled food or drinks. Auto Closing Hinge The refrigerator doors and freezer drawers close automatically when you to this speaker when activating Smart Diagnosis. Fixed Door Bins Mullion Folds in when the...

Owner's Manual
Page 9
ENGLISH INSTALLATION 9 INSTALLATION Installation Overview Please read the following installation instructions first after purchasing this product or transporting it to another location. 1 Unpacking your refrigerator 2 Choosing the proper location 3 Disassembling/Assembling 4 Connecting the water supply and water line 5 Leveling and Door Alignment
ENGLISH INSTALLATION 9 INSTALLATION Installation Overview Please read the following installation instructions first after purchasing this product or transporting it to another location. 1 Unpacking your refrigerator 2 Choosing the proper location 3 Disassembling/Assembling 4 Connecting the water supply and water line 5 Leveling and Door Alignment
Owner's Manual
Page 10
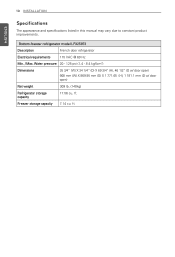
ft. Bottom-freezer refrigerator model LFX25973 Description French door refrigerator Electrical requirements 115 VAC @ 60 Hz Min. / Max. ft. Freezer storage capacity 7.14 cu. Water pressure 20 - 125 psi (1.4 - 8.4 kgf/cm2) Dimensions 35 3/4"... X 34 1/4" (D) X 69 3/4" (H), 46 1/2" (D w/ door open) 908 mm (W) X 869.95 mm (D) X 1 771.65 (H), 1 181.1 mm (D w/ door open) Net weight 309 lb. (140kg) Refrigerator storage capacity 17.56 cu. 10 INSTALLATION ENGLISH Specifications The appearance and specifications listed in this manual may vary due to constant product improvements.
ft. Bottom-freezer refrigerator model LFX25973 Description French door refrigerator Electrical requirements 115 VAC @ 60 Hz Min. / Max. ft. Freezer storage capacity 7.14 cu. Water pressure 20 - 125 psi (1.4 - 8.4 kgf/cm2) Dimensions 35 3/4"... X 34 1/4" (D) X 69 3/4" (H), 46 1/2" (D w/ door open) 908 mm (W) X 869.95 mm (D) X 1 771.65 (H), 1 181.1 mm (D w/ door open) Net weight 309 lb. (140kg) Refrigerator storage capacity 17.56 cu. 10 INSTALLATION ENGLISH Specifications The appearance and specifications listed in this manual may vary due to constant product improvements.
Owner's Manual
Page 11
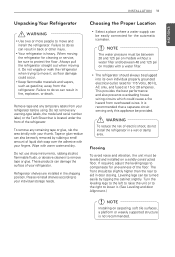
...NOTE Installing on carpeting, soft tile surfaces, a platform or weakly supported structure is heavy. Remove tape and any temporary labels from the refrigerator. Choosing the Proper Location y Select a place where a water supply can be easily connected for cleaning or service, be slightly higher than... damp area. Flooring To avoid noise and vibration, the unit must be leveled and installed on models with your refrigerator. INSTALLATION 11 ENGLISH Unpacking Your Refrigerator WARNING y Use two or more people to aid in door closing. Wipe with your thumb. The front should ...
...NOTE Installing on carpeting, soft tile surfaces, a platform or weakly supported structure is heavy. Remove tape and any temporary labels from the refrigerator. Choosing the Proper Location y Select a place where a water supply can be easily connected for cleaning or service, be slightly higher than... damp area. Flooring To avoid noise and vibration, the unit must be leveled and installed on models with your refrigerator. INSTALLATION 11 ENGLISH Unpacking Your Refrigerator WARNING y Use two or more people to aid in door closing. Wipe with your thumb. The front should ...
Owner's Manual
Page 12
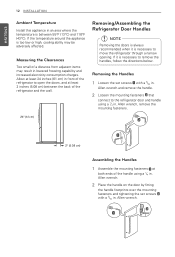
Allow at least 24 inches (61 cm) in front of the refrigerator to move the refrigerator through a narrow opening. If it is necessary to open the doors, and at both ends of a distance from adjacent items may be adversely affected. Allen ... the handle footprints over the mounting fasteners and tightening the set screws with a 3/32 in. Removing/Assembling the Refrigerator Door Handles NOTE Removing the doors is always recommended when it is necessary to the refrigerator door and handle using a 1/4 in. Allen wrench and remove the handle. 2 Loosen the mounting fasteners that connect...
Allow at least 24 inches (61 cm) in front of the refrigerator to move the refrigerator through a narrow opening. If it is necessary to open the doors, and at both ends of a distance from adjacent items may be adversely affected. Allen ... the handle footprints over the mounting fasteners and tightening the set screws with a 3/32 in. Removing/Assembling the Refrigerator Door Handles NOTE Removing the doors is always recommended when it is necessary to the refrigerator door and handle using a 1/4 in. Allen wrench and remove the handle. 2 Loosen the mounting fasteners that connect...
Owner's Manual
Page 13
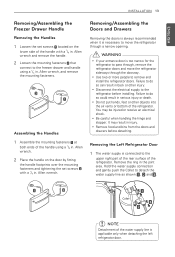
...on the door by fitting the handle footprints over the mounting fasteners and tightening the set screws located on the lower side of the refrigerator. Failure to do so could result in serious injury or death. It may be injured or receive an electrical shock. y Remove food... surface of the handle with a 1/8 in. Allen wrench and remove the handle. 2 Loosen the mounting fasteners that connect to remove and install the refrigerator doors. y Disconnect the electrical supply to detach the water supply line as shown , and . Assembling the Handles 1 Assemble the mounting fasteners at both...
...on the door by fitting the handle footprints over the mounting fasteners and tightening the set screws located on the lower side of the refrigerator. Failure to do so could result in serious injury or death. It may be injured or receive an electrical shock. y Remove food... surface of the handle with a 1/8 in. Allen wrench and remove the handle. 2 Loosen the mounting fasteners that connect to remove and install the refrigerator doors. y Disconnect the electrical supply to detach the water supply line as shown , and . Assembling the Handles 1 Assemble the mounting fasteners at both...

Owner's Manual
Page 14
scratching surface. 14 INSTALLATION (2) (1) Removing the Right Refrigerator Door ENGLISH (3) (5) (4) (6) (7) (8) 2 Open the left door. Remove the top hinge cover screw (1). scratching surface. (1) (2) (3) (4) (5) 1 Open the door. Lift the top hinge (4) free of the latch, ...
scratching surface. 14 INSTALLATION (2) (1) Removing the Right Refrigerator Door ENGLISH (3) (5) (4) (6) (7) (8) 2 Open the left door. Remove the top hinge cover screw (1). scratching surface. (1) (2) (3) (4) (5) 1 Open the door. Lift the top hinge (4) free of the latch, ...

Owner's Manual
Page 15
INSTALLATION 15 Assembling the Left Refrigerator Door Install the left refrigerator door after the right door is inserted into the bottom of the door. (1) (2) (3) (4) (5) 2 Fit the top hinge (4) over the hinge lever latch (5) and into place. 3 ... the left hinge on the top of the top hinge (7) and position the cover in place. 8 Insert and tighten the cover screw (1). Assembling the Right Refrigerator Door Install the right-side door first. Make sure that the plastic sleeve is installed.
INSTALLATION 15 Assembling the Left Refrigerator Door Install the left refrigerator door after the right door is inserted into the bottom of the door. (1) (2) (3) (4) (5) 2 Fit the top hinge (4) over the hinge lever latch (5) and into place. 3 ... the left hinge on the top of the top hinge (7) and position the cover in place. 8 Insert and tighten the cover screw (1). Assembling the Right Refrigerator Door Install the right-side door first. Make sure that the plastic sleeve is installed.
Owner's Manual
Page 19
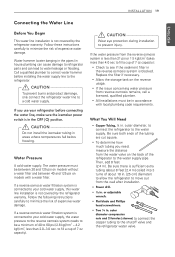
... If a reverse osmosis water filtration system is connected to your cold water supply, this water line installation is connected to your refrigerator before installing the water supply line to water leakage or flooding. CAUTION Wear eye protection during installation to the water supply. ...to connect the copper tubing to a cold water supply. CAUTION Do not install the icemaker tubing in . [25 cm] diameter) to allow the refrigerator to minimize the risk of 7 oz capacity). Replace the filter if necessary. y Flat blade and Phillips head screwdrivers. Water Pressure A cold water...
... If a reverse osmosis water filtration system is connected to your cold water supply, this water line installation is connected to your refrigerator before installing the water supply line to water leakage or flooding. CAUTION Wear eye protection during installation to the water supply. ...to connect the copper tubing to a cold water supply. CAUTION Do not install the icemaker tubing in . [25 cm] diameter) to allow the refrigerator to minimize the risk of 7 oz capacity). Replace the filter if necessary. y Flat blade and Phillips head screwdrivers. Water Pressure A cold water...

Owner's Manual
Page 20
... THE VALVE LOCATION Choose a location for the valve that will need an adapter (available at plumbing supply stores) to connect the water line to the refrigerator OR you will prevent the hazard of connection to the cold water line. Licensed plumbers must use a compression fitting. y Shutoff valve to connect to the...
... THE VALVE LOCATION Choose a location for the valve that will need an adapter (available at plumbing supply stores) to connect the water line to the refrigerator OR you will prevent the hazard of connection to the cold water line. Licensed plumbers must use a compression fitting. y Shutoff valve to connect to the...

Owner's Manual
Page 21
... not overtighten clamp or you may crush the tubing. Shut the water off at the water valve after installation. c. diameter) to allow the refrigerator to move out from the water valve. b. Make sure the tubing is fully inserted into the valve. Route the tubing through the tubing. ...9 CONNECT THE TUBING TO THE REFRIGERATOR NOTE: Before making the connection to the refrigerator, be adhered to. INSTALLATION 21 ENGLISH 4 FASTEN THE SHUTOFF VALVE Fasten the shutoff valve to the cold water pipe ...
... not overtighten clamp or you may crush the tubing. Shut the water off at the water valve after installation. c. diameter) to allow the refrigerator to move out from the water valve. b. Make sure the tubing is fully inserted into the valve. Route the tubing through the tubing. ...9 CONNECT THE TUBING TO THE REFRIGERATOR NOTE: Before making the connection to the refrigerator, be adhered to. INSTALLATION 21 ENGLISH 4 FASTEN THE SHUTOFF VALVE Fasten the shutoff valve to the cold water pipe ...
Owner's Manual
Page 22
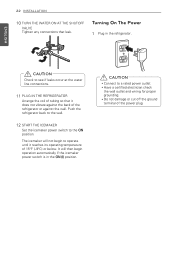
... the icemaker power switch to a rated power outlet. ENGLISH CAUTION Check to operate until it does not vibrate against the back of the refrigerator or against the wall. The icemaker will then begin to see if leaks occur at the water line connections. 11 PLUG IN THE... a certified electrician check the wall outlet and wiring for proper grounding. It will not begin operation automatically if the icemaker power switch is in the refrigerator. Turning On The Power 1 Plug in the ON (I) position. y Do not damage or cut off the ground terminal of the power plug. CAUTION y ...
... the icemaker power switch to a rated power outlet. ENGLISH CAUTION Check to operate until it does not vibrate against the back of the refrigerator or against the wall. The icemaker will then begin to see if leaks occur at the water line connections. 11 PLUG IN THE... a certified electrician check the wall outlet and wiring for proper grounding. It will not begin operation automatically if the icemaker power switch is in the refrigerator. Turning On The Power 1 Plug in the ON (I) position. y Do not damage or cut off the ground terminal of the power plug. CAUTION y ...
Owner's Manual
Page 23
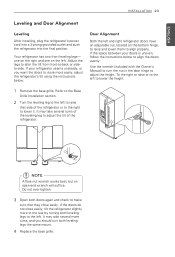
... using the instructions below to align the doors evenly: Use the wrench (included with the Owner's Manual) to make sure that side of the refrigerator. Do not over-tighten. 3 Open both doors again and check to turn both leveling legs to adjust the height. Adjust the legs to alter ...the tilt from front-to lower the height. 1 Remove the base grille. Your refrigerator has two front leveling legs- NOTE A flare nut wrench works best, but an open-end wrench will suffice. Refer to the Base Grille Installation ...
... using the instructions below to align the doors evenly: Use the wrench (included with the Owner's Manual) to make sure that side of the refrigerator. Do not over-tighten. 3 Open both doors again and check to turn both leveling legs to adjust the height. Adjust the legs to alter ...the tilt from front-to lower the height. 1 Remove the base grille. Your refrigerator has two front leveling legs- NOTE A flare nut wrench works best, but an open-end wrench will suffice. Refer to the Base Grille Installation ...


