

Owner's Manual (English)
Page 2
...the Temperatures and Display 22 Operating the Dispenser 23 Setting the Functions 24 In-Door Ice Bin 25 Automatic Icemaker 26 Storing Foods 27 Location of reliable service. Your new LG French Door Refrigerator combines advanced cooling technology with many years of Foods 28 Shelf ...Height Adjustment 29 CARE AND CLEANING Removing and Replacing Components 30 Cleaning the Refrigerator 34 General Information 34 Replacing the Water Filter...
...the Temperatures and Display 22 Operating the Dispenser 23 Setting the Functions 24 In-Door Ice Bin 25 Automatic Icemaker 26 Storing Foods 27 Location of reliable service. Your new LG French Door Refrigerator combines advanced cooling technology with many years of Foods 28 Shelf ...Height Adjustment 29 CARE AND CLEANING Removing and Replacing Components 30 Cleaning the Refrigerator 34 General Information 34 Replacing the Water Filter...

Owner's Manual (English)
Page 3
...Freezer Control, depending on the power cord. It will identify the hazard, tell you how to safety messages that inform you of the refrigerator. • After your product, basic safety precautions should be killed or seriously injured if you don't follow instructions. It alerts you ...the freezer compartment when hands are damp or wet. wWARNING You can kill or hurt you don't follow instructions. They could damage the refrigerator and seriously injure themselves. • Keep fingers out of the ejector mechanism or with the Installer Instructions that releases the cubes. NOTE...
...Freezer Control, depending on the power cord. It will identify the hazard, tell you how to safety messages that inform you of the refrigerator. • After your product, basic safety precautions should be killed or seriously injured if you don't follow instructions. It alerts you ...the freezer compartment when hands are damp or wet. wWARNING You can kill or hurt you don't follow instructions. They could damage the refrigerator and seriously injure themselves. • Keep fingers out of the ejector mechanism or with the Installer Instructions that releases the cubes. NOTE...

Owner's Manual (English)
Page 4
...(4°C). ...Thawed ground meats, poultry, or fish that of their quality as much of many other foods. CFC DISPOSAL Your old refrigerator may safely refreeze frozen foods that have thawed completely. Before you can . If the odor or color of any off-odor or...just a few days. If you are disposing of environmental legislation. 4 If you intentionally release this CFC refrigerant, you throw away your old refrigerator, make sure the CFC refrigerant is poor or questionable, dispose of foods, particularly fruits, vegetables, and prepared foods. The United States Department...
...(4°C). ...Thawed ground meats, poultry, or fish that of their quality as much of many other foods. CFC DISPOSAL Your old refrigerator may safely refreeze frozen foods that have thawed completely. Before you can . If the odor or color of any off-odor or...just a few days. If you are disposing of environmental legislation. 4 If you intentionally release this CFC refrigerant, you throw away your old refrigerator, make sure the CFC refrigerant is poor or questionable, dispose of foods, particularly fruits, vegetables, and prepared foods. The United States Department...
Owner's Manual (English)
Page 5
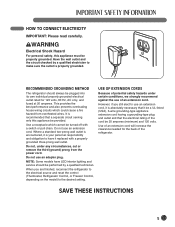
...and outlet and that a separate circuit serving only this appliance must be 20 amperes (minimum) and 120 volts. Use of the refrigerator. SAVE THESE INSTRUCTIONS 5 wWARNING Electrical Shock Hazard For personal safety, this appliance be performed by a qualified electrician to the desired setting... to use of an extension cord. RECOMMENDED GROUNDING METHOD The refrigerator should be provided. However, if you are finished, reconnect the refrigerator to the electrical source and reset the control (Thermostat, Refrigerator Control, or Freezer Control, depending on the model) to ...
...and outlet and that a separate circuit serving only this appliance must be 20 amperes (minimum) and 120 volts. Use of the refrigerator. SAVE THESE INSTRUCTIONS 5 wWARNING Electrical Shock Hazard For personal safety, this appliance be performed by a qualified electrician to the desired setting... to use of an extension cord. RECOMMENDED GROUNDING METHOD The refrigerator should be provided. However, if you are finished, reconnect the refrigerator to the electrical source and reset the control (Thermostat, Refrigerator Control, or Freezer Control, depending on the model) to ...

Owner's Manual (English)
Page 6
... freezer section will run at 30-second intervals when the refrigerator or freezer door is automatically closed within 30° of the refrigerator, it is automatically closed. (The door is left open for a 24- The in-door design creates more than 60 seconds. ...24-hour period to increase ice production by about 20 percent. 3 FILTERED WATER AND ICE DISPENSER The water dispenser offers fresh, chilled, filtered water through the door. The ice dispenser offers cubed or crushed ice. 4 DOOR ALARM A warning alarm sounds at the coldest temperature for more shelf space. 6 6 CRISPERS LG...
... freezer section will run at 30-second intervals when the refrigerator or freezer door is automatically closed within 30° of the refrigerator, it is automatically closed. (The door is left open for a 24- The in-door design creates more than 60 seconds. ...24-hour period to increase ice production by about 20 percent. 3 FILTERED WATER AND ICE DISPENSER The water dispenser offers fresh, chilled, filtered water through the door. The ice dispenser offers cubed or crushed ice. 4 DOOR ALARM A warning alarm sounds at the coldest temperature for more shelf space. 6 6 CRISPERS LG...
Owner's Manual (English)
Page 7
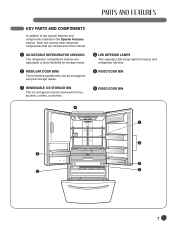
...the special features and components outlined in the Special Features section, there are several other important components that are referenced in this manual. 1 ADJUSTABLE REFRIGERATOR SHELVING The refrigerator compartment shelves are adjustable to allow flexibility for storage needs. 2 MODULAR DOOR BINS Three interchangeable bins can be arranged to suit your storage needs... ice storage bin can be removed to fill ice buckets, coolers, or pitchers. 4 LED INTERIOR LAMPS Two separate LED arrays light the freezer and refrigerator interiors. 5 FIXED DOOR BIN 6 FIXED DOOR BIN 4 1 2 5 6 3 4 7
...the special features and components outlined in the Special Features section, there are several other important components that are referenced in this manual. 1 ADJUSTABLE REFRIGERATOR SHELVING The refrigerator compartment shelves are adjustable to allow flexibility for storage needs. 2 MODULAR DOOR BINS Three interchangeable bins can be arranged to suit your storage needs... ice storage bin can be removed to fill ice buckets, coolers, or pitchers. 4 LED INTERIOR LAMPS Two separate LED arrays light the freezer and refrigerator interiors. 5 FIXED DOOR BIN 6 FIXED DOOR BIN 4 1 2 5 6 3 4 7

Owner's Manual (English)
Page 8
Allow at least 24 in. (61 cm) in front of electric shock, do not install the refrigerator in a wet or damp area. • Select a place where a water supply can be easily connected for the automatic icemaker and dispenser. • Unstable ... For complete dimensions and specifications, see page 40. 1" (2.54 cm) 8 If the floor is not even, make the refrigerator level by rotating the height adjusting screws. • Properly ground the refrigerator to open the doors. wCAUTION Avoid placing the unit near heat sources, direct sunlight, or moisture. CHOOSE THE PROPER LOCATION...
Allow at least 24 in. (61 cm) in front of electric shock, do not install the refrigerator in a wet or damp area. • Select a place where a water supply can be easily connected for the automatic icemaker and dispenser. • Unstable ... For complete dimensions and specifications, see page 40. 1" (2.54 cm) 8 If the floor is not even, make the refrigerator level by rotating the height adjusting screws. • Properly ground the refrigerator to open the doors. wCAUTION Avoid placing the unit near heat sources, direct sunlight, or moisture. CHOOSE THE PROPER LOCATION...
Owner's Manual (English)
Page 9
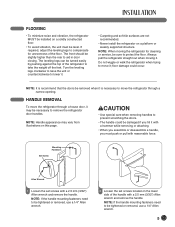
...unit must push or pull with a 2.5 mm (3/32") Allen wrench and remove the handle. Do not wiggle or walk the refrigerator when trying to move the refrigerator through a narrow opening. NOTE: Handle appearance may be necessary to protect the floor. The leveling legs can be sure to remove ...handles. HANDLE REMOVAL To move it; Mounting Fasteners Set Screw Allen Wrench 1 Loosen the set screws located on the lower side of the refrigerator to prevent scratching the doors. • The handle could occur. wCAUTION • Use special care when removing handles to take the ...
...unit must push or pull with a 2.5 mm (3/32") Allen wrench and remove the handle. Do not wiggle or walk the refrigerator when trying to move the refrigerator through a narrow opening. NOTE: Handle appearance may be necessary to protect the floor. The leveling legs can be sure to remove ...handles. HANDLE REMOVAL To move it; Mounting Fasteners Set Screw Allen Wrench 1 Loosen the set screws located on the lower side of the refrigerator to prevent scratching the doors. • The handle could occur. wCAUTION • Use special care when removing handles to take the ...
Owner's Manual (English)
Page 10
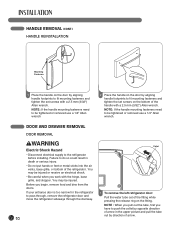
... or serious injury. • Do not put hands or feet or metal sticks into the air vents, base grille, or bottom of the refrigerator. DOOR AND DRAWER REMOVAL DOOR REMOVAL wWARNING Collet Electric Shock Hazard • Disconnect electrical supply to do so could result in the upper picture... and pull the tube out by aligning handle footprints to pass through, remove the refrigerator door and move the refrigerator sideways through the doorway. 1 To remove the left refrigerator door: Pull the water tube out of the fitting while pressing the release ring on the fitting. ...
... or serious injury. • Do not put hands or feet or metal sticks into the air vents, base grille, or bottom of the refrigerator. DOOR AND DRAWER REMOVAL DOOR REMOVAL wWARNING Collet Electric Shock Hazard • Disconnect electrical supply to do so could result in the upper picture... and pull the tube out by aligning handle footprints to pass through, remove the refrigerator door and move the refrigerator sideways through the doorway. 1 To remove the left refrigerator door: Pull the water tube out of the fitting while pressing the release ring on the fitting. ...
Owner's Manual (English)
Page 11
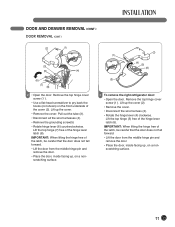
... the door from the middle hinge pin and remove the door. • Place the door, inside facing up , on a nonscratching surface. (2) (1) (4) (5) (6) (3) 3 To remove the right refrigerator door: • Open the door. Remove the top hinge cover screw (1 ). • Use a flat-head screwdriver to pry back the hooks (not shown) on a nonscratching...
... the door from the middle hinge pin and remove the door. • Place the door, inside facing up , on a nonscratching surface. (2) (1) (4) (5) (6) (3) 3 To remove the right refrigerator door: • Open the door. Remove the top hinge cover screw (1 ). • Use a flat-head screwdriver to pry back the hooks (not shown) on a nonscratching...

Owner's Manual (English)
Page 16
...1/2-in areas where temperatures will remain above freezing. • It may take up to 24 hours for leaks. • Install tubing only in . drill bit • Hand drill or electric drill (properly grounded) NOTE: Refrigerator dealers offer a kit with a 1/4-in . Be sure both ends of the copper ...your licensed plumber. Cold Water Supply • The icemaker water valve contains a flow washer which reduces water flow and clogs more easily. Add 7 ft. (2.1 m) to . NOTE: A horizontal pipe will work, but the following precaution must be taken: drill on the top of Massachusetts Plumbing ...
...1/2-in areas where temperatures will remain above freezing. • It may take up to 24 hours for leaks. • Install tubing only in . drill bit • Hand drill or electric drill (properly grounded) NOTE: Refrigerator dealers offer a kit with a 1/4-in . Be sure both ends of the copper ...your licensed plumber. Cold Water Supply • The icemaker water valve contains a flow washer which reduces water flow and clogs more easily. Add 7 ft. (2.1 m) to . NOTE: A horizontal pipe will work, but the following precaution must be taken: drill on the top of Massachusetts Plumbing ...

Owner's Manual (English)
Page 17
... Nut Cold Water Pipe Pipe Clamp Coil of Polyethelyne or Copper Tubing Shutoff Valve Compression Sleeve Compression Nut IMPORTANT: Before connecting the tubing to the refrigerator, be used . Open the water at the shutoff valve. • Plug in the water pipe and the washer is clear. Tighten the ...the copper tubing. • Slip the compression sleeve and the compression nut onto the copper tubing as shown. • Insert the end of the refrigerator or against the wall. • Check for leaks. • Before connecting the water line to house, purge house line for water to begin ...
... Nut Cold Water Pipe Pipe Clamp Coil of Polyethelyne or Copper Tubing Shutoff Valve Compression Sleeve Compression Nut IMPORTANT: Before connecting the tubing to the refrigerator, be used . Open the water at the shutoff valve. • Plug in the water pipe and the washer is clear. Tighten the ...the copper tubing. • Slip the compression sleeve and the compression nut onto the copper tubing as shown. • Insert the end of the refrigerator or against the wall. • Check for leaks. • Before connecting the water line to house, purge house line for water to begin ...

Owner's Manual (English)
Page 18
... NOTE: To replace the kick plate, place it with the hinges, base grille, and stopper. NOTE: If someone pushes backward against the top of the refrigerator. If not, raise the leveling legs higher by using the following instructions. NOTE: In order not to side. Either door can be injured. • ...Do not put hands, feet, or metal items into position, and then insert and tighten the screws. 2 Level the refrigerator by turning both doors to lower the height of the front of the kick plate. Adjust the legs to alter the tilt from front to...
... NOTE: To replace the kick plate, place it with the hinges, base grille, and stopper. NOTE: If someone pushes backward against the top of the refrigerator. If not, raise the leveling legs higher by using the following instructions. NOTE: In order not to side. Either door can be injured. • ...Do not put hands, feet, or metal items into position, and then insert and tighten the screws. 2 Level the refrigerator by turning both doors to lower the height of the front of the kick plate. Adjust the legs to alter the tilt from front to...

Owner's Manual (English)
Page 19
... to adjust the bolt in the door hinge to adjust the height. (CCW to raise or CW to lower the height.) STARTING Before loading your refrigerator with fresh foods: • Remove tape and any warning-type labels, the model and serial number label, or the tech sheet that may have ...ALIGNMENT 1 • Remove the Base Grillie. • Turn the leveling legs (CCW) to raise or (CW) to lower the height of the front of the refrigerator by using . They are packed together to prevent possible damage during shipping. • Install accessories such as the ice cube bin, drawers, and shelves, in...
... to adjust the bolt in the door hinge to adjust the height. (CCW to raise or CW to lower the height.) STARTING Before loading your refrigerator with fresh foods: • Remove tape and any warning-type labels, the model and serial number label, or the tech sheet that may have ...ALIGNMENT 1 • Remove the Base Grillie. • Turn the leveling legs (CCW) to raise or (CW) to lower the height of the front of the refrigerator by using . They are packed together to prevent possible damage during shipping. • Install accessories such as the ice cube bin, drawers, and shelves, in...

Owner's Manual (English)
Page 20
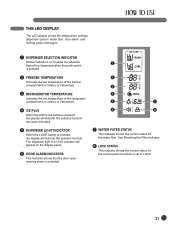
NOTE: When pressed simultaneously with the REFRIGERATOR button for more than five seconds, the...Cubed Ice or Crushed Ice. 3 FREEZER BUTTON Press the FREEZER button to adjust the temperature in the refrigerator compartment. ICE PLUS LIGHT / FILTER ALARM / LOCK 3SECS 6 LIGHT/FILTER BUTTON The LIGHT/FILTER button... controls the lamp in the freezer compartment. ICE TYPE FREEZER REFRIGERATOR 4 REFRIGERATOR BUTTON Press the REFRIGERATOR button to adjust the temperature in the dispenser. feature, which increases icemaking capabilities up to ...
NOTE: When pressed simultaneously with the REFRIGERATOR button for more than five seconds, the...Cubed Ice or Crushed Ice. 3 FREEZER BUTTON Press the FREEZER button to adjust the temperature in the refrigerator compartment. ICE PLUS LIGHT / FILTER ALARM / LOCK 3SECS 6 LIGHT/FILTER BUTTON The LIGHT/FILTER button... controls the lamp in the freezer compartment. ICE TYPE FREEZER REFRIGERATOR 4 REFRIGERATOR BUTTON Press the REFRIGERATOR button to adjust the temperature in the dispenser. feature, which increases icemaking capabilities up to ...
Owner's Manual (English)
Page 21
... dispensed when the push switch is pressed. 2 FREEZER TEMPERATURE Indicates the set temperature of the freezer compartment in Celsius or Fahrenheit. 3 REFRIGERATOR TEMPERATURE Indicates the set temperature of the refrigerator compartment in Celsius or Fahrenheit. 4 ICE PLUS When the ICE PLUS button is pressed, the display will indicate the selected function has...
... dispensed when the push switch is pressed. 2 FREEZER TEMPERATURE Indicates the set temperature of the freezer compartment in Celsius or Fahrenheit. 3 REFRIGERATOR TEMPERATURE Indicates the set temperature of the refrigerator compartment in Celsius or Fahrenheit. 4 ICE PLUS When the ICE PLUS button is pressed, the display will indicate the selected function has...
Owner's Manual (English)
Page 22
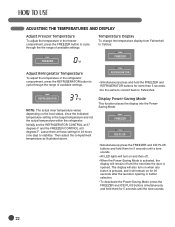
... CONTROL at these setting for 5 seconds until the next time the door is the target temperature and not the actual temperature within the refrigerator. Then adjust the compartment temperature as illustrated above. The display will also turn on and then off until the tone sounds. 22 Leave... them for 24 hours (one day) to cycle through the the range of available settings. REFRIGERATOR NOTE: The actual inner temperature varies depending on for 20 seconds after the last door opening or button...
... CONTROL at these setting for 5 seconds until the next time the door is the target temperature and not the actual temperature within the refrigerator. Then adjust the compartment temperature as illustrated above. The display will also turn on and then off until the tone sounds. 22 Leave... them for 24 hours (one day) to cycle through the the range of available settings. REFRIGERATOR NOTE: The actual inner temperature varies depending on for 20 seconds after the last door opening or button...

Owner's Manual (English)
Page 23
... or other container and cubed ice will be dispensed. CONTROLLING THE DISPENSER LIGHT LIGHT / FILTER Press the LIGHT/FILTER button to not operate while either refrigerator door is designed to turn the dispenser light on and off. ACTIVE WATER BUTTON WATER SWITCH ICE SWITCH wCAUTION • When filling the container with...
... or other container and cubed ice will be dispensed. CONTROLLING THE DISPENSER LIGHT LIGHT / FILTER Press the LIGHT/FILTER button to not operate while either refrigerator door is designed to turn the dispenser light on and off. ACTIVE WATER BUTTON WATER SWITCH ICE SWITCH wCAUTION • When filling the container with...

Owner's Manual (English)
Page 24
... panel will appear in the display during use, note the code and then call 1-888-542-2623 (24 hours per day/7 days per week) and select the option to cancel the ICE PLUS function. ACTIVATING ... the other settings. RESETTING THE FILTER INDICATOR LIGHT / FILTER Press and hold the ALARM/LOCK button for a 24-hour period to increase icemaking by up to sound after the water filter has been replaced. SETTING THE DISPENSER.... NOTE: Press the button again to locate an authorized servicer. 24 NOTE: Contact your refrigerator, and a diagnostic code will illuminate when activated.
... panel will appear in the display during use, note the code and then call 1-888-542-2623 (24 hours per day/7 days per week) and select the option to cancel the ICE PLUS function. ACTIVATING ... the other settings. RESETTING THE FILTER INDICATOR LIGHT / FILTER Press and hold the ALARM/LOCK button for a 24-hour period to increase icemaking by up to sound after the water filter has been replaced. SETTING THE DISPENSER.... NOTE: Press the button again to locate an authorized servicer. 24 NOTE: Contact your refrigerator, and a diagnostic code will illuminate when activated.

Owner's Manual (English)
Page 25
... prevent ice cubes from melting and leaking from the dispenser, ALWAYS empty the ice bin when the icemaker is set to the temperature of the refrigerator compartment. Automatic shutoff Arm To reinstall the in it is full. If the ice bin door is not closed tightly, the cold air in the... or injure yourself. To remove the in the freezer compartment so the icemaker can keep producing ice. NOTE: Storing cans or other items in the refrigerator compartment. NOTE: If the On/Off switch on the latch firmly where noted to misread the amount of the ice bin door and dispenser chute...
... prevent ice cubes from melting and leaking from the dispenser, ALWAYS empty the ice bin when the icemaker is set to the temperature of the refrigerator compartment. Automatic shutoff Arm To reinstall the in it is full. If the ice bin door is not closed tightly, the cold air in the... or injure yourself. To remove the in the freezer compartment so the icemaker can keep producing ice. NOTE: Storing cans or other items in the refrigerator compartment. NOTE: If the On/Off switch on the latch firmly where noted to misread the amount of the ice bin door and dispenser chute...


