Owner's Manual
Page 2
... the operating and care instructions in this manual and your purchase and welcome to Connect Electricity 5 PARTS AND FEATURES Special Features 6 Key Parts and Components 7 INSTALLATION Choose the Proper Location 8 Clearances 8 Flooring 9 Handle Removal 9 Door and Drawer Removal 10 Connecting the Water Supply 16 Connecting the Water Lines 16 Leveling the Refrigerator Doors 18 Starting 19 HOW TO USE Control Panel Features 20 The LED Display 21 Adjusting the Temperatures and Display 22 Operating the Dispenser 23 Setting the Functions 24 In-Door Ice Bin 25 Automatic Icemaker...
... the operating and care instructions in this manual and your purchase and welcome to Connect Electricity 5 PARTS AND FEATURES Special Features 6 Key Parts and Components 7 INSTALLATION Choose the Proper Location 8 Clearances 8 Flooring 9 Handle Removal 9 Door and Drawer Removal 10 Connecting the Water Supply 16 Connecting the Water Lines 16 Leveling the Refrigerator Doors 18 Starting 19 HOW TO USE Control Panel Features 20 The LED Display 21 Adjusting the Temperatures and Display 22 Operating the Dispenser 23 Setting the Functions 24 In-Door Ice Bin 25 Automatic Icemaker...
Owner's Manual
Page 3
... be preceded by a qualified technician. • Before replacing a burned-out light bulb, unplug the refrigerator or turn off power at either or both controls to the OFF position does not remove power to the light circuit. • When you are finished, reconnect the refrigerator to the electrical source and reset the control (Thermostat Refrigerator Control, or Freezer Control, or Freezer Control, depending on the power cord. All safety messages will identify the...
... be preceded by a qualified technician. • Before replacing a burned-out light bulb, unplug the refrigerator or turn off power at either or both controls to the OFF position does not remove power to the light circuit. • When you are finished, reconnect the refrigerator to the electrical source and reset the control (Thermostat Refrigerator Control, or Freezer Control, or Freezer Control, depending on the power cord. All safety messages will identify the...
Owner's Manual
Page 6
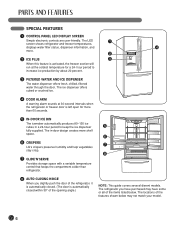
.... 5 IN-DOOR ICE BIN The icemaker automatically produces 80-130 ice cubes in -door design creates more than refrigerator. 8 AUTO CLOSING HINGE When you have some or all of the opening angle.) NOTE: This guide covers several dierent models. The refrigerator you slightly push the door of the refrigerator, it is automatically closed. (The door is left open for a 24- SPECIAL FEATURES 1 CONTROL PANEL LED DISPLAY SCREEN Simple electronic controls are user-friendly.
.... 5 IN-DOOR ICE BIN The icemaker automatically produces 80-130 ice cubes in -door design creates more than refrigerator. 8 AUTO CLOSING HINGE When you have some or all of the opening angle.) NOTE: This guide covers several dierent models. The refrigerator you slightly push the door of the refrigerator, it is automatically closed. (The door is left open for a 24- SPECIAL FEATURES 1 CONTROL PANEL LED DISPLAY SCREEN Simple electronic controls are user-friendly.

Owner's Manual
Page 8
... install the refrigerator where it will not be easily connected for the automatic icemaker and dispenser. • Unstable installation may cause vibration and noise. If the temperature around the appliance is too low or too high, cooling ability may result in an area where the temperature is not even, make the refrigerator level by rotating the height adjusting screws. • Properly ground the refrigerator to open the doors...
... install the refrigerator where it will not be easily connected for the automatic icemaker and dispenser. • Unstable installation may cause vibration and noise. If the temperature around the appliance is too low or too high, cooling ability may result in an area where the temperature is not even, make the refrigerator level by rotating the height adjusting screws. • Properly ground the refrigerator to open the doors...
Owner's Manual
Page 9
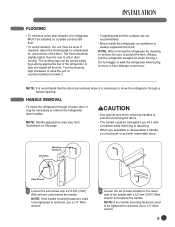
... assemble or disassemble a handle, you must be sure to compensate for cleaning or service, be level. NOTE: If the handle mounting fasteners need to remove the refrigerator door handles. Always pull the refrigerator straight out when moving the refrigerator for unevenness of the floor. HANDLE REMOVAL To move the refrigerator through a narrow opening. NOTE: Handle appearance may be necessary to be tightened or removed, use a 1/4" Allen wrench. 9 wCAUTION • Use special care...
... assemble or disassemble a handle, you must be sure to compensate for cleaning or service, be level. NOTE: If the handle mounting fasteners need to remove the refrigerator door handles. Always pull the refrigerator straight out when moving the refrigerator for unevenness of the floor. HANDLE REMOVAL To move the refrigerator through a narrow opening. NOTE: Handle appearance may be necessary to be tightened or removed, use a 1/4" Allen wrench. 9 wCAUTION • Use special care...

Owner's Manual
Page 16
.... This will help drain water from the connection on the lower left rear of copper tubing you begin. • If operating the refrigerator before installing the water connection, turn the icemaker to the OFF position to prevent operation without water. • All installations must be in accordance with local plumbing code requirements. • Use copper tubing and check for the icemaker to begin producing ice. Cold Water Supply • The icemaker water valve contains a flow washer...
.... This will help drain water from the connection on the lower left rear of copper tubing you begin. • If operating the refrigerator before installing the water connection, turn the icemaker to the OFF position to prevent operation without water. • All installations must be in accordance with local plumbing code requirements. • Use copper tubing and check for the icemaker to begin producing ice. Cold Water Supply • The icemaker water valve contains a flow washer...

Owner's Manual
Page 17
... its operating temperature of the tubing into the connection as far as possible. Do not overtighten or you are ready to the cold water pipe with a wrench. Tubing Clamp 1/4" Tubing 1/4" Compression Nut Ferrule (Sleeve) Water valve Refrigerator Connection • Remove the plastic flexible cap from the lines. • Push the refrigerator back to the wall. • Set the icemaker switch to house, purge house line for leaks. • Before connecting the water line...
... its operating temperature of the tubing into the connection as far as possible. Do not overtighten or you are ready to the cold water pipe with a wrench. Tubing Clamp 1/4" Tubing 1/4" Compression Nut Ferrule (Sleeve) Water valve Refrigerator Connection • Remove the plastic flexible cap from the lines. • Push the refrigerator back to the wall. • Set the icemaker switch to house, purge house line for leaks. • Before connecting the water line...

Owner's Manual
Page 18
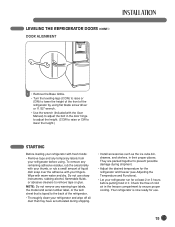
... to move left . Remove the kick plate screws and then the kick plate. • Open the Freezer Drawer. • Once the drawer is open, there is uniquely designed with the 'Adjust' to the floor to install and use. 18 NOTE: The front of the leveling legs, which makes adjustment easier. NOTE: If someone pushes backward against the top of the refrigerator. LEVELING THE REFRIGERATOR DOORS wWARNING Electrical Shock...
... to move left . Remove the kick plate screws and then the kick plate. • Open the Freezer Drawer. • Once the drawer is open, there is uniquely designed with the 'Adjust' to the floor to install and use. 18 NOTE: The front of the leveling legs, which makes adjustment easier. NOTE: If someone pushes backward against the top of the refrigerator. LEVELING THE REFRIGERATOR DOORS wWARNING Electrical Shock...
Owner's Manual
Page 19
... refrigerator run for at least 2 or 3 hours before using flat blade screw driver or 11/32" wrench. • Use the wrench (Included with the User Manual) to adjust the bolt in the door hinge to adjust the height. (CCW to raise or CW to ensure proper cooling. Your refrigerator is taped to prevent possible damage during shipping. • Install accessories such as the ice cube bin, drawers, and shelves...
... refrigerator run for at least 2 or 3 hours before using flat blade screw driver or 11/32" wrench. • Use the wrench (Included with the User Manual) to adjust the bolt in the door hinge to adjust the height. (CCW to raise or CW to ensure proper cooling. Your refrigerator is taped to prevent possible damage during shipping. • Install accessories such as the ice cube bin, drawers, and shelves...

Owner's Manual
Page 20
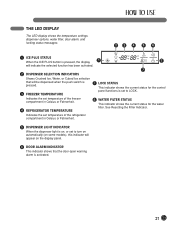
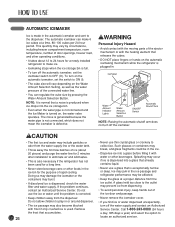
... dispenser and resets the water filter replacement indicator when the water filter has been replaced. 7 ALARM/LOCK BUTTON Press this button to control the door-open alarm or to adjust the temperature in the freezer compartment. CONTROL PANEL FEATURES For complete details on button functions, see pages 22-24. 1 LED DISPLAY The LCD/LED display shows the temperature settings, dispenser options, and the water filter, door alarm, and locking status messages. 2 ICE PLUS BUTTON Press this button to turn on the ICE PLUS feature, which increases icemaking...
... dispenser and resets the water filter replacement indicator when the water filter has been replaced. 7 ALARM/LOCK BUTTON Press this button to control the door-open alarm or to adjust the temperature in the freezer compartment. CONTROL PANEL FEATURES For complete details on button functions, see pages 22-24. 1 LED DISPLAY The LCD/LED display shows the temperature settings, dispenser options, and the water filter, door alarm, and locking status messages. 2 ICE PLUS BUTTON Press this button to turn on the ICE PLUS feature, which increases icemaking...
Owner's Manual
Page 21
... Ice, Water, or Cubed Ice selection that will be dispensed when the push switch is pressed. 7 LOCK STATUS This indicator shows the current status for the control panel functions is set to turn on automatically (on some models), this indicator will appear on the display panel. 6 DOOR ALARM INDICATOR This indicator shows that the door-open warning alarm is on, or set to LOCK. 3 FREEZER TEMPERATURE Indicates the set temperature of the freezer compartment in Celsius or Fahrenheit. 4 REFRIGERATOR TEMPERATURE 8 WATER FILTER...
... Ice, Water, or Cubed Ice selection that will be dispensed when the push switch is pressed. 7 LOCK STATUS This indicator shows the current status for the control panel functions is set to turn on automatically (on some models), this indicator will appear on the display panel. 6 DOOR ALARM INDICATOR This indicator shows that the door-open warning alarm is on, or set to LOCK. 3 FREEZER TEMPERATURE Indicates the set temperature of the freezer compartment in Celsius or Fahrenheit. 4 REFRIGERATOR TEMPERATURE 8 WATER FILTER...
Owner's Manual
Page 24
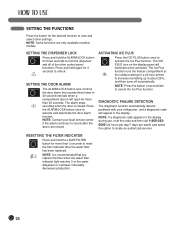
... icemaking up to about 20%, and then turns off automatically. The Ice Plus function runs the freezer compartment at the coldest setting for the desired function to view and select other control panel functions. NOTE: Some functions are closed . The alarm stops sounding when the door is left open for more than 3 seconds to sound after the water filter has been replaced. NOTE: Contact your refrigerator, and a diagnostic code...
... icemaking up to about 20%, and then turns off automatically. The Ice Plus function runs the freezer compartment at the coldest setting for the desired function to view and select other control panel functions. NOTE: Some functions are closed . The alarm stops sounding when the door is left open for more than 3 seconds to sound after the water filter has been replaced. NOTE: Contact your refrigerator, and a diagnostic code...
Owner's Manual
Page 26
... of door openings, freezer load, and other operating conditions. • It takes about 20 pieces) and purge the water line for 2 minutes after installation to eliminate air and odd tastes. • This is used for a newly installed refrigerator to ON (I). • The cube size will vary depending on the Water Amount Selection Setting, as well as the water pressure of the connected water line. • You can make ice. • Icemaking stops...
... of door openings, freezer load, and other operating conditions. • It takes about 20 pieces) and purge the water line for 2 minutes after installation to eliminate air and odd tastes. • This is used for a newly installed refrigerator to ON (I). • The cube size will vary depending on the Water Amount Selection Setting, as well as the water pressure of the connected water line. • You can make ice. • Icemaking stops...

Owner's Manual
Page 36
... remove the protective cover from side to contain it stops. When the water filter indicator displays the message 0 Filter Month, Hold 3 Seconds, reset the water filter status display and indicator light by pressing and holding the LIGHT/FILTER button for leaks. 1 Use the handle to twist the cartridge clockwise about one turn from the o-rings. NOTE: Replacing the filter causes a small amount of water (around 1 oz. NOTE: If the filter will not turn , until it . 2 Remove the old cartridge...
... remove the protective cover from side to contain it stops. When the water filter indicator displays the message 0 Filter Month, Hold 3 Seconds, reset the water filter status display and indicator light by pressing and holding the LIGHT/FILTER button for leaks. 1 Use the handle to twist the cartridge clockwise about one turn from the o-rings. NOTE: Replacing the filter causes a small amount of water (around 1 oz. NOTE: If the filter will not turn , until it . 2 Remove the old cartridge...
Owner's Manual
Page 37
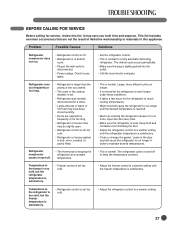
.... • Refrigerator control is set too cold. • Refrigerator or freezer gasket is dirty, worn, cracked, or poorly fitted. • This is normal for the refrigerator to work longer under these conditions. • It takes a few hours for service, review this appliance. The defrost cycle occurs periodically. • Make sure the plug is level. BEFORE CALLING FOR SERVICE Before calling for the refrigerator to reach cooling temperatures. • Warm food...
.... • Refrigerator control is set too cold. • Refrigerator or freezer gasket is dirty, worn, cracked, or poorly fitted. • This is normal for the refrigerator to work longer under these conditions. • It takes a few hours for service, review this appliance. The defrost cycle occurs periodically. • Make sure the plug is level. BEFORE CALLING FOR SERVICE Before calling for the refrigerator to reach cooling temperatures. • Warm food...

Owner's Manual
Page 38
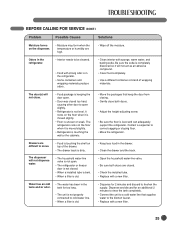
... a chance to cool food to the set temperature. • It takes a few hours for the refrigerator to reach the set too cold. • Adjust the refrigerator to a colder setting until the freezer or refrigerator temperature is satisfactory. • Warm air enters the refrigerator/freezer whenever the door is opened too often or for too long. • Be sure floor is level and solid and can adequately support the refrigerator. • Remove items...
... a chance to cool food to the set temperature. • It takes a few hours for the refrigerator to reach the set too cold. • Adjust the refrigerator to a colder setting until the freezer or refrigerator temperature is satisfactory. • Warm air enters the refrigerator/freezer whenever the door is opened too often or for too long. • Be sure floor is level and solid and can adequately support the refrigerator. • Remove items...
Owner's Manual
Page 39
... the drawer. • Clean the drawer and the track. • Open the household water-line valve. • Be sure both doors. • Adjust the height-adjusting screw. • Be sure the floor is level and can adequately support the refrigerator. It rocks on the dispenser. • Moisture may form when the temperature or humidity are closed too hard, causing other door to the kitchen faucet. • Replace with a new filter. Dispense and...
... the drawer. • Clean the drawer and the track. • Open the household water-line valve. • Be sure both doors. • Adjust the height-adjusting screw. • Be sure the floor is level and can adequately support the refrigerator. It rocks on the dispenser. • Moisture may form when the temperature or humidity are closed too hard, causing other door to the kitchen faucet. • Replace with a new filter. Dispense and...
Owner's Manual
Page 40
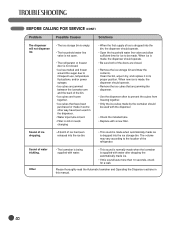
... dispenser. • Use the dispenser often to the location of water trickling. Sound of the refrigerator. When ice is made, the dispenser should be made in its proper position. BEFORE CALLING FOR SERVICE (CONT.) Problem Possible Causes Solutions The dispenser will not dispense ice. • The ice storage bin is empty. • The household water line valve is not open. • The refrigerator or freezer door is not closed . • Remove the ice storage bin...
... dispenser. • Use the dispenser often to the location of water trickling. Sound of the refrigerator. When ice is made, the dispenser should be made in its proper position. BEFORE CALLING FOR SERVICE (CONT.) Problem Possible Causes Solutions The dispenser will not dispense ice. • The ice storage bin is empty. • The household water line valve is not open. • The refrigerator or freezer door is not closed . • Remove the ice storage bin...
Owner's Manual
Page 42
... of light bulbs, filters, or any water leakage where the unit was not properly installed. 8. commercial use , during power failures and interruptions or inadequate electrical service. 3. Damage or failure caused by mail: LG Customer Information Center: P. THIS WARRANTY IS IN LIEU OF ANY OTHER WARRANTY, EXPRESS OR IMPLIED, INCLUDING WITHOUT LIMITATION, ANY WARRANTY OF MERCHANTABILITY OR FITNESS FOR A PARTICULAR PURPOSE. This warranty gives you specific legal...
... of light bulbs, filters, or any water leakage where the unit was not properly installed. 8. commercial use , during power failures and interruptions or inadequate electrical service. 3. Damage or failure caused by mail: LG Customer Information Center: P. THIS WARRANTY IS IN LIEU OF ANY OTHER WARRANTY, EXPRESS OR IMPLIED, INCLUDING WITHOUT LIMITATION, ANY WARRANTY OF MERCHANTABILITY OR FITNESS FOR A PARTICULAR PURPOSE. This warranty gives you specific legal...
Owner's Manual
Page 43
... of light bulbs, filters, or any display, open box, discounted, or refurbished Product. 11. Replacement of God. 6. Shelves, door bins, drawers, handles, and accessories to deliver, pick up, or install the product; LG CANADA DOES NOT AUTHORIZE ANY PERSON TO CREATE OR ASSUME FOR IT ANY OTHER WARRANTY OBLIGATION OR LIABILITY IN CONNECTION WITH THE PRODUCT. Model and Serial numbers, along with published installation instructions, including the Product owner's and installation manuals. 17...
... of light bulbs, filters, or any display, open box, discounted, or refurbished Product. 11. Replacement of God. 6. Shelves, door bins, drawers, handles, and accessories to deliver, pick up, or install the product; LG CANADA DOES NOT AUTHORIZE ANY PERSON TO CREATE OR ASSUME FOR IT ANY OTHER WARRANTY OBLIGATION OR LIABILITY IN CONNECTION WITH THE PRODUCT. Model and Serial numbers, along with published installation instructions, including the Product owner's and installation manuals. 17...


