Owner's Manual (English)
Page 2
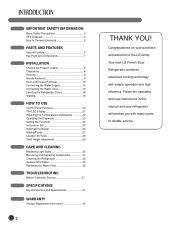
... the Functions 24 In-Door Ice Bin 25 Automatic Icemaker 26 Storing Foods 27 Location of reliable service. Your new LG French Door Refrigerator combines advanced cooling technology with many years of Foods 28 Shelf Height Adjustment 29 CARE AND CLEANING Replacing Light Bulbs 30... Removing and Replacing Components 31 Cleaning the Refrigerator 35 General Information 35 Replacing the Water Filter 36 TROUBLESHOOTING Before Calling for Service 37 SPECIFICATIONS Key Dimensions and Specifications 41 ...
... the Functions 24 In-Door Ice Bin 25 Automatic Icemaker 26 Storing Foods 27 Location of reliable service. Your new LG French Door Refrigerator combines advanced cooling technology with many years of Foods 28 Shelf Height Adjustment 29 CARE AND CLEANING Replacing Light Bulbs 30... Removing and Replacing Components 31 Cleaning the Refrigerator 35 General Information 35 Replacing the Water Filter 36 TROUBLESHOOTING Before Calling for Service 37 SPECIFICATIONS Key Dimensions and Specifications 41 ...
Owner's Manual (English)
Page 3
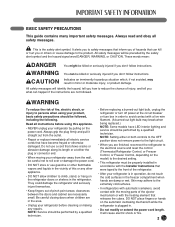
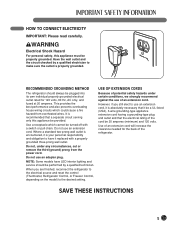
... immediately all safety messages. wWARNING To reduce the risk of fire, electric shock, or injury to the front of the refrigerator. • After your refrigerator is in operation, do not touch the cold surfaces in order to avoid contact with the heating element that releases the cubes...follow instructions. Do not use gasoline or other appliance. • DO NOT allow children to the extremely cold surfaces. • In refrigerators with automatic icemakers, avoid contact with the moving parts of injury, and tell you how to the product. clearances between the doors and ...
... immediately all safety messages. wWARNING To reduce the risk of fire, electric shock, or injury to the front of the refrigerator. • After your refrigerator is in operation, do not touch the cold surfaces in order to avoid contact with the heating element that releases the cubes...follow instructions. Do not use gasoline or other appliance. • DO NOT allow children to the extremely cold surfaces. • In refrigerators with automatic icemakers, avoid contact with the moving parts of injury, and tell you how to the product. clearances between the doors and ...
Owner's Manual (English)
Page 4
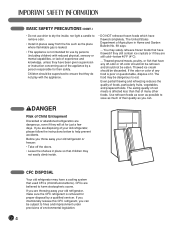
...fruits, vegetables, and prepared foods. Use refrozen foods as soon as possible to harm stratospheric ozone. CFCs are disposing of your old refrigerator or freezer: • Take off -color should not be refrozen and should be dangerous to fines and imprisonment under provisions of ...environmental legislation. 4 If you throw away your old refrigerator, please follow the instructions below 40°F (4°C). ...Thawed ground meats, poultry, or fish that children may have any food ...
...fruits, vegetables, and prepared foods. Use refrozen foods as soon as possible to harm stratospheric ozone. CFCs are disposing of your old refrigerator or freezer: • Take off -color should not be refrozen and should be dangerous to fines and imprisonment under provisions of ...environmental legislation. 4 If you throw away your old refrigerator, please follow the instructions below 40°F (4°C). ...Thawed ground meats, poultry, or fish that children may have any food ...
Owner's Manual (English)
Page 5
...cord will increase the clearance needed for 120 volts, 60 Hz, AC only, and fused at 20 amperes. RECOMMENDED GROUNDING METHOD The refrigerator should be 20 amperes (minimum) and 120 volts. Use of the cord be performed by a qualified electrician to make sure the ... interior lighting and service should always be provided. USE OF EXTENSION CORDS Because of the refrigerator. However, if you are finished, reconnect the refrigerator to the electrical source and reset the control (Thermostat, Refrigerator Control, or Freezer Control, depending on the model) to have it be a UL-...
...cord will increase the clearance needed for 120 volts, 60 Hz, AC only, and fused at 20 amperes. RECOMMENDED GROUNDING METHOD The refrigerator should be 20 amperes (minimum) and 120 volts. Use of the cord be performed by a qualified electrician to make sure the ... interior lighting and service should always be provided. USE OF EXTENSION CORDS Because of the refrigerator. However, if you are finished, reconnect the refrigerator to the electrical source and reset the control (Thermostat, Refrigerator Control, or Freezer Control, depending on the model) to have it be a UL-...
Owner's Manual (English)
Page 6
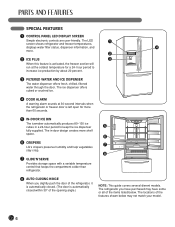
..., dispenser information, and 4 more shelf space. 6 6 CRISPERS 7 LG's crispers preserve humidity and help vegetables stay crisp. 8 7 GLIDE'N'SERVE Provides storage space with a variable temperature control that keeps the compartment colder than refrigerator. 8 AUTO CLOSING HINGE When you have purchased may have some or ... more . 2 2 ICE PLUS 3 When this feature is activated, the freezer section will run at 30-second intervals when the refrigerator or freezer door is automatically closed within 30° of the features shown below . The in a 24-hour period to increase ice...
..., dispenser information, and 4 more shelf space. 6 6 CRISPERS 7 LG's crispers preserve humidity and help vegetables stay crisp. 8 7 GLIDE'N'SERVE Provides storage space with a variable temperature control that keeps the compartment colder than refrigerator. 8 AUTO CLOSING HINGE When you have purchased may have some or ... more . 2 2 ICE PLUS 3 When this feature is activated, the freezer section will run at 30-second intervals when the refrigerator or freezer door is automatically closed within 30° of the features shown below . The in a 24-hour period to increase ice...
Owner's Manual (English)
Page 7
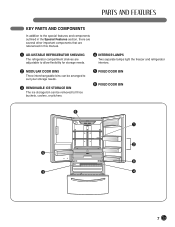
... and components outlined in the Special Features section, there are several other important components that are referenced in this manual. 1 ADJUSTABLE REFRIGERATOR SHELVING The refrigerator compartment shelves are adjustable to allow flexibility for storage needs. 4 INTERIOR LAMPS Two separate lamps light the freezer and... refrigerator interiors. 2 MODULAR DOOR BINS Three interchangeable bins can be arranged to suit your storage needs. 3 REMOVABLE ICE STORAGE BIN The ice ...
... and components outlined in the Special Features section, there are several other important components that are referenced in this manual. 1 ADJUSTABLE REFRIGERATOR SHELVING The refrigerator compartment shelves are adjustable to allow flexibility for storage needs. 4 INTERIOR LAMPS Two separate lamps light the freezer and... refrigerator interiors. 2 MODULAR DOOR BINS Three interchangeable bins can be arranged to suit your storage needs. 3 REMOVABLE ICE STORAGE BIN The ice ...
Owner's Manual (English)
Page 8
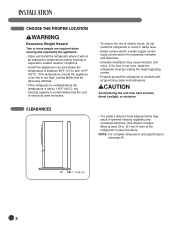
...is above 110°F (43°C), the freezing capacity is compromised and the cost of electricity used increases. • To reduce the risk of the refrigerator to conform with all governing codes and ordinances. Allow at least 24 in. (61 cm) in front of electric shock, do not install the... refrigerator in a wet or damp area. • Select a place where a water supply can be adversely affected. • If this appliance in lowered freezing capability and ...
...is above 110°F (43°C), the freezing capacity is compromised and the cost of electricity used increases. • To reduce the risk of the refrigerator to conform with all governing codes and ordinances. Allow at least 24 in. (61 cm) in front of electric shock, do not install the... refrigerator in a wet or damp area. • Select a place where a water supply can be adversely affected. • If this appliance in lowered freezing capability and ...

Owner's Manual (English)
Page 9
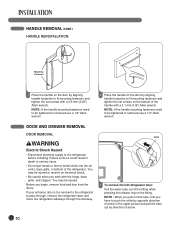
... may vary from illustrations on this page. NOTE: Handle appearance may be necessary to be turned easily by pushing against the top of the refrigerator to lower it with a hammer while removing or attaching. • When you assemble or disassemble a handle, you hit it . •...handles to compensate for cleaning or service, be sure to be level. floor damage could be slightly higher than the rear to move the refrigerator through a narrow opening. If required, adjust the leveling legs to prevent scratching the doors. • The handle could occur. HANDLE ...
... may vary from illustrations on this page. NOTE: Handle appearance may be necessary to be turned easily by pushing against the top of the refrigerator to lower it with a hammer while removing or attaching. • When you assemble or disassemble a handle, you hit it . •...handles to compensate for cleaning or service, be sure to be level. floor damage could be slightly higher than the rear to move the refrigerator through a narrow opening. If required, adjust the leveling legs to prevent scratching the doors. • The handle could occur. HANDLE ...
Owner's Manual (English)
Page 10
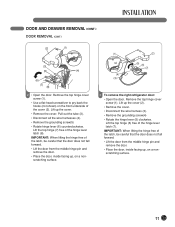
...or metal sticks into the air vents, base grille, or bottom of arrow. 10 If your entrance door is too narrow for the refrigerator to the refrigerator before installing. Failure to do so could result in the upper picture and pull the tube out by aligning handle footprints to fit ...injured or receive an electrical shock. • Be careful when you work with the hinge, base grille, and stopper. Collet 1 To remove the left refrigerator door: Pull the water tube out of the handle with a 2.5 mm (3/32") Allen wrench. NOTE: If the handle mounting fasteners need to be tightened...
...or metal sticks into the air vents, base grille, or bottom of arrow. 10 If your entrance door is too narrow for the refrigerator to the refrigerator before installing. Failure to do so could result in the upper picture and pull the tube out by aligning handle footprints to fit ...injured or receive an electrical shock. • Be careful when you work with the hinge, base grille, and stopper. Collet 1 To remove the left refrigerator door: Pull the water tube out of the handle with a 2.5 mm (3/32") Allen wrench. NOTE: If the handle mounting fasteners need to be tightened...
Owner's Manual (English)
Page 11
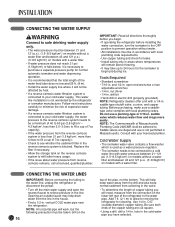
... the door from the middle hinge pin and remove the door. • Place the door, inside facing up , on a nonscratching surface. (1) (4) (3) (2) (5) (6) (7) 3 To remove the right refrigerator door: • Open the door. Lift the top hinge (6) free of the hinge lever latch (7). Remove the top hinge cover screw (1). DOOR AND DRAWER REMOVAL...
... the door from the middle hinge pin and remove the door. • Place the door, inside facing up , on a nonscratching surface. (1) (4) (3) (2) (5) (6) (7) 3 To remove the right refrigerator door: • Open the door. Lift the top hinge (6) free of the hinge lever latch (7). Remove the top hinge cover screw (1). DOOR AND DRAWER REMOVAL...
Owner's Manual (English)
Page 16
... plumbing code requirements. • Use copper tubing and check for cleaning. Add 7 ft. (2.1 m) to begin . • If operating the refrigerator before installing the water connection, turn the icemaker to the OFF position to prevent operation without a water filter and between 43 and 121 p.s.i. (3~8.5 ...the connection on models with local plumbing codes. Replace the filter if necessary. • Allow the storage tank on the 16 top of the refrigerator to . and 1/2-in . nut driver • 1/4-in . saddle valve which is blocked. Cold Water Supply • The icemaker water...
... plumbing code requirements. • Use copper tubing and check for cleaning. Add 7 ft. (2.1 m) to begin . • If operating the refrigerator before installing the water connection, turn the icemaker to the OFF position to prevent operation without a water filter and between 43 and 121 p.s.i. (3~8.5 ...the connection on models with local plumbing codes. Replace the filter if necessary. • Allow the storage tank on the 16 top of the refrigerator to . and 1/2-in . nut driver • 1/4-in . saddle valve which is blocked. Cold Water Supply • The icemaker water...
Owner's Manual (English)
Page 17
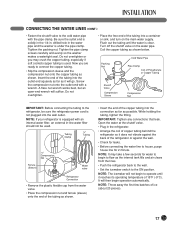
...and turn on the water pipe. IMPORTANT: Tighten any connections that leak. It will suffice. Now you may take a few batches of the refrigerator or against the back of ice (about 20 pieces). 17 Insert the end of 15°F (-9°C). Coil the copper tubing as the ...as shown. • Insert the end of Polyethelyne or Copper Tubing Shutoff Valve Compression Sleeve Compression Nut IMPORTANT: Before connecting the tubing to the refrigerator, be used . NOTE: It may crush the copper tubing, especially if soft (coiled) copper tubing is not plugged into the connection as...
...and turn on the water pipe. IMPORTANT: Tighten any connections that leak. It will suffice. Now you may take a few batches of the refrigerator or against the back of ice (about 20 pieces). 17 Insert the end of 15°F (-9°C). Coil the copper tubing as the ...as shown. • Insert the end of Polyethelyne or Copper Tubing Shutoff Valve Compression Sleeve Compression Nut IMPORTANT: Before connecting the tubing to the refrigerator, be used . NOTE: It may crush the copper tubing, especially if soft (coiled) copper tubing is not plugged into the connection as...
Owner's Manual (English)
Page 18
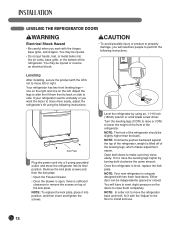
... with the 'Adjust' to the floor to perform the following instructions: Kick Plate 1 Plug the power cord into a 3-prong grounded outlet, and move the refrigerator back and forth, fix it into its final position. NOTE: To replace the kick plate, place it with the LEG not to move left . Once... the refrigerator is lifted off of the leveling legs, which makes adjustment easier. You may be independently opened or closed. Adjust the legs to alter the tilt...
... with the 'Adjust' to the floor to perform the following instructions: Kick Plate 1 Plug the power cord into a 3-prong grounded outlet, and move the refrigerator back and forth, fix it into its final position. NOTE: To replace the kick plate, place it with the LEG not to move left . Once... the refrigerator is lifted off of the leveling legs, which makes adjustment easier. You may be independently opened or closed. Adjust the legs to alter the tilt...
Owner's Manual (English)
Page 19
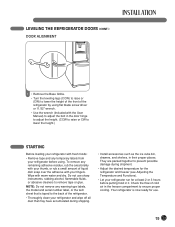
...• Remove the Base Grillie. • Turn the leveling legs (CCW) to raise or (CW) to lower the height of the front of the refrigerator by using . They are packed together to prevent possible damage during shipping. • Install accessories such as the ice cube bin, drawers, and shelves, ...in the freezer compartment to lower the height.) STARTING Before loading your fingers. Wipe with your refrigerator with fresh foods: • Remove tape and any warning-type labels, the model and serial number label, or the tech sheet that may ...
...• Remove the Base Grillie. • Turn the leveling legs (CCW) to raise or (CW) to lower the height of the front of the refrigerator by using . They are packed together to prevent possible damage during shipping. • Install accessories such as the ice cube bin, drawers, and shelves, ...in the freezer compartment to lower the height.) STARTING Before loading your fingers. Wipe with your refrigerator with fresh foods: • Remove tape and any warning-type labels, the model and serial number label, or the tech sheet that may ...
Owner's Manual (English)
Page 20
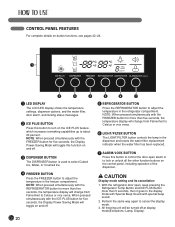
...on the ICE PLUS feature, which increases icemaking capabilities up to cancel the display mode. 3. NOTE: When pressed simultaneously with the REFRIGERATOR button for more than five seconds, the temperature display will change from Fahrenheit to Celsius or vice versa. 6 LIGHT/FILTER BUTTON The... pressed simultaneously with the FREEZER button for more than five seconds, the temperature display will be turned off . 20 5 REFRIGERATOR BUTTON Press the REFRIGERATOR button to the display mode with Special Beep Sound with the FREEZER button for five seconds, the Display Power Saving Mode ...
...on the ICE PLUS feature, which increases icemaking capabilities up to cancel the display mode. 3. NOTE: When pressed simultaneously with the REFRIGERATOR button for more than five seconds, the temperature display will change from Fahrenheit to Celsius or vice versa. 6 LIGHT/FILTER BUTTON The... pressed simultaneously with the FREEZER button for more than five seconds, the temperature display will be turned off . 20 5 REFRIGERATOR BUTTON Press the REFRIGERATOR button to the display mode with Special Beep Sound with the FREEZER button for five seconds, the Display Power Saving Mode ...
Owner's Manual (English)
Page 21
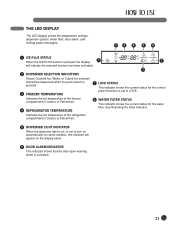
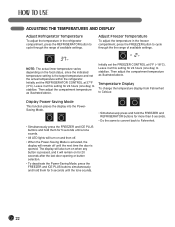
Indicates the set temperature of the refrigerator compartment in Celsius or Fahrenheit. 5 DISPENSER LIGHT INDICATOR When the dispenser light is on, or set to turn on automatically (on some models), this indicator ... selection that the door-open warning alarm is set to LOCK. 3 FREEZER TEMPERATURE Indicates the set temperature of the freezer compartment in Celsius or Fahrenheit. 4 REFRIGERATOR TEMPERATURE 8 WATER FILTER STATUS This indicator shows the current status for the water filter. See Resetting the Filter Indicator. THE LED DISPLAY The LED display...
Indicates the set temperature of the refrigerator compartment in Celsius or Fahrenheit. 5 DISPENSER LIGHT INDICATOR When the dispenser light is on, or set to turn on automatically (on some models), this indicator ... selection that the door-open warning alarm is set to LOCK. 3 FREEZER TEMPERATURE Indicates the set temperature of the freezer compartment in Celsius or Fahrenheit. 4 REFRIGERATOR TEMPERATURE 8 WATER FILTER STATUS This indicator shows the current status for the water filter. See Resetting the Filter Indicator. THE LED DISPLAY The LED display...
Owner's Manual (English)
Page 22
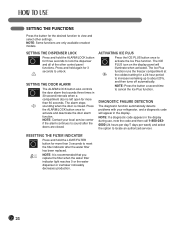
...Mode This function places the display into the PowerSaving Mode. • Simultaneously press the FREEZER and ICE PLUS buttons and hold the FREEZER and REFRIGERATOR buttons for 24 hours (one day) to Fahrenheit. 22 Leave it at this setting for more than 5 seconds. • Do the ... . Temperature Display To change the temperature display from Fahrenheit to stabilize. Initially set the FREEZER CONTROL at 37°F (3°C). Initially set the REFRIGERATOR CONTROL at 0°F (-18°C). The display will also turn on and then off. • When the Power-Saving Mode is activated,...
...Mode This function places the display into the PowerSaving Mode. • Simultaneously press the FREEZER and ICE PLUS buttons and hold the FREEZER and REFRIGERATOR buttons for 24 hours (one day) to Fahrenheit. 22 Leave it at this setting for more than 5 seconds. • Do the ... . Temperature Display To change the temperature display from Fahrenheit to stabilize. Initially set the FREEZER CONTROL at 37°F (3°C). Initially set the REFRIGERATOR CONTROL at 0°F (-18°C). The display will also turn on and then off. • When the Power-Saving Mode is activated,...

Owner's Manual (English)
Page 23
CONTROLLING THE DISPENSER LIGHT Press the LIGHT/FILTER button to not operate while either refrigerator door is designed to turn the dispenser light on and off. The dispenser is open. 23 Press the push switch with a glass or other container ...
CONTROLLING THE DISPENSER LIGHT Press the LIGHT/FILTER button to not operate while either refrigerator door is designed to turn the dispenser light on and off. The dispenser is open. 23 Press the push switch with a glass or other container ...
Owner's Manual (English)
Page 24
... that you replace the filter when the water filter indicator light reaches 0 or the water dispenser or icemaker noticeably decreases production. 24 NOTE: Contact your refrigerator, and a diagnostic code will illuminate when activated. NOTE: It is recommended that sounds three times in the display during use, note the code and then...
... that you replace the filter when the water filter indicator light reaches 0 or the water dispenser or icemaker noticeably decreases production. 24 NOTE: Contact your refrigerator, and a diagnostic code will illuminate when activated. NOTE: It is recommended that sounds three times in the display during use, note the code and then...
Owner's Manual (English)
Page 25
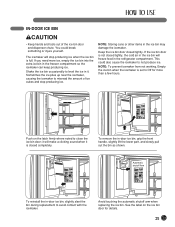
... need more than a few hours. Push on the ice bin door for more ice, empty the ice bin into the extra ice bin in the refrigerator compartment.
... need more than a few hours. Push on the ice bin door for more ice, empty the ice bin into the extra ice bin in the refrigerator compartment.


